OTRATTW Switches

 07-07-2012, 10:38 PM
#22
While I could not seem to find it anywhere under the dash (did not feel like dismantling the entire dash) I did find two instances of this wire under the rubber boot that protects the shifter (bezel was already broken easy to look at the wires above the tranny). Once of which was connected to a dead end that I assume would be where they power windows would plug into if I had that option. So I tapped in there.
Result: Amber light turns on when I turn the headlights on and does dim with the dimmer.
The following users liked this post:
Alextorello (08-30-2018)
07-07-2012, 10:48 PM
#23
JK Newbie
Thread Starter

I wired my Amber light on a switch this week. I tapped into the Orange wire with the gray stripe that many others have said runs through the dash.
While I could not seem to find it anywhere under the dash (did not feel like dismantling the entire dash) I did find two instances of this wire under the rubber boot that protects the shifter (bezel was already broken easy to look at the wires above the tranny). Once of which was connected to a dead end that I assume would be where they power windows would plug into if I had that option. So I tapped in there.
Result: Amber light turns on when I turn the headlights on and does dim with the dimmer.
07-07-2012, 10:54 PM
#25
JK Newbie
Thread Starter
I just used the "12 Volt Power Adapter" wire harness from Q_____tec to tap the aux power plug in the front dash that is ignition switched. Then ran wire over to switches for power. Since the amber LEDs aren't overly bright, I did not need to connect them to a dimmer switch. They don't distract or blind me while on in the dark. The switches come with a wire diagram for the 5 prongs to let you know which prongs are for which LEDs. 2 for amber and 3 for green that control the lights. You can get the rocker switches with several different color combos and configuration.
07-07-2012, 11:19 PM
#26
JK Junkie

Join Date: Sep 2008
Location: Vista, CA
Posts: 2,855
Likes: 0
Received 0 Likes
on
0 Posts
I just used the "12 Volt Power Adapter" wire harness from Q_____tec to tap the aux power plug in the front dash that is ignition switched. Then ran wire over to switches for power. Since the amber LEDs aren't overly bright, I did not need to connect them to a dimmer switch. They don't distract or blind me while on in the dark. The switches come with a wire diagram for the 5 prongs to let you know which prongs are for which LEDs. 2 for amber and 3 for green that control the lights. You can get the rocker switches with several different color combos and configuration.
 07-15-2012, 04:27 PM
#27
JK Enthusiast
So I got my switch pod and rockers and did a little write up on my steps. Maybe this will help some others. I love my custom switches!
Installing Contura V Laser Etched Rockers In A Rugged Ridge A-Pillar Switch Pod.
Step 1 - Cut openings for switches in switch pod. Use tool of your choice. Score cut lines with an utility knife or if you have a steady hand, a dremel with a small cutting disk makes easy work of it.
Step 2 - Decide the order of your switches from top to bottom. Slide switches partially into openings.
Step 3 - You will observe that the rockers on the switches are thicker in the center so they push on each other not allowing them to properly mount in the openings on switch pod.
Step 4 - Remove the rockers from the switch bases using the special rocker tool.
Step 5 - Push switch bases into switch pod until they click and lock into place. They should be flush and evenly lined up.
Step 6 - Sand the edges of the rockers down. Focus on the center of the edge of the rocker as this is the area that causes them not to flush mount on top of each other. Starting with your bottom rocker, work your way up one by one. Note that the bottom rocker will only be sanded on its top edge, the two middle rockers with have both edged sanded and the top rocker will only have its bottom edge sanded.
Step 7 - Once you have sanded all edges of the rockers, test fitting as you go along, use a black sharpie marker to color in the white sanded edges.
Step 8 - Pop all your rockers onto switch bases until they click into place. Now your ready to install the switch pod in your Jeep following the Rugged Ridge instructions.
I installed the 12V Power Tap from Quadratec yesterday. That wasn't bad to install.
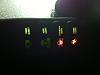
I daisychained all 4 switches from the Power Tap for the Amber light that will be on when the ignition is on. (Yellow+, Green-).
I used the original Rigid wiring for the lights to their switches.
I wish I could have gotten the green lights for the icons but that switch has been discontinued but the red looks good.
I haven't finished the wiring yet for the 3rd switch and I don't have anything connected to the Zombie Light switch yet so that I just for fun right now until I find another accessory to install.
I agree, top notch customer service. I had my custom switches a couple of days after I orderd plus I also received a couple extra switches to practice with plus the tool to remove the switches from the rockers.
The following users liked this post:
Alextorello (08-30-2018)
07-15-2012, 06:10 PM
#28
Originally Posted by CrystalRubi
Great writeup. Was a big help this weekend as I installed mine in between the thunderstorms. Wish I had a garage on days like this.
I installed the 12V Power Tap from Quadratec yesterday. That wasn't bad to install.
I daisychained all 4 switches from the Power Tap for the Amber light that will be on when the ignition is on. (Yellow+, Green-).
I used the original Rigid wiring for the lights to their switches.
I wish I could have gotten the green lights for the icons but that switch has been discontinued but the red looks good.
I haven't finished the wiring yet for the 3rd switch and I don't have anything connected to the Zombie Light switch yet so that I just for fun right now until I find another accessory to install.
<img src="https://www.jk-forum.com/forums/attachment.php?attachmentid=341441"/>
<img src="https://www.jk-forum.com/forums/attachment.php?attachmentid=341442"/>
<img src="https://www.jk-forum.com/forums/attachment.php?attachmentid=341443"/>
<img src="https://www.jk-forum.com/forums/attachment.php?attachmentid=341444"/>
I agree, top notch customer service. I had my custom switches a couple of days after I orderd plus I also received a couple extra switches to practice with plus the tool to remove the switches from the rockers.
Looks great!!!
10-09-2012, 10:44 PM
#29
JK Enthusiast
Join Date: Sep 2011
Location: Pomona, Ca
Posts: 315
Likes: 0
Received 0 Likes
on
0 Posts
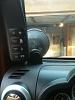
Did mine this past weekend after I installed my hella lights..
Zombie lights = inside aux lights (for now)
Sasquatch lights = black magics
Passenger eject = unassigned
Trunk monkey = on board air
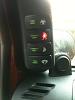
Zombie lights = inside aux lights (for now)
Sasquatch lights = black magics
Passenger eject = unassigned
Trunk monkey = on board air
10-17-2012, 07:35 PM
#30
JK Newbie

Join Date: Jul 2011
Location: Memphis, TN
Posts: 1
Likes: 0
Received 0 Likes
on
0 Posts
Great write up. Ordered mine last week and installed tonight. Wiring was a breeze because of this thread. I can not say enough good things about Jim over at OTRATTW. They are busy but when you see the product you will understand why. Shipping was quick and the product is great. Now I have to do my buddies pillar this weekend.