Wiring w/ Relay and Daystar Rocker Switch
 05-29-2011, 07:44 AM
#1
JK Enthusiast
Thread Starter
Join Date: Feb 2011
Location: Conifer, CO
Posts: 405
Likes: 0
Received 0 Likes
on
0 Posts
I am wiring up some auxiliary lights on the front bumper. I've been browsing for a good 30 minutes now and can't seem to find a basic diagram that details out both the relay and the rocker switch wiring. Can someone please verify that what I have listed below is correct:
On the Relay I have I will first list what the box says it does, then my interpretation (correct or incorrect) of what I think its telling me:
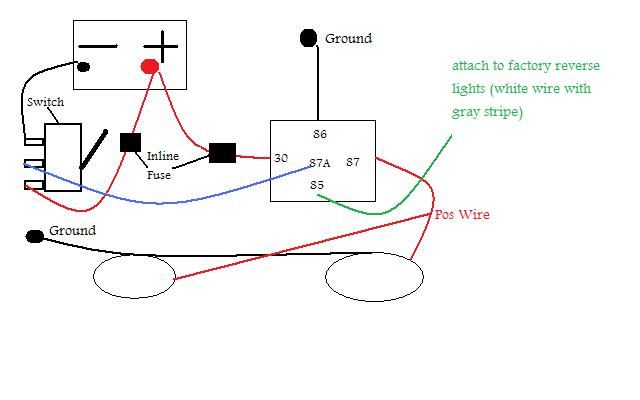
30 - Positive --> Wire directly to positive pole on battery
87 - Lamp --> Run wire from here to the red wire on the light
86 - Negative --> Ground this wire
85 - Switch --> The Daystar Rocker Switch has three poles, 2, 3, and 7. 3 says Power Out, and I believe 85 should be run here
On the Rocker:
2 - Power In --> Wire through 20 amp fuse then on to positive pole on battery
3 - Power Out --> I believe this should be wired to 85 on the relay
7 - Ground for Lamp --> I don't know if this should grounded or run to the Negative pole on the battery.
On the Light:
Red Wire - Connect to 87 on Relay
Black Wire - Ground to jeep.
I am sure something is wrong here, and really appreciate someone straightening me out before I dive into this. I am trying to wire this up to the battery so I can run the lights with the Jeep on or off rather than to dc plug.
Thanks a ton.
On the Relay I have I will first list what the box says it does, then my interpretation (correct or incorrect) of what I think its telling me:
30 - Positive --> Wire directly to positive pole on battery
87 - Lamp --> Run wire from here to the red wire on the light
86 - Negative --> Ground this wire
85 - Switch --> The Daystar Rocker Switch has three poles, 2, 3, and 7. 3 says Power Out, and I believe 85 should be run here
On the Rocker:
2 - Power In --> Wire through 20 amp fuse then on to positive pole on battery
3 - Power Out --> I believe this should be wired to 85 on the relay
7 - Ground for Lamp --> I don't know if this should grounded or run to the Negative pole on the battery.
On the Light:
Red Wire - Connect to 87 on Relay
Black Wire - Ground to jeep.
I am sure something is wrong here, and really appreciate someone straightening me out before I dive into this. I am trying to wire this up to the battery so I can run the lights with the Jeep on or off rather than to dc plug.
Thanks a ton.
 05-29-2011, 08:14 AM
#2
JK Jedi
05-29-2011, 08:21 AM
#3
JK Enthusiast
Thread Starter
Join Date: Feb 2011
Location: Conifer, CO
Posts: 405
Likes: 0
Received 0 Likes
on
0 Posts
Thanks BigRed. Two questions.
First, in that drawing is my interpretation correct that the Green Load from Switch is my Rocker Switches Power Out and that White Supply is my switches Power In?
Second, I was under the impression that for safety reasons its a good idea to put a fuse inline somewhere. Would it/should it go inline on the White wire or Yellow wire?
05-29-2011, 09:50 AM
#4
JK Junkie
Flaxbourton
30 - Positive --> Wire directly to positive pole on battery
30 - Positive --> Wire directly to positive pole on battery
87 - Lamp --> Run wire from here to the red wire on the light
86 - Negative --> Ground this wire
85 - Switch --> The Daystar Rocker Switch
On the Rocker:
2 - Power In --> Wire through 20 amp fuse then on to positive pole on battery
2 - Power In --> Wire through 20 amp fuse then on to positive pole on battery
3 - Power Out --> I believe this should be wired to 85 on the relay
7 - Ground for Lamp --> I don't know if this should grounded or run to the Negative pole on the battery.
First, in that drawing is my interpretation correct that the Green Load from Switch is my Rocker Switches Power Out and that White Supply is my switches Power In?
Second, I was under the impression that for safety reasons its a good idea to put a fuse inline somewhere. Would it/should it go inline on the White wire or Yellow wire?
05-29-2011, 11:28 AM
#5
JK Enthusiast
Thread Starter
Join Date: Feb 2011
Location: Conifer, CO
Posts: 405
Likes: 0
Received 0 Likes
on
0 Posts
Awesome reply. Thank you very much!
Good call on the 3amp fuse instead of 20A. If there is a fuse between the relay and the battery, is the 3A fuse really necessary between the switch and battery?
To elaborate on what I am working on, I am installing two different lighting applications. Everything will be wired to Daystar switches in my new RR A-Pillar Switch Pod.
The first is a single 55W Pilot PL-195 w/ blue bulb behind the Spider emblem in my PSC Brawler Lite front bumper. I can't find any amperage information on this bulb, but I am assuming since it is Halogen that I should still set up a relay and fuses for it?
The second switch will be used to power a 42" VisionX Xmitter LED Light bar. Their website says it draws 20Amps. This switch will also power 2 VisionX 6500 Series HID 35W Euro Beam lamps on my front bumper. The website says these only draw 3A each, so I am assuming probably a 30A fuse?
These were previously set up by the last owner of the Jeep to function through the Steering column switch via pulling to turn on the fogs. However, the new bumper comes with spots for standard fog lights so I am hooking them back up to the steering stick and setting up the other lights as per the above.
05-29-2011, 02:11 PM
#6
JK Junkie
Good call on the 3amp fuse instead of 20A. If there is a fuse between the relay and the battery, is the 3A fuse really necessary between the switch and battery?
The first is a single 55W Pilot PL-195 w/ blue bulb behind the Spider emblem in my PSC Brawler Lite front bumper. I can't find any amperage information on this bulb, but I am assuming since it is Halogen that I should still set up a relay and fuses for it?
55w * 2 = 110w
110w / 12v = 9.16A
This switch will also power 2 VisionX 6500 Series HID 35W Euro Beam lamps on my front bumper. The website says these only draw 3A each?
70w / 12v = 5.83A
6A + 20A = 26A
Should be good to go.
 05-30-2011, 04:46 AM
#7
JK Enthusiast
Thread Starter
Join Date: Feb 2011
Location: Conifer, CO
Posts: 405
Likes: 0
Received 0 Likes
on
0 Posts
The power to the switch only supplys the coil on the relay and does not have anything to do with the power for the lights. So; the 3A fuse protects the switch circuit and the coil of the relay. The larger fuse protects the lighting circuit and the lights only.
The relay is probably optional. I would if it were mine. Current flowing thru the switch makes it heat up. This is why it is desirable to use a relay. The fuse is "NEVER" optional.
55w * 2 = 110w
110w / 12v = 9.16A
35w * 2 = 70w
70w / 12v = 5.83A
6A + 20A = 26A
Should be good to go.
The relay is probably optional. I would if it were mine. Current flowing thru the switch makes it heat up. This is why it is desirable to use a relay. The fuse is "NEVER" optional.
55w * 2 = 110w
110w / 12v = 9.16A
35w * 2 = 70w
70w / 12v = 5.83A
6A + 20A = 26A
Should be good to go.
Trending Topics
 05-31-2011, 01:53 AM
#9
JK Junkie
05-31-2011, 03:57 AM
#10
JK Enthusiast
Join Date: Apr 2011
Location: Temecula, CA
Posts: 101
Likes: 0
Received 0 Likes
on
0 Posts
This link is a great way to wire up multiple auxilery switches. The bussman box allows you to orginize your multiple relays. This will look very confusing at first, but if you spend hours staring at it you can figure it out. I finally understand and will attempt this one in the next couple months. Joe002 did an incredibly professional job on this.
https://www.jk-forum.com/forums/show...ctrical-Hookup
https://www.jk-forum.com/forums/show...ctrical-Hookup