'12 JKR on a budget
 01-22-2017, 03:13 AM
#1
JK Newbie
Thread Starter

Join Date: Aug 2015
Location: Denver, CO
Posts: 18
Likes: 0
Received 0 Likes
on
0 Posts
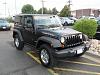
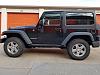
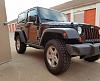
I have always been into motorsports, but tended towards racing/classic cars more than offroading, as testified by an empty wallet. During a hiking trip to Moab in a sedan, and realizing how much more of the area I could explore with a 4x4, my heart became set on a Wrangler. After said sedan was hit and totaled about a year later, I took the insurance money as a down payment. All the experienced Jeepers in my social circle told me to get one with the 3.6L that had just come out, and I knew I couldn't afford any major modifications until the note was paid off. So I bought my first-ever brand new vehicle, a 2012 Rubicon:

I haven't been very good about taking pictures as I've gone through this process, but I will do the best I can.
I haven't been very good about taking pictures as I've gone through this process, but I will do the best I can.
 01-22-2017, 03:39 AM
#2
JK Newbie
Thread Starter
Join Date: Aug 2015
Location: Denver, CO
Posts: 18
Likes: 0
Received 0 Likes
on
0 Posts
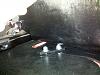
First order of business was deflation/inflation for trails. I purchased a Joes Racing Products pressure gauge/bleedoff valve, and a Superflow MV50 respectively.
The gauge is still used to dial in exact pressure, although I have since added a set of Staun Tyre Deflators set at 21psi for washboard. I usually run ~16psi for rock crawling, and don't have the guts to go lower without beadlocks.
This is a good time to commend Superflow's customer service. My first MV50 chewed up the intake reed valve after about two years of use, probably from ambient dust. It was still such a value that I just bought a new one and had the same problem within the same timespan. The second time, I contacted the manufacturer to ask about buying spare parts and instead they sent me two new manifold plates, one for each compressor, at their expense. Both are still on duty.
01-22-2017, 10:32 AM
#3
JK Newbie
Thread Starter
Join Date: Aug 2015
Location: Denver, CO
Posts: 18
Likes: 0
Received 0 Likes
on
0 Posts
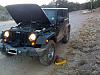
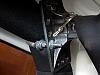
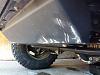
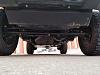
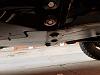
The first trail damage I got was some rock rash on my lower front LCA mounts going up some pretty choppy chutes. At this point I was obsessed with finding quality bolt-on parts, because I was afraid of warranty issues. I wanted things I could take off and deny if I had to bring it in to the dealership. So I purchased some Skid Row Front LCA skids.
The ARB cover came later, but I don't have pictures from when the skids were new.
While poking around the underside, I noticed the rear shock mounts hung down in a vulnerable position as well. Enter the Kilby Rear LCA Skid.
Once again, the diff cover/slider came later.
I have been very happy with the performance of both products, and despite being "just" bolt-ons, they gave me much more confidence in tackling difficult obstacles.
Last edited by C4T; 01-22-2017 at 10:34 AM.
01-22-2017, 11:19 AM
#4
JK Newbie
Thread Starter
Join Date: Aug 2015
Location: Denver, CO
Posts: 18
Likes: 0
Received 0 Likes
on
0 Posts
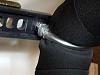
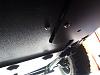
Now that I was taking on higher-rated trails, I needed better recovery gear than crossed fingers. I bought a couple of Smittybilt 3/4" D-ring shackles, 3"x30' 30klbs recovery strap, and 4"x8' 40klbs tree strap . I also bought a 48" Hi-Lift Xtreme Jack, Offroad Base, Lift Mate, Rescue 42 JackMate, Handle Keeper and Neoprene Cover. My thinking was that in a pinch, I could use the jack as a winch even if it takes a lot longer. Finally, I bought a Coleman LED Rechargeable Spotlight (since replaced with a Nebo O2 Beam,) because I found myself wheeling at night more than is probably appropriate, and a Safe-T-Seal tire plug kit. I have used the plug kit three times, once on my own tire, which I am still wheeling hard with no issues.
Despite having a neoprene cover, I wanted the Hi-Lift mounted inside to avoid theft. Most roll cage brackets were pricey and mounted it down low towards the tailgate. I wanted it tucked up into the top corner, out of the way. I bought a couple of 3" U-bolts from Home Depot and ran some some 1/2" plastic tubing around them so they wouldn't bite into the padding too hard. The U-bolts are mounted to the cage, and then the jack just slides over the extended threads. I used wingnuts where I could and hex nuts where I had less room to tighten the jack down.

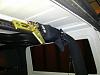
Fortunately it's a lot more solid than I was afraid of. I can shake the whole rig by grabbing the jack and there are no rattles when on the trail. The U-bolts were a real pain to get oriented correctly by myself (while holding the jack up with one arm,) but once they are in place the jack can be taken off and put back on in under 5 minutes.
Despite having a neoprene cover, I wanted the Hi-Lift mounted inside to avoid theft. Most roll cage brackets were pricey and mounted it down low towards the tailgate. I wanted it tucked up into the top corner, out of the way. I bought a couple of 3" U-bolts from Home Depot and ran some some 1/2" plastic tubing around them so they wouldn't bite into the padding too hard. The U-bolts are mounted to the cage, and then the jack just slides over the extended threads. I used wingnuts where I could and hex nuts where I had less room to tighten the jack down.
Fortunately it's a lot more solid than I was afraid of. I can shake the whole rig by grabbing the jack and there are no rattles when on the trail. The U-bolts were a real pain to get oriented correctly by myself (while holding the jack up with one arm,) but once they are in place the jack can be taken off and put back on in under 5 minutes.
Last edited by C4T; 01-22-2017 at 12:41 PM.
01-22-2017, 11:29 AM
#5
JK Newbie
Thread Starter
Join Date: Aug 2015
Location: Denver, CO
Posts: 18
Likes: 0
Received 0 Likes
on
0 Posts
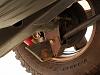
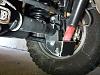
After the front air dam took a shot from a boulder, I decided the sway bar disconnect needed armor. A bumper was not yet on the agenda, so the Mopar skid fit the bill perfectly. I don't have any pictures of it new, so here is a picture of how it's already earned its keep.
At this time I also installed the ARB competition diff covers front and rear with LubeLocker gaskets, pictured above and in previous posts.
Next up was the AEV diff slider.
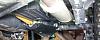
With those in place, along with the factory skids, I had almost everything protected that had close calls on the trail.
At this time I also installed the ARB competition diff covers front and rear with LubeLocker gaskets, pictured above and in previous posts.
Next up was the AEV diff slider.
With those in place, along with the factory skids, I had almost everything protected that had close calls on the trail.
01-22-2017, 11:50 AM
#6
JK Newbie
Thread Starter
Join Date: Aug 2015
Location: Denver, CO
Posts: 18
Likes: 0
Received 0 Likes
on
0 Posts
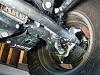
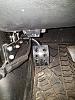
The factory skids are worthy specimens, but with the way I bang on rocks they were showing room for improvement. I also knew I was on borrowed time running without an engine skid. These are the factory skids after a treatment of rustkiller (Ospho.)
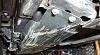
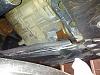
I then used Eastwood chassis primer and paint on anything that was to be covered by my new skids. Enter the Rock Hard Skid System!
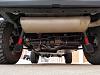
Because my factory gas tank skid was so banged up (and the crossmember had a few scrapes too,) it was quite a job getting the new skids in place. Took the better part of a weekend. I bent a few hole punches, invented some new curse phrases, and thoroughly swept the floor of the garage using the back of my t-shirt. I also had to drill a new hole for the tab holding the gas tank/t-fer skids together so that it wouldn't rub against the gas tank.
To the left of this angle you can see where the original hole was, and where i had to drill the new one (where it is currently installed.) It is now flush.
This skid system is very solid in steel; I can't speak for the aluminum. But it is a heavy SOB. When you're working alone, a good floor jack is invaluable for holding the pieces in position while you fight the bolts back in.
I then used Eastwood chassis primer and paint on anything that was to be covered by my new skids. Enter the Rock Hard Skid System!
Because my factory gas tank skid was so banged up (and the crossmember had a few scrapes too,) it was quite a job getting the new skids in place. Took the better part of a weekend. I bent a few hole punches, invented some new curse phrases, and thoroughly swept the floor of the garage using the back of my t-shirt. I also had to drill a new hole for the tab holding the gas tank/t-fer skids together so that it wouldn't rub against the gas tank.
To the left of this angle you can see where the original hole was, and where i had to drill the new one (where it is currently installed.) It is now flush.
This skid system is very solid in steel; I can't speak for the aluminum. But it is a heavy SOB. When you're working alone, a good floor jack is invaluable for holding the pieces in position while you fight the bolts back in.
01-22-2017, 12:26 PM
#7
JK Newbie
Thread Starter
Join Date: Aug 2015
Location: Denver, CO
Posts: 18
Likes: 0
Received 0 Likes
on
0 Posts
Now that I had all the armor I wanted, along with ~80lbs of tools and supplies that I take everywhere, the factory springs were sagging pretty bad. My poor tailpipe wishes I had taken this next step sooner.

I went to the offroad shop where I bought the Rock Hard skids, and asked what they do with takeoffs from lift installs. Turns out most people just junk it. I then asked if they would keep an eye out for some "19/60" springs (this is based on the last two digits of the part#, 19/front and 60/rear are the tallest springs you can get without taking off a 10A.) Since I was at 50k miles, and run over a lot of washboard at full pressure while getting to trailheads, I also asked if they would keep an eye out for some new Rubi shocls. About a week later, they had the springs and shocks off a JKUR with ~1500 miles, for free. They also have a grateful customer who puts them at the top of his list. I now sit a little more level than the factory rake, and perhaps a touch over factory height. But most importantly, the sag is gone.
The factory brake pads were getting pretty thin trying to stop all this additional weight as well. A set of Hawk LTS pads fixed that.
I also forgot to mention one of the best mods I made which was one of the first, and cheapest: The M.O.R.E. dead pedal for automatics.
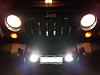
Next up is a pair of JW Speaker fog lights now that one of the factory lights burned out. Headlights will follow the same protocol. Other upcoming mods are chopping the front bumper into a subby, and installing a Warn M8000 onto a Rock Hard winch plate.
I went to the offroad shop where I bought the Rock Hard skids, and asked what they do with takeoffs from lift installs. Turns out most people just junk it. I then asked if they would keep an eye out for some "19/60" springs (this is based on the last two digits of the part#, 19/front and 60/rear are the tallest springs you can get without taking off a 10A.) Since I was at 50k miles, and run over a lot of washboard at full pressure while getting to trailheads, I also asked if they would keep an eye out for some new Rubi shocls. About a week later, they had the springs and shocks off a JKUR with ~1500 miles, for free. They also have a grateful customer who puts them at the top of his list. I now sit a little more level than the factory rake, and perhaps a touch over factory height. But most importantly, the sag is gone.
The factory brake pads were getting pretty thin trying to stop all this additional weight as well. A set of Hawk LTS pads fixed that.
I also forgot to mention one of the best mods I made which was one of the first, and cheapest: The M.O.R.E. dead pedal for automatics.
Next up is a pair of JW Speaker fog lights now that one of the factory lights burned out. Headlights will follow the same protocol. Other upcoming mods are chopping the front bumper into a subby, and installing a Warn M8000 onto a Rock Hard winch plate.
Trending Topics
 02-03-2017, 10:59 AM
#9
Former Vendor

Awesome build so far, C4T! We like that you are doing all the functional mods first instead of aesthetics. Keep up the progress and post up some wheeling pics/video if you have the chance!
02-14-2017, 11:08 PM
#10
JK Newbie
Thread Starter
Join Date: Aug 2015
Location: Denver, CO
Posts: 18
Likes: 0
Received 0 Likes
on
0 Posts
Thanks! This being my first 4x4, I am trying to learn and improve the vehicle through personal trial-and-error, with advice from those with more experience. It will be a very slow build. "Tons and 40s" were never immediate options, which is why I went with the Rubicon. In the meantime, hopefully a mostly stock rig forces me to learn good lines and wheel placement. Unfortunately, that means boring videos. But she's still gone everywhere I pointed her.
JWS fogs installed, needing adjustment: I seriously wish a headlight would burn out (so I can buy a pair to match the fog lights.) These are awesome.
EDIT: Also, in my case it was worth removing the bumper for this swap. With the disconnect, skidplate, and vacuum canister...just too much in the way. I also used some Headlight Revolution adapter cables instead of splicing wires; they should give me an adequate length of fog light cables if I ever pick an aftermarket bumper with a wide placement.
Last edited by C4T; 02-14-2017 at 11:25 PM.