Invest2m4's broke the budget build; tons, 40s and triangles...
 01-27-2015, 05:35 PM
#101
JK Junkie
Thread Starter
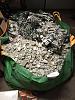
Just so you guys don't think I'm slacking, this is what has been keeping me busy the last week. That's an 8' x 4' x 2.5' bag filled with about 3500 lbs of concrete and tile. Imagine my surprise when I went to demo our bathroom and found out they used to build them out of 2" of concrete. And when they use concrete, they attach the tile with a synthetic blend of grout and unicorn semen. Using a sledge hammer is like pissing on a forest fire. I did however, find a second use for a long throw air hammer 
 01-28-2015, 03:57 AM
#103
JK Enthusiast
Join Date: Nov 2010
Location: Oak Park, IL
Posts: 226
Likes: 0
Received 0 Likes
on
0 Posts
Just so you guys don't think I'm slacking, this is what has been keeping me busy the last week. That's an 8' x 4' x 2.5' bag filled with about 3500 lbs of concrete and tile. Imagine my surprise when I went to demo our bathroom and found out they used to build them out of 2" of concrete. And when they use concrete, they attach the tile with a synthetic blend of grout and unicorn semen. Using a sledge hammer is like pissing on a forest fire. I did however, find a second use for a long throw air hammer <img src="https://www.jk-forum.com/forums/attachment.php?attachmentid=594007"/>
<img src="https://www.jk-forum.com/forums/attachment.php?attachmentid=594007"/>
01-31-2015, 12:56 AM
#104
JK Newbie
Join Date: Apr 2013
Location: Corpus Christi, TX
Posts: 21
Likes: 0
Received 0 Likes
on
0 Posts
Sorry to hijack, but in case you need advise for the flooring... A few years ago I did the same thing. If you are still working on a larger space, you can rent a standard military style floor buffer with a metal toothed attachment instead of the floor buffer attachment. It takes time, but the swirling motion and forcing the buffer into an angled approach will cut away that grout. I did a 25'x8' section of my entryway like this. Get a good chisel with knuckle protector for the corners too. Good luck.
01-31-2015, 02:11 PM
#105
JK Junkie
Thread Starter
Sorry to hijack, but in case you need advise for the flooring... A few years ago I did the same thing. If you are still working on a larger space, you can rent a standard military style floor buffer with a metal toothed attachment instead of the floor buffer attachment. It takes time, but the swirling motion and forcing the buffer into an angled approach will cut away that grout. I did a 25'x8' section of my entryway like this. Get a good chisel with knuckle protector for the corners too. Good luck.
02-09-2015, 06:11 AM
#106
JK Junkie
Thread Starter
I've gotten a bit behind on this thread, so I'll try and get it up to speed.
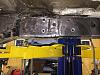
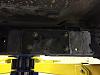
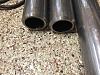
Project rear lower crossmember recap: after about 50 iterations on design, I finally came up with a solution that cleared the driveshaft, was at frame level, and gave me access to removing the transfer case.
Stats
- 2" x 4" x .250 wall tube
- 3/8" link tabs (I'll be fabbing some skids for them later, which will add support and box them in)
- Removable, with (4) 1/2" bolts per side
- Frame was partially plated with 3/16" steel to make it level as there is a transition in the frame
- Drilled 3/4' holes and sleeved the frame with DOM so the bolts can be cranked down (drilling through the 3/16" plate and frame pretty much ruined my day...)
- Cut the ends off the t-case so I could move the crossmember as far forward as possible so it would clear a driveshaft
02-09-2015, 06:14 AM
#108
JK Junkie
Thread Starter
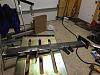
The pile continues to grow (and there is a box full in another location). I'll have to make some art with it when this build is done.
I was also laughing with Ringer the other day about the inventory of tabs, brackets, and steel that one collects on a build like this. Goes something like: buy brackets, test fit brackets, brackets don't work, buy new brackets. As for steel, my local supply shop has tons of drops and I'll go in for say 3ft of tube and they say "for $10 more, you can take the whole 11ft piece." They don't like having drops of drops I guess...
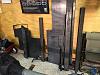
I was also laughing with Ringer the other day about the inventory of tabs, brackets, and steel that one collects on a build like this. Goes something like: buy brackets, test fit brackets, brackets don't work, buy new brackets. As for steel, my local supply shop has tons of drops and I'll go in for say 3ft of tube and they say "for $10 more, you can take the whole 11ft piece." They don't like having drops of drops I guess...
02-09-2015, 06:16 AM
#109
JK Junkie
Thread Starter
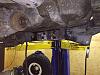
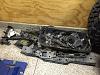
Have the rear links figured out and will be welding them up this week (there are 4, one is just MIA in the picture - not very photogenic I guess). I ended up with about 75% anti-squat, which is what I was looking for. Also ended up just shy of 8" of stretch. Would have liked a little more, but have a fuel tank to fit back there.
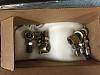
A friend of mine works at a large race/fab shop, which is very helpful. He lathed a bevel on the control arms for me. Nice work. Also bent some 1/4" plate for me (that is for project new trans crossmember - takes some imagination to figure that one out).
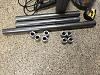
A friend of mine works at a large race/fab shop, which is very helpful. He lathed a bevel on the control arms for me. Nice work. Also bent some 1/4" plate for me (that is for project new trans crossmember - takes some imagination to figure that one out).
02-09-2015, 06:18 AM
#110
JK Junkie
Thread Starter
Following my experience with MetalCloak (Will and Matson kick a##), their Duroflex joints, and their customer service, it was a no brainer going with them again. It's like a box of gold.