Invest2m4's broke the budget build; tons, 40s and triangles...
 11-30-2014, 01:26 PM
#71
JK Enthusiast

Side note, I brought that front Rubi D44 home last night and 18 hours later the guy has located a rear Rubi D44 for me!!!


 11-30-2014, 03:13 PM
#72
JK Junkie
Thread Starter
Next spring we'll have to meet up on the trails and I'll show you what those lockers can do
 11-30-2014, 04:15 PM
#73
JK Jedi
12-01-2014, 09:30 PM
#74
JK Enthusiast
Join Date: Apr 2012
Location: United States
Posts: 392
Likes: 0
Received 0 Likes
on
0 Posts
12-02-2014, 05:19 AM
#75
JK Junkie
Thread Starter
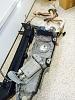
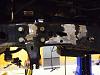
Finally got some real work done this weekend. Pretty much everything on the exterior that needs to be removed has been removed. The front is clean of brackets.
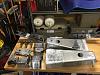
I like to try different tools and found a combo that works really well for removing stock JK brackets. The front took me about an hour and a half to clear and sand. Tools pictured below: plasma cutter, 13A pure beef 7" grinder/cutoff, high power air hammer and chisel, beer.
The air hammer made the difference. I cut the big stuff away with a quick plasma cut. Then I cut into the welds a little with a cutoff. The stock welds are weak sauce and at that point, I hit them with the air hammer and they pop right off. Pretty clean. What was left took about 10 seconds to flatten with the beast grinder.
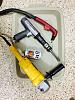
12-02-2014, 09:45 AM
#76
JK Enthusiast
Join Date: Apr 2012
Location: United States
Posts: 392
Likes: 0
Received 0 Likes
on
0 Posts
man that stock gas tank is hideous. would you mind helping me out, it looks like there's two large apparatus on the tank, one in the middle, and one at the end. obviously one is the fuel pump, but what's the other? trying to figure out, because, i totally don't have an idea up my sleeves.... 
 12-25-2014, 12:26 PM
#79
JK Junkie
Thread Starter
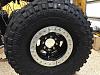
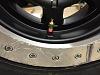
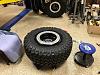
Finally back to business. Two weeks off, so I hope to get a lot done. Mounted the tires on beadlocks and drilled, tapped, and installed the Monster valves. The amount of air flow is insane. Pretty happy about that purchase. I had my Dad hard at work at my beadlock torque station. Went way faster with two wrenches going.
12-25-2014, 12:28 PM
#80
JK Junkie
Thread Starter
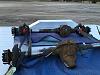
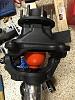
Also picked my axles up from getting the gears and lockers installed (no, the rear is not done and it's a long story...). While the stock axle shafts were massive, I decided last minute that I have no desire to replace broken u-joints (and removing the shafts is a total bit#h). So, I ordered up a set of RCV shafts. Incredible how much larger they are compared to my D44 version.
Also decided to get the Reid high steer knuckle rather than taking the risk of having a stock one machined. Painted everything from the Cs out while I had it apart.
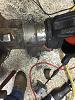
Also got around to cutting the last bit of cast that is in the way of welding brackets on. Pro tip: portable band saw (portaband) cuts through cast like butter. Wish I knew about that a month ago. Now I have about 3" of clear tube to weld to.
Most every part has arrived as well, with a few stragglers getting here by Monday. I have some stuff to clear from the rear frame tomorrow and media blast the axles. After that, it should be time to start the fun stuff.
Also decided to get the Reid high steer knuckle rather than taking the risk of having a stock one machined. Painted everything from the Cs out while I had it apart.
Also got around to cutting the last bit of cast that is in the way of welding brackets on. Pro tip: portable band saw (portaband) cuts through cast like butter. Wish I knew about that a month ago. Now I have about 3" of clear tube to weld to.
Most every part has arrived as well, with a few stragglers getting here by Monday. I have some stuff to clear from the rear frame tomorrow and media blast the axles. After that, it should be time to start the fun stuff.