NJKURPat's Rubi Build
 05-22-2015, 03:24 PM
#1
JK Enthusiast
Thread Starter
Join Date: Dec 2014
Location: Denver
Posts: 248
Likes: 0
Received 0 Likes
on
0 Posts
Well, I finally decided to get around to doing my build thread.
Just a little background: I purchased a 2010 2Dr JK sport a little over two and a half years ago and was quickly bitten by the mod bug. I threw on a 2" rancho lift with some rubi take offs my uncle gave me. They had barely 500 miles on them and I loved it. Then after 6 months, I wanted more travel, rear springs, larger tires, and a longer wheel base/storage room. After a long internal debate about throwing more money at the 2Dr, I decided to shop around for a 4Dr.
Well, as luck would have it, in Nov 2013 I stumbled upon a 2008 JKUR on craigslist and I made an appointment with the dealer for a test drive. I wasn't even looking for a rubi, but I'm not one to complain over lockers and a e-disco. Plus, it came with a snorkel. So, I made the decision and traded in the JK for the JKUR. I went from a 2010 sport with a soft top to a 2008 Rubi hard top with all the options for no monthly payment change. All in, 23k out the door. Then it came time to save, and research the crap out of a lift. Through another forum, I discovered MetalCloak and knew I had to have the 2.5" Dual Rate ARB kit. It was a little expensive, but including all the parts I wanted plus some being chromo I couldn't be happier.
After 6 months of JKU ownership, I purchased a set of KM2 33x12.5R15 on procomp wheels from a friend with about 50% tread. I knew them being used would give me an excuse for 35's sooner, and left a little more money for my lift. Then in September of 2014, I purchased my lift kit during a free shipping sale. I wasn't free to do an install until October, so the boxes just sat in my room and stared at me. Then I was finally able to get the lift installed.
It gave me a little over 3" maybe closer to 3.5" as I forgot to take before and after measurements. I knew this would happen, and I was very happy with the results. Took a little over 10 hours for the front and 7 for the rear. It was my first really complete lift, and I had to make a couple runs for some tools and enlist one of my buddies for help.
Last edited by NJKURPat; 05-22-2015 at 03:46 PM.
 05-22-2015, 03:31 PM
#2
JK Enthusiast
Thread Starter
Join Date: Dec 2014
Location: Denver
Posts: 248
Likes: 0
Received 0 Likes
on
0 Posts
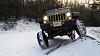
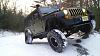
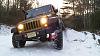
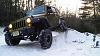
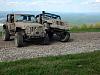
Then during the winter I decided to make a run up to the local fire tower trail. On the way up, I noticed a perfect frozen mount to test out the flex of the suspension and check if there was any interference.
This entire build is going to be one learning experience at a time. I started with zero mechanical ability and now feel very comfortable performing maintenance needed.
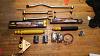
Shortly after those pictures, I had some serious trouble getting my manual transmission to shift. I just couldn't get the shifter into gear. So I had the clutch and all those parts replaced. Centerforce clutch disk and pressure plate, mopar flywheel and pilot bearing, and moog throw out bearing. I was running out of time with finals approaching and wanted to do it myself, but it wasn't a feasible option. So unfortunately I had to pay for the labor of a shop.
This entire build is going to be one learning experience at a time. I started with zero mechanical ability and now feel very comfortable performing maintenance needed.
Shortly after those pictures, I had some serious trouble getting my manual transmission to shift. I just couldn't get the shifter into gear. So I had the clutch and all those parts replaced. Centerforce clutch disk and pressure plate, mopar flywheel and pilot bearing, and moog throw out bearing. I was running out of time with finals approaching and wanted to do it myself, but it wasn't a feasible option. So unfortunately I had to pay for the labor of a shop.
05-22-2015, 03:41 PM
#3
JK Enthusiast
Thread Starter
Join Date: Dec 2014
Location: Denver
Posts: 248
Likes: 0
Received 0 Likes
on
0 Posts
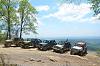
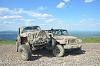
Then, in May I was finally able to really stretch my legs and went to Windrock with JK505, JJohnson1892, goose142, and Karmynsbeep. Man that was one hell of a trip. Adam had a nice flop. Me JJ, and goose almost rolled getting a stupid poser picture. I became really envious of 35's and will probably move to them sooner rather than later. And I really learned a lot about what my jeep is capable of. And what goose and a stock sahara is able to do.....keep up with all of us lifted jeeps on blues. HERO GAS IT!
The picture that almost damaged 3 of us.
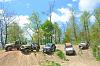
Windrock was amazing, the views were awesome, and I could spend a week there without hitting the same trail. Well except G1!!! haha
haha
Me staked on JK505. First time being stacked on and my first stack.
Adam spotting me. Couldn't have gotten through the weekend without him and Cody. Thanks guys.
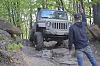
And had to let Cody stack up on me.
The picture that almost damaged 3 of us.
Windrock was amazing, the views were awesome, and I could spend a week there without hitting the same trail. Well except G1!!!
hahaMe staked on JK505. First time being stacked on and my first stack.
Adam spotting me. Couldn't have gotten through the weekend without him and Cody. Thanks guys.
And had to let Cody stack up on me.
05-22-2015, 05:47 PM
#4
Former Member

Join Date: Dec 2014
Posts: 518
Likes: 0
Received 0 Likes
on
0 Posts
05-22-2015, 07:59 PM
#5
JK Enthusiast
Thread Starter
Join Date: Dec 2014
Location: Denver
Posts: 248
Likes: 0
Received 0 Likes
on
0 Posts
It's gonna be slow. As the whole college thing gets in the way hahahaha. But it'll start to gain momentum within a year or so.
05-25-2015, 02:39 AM
#7
Former Member
Join Date: Dec 2014
Posts: 518
Likes: 0
Received 0 Likes
on
0 Posts
Trending Topics
05-25-2015, 07:38 AM
#8
JK Enthusiast
Thread Starter
Join Date: Dec 2014
Location: Denver
Posts: 248
Likes: 0
Received 0 Likes
on
0 Posts
05-27-2015, 09:01 AM
#9
JK Enthusiast
Thread Starter
Join Date: Dec 2014
Location: Denver
Posts: 248
Likes: 0
Received 0 Likes
on
0 Posts
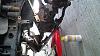
On Friday I decided to pull the doors and do some repair for the serious hinge bubbling I was experiencing. After the hinges started to chip, I picked up some rattle can bedliner. I sanded down the bubbling and chipped paint, sprayed a self-etching primer, and a couple coats of the liner. I opted to not paint the lower part of the hinge attached to the tub and think it turned out pretty well.
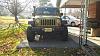
Now that a thunderstom is rolling in, I was forced to finally put the doors back on. But, I got some pictures for karmynsbeep.
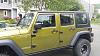

Next up, want to line the hinges on the hood and do the grill. Man this stuff is addicting.
Now that a thunderstom is rolling in, I was forced to finally put the doors back on. But, I got some pictures for karmynsbeep.
Next up, want to line the hinges on the hood and do the grill. Man this stuff is addicting.
05-27-2015, 01:28 PM
#10
Former Member
Join Date: Dec 2014
Posts: 518
Likes: 0
Received 0 Likes
on
0 Posts

