WxNerd2015's Never Ending Build -
 01-04-2017, 04:55 AM
#171
JK Enthusiast
Thread Starter
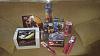
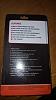
Well, I must have been very good this year! Santa was very nice to me! I got a whole bunch of Jeep projects coming up! Ended up getting an ARB compressor with the tire inflator kit and underhood mount, an sPod SE with the 8 switches (not the touch screen, I prefer the switches), an ARB Snatch Strap, same small tools I have been needing, a Cobra 75WX CB (as I am redoing my CB Set-Up for the Jeep), and a Fortin pre-programmed Auto-Starter! Lots of goodies!
I already got the Auto-Starter installed, and while the directions are simple, and there are many good videos to follow, that dang data immobilizer module plug was a PITA to get out, and took about 30 minutes, which was longer than the entire rest of the install/programming/setup for the entire system and buttoning everything back up! But in the end, very worth it! Looks nice, very small module, and works as advertised, very well! To start it, just press the Lock Button on the factory remote 3 times, and that's it! No extra fob, or wires to splice, or anything like that! It's great! here is the link to the starter that I purchased, as well as the video i used to install:
Fortin EVO-CHRT5 Stand-Alone Remote Start Chrysler Dodge Jeep Combo Regular Key | eBay
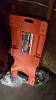
https://www.youtube.com/watch?v=KNzZXikGRnQ&t=8s I also have already gotten the ARB Compressor set up as far as i could without installing in the Jeep yet. Meaning, the Compressor is on the mounting bracket, and fully plumbed with the 3 way splitter, tire fill quick connector, and the pressure sensor. All that is left is to secure the mounting bracket to the brake booster bolts, and make the necessary electrical connections, mainly once the sPod is in. There will be a write-up on all these installs, besides the Auto-Starter, as I feel that that video explains it well. Also, I used a compressor install write-up on a different forum (so I will not share that link here per forum rules), as well as using the below video!
https://www.youtube.com/watch?v=S9yOAamRmJg But a full write-up will come soon! Happy Holidays and Happy New Years to all the forum members and fellow Jeepers!
I already got the Auto-Starter installed, and while the directions are simple, and there are many good videos to follow, that dang data immobilizer module plug was a PITA to get out, and took about 30 minutes, which was longer than the entire rest of the install/programming/setup for the entire system and buttoning everything back up! But in the end, very worth it! Looks nice, very small module, and works as advertised, very well! To start it, just press the Lock Button on the factory remote 3 times, and that's it! No extra fob, or wires to splice, or anything like that! It's great! here is the link to the starter that I purchased, as well as the video i used to install:
Fortin EVO-CHRT5 Stand-Alone Remote Start Chrysler Dodge Jeep Combo Regular Key | eBay
https://www.youtube.com/watch?v=KNzZXikGRnQ&t=8s I also have already gotten the ARB Compressor set up as far as i could without installing in the Jeep yet. Meaning, the Compressor is on the mounting bracket, and fully plumbed with the 3 way splitter, tire fill quick connector, and the pressure sensor. All that is left is to secure the mounting bracket to the brake booster bolts, and make the necessary electrical connections, mainly once the sPod is in. There will be a write-up on all these installs, besides the Auto-Starter, as I feel that that video explains it well. Also, I used a compressor install write-up on a different forum (so I will not share that link here per forum rules), as well as using the below video!
https://www.youtube.com/watch?v=S9yOAamRmJg But a full write-up will come soon! Happy Holidays and Happy New Years to all the forum members and fellow Jeepers!
 01-04-2017, 05:01 AM
#172
JK Enthusiast
Thread Starter
So, just a day or two ago, just had the Jeep turn 50k, and by the way, finally has a name too! I decided to name 'er "Twister", since I am a meteorologist and all, and the rig has done it's fair share of chasing! I know, for an '11 JK, that is still pretty low, but I bought it in May of '14 with 10k, so the rig is definitely getting run now! 50k strong, and everything seems to be running great!

I also, was playing around a bit and testing what functions Jeep might have built in that are not too well known, and I am sure plenty of y'all here already found it, but you can do an instrument cluster diagnostic test to make sure all you lights and gauges are working properly. All you have to do is make sure the Jeep is off, hold in the trip/odometer button, turn the key to "ON" but do not start the Jeep, and then the cluster will begin the diagnostic and you can watch it happen. Just follow the video below!
https://www.youtube.com/watch?v=ppfYMx9bJOQ&t=14s
Last edited by WxNerd2015; 01-04-2017 at 06:31 AM.
01-04-2017, 05:32 AM
#173
JK Enthusiast
Thread Starter
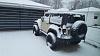
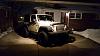
So my fiance and I just moved to our new house before the holiday in Madison Heights. The house is very nice, and only needed a couple of things, however, I ended up adding 1 extra thing which technically didn't need to be done, however, is a Jeep problem, but a good problem by my standards. We have a 2 1/2 car garage, which I would very much like to utilize, and the old door on the house (solid garage door that folds out and slides in) hung down so far in the opening that it was about 2" too low to get the Jeep in the garage. Therefore, new garage door jumped up high on the list of things to do! and sure enough, within the first week of owning the house, it was already modded for my Jeep! Haha! I had the Door Drs come out to do the removal and installation and explained to them why I wanted to do this and I needed as much space as they could give me with lifting the door higher. Well, 5 1/2 hours later, they redid the rafters in the garage so that they were a foot higher than they were and secured everything with angle iron, flipped the beams so the bow was on the top, and tucked the door way up above the opening on the garage! A fully custom installation inside on that, and I am highly impressed with the work they did and highly recommend them! They managed to get about 7" of clearance above my Jeep now in the garage, and I am loving it! Here's some pics!
Before (And this door was a very faded black and looked extremely old):
After:
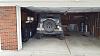
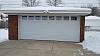
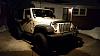
And then, here's just a few more cool pics of the Jeep because...why not?
Before (And this door was a very faded black and looked extremely old):
After:
And then, here's just a few more cool pics of the Jeep because...why not?
02-04-2017, 07:28 PM
#174
JK Enthusiast
Thread Starter
Ok, ok, ok...I kinda left a cliff hanger after Christmas! I have now swapped out the CB, install the sPod SE 8 switch console, and installed the ARB Compressor! Everything is working great, looks great, and I love em! I have not had time to rewire my off road lights on the a pillars yet, but that is coming soon, but all the other accessories are wired! I am just trying to look for a way to attach one of the sPod switches to tigger the reverse lights from the switch if I want some light back there, as my projector LED bulbs throw plenty of light for what I am looking for, but trying to find the right wire, and where to splice into the wire to run the power to the sPod. But I promise, I will have full write ups of all of this soon, just been very busy lately!
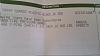
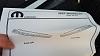
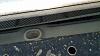
Anyways, I also picked up a set of Mopar door sill guards, as the winter months were beginning to take their toll on the door sills with scratches from boots and stuff, so I wanted to throw a little extra protection there, and I think they look pretty nice, and will get the job done. Basically, the instructions have a page with the 2 things included in the package, and 2 steps. Those steps would be: 1, wipe the application area with the provided alcohol wipe, 2 when clean, peel backing off bottom of guard and stick it on. Simple as that! Here's some pics from the install:
Mopar Part#
Direction Sheet
Driver Side Before and After
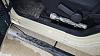
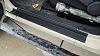

Passenger Side Before and After

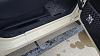
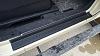
Just an extra side note, I really like how the strip on the tape that needed to be peeled off has a piece pf tape stuck under it to help you get started pulling it off. Because if you have ever worked with these before, getting the cover of the adhesive off can be really hard to get started, so that was a nice touch for the installation

Anyways, stay tuned for more updated, and maybe some off road pics soon too as I have a trip planned soon too!
Anyways, I also picked up a set of Mopar door sill guards, as the winter months were beginning to take their toll on the door sills with scratches from boots and stuff, so I wanted to throw a little extra protection there, and I think they look pretty nice, and will get the job done. Basically, the instructions have a page with the 2 things included in the package, and 2 steps. Those steps would be: 1, wipe the application area with the provided alcohol wipe, 2 when clean, peel backing off bottom of guard and stick it on. Simple as that! Here's some pics from the install:
Mopar Part#
Direction Sheet
Driver Side Before and After
Passenger Side Before and After
Just an extra side note, I really like how the strip on the tape that needed to be peeled off has a piece pf tape stuck under it to help you get started pulling it off. Because if you have ever worked with these before, getting the cover of the adhesive off can be really hard to get started, so that was a nice touch for the installation
Anyways, stay tuned for more updated, and maybe some off road pics soon too as I have a trip planned soon too!
Last edited by WxNerd2015; 02-04-2017 at 07:31 PM.
03-15-2017, 05:39 AM
#175
JK Enthusiast
Thread Starter
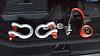
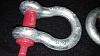
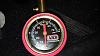
Just a short update, and there should be a bunch more updates over the next few days...unfortunately, I have just gotten extremely busy and have been unable to get to posting much up here. I have all the pics and everything ready to go, just need to the time to post em up! So anyways, here's a fewmore goodies I snagged for my Jeep! A smaller ARB Air Gauge, and this small one I actually like better than the large one for the fact that it fits under the floor in the back better with all my other stuff, and, once you take the pressure, this one will hold the needle in the measured position until you press the button to release the pressure, the large gauge doesn't do that! Also snagged a few ARB 10k lbs 3/4" D-Rings, just incase those are needed to attach the snatch strap anywhere! As I mentioned, a lot more updates coming soon, so stay tuned!

Oh! And almost forgot! I also got a new creeper from Harbor Frieght! Pretty nice and love the head rest and the tool/parts trays!
Oh! And almost forgot! I also got a new creeper from Harbor Frieght! Pretty nice and love the head rest and the tool/parts trays!
Last edited by WxNerd2015; 03-16-2017 at 10:33 AM.
03-15-2017, 07:43 AM
#176
JK Enthusiast
Thread Starter
Ok, so the other day...a few weeks ago...we got some really good rains come through the area, that especially with the still frozen ground, caused a lot of standing water. So naturally, I was hitting a lot of puddles on the way home because...i have a Jeep, it's fun, and you never get too old to go play in a puddle! But when I got home, I had this horrible metal on metal squeaking sound that seemed to be coming out of the rear, whenever a bump was hit or I closed a door, especially the rear door. It gave me such a horrible feeling as I was hoping I didn't do any damage to anything cuz I really didn't wanna have to ake any repairs, but I was maybe a little on the aggressive side with some of the "puddles" (some were like small ponds, haha). So anyways, knowing it was in the back, I crawled underneath and started looking for where metal could be rubbing and started grabbing and shaking a lot of stuff, and finally found that the exhaust shield, that thin, flimsy piece of metal that sits between the underside of the body and the muffler, had pulled out of the driver side bolt holding it to the body and had fallen onto the muffler. I felt much better seeing this, knowing it wasn't anything over critical and that I could easily fix it.
But as a side note, I believe this design is extremely stupid in that the washers that compress the shield to the body are BARELY larger than the hole in the shield! Why did they not put a bigger washer on there? Unless my is really that deteriorated? But it's only like 2/3's of the edge of the hole, like a couple mms are actually under the washer, so definitely no question as to why it fell off, more like why didn't it fall off sooner?
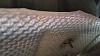
This is the side that fell off, and you can see the size of the hole to the size of the washer on the bolt: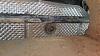
This is the good side that did not fall off, and you can see that it looks like it is barely on there: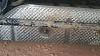
Here you can see how long the stud is:
Anyways, back to fixing, I was having a heck of a time finding the right socket to actually get the bolt (it looks rusty, but it wasn't an issue to turn once I got the right socket). I finally ended up narrowing it down to an 11 mm socket, but the stud the bolt goes on is so long, I had to try and find a deep socket, of which, I did not have any 11 mm, only 10 and 12 mm, however, I was able to find the equivelent in SAE sockets which fit just close enough to loosen the bolt maybe 10 turns. I was then able to fish the shield back up on top of the washer and tighten the bolt back down.
So in the end, the shield once again feels secure, however, it's still only held on by 3 bolts that barely are making contact with it, so...for the moment it's there, as I didn't feel like taking all the bolts out, but I may either end of removing it, or the more likely option, I may grab some bigger washers to throw on there to prevent this in the future.
But as a side note, I believe this design is extremely stupid in that the washers that compress the shield to the body are BARELY larger than the hole in the shield! Why did they not put a bigger washer on there? Unless my is really that deteriorated? But it's only like 2/3's of the edge of the hole, like a couple mms are actually under the washer, so definitely no question as to why it fell off, more like why didn't it fall off sooner?
This is the side that fell off, and you can see the size of the hole to the size of the washer on the bolt:
This is the good side that did not fall off, and you can see that it looks like it is barely on there:
Here you can see how long the stud is:
Anyways, back to fixing, I was having a heck of a time finding the right socket to actually get the bolt (it looks rusty, but it wasn't an issue to turn once I got the right socket). I finally ended up narrowing it down to an 11 mm socket, but the stud the bolt goes on is so long, I had to try and find a deep socket, of which, I did not have any 11 mm, only 10 and 12 mm, however, I was able to find the equivelent in SAE sockets which fit just close enough to loosen the bolt maybe 10 turns. I was then able to fish the shield back up on top of the washer and tighten the bolt back down.
So in the end, the shield once again feels secure, however, it's still only held on by 3 bolts that barely are making contact with it, so...for the moment it's there, as I didn't feel like taking all the bolts out, but I may either end of removing it, or the more likely option, I may grab some bigger washers to throw on there to prevent this in the future.
03-15-2017, 01:39 PM
#177
JK Enthusiast
Thread Starter
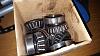
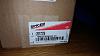
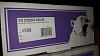
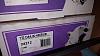
I finally did it...and I am so glad I did! I took the Jeep up to Unlimited Offroad up here in Michigan, and got TWSTR regeared from the stock 3.73 ratio up to 4.56! It is truly a night and day difference which is just another story along the long line of regear stories for the JKs! I was feeling so down on power, and with the old 3.8L...it was that much worse! I thought I would be a bit better with only the 33s, but overall, it needed it bad! The reggae took a day and a half from the shop, but picked it up with no issues! I was running in 3rd Gear on the expressway just to keep 70 at like 3300 rpm, which definitely was not good for the Jeep, and now...I feel like I got 100 more HP and I can even speed up on the highway in 4th now! Not to mention, at 70 on the expressway, the rpms only have jumped to 2200 to 2300 from just below 2000, and running in 4th a lot more, has greatly helped the MPGs! I have gotten like 4-5 MPGs back, and even driving a bit harder, I am still 2-3 MPGs better easily! Oh, and I forgot mention I got the Yukon Gear Sets front and rear, you can see the part numbers in the pics, as well as the Spicer rebuild kits for them!


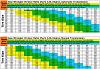
Here is the regear chart for a 3.8L V6 JK with the Automatic 4-Speed. I am on the low end, but for still being a daily driver with the 33s, it is dang nice!
Additionally, while I was in the shop, they noticed my rear axles seals were bad, which I knew was coming soon, so they went ahead and fixed that up nice too, since everything that needed to be out to do those was already out for the regear!
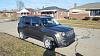
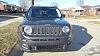
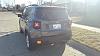
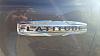
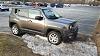
I also had a rental while my Jeep was in the shop, and ended up getting to still drive a Jeep! The rental company has a Renegade in and it was between that and a Mazda sedan! I know it is no JK, but was definitely a different vehicle to drive, and not as bad as I thought it might be! Though a bit underpowered! Here's some pics of it!


My next projects that I will be looking at though is keeping an eye on ball joints, that at 53k miles are starting to wear, as well as thinking about some new pads and maybe rotors for the front brakes!
Here is the regear chart for a 3.8L V6 JK with the Automatic 4-Speed. I am on the low end, but for still being a daily driver with the 33s, it is dang nice!
Additionally, while I was in the shop, they noticed my rear axles seals were bad, which I knew was coming soon, so they went ahead and fixed that up nice too, since everything that needed to be out to do those was already out for the regear!
I also had a rental while my Jeep was in the shop, and ended up getting to still drive a Jeep! The rental company has a Renegade in and it was between that and a Mazda sedan! I know it is no JK, but was definitely a different vehicle to drive, and not as bad as I thought it might be! Though a bit underpowered! Here's some pics of it!
My next projects that I will be looking at though is keeping an eye on ball joints, that at 53k miles are starting to wear, as well as thinking about some new pads and maybe rotors for the front brakes!
03-15-2017, 02:25 PM
#179
Sponsoring Manufacturer

I finally did it...and I am so glad I did! I took the Jeep up to Unlimited Offroad up here in Michigan, and got TWSTR regeared from the stock 3.73 ratio up to 4.56! It is truly a night and day difference which is just another story along the long line of regear stories for the JKs! I was feeling so down on power, and with the old 3.8L...it was that much worse! I thought I would be a bit better with only the 33s, but overall, it needed it bad! The reggae took a day and a half from the shop, but picked it up with no issues! I was running in 3rd Gear on the expressway just to keep 70 at like 3300 rpm, which definitely was not good for the Jeep, and now...I feel like I got 100 more HP and I can even speed up on the highway in 4th now! Not to mention, at 70 on the expressway, the rpms only have jumped to 2200 to 2300 from just below 2000, and running in 4th a lot more, has greatly helped the MPGs! I have gotten like 4-5 MPGs back, and even driving a bit harder, I am still 2-3 MPGs better easily! Oh, and I forgot mention I got the Yukon Gear Sets front and rear, you can see the part numbers in the pics, as well as the Spicer rebuild kits for them!
Attachment 668397
Attachment 668398
Attachment 668399
Attachment 668401
Attachment 668400
Attachment 668402
Here is the regear chart for a 3.8L V6 JK with the Automatic 4-Speed. I am on the low end, but for still being a daily driver with the 33s, it is dang nice!
Attachment 668410
Additionally, while I was in the shop, they noticed my rear axles seals were bad, which I knew was coming soon, so they went ahead and fixed that up nice too, since everything that needed to be out to do those was already out for the regear!
I also had a rental while my Jeep was in the shop, and ended up getting to still drive a Jeep! The rental company has a Renegade in and it was between that and a Mazda sedan! I know it is no JK, but was definitely a different vehicle to drive, and not as bad as I thought it might be! Though a bit underpowered! Here's some pics of it!
Attachment 668403
Attachment 668404
Attachment 668405
Attachment 668406
Attachment 668407
Attachment 668408
Attachment 668409
My next projects that I will be looking at though is keeping an eye on ball joints, that at 53k miles are starting to wear, as well as thinking about some new pads and maybe rotors for the front brakes!
And for brakes too! https://www.dynatrac.com/brake-syste...e-jeep-jk.html
03-15-2017, 03:42 PM
#180
JK Enthusiast
Thread Starter
Absolutely! I was very doubtful myself that it would really change that much, but I just can not believe the difference! And with evidence to prove it there! I highly recommend that as the first step to get some drivability back to the rig!