darkknight1999 Build thread :)
 04-17-2014, 04:39 PM
#11
JK Freak
Thread Starter
All my wire finally showed up. Now I can start to wire up my fuse/relay block, all my lights, equipment and accessories.

My fairlead license plate holder showed up today as well... but its not really that exciting... other than I'll be legal again this weekend.


My fairlead license plate holder showed up today as well... but its not really that exciting... other than I'll be legal again this weekend.

 04-20-2014, 05:08 PM
#12
JK Freak
Thread Starter
Well since I swapped the rear bumper I needed to figure out a new 3rd brake light. So with that I set out to find a solution. I ended up buying the Delta LED lug nut light kit.
The kit itself is barely ok... honestly its way over priced for what you get. The lights didn't fit into the lug holes, the harness leads on the light side didn't fit through the lug holes either. So I had to customize the whole thing. They supply a 4' power lead and (t-tap)
  I have no idea what they think you'd do with 4 feet of wire... You should never use a t-tap. So that went in the trash.
Basically I bought it for just the LED light parts in the end since I cut the harness up and made a custom one from it.
I started by cutting down the connector boot on one side so it fit into the hole. This on took only a few minutes and of course I forgot to take a picture of it.
I had to customize the LED themselves since they wouldn't fit into the lug holes

I had to grind the LED's down to fit into the holes, I used a Dremel to grind them down, you could do it by hand but you'll be there all day...

Once I was able to get them to fit, I made a custom hardness. I cut the factory rear tail light harness off and however I left it long enough so should I even have to reconnect it I can solder it back on easy enough.
Here's a few pics of the harness:


The LEDs are pretty bright. I'm glad I did it... but I'm going strong consideration to building a kit and selling them. This kit could have been complete plug and play... and its not.
The kit itself is barely ok... honestly its way over priced for what you get. The lights didn't fit into the lug holes, the harness leads on the light side didn't fit through the lug holes either.
So I had to customize the whole thing. They supply a 4' power lead and (t-tap) I have no idea what they think you'd do with 4 feet of wire... You should never use a t-tap. So that went in the trash. Basically I bought it for just the LED light parts in the end since I cut the harness up and made a custom one from it.
I started by cutting down the connector boot on one side so it fit into the hole. This on took only a few minutes and of course I forgot to take a picture of it.
I had to customize the LED themselves since they wouldn't fit into the lug holes

I had to grind the LED's down to fit into the holes, I used a Dremel to grind them down, you could do it by hand but you'll be there all day...

Once I was able to get them to fit, I made a custom hardness. I cut the factory rear tail light harness off and however I left it long enough so should I even have to reconnect it I can solder it back on easy enough.
Here's a few pics of the harness:


The LEDs are pretty bright. I'm glad I did it... but I'm going strong consideration to building a kit and selling them. This kit could have been complete plug and play... and its not.
Last edited by darkknight1999; 04-20-2014 at 05:16 PM.


 04-27-2014, 10:47 AM
#15
JK Freak
Thread Starter
I finally was able to plug the holes in the tailgate from removing the stock tire bumpers. When I installed my ACE rear bumper and tire carrier I had to remove the rubber tire bumpers/stabilizers. Course doing so left the 2 holes there. So after some searching I found a good solution. I ended up using Tram 3/4 Flush antenna hole plugs. They are a very tight fit, but the seal the holes perfect. I bought mine off eBay for $6.95 for the pair. Here a link to the plugs: Tram 3 4" Flush Antenna Hole Plug Pair of 2 1281 | eBay
Last edited by darkknight1999; 04-27-2014 at 10:54 AM.
 05-20-2014, 05:05 PM
#18
JK Freak
Thread Starter
I'm adding a fair amount of aftermarket equipment. Lighting, winch, a full sound system, CB, fridge, air system, an expedition trailer at some point... etc... I designed the system so that everything new would be on it's own fuse/relay box separate from the stock wiring and system. This way if I'm on the trail I can quickly eliminate all accessories that have been added with the flip of a switch.
The Blue Top has a secondary set of posts that I will utilize for all add-ons. So if the accessory circuit breaker fails I can pull the lead right off the battery without effecting the Jeep.
The Blue Top is designed for marine and RV applications... and although it's a jeep and not an RV I will be adding a lot to it, so it's the right choice for me. I had good luck with the first Yellow top Optima I had in our S2000... The second one not so much... :lol: So time will tell.
Sent from my NSA monitoring device... Using the JK-Forum app
06-14-2014, 09:48 AM
#19
JK Freak
Thread Starter
I've been crazy busy so I haven't had time to do much on the Jeep over the last month... but I had some time today to I draw out the wiring diagram for the secondary fuse/relay block. I figured someone on here might benefit from this so I figured I would just post it up.
I'll be doing a full write-up once I have it finished... but for those that have the time and need a wiring diagram... here ya go

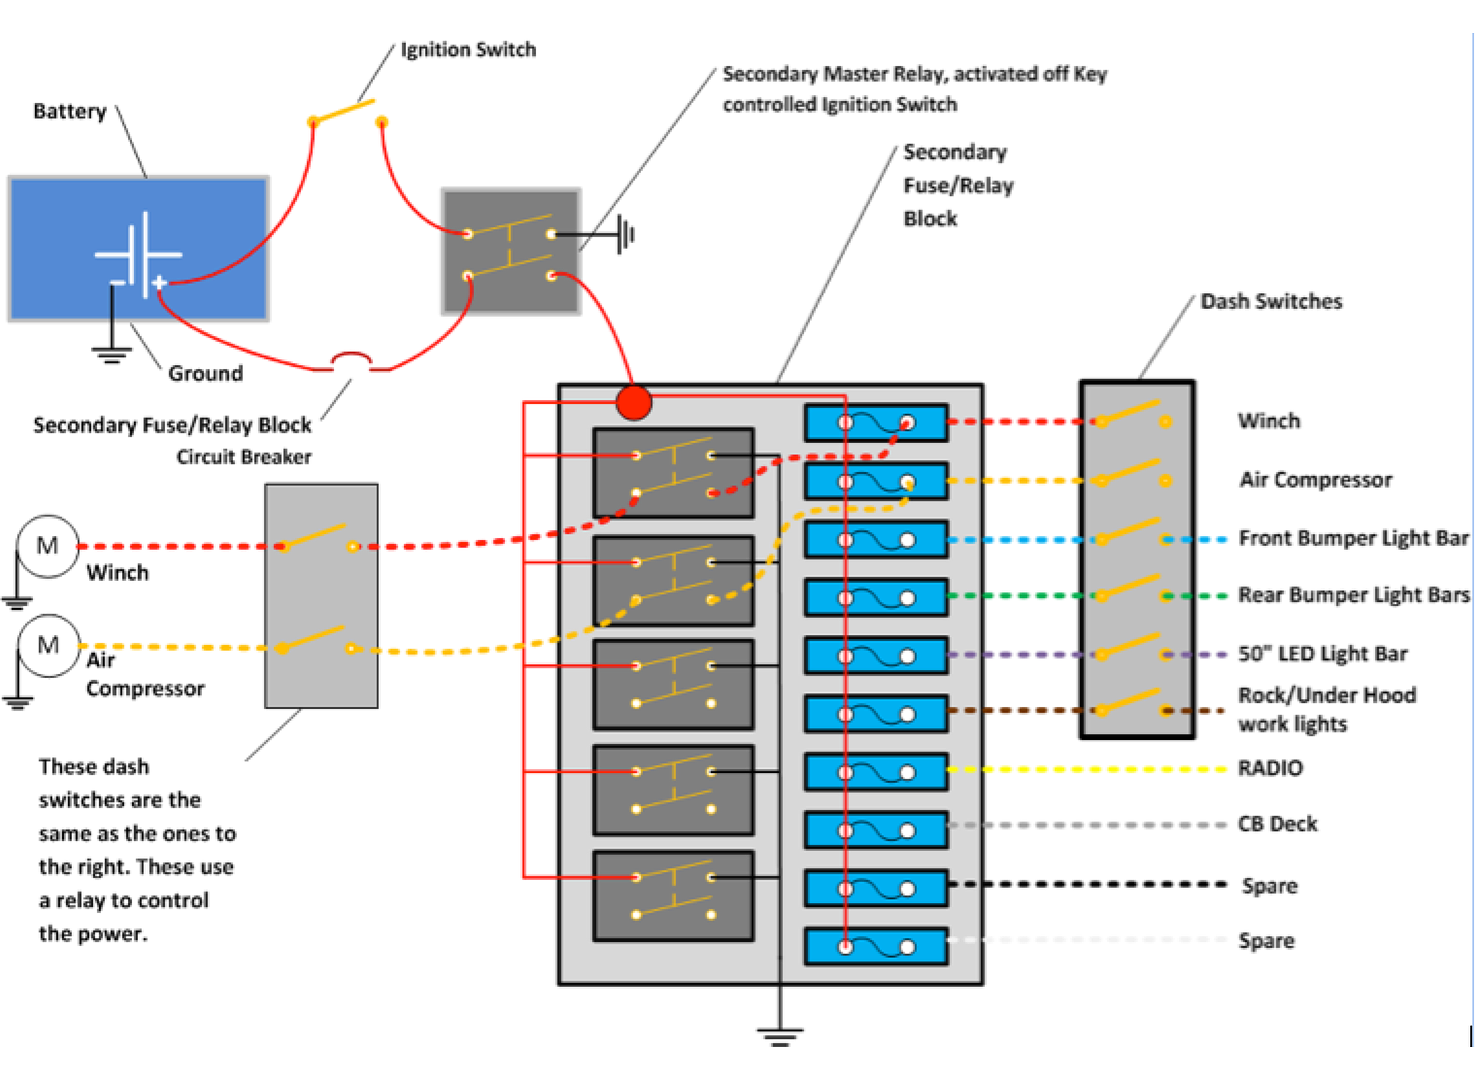
I'll be doing a full write-up once I have it finished... but for those that have the time and need a wiring diagram... here ya go
 06-19-2014, 05:14 AM
#20
JK Freak
Thread Starter
Ok so in planning out my secondary fuse/relay box and the gear I have added or will be adding... I quickly came to the conclusion that A) The Daystar panel is a pile of garbage... and B) I bought a 4 switch panel and currently I have 6 switches to connect up. So even if the Daystar was better quality it still doesn't have enough switch space anyway.
Soooo.... that leads us down the road of where to put the switches... and of course I end up wanting to put them up in a place that doesn't really allow for it... well not yet at least.. hehehe
So I've decided to put them centered on the upper windshield trim, between the sun visor clips.
This is a work in progress, but in the end it will look factory.
For now this is what we have going on... lol its ugly now but by the end of the week it won't be


