Did a Thule roof rack on a 2 door hard top
 10-13-2012, 06:50 PM
#1
Super Moderator

Thread Starter
So winter (snowboarding) is on the way and the hard top was already off for other projects so I figured what the hell. Ordered up some Thule tracks, Podium feet and load bars. I have a VW rabbit with a roof rack and I wanted to make sure I could get the bars with the proper spacing so I did a bunch of measuring. The rabbit bars were 27" apart center to center. Using the very edges of the hard top I could manage around 34" bar to bar, so no problems. I considered other options, but here's what I went with.
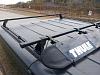
This was the general idea. The whole rack on the hard top (so the freedom panels can come off with a surfboard on in the summer) and plenty of space for adjustment between the bars. I trimmed the racks to length with a hacksaw, came out very clean. Make sure you account for the end caps!

(no picture) There is a seam in the hard top between the 2- layer corners and the single layer interior area. It's about an inch wide and it's reasonably close to lining up with the area I wanted to mount the tracks. I spent a lot of time eying up top and bottom so the tracks would sit on a flat section of the top and the bolts would come through that seam. When I felt comfortable with it, I used the smallest drill bit I had to make a pilot hole. Happened to be almost exactly where I wanted it to end up. On with the show..
Thule recommends using every other hole on the tracks, but I wanted to distribute the load over as large an area as possible. I used all the holes. In that light, I didn't want to just throw some washers and nuts under the hard top so I picked up some 3/4" wide by 1/8" thick flat steel bar and trimmed it to the length of the tracks. Then I lined it up with where the bolt holes came through (about 1/4" off center) and marked and drilled holes. And then some primer and paint. My phone's camera does not perform well in low light..

Then I bolted the tracks down. They come with 5mm hex head bolts, adhesive backed washers, nylock stop nuts and a few options for covering the exposed nuts/screws. I trimmed the bolts down to the right length (tough to find M5 stainless cap head bolts on short notice). I put the adhesive washers on the bolts, put some silicon on the threads, put them through the tracks, hardtop and the steel and followed them up with stainless washers, stop nuts and the supplied Thule nut caps.


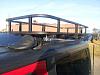
I tried to get a shot of the top/bottom to show the placement of the tracks. Don't know how successful it was.


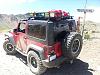
So, the feet and bars went on without a hitch. They are adjustable for spacing so I plan on marking placements for surfboard, snowboard, bicycle, whatever. Also a nice feature is that you can unbolt the feet and bars and snap some caps on the foot bases without losing your position.

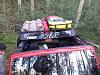
One lousy shot on the jeep to wrap it up. I picked up that hard top and set it on the jeep all by myself at 2 in the morning. I'm proud of that.

I'll get some better pictures when there's daylight and I have a camera. I got a lot of the ideas and gumption to do this from this forum, so thanks to everyone who did this before me. I hope this helps someone who's on the fence about putting a rack like this together. Yes, drilling that first hole in the hard top is horrifying but have no fear!
This was the general idea. The whole rack on the hard top (so the freedom panels can come off with a surfboard on in the summer) and plenty of space for adjustment between the bars. I trimmed the racks to length with a hacksaw, came out very clean. Make sure you account for the end caps!
(no picture) There is a seam in the hard top between the 2- layer corners and the single layer interior area. It's about an inch wide and it's reasonably close to lining up with the area I wanted to mount the tracks. I spent a lot of time eying up top and bottom so the tracks would sit on a flat section of the top and the bolts would come through that seam. When I felt comfortable with it, I used the smallest drill bit I had to make a pilot hole. Happened to be almost exactly where I wanted it to end up. On with the show..
Thule recommends using every other hole on the tracks, but I wanted to distribute the load over as large an area as possible. I used all the holes. In that light, I didn't want to just throw some washers and nuts under the hard top so I picked up some 3/4" wide by 1/8" thick flat steel bar and trimmed it to the length of the tracks. Then I lined it up with where the bolt holes came through (about 1/4" off center) and marked and drilled holes. And then some primer and paint. My phone's camera does not perform well in low light..
Then I bolted the tracks down. They come with 5mm hex head bolts, adhesive backed washers, nylock stop nuts and a few options for covering the exposed nuts/screws. I trimmed the bolts down to the right length (tough to find M5 stainless cap head bolts on short notice). I put the adhesive washers on the bolts, put some silicon on the threads, put them through the tracks, hardtop and the steel and followed them up with stainless washers, stop nuts and the supplied Thule nut caps.
I tried to get a shot of the top/bottom to show the placement of the tracks. Don't know how successful it was.
So, the feet and bars went on without a hitch. They are adjustable for spacing so I plan on marking placements for surfboard, snowboard, bicycle, whatever. Also a nice feature is that you can unbolt the feet and bars and snap some caps on the foot bases without losing your position.
One lousy shot on the jeep to wrap it up. I picked up that hard top and set it on the jeep all by myself at 2 in the morning. I'm proud of that.
I'll get some better pictures when there's daylight and I have a camera. I got a lot of the ideas and gumption to do this from this forum, so thanks to everyone who did this before me. I hope this helps someone who's on the fence about putting a rack like this together. Yes, drilling that first hole in the hard top is horrifying but have no fear!

 10-13-2012, 08:44 PM
#4
Super Moderator
Thread Starter

Trending Topics
10-14-2012, 07:54 AM
#8
JK Enthusiast
Join Date: Sep 2012
Location: Leamington
Posts: 157
Likes: 0
Received 0 Likes
on
0 Posts
Looks like the rack would make it easy to hook up some ratchet straps to the ceiling of your garage and save you from putting the top on caveman style.
Nice build
Nice build
10-14-2012, 01:00 PM
#10

I did roughly the same thing, but I grabbed some rails off a 4-Runner and cut them to size. I then got all the other pieces of Craigslist. I have less than $200 wrapped up in the whole thing and it works great.
Very nice write up!
I also picked up a hitch carrier for $50, removed the hitch bar and u-bolted it to the rails. It leaves enough room for a kayak or soft bag on the other side.
Very nice write up!
I also picked up a hitch carrier for $50, removed the hitch bar and u-bolted it to the rails. It leaves enough room for a kayak or soft bag on the other side.