Installed Roof Rails on Two Door Hard Top
 02-28-2015, 11:39 AM
#1
JK Enthusiast
Thread Starter
Join Date: Oct 2006
Location: Westminster, MD
Posts: 163
Likes: 0
Received 0 Likes
on
0 Posts
I was getting really annoyed with the lack of interior space in my two door--even if it's preferred for the tight, high center-prone trails that we run at Rausch Creek--I could never take friends up to the mountain and fit all the gear inside. I needed a rack.
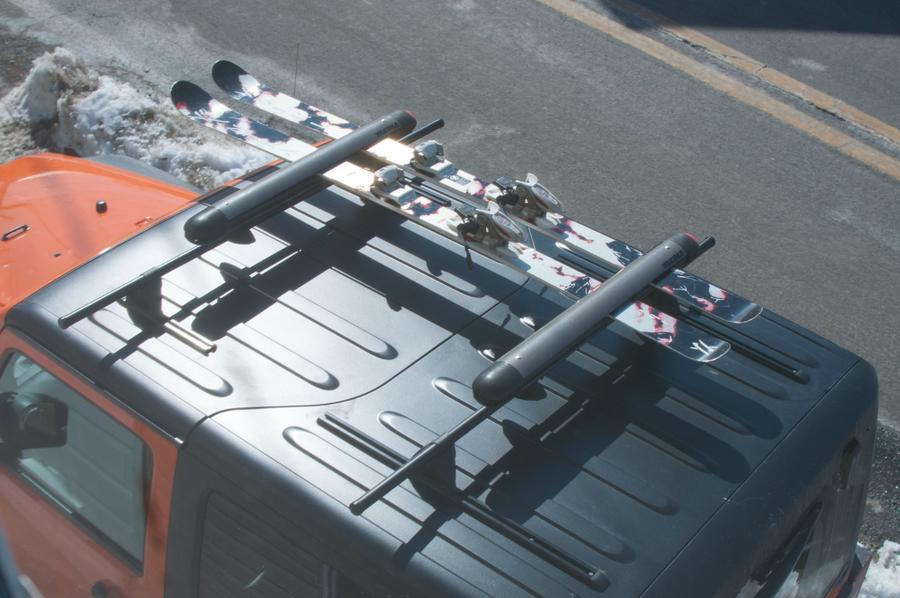
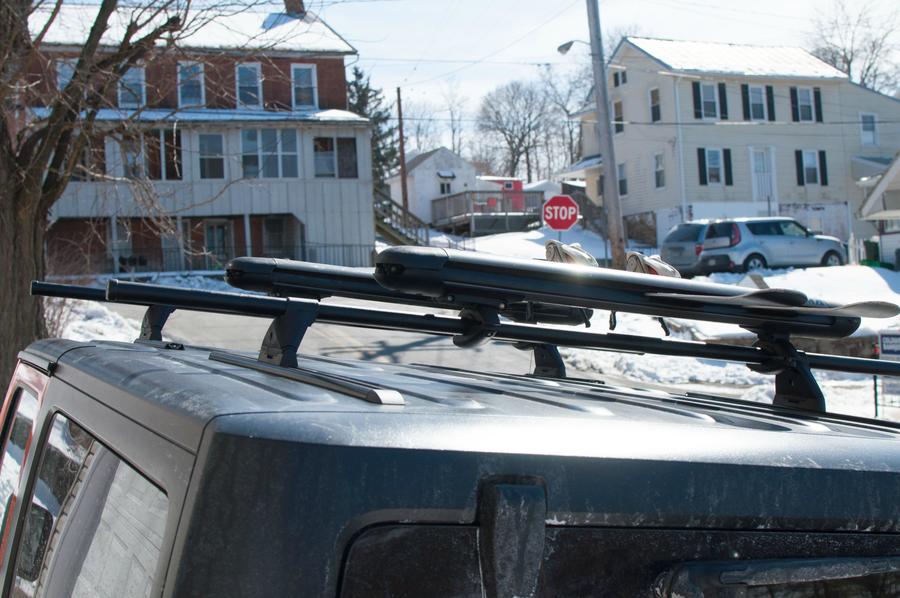
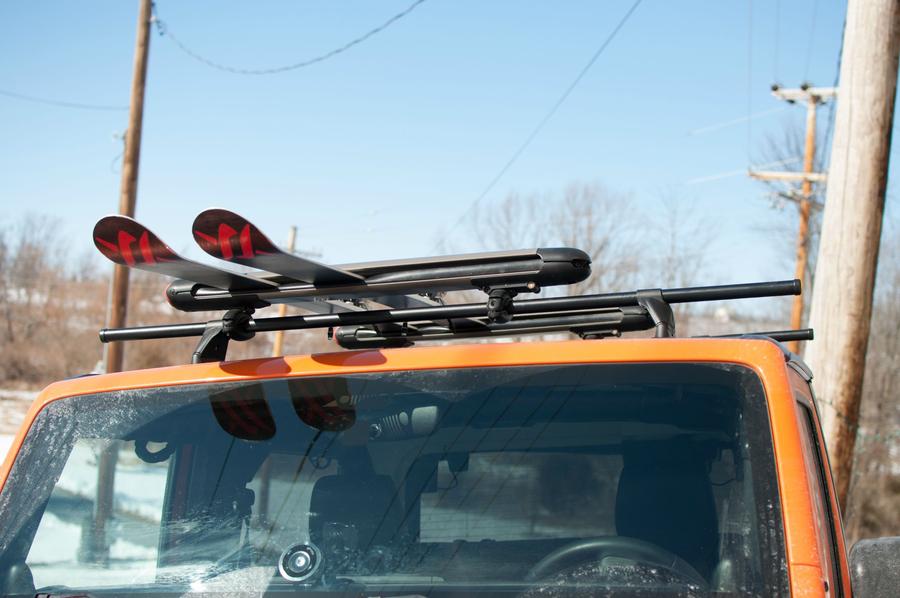
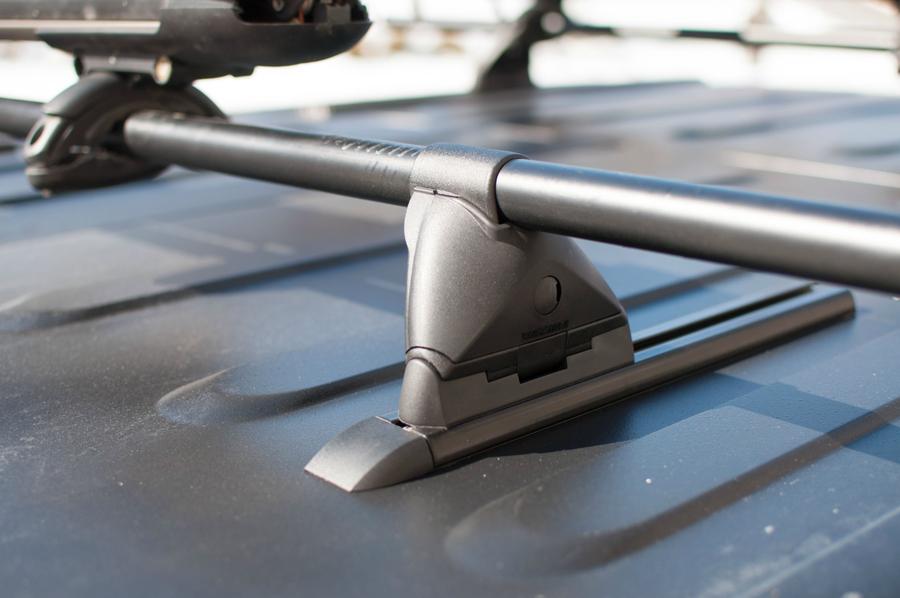
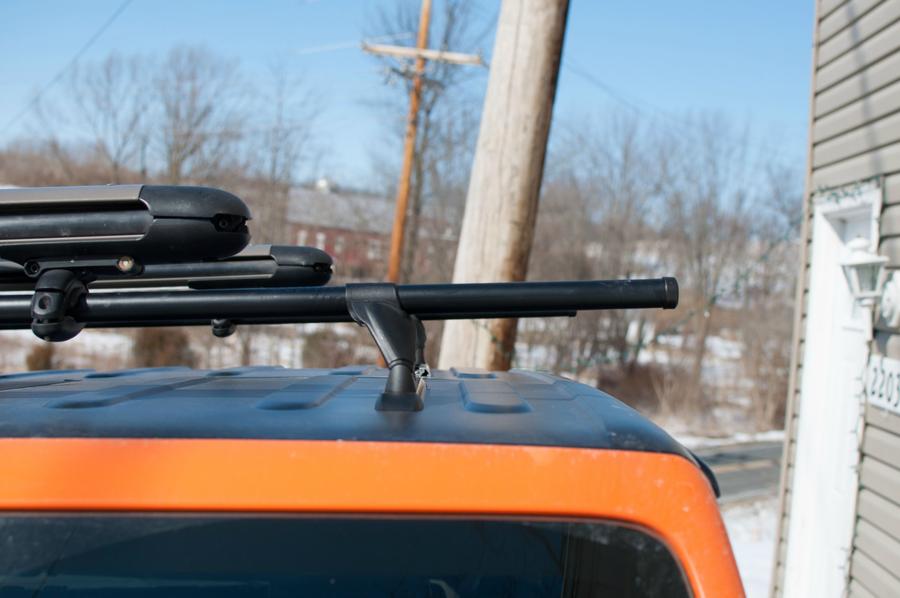
I ordered Yakima's universal roof rail kit (p/n 8001616) and threw it on. Of course I couldn't just do it the normal way. For one, the kit is made for a four door and the rails are too long to install on just the rear portion of the two door hard top: they had to be cut anyway. Out comes the angle grinder to cut to fit. Scissors take care of the plastic liner of the rail. So I had these little sections left over and decided to put them on the T-top portions because it seemed strong enough and it'd be nice to have the flexibility to mount things farther forward. Also, user FT did it and said it's fine in this post (and subsequent PMs).
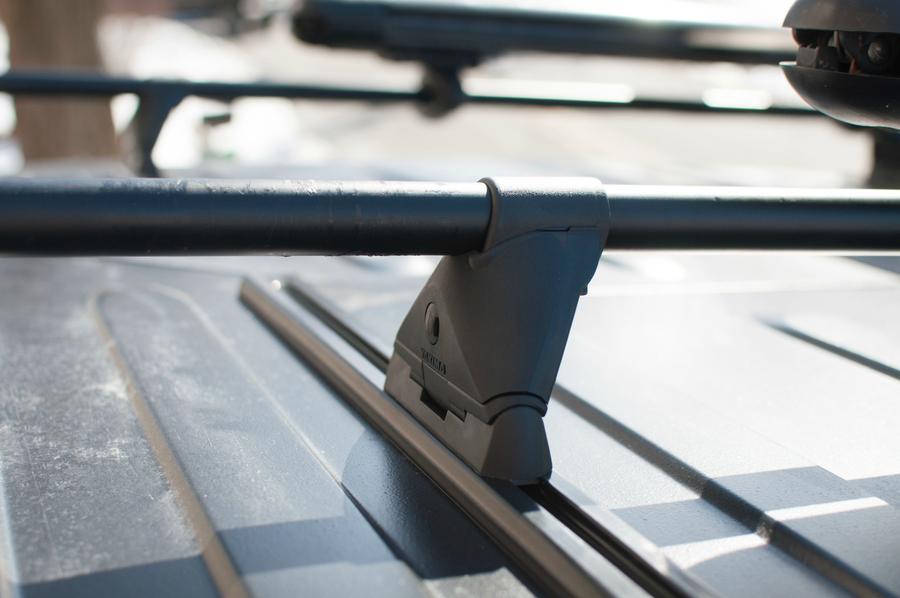
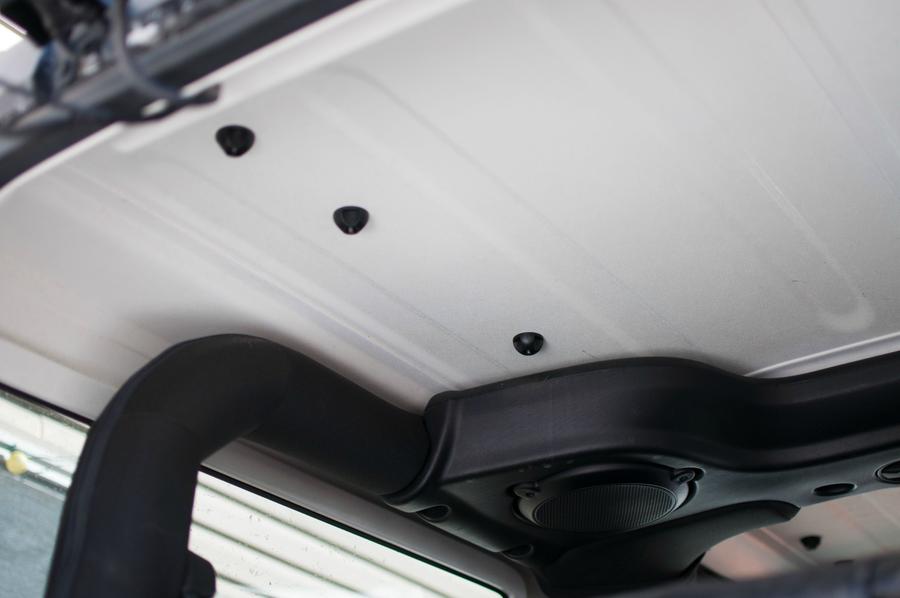
So, mock up the rail sections, measure thrice, mark holes with marker, and drill twice (once for a 1/8" pilot hole, then 7/32" final hole): three holes for each of the T-top sections, and four for each rear section. That's fourteen (14) holes in your hard top ... yikes. Don't worry--you're not a wuss. There's plenty of Loctite black silicone sealant to do them all up right, a nice big dab in the middle and circled all around its circumference. Each hole gets a white nylon washer that fits up into the rail's channel to help seal out water, then on plops the rail. A machine screw down through the hole with a black nylon washer (or end cap) and secure underneath on the inside of the top with wide base plastic wing nuts. You can get things plenty tight with the set up, though I was skeptical at first. You don't need to really crank down on it--the sealant will squeeze out when things get tight enough. Plus, if you squeeze out too much sealant there won't be anything there to block water from dripping down on ya while you're driving. Yay, that's always fun.
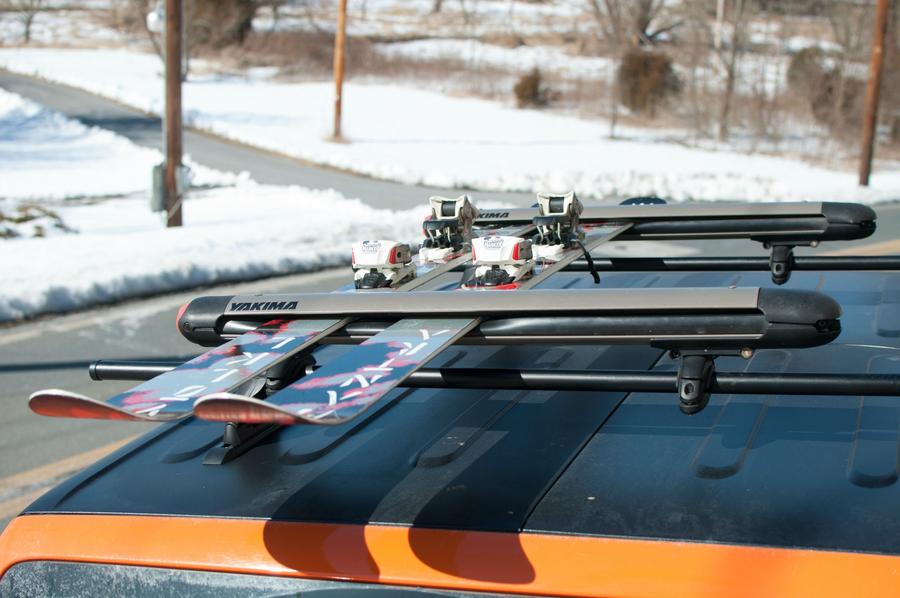
Those are Yakima Fat Cat 6 ski/snowboard holders, by the way.
For the front sections, I chose to put a screw threw all three available holes in the rail for strength: the fiberglass is surprisingly thick so it's dang stout by my standards. Since I cut the rails and used all sections, I needed four more end caps for the freshly cut ends. They're on the way, so just screws and washers for right now. The T-tops were easy because I just did them inside watching TV.
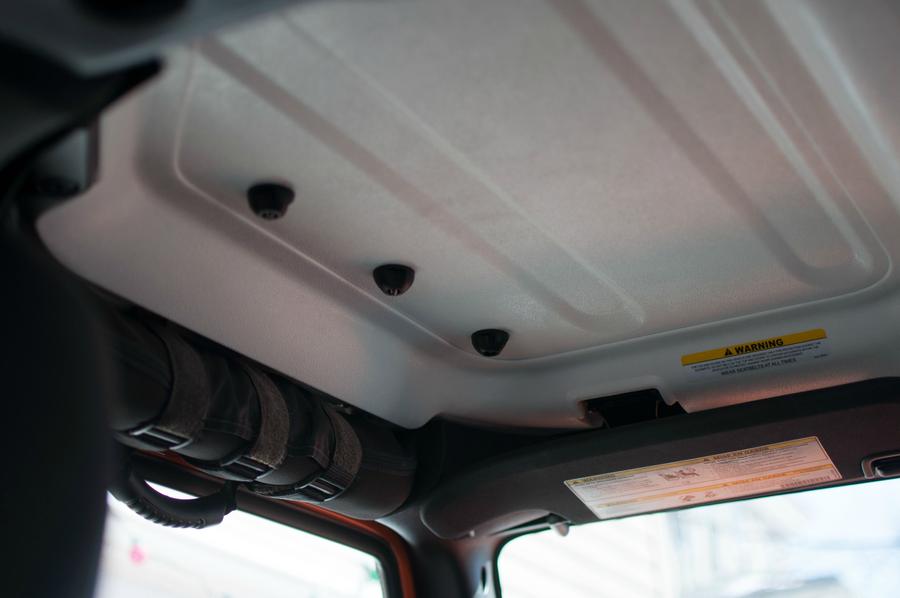
Since I cut the front portions so they retained all three holes, the rear most being measured so an end cap will fit right on, I had to drill new 1/4" holes in the front of the rear rails so I could throw end caps there, too. The rear portions got screws at each end for the end caps, then (from front to rear) skip hole, screw, skip hole, screw. The last two holes in the rail have screws.
The first hole in the front goes through the portion of the hard top where it's a single layer of fiberglass. Just another 1/2" forward and it's the two layer portion and the screw won't be long enough--I wouldn't want to go through that portion even if I had a longer screw, anyway. I had to take out the six hard top mounting screws and tilt the top back a bit to get to the front holes since they're above the sound bar. The plastic nuts underneath don't interfere with anything at this location.
After a trip to the mountain, topping out at 70 mph at one point, nothing moved and everything held tight. The top didn't even creak. As a note, the instructions (which were well-written and easy to understand, coming from a technical writer) say that the rail thru-holes should be 1/4" diameter, but that just seemed so large for how small the machine screws are. I reduced them to 7/32" after measuring the screw with a caliper. I know there's supposed to be room for sealant to squish down into, and I allowed for that, but 1/4" seemed way too large.
Any questions, feel free to ask.
Straight
I ordered Yakima's universal roof rail kit (p/n 8001616) and threw it on. Of course I couldn't just do it the normal way. For one, the kit is made for a four door and the rails are too long to install on just the rear portion of the two door hard top: they had to be cut anyway. Out comes the angle grinder to cut to fit. Scissors take care of the plastic liner of the rail. So I had these little sections left over and decided to put them on the T-top portions because it seemed strong enough and it'd be nice to have the flexibility to mount things farther forward. Also, user FT did it and said it's fine in this post (and subsequent PMs).
So, mock up the rail sections, measure thrice, mark holes with marker, and drill twice (once for a 1/8" pilot hole, then 7/32" final hole): three holes for each of the T-top sections, and four for each rear section. That's fourteen (14) holes in your hard top ... yikes. Don't worry--you're not a wuss. There's plenty of Loctite black silicone sealant to do them all up right, a nice big dab in the middle and circled all around its circumference. Each hole gets a white nylon washer that fits up into the rail's channel to help seal out water, then on plops the rail. A machine screw down through the hole with a black nylon washer (or end cap) and secure underneath on the inside of the top with wide base plastic wing nuts. You can get things plenty tight with the set up, though I was skeptical at first. You don't need to really crank down on it--the sealant will squeeze out when things get tight enough. Plus, if you squeeze out too much sealant there won't be anything there to block water from dripping down on ya while you're driving. Yay, that's always fun.
Those are Yakima Fat Cat 6 ski/snowboard holders, by the way.
For the front sections, I chose to put a screw threw all three available holes in the rail for strength: the fiberglass is surprisingly thick so it's dang stout by my standards. Since I cut the rails and used all sections, I needed four more end caps for the freshly cut ends. They're on the way, so just screws and washers for right now. The T-tops were easy because I just did them inside watching TV.
Since I cut the front portions so they retained all three holes, the rear most being measured so an end cap will fit right on, I had to drill new 1/4" holes in the front of the rear rails so I could throw end caps there, too. The rear portions got screws at each end for the end caps, then (from front to rear) skip hole, screw, skip hole, screw. The last two holes in the rail have screws.
The first hole in the front goes through the portion of the hard top where it's a single layer of fiberglass. Just another 1/2" forward and it's the two layer portion and the screw won't be long enough--I wouldn't want to go through that portion even if I had a longer screw, anyway. I had to take out the six hard top mounting screws and tilt the top back a bit to get to the front holes since they're above the sound bar. The plastic nuts underneath don't interfere with anything at this location.
After a trip to the mountain, topping out at 70 mph at one point, nothing moved and everything held tight. The top didn't even creak. As a note, the instructions (which were well-written and easy to understand, coming from a technical writer) say that the rail thru-holes should be 1/4" diameter, but that just seemed so large for how small the machine screws are. I reduced them to 7/32" after measuring the screw with a caliper. I know there's supposed to be room for sealant to squish down into, and I allowed for that, but 1/4" seemed way too large.
Any questions, feel free to ask.
Straight
