Magnacon build

 04-08-2014, 06:57 PM
#12
JK Super Freak
Thread Starter

So today was a good day. Got the hood back from paint today, new Odyssey batteries came in, Rotopax are here, and Genesis Offroad dual battery kit is here. Now all I have to do is start installing stuff and get out to Moab and hope nothing falls off! The pics should give everyone a better idea of where this is all going.
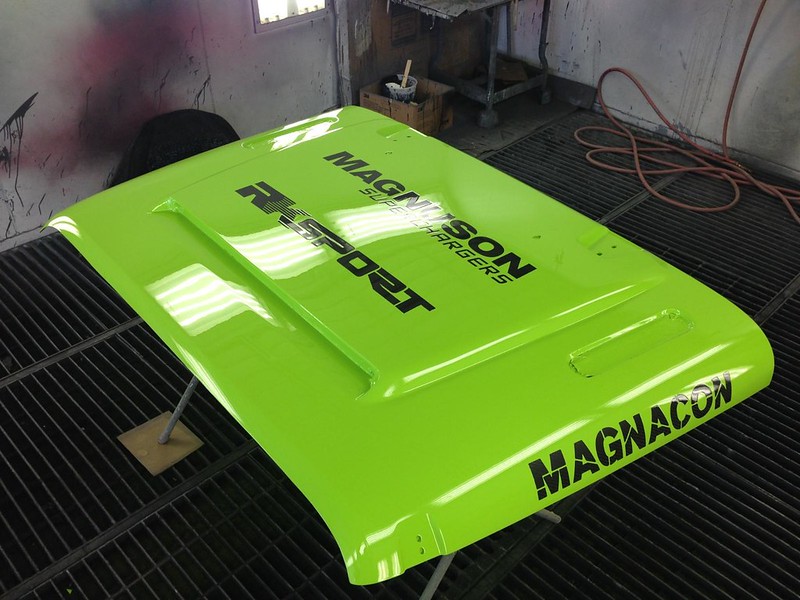
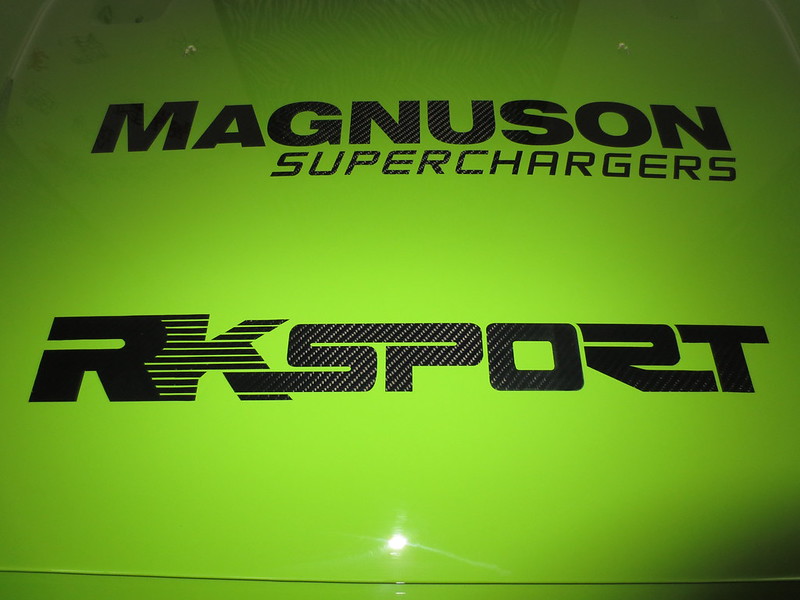
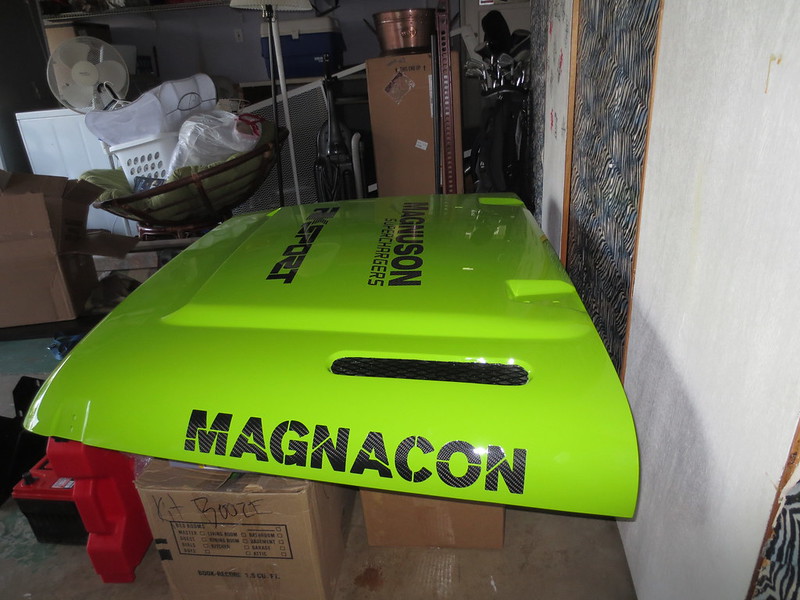
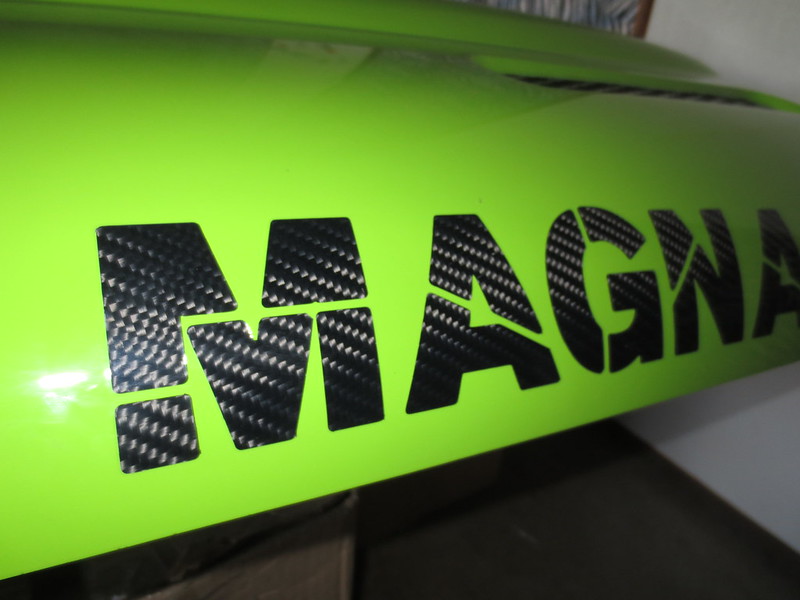
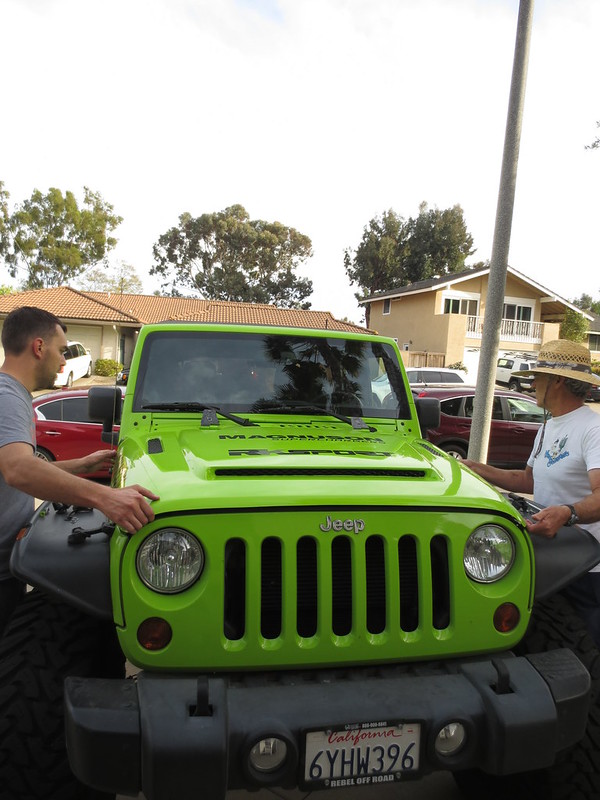
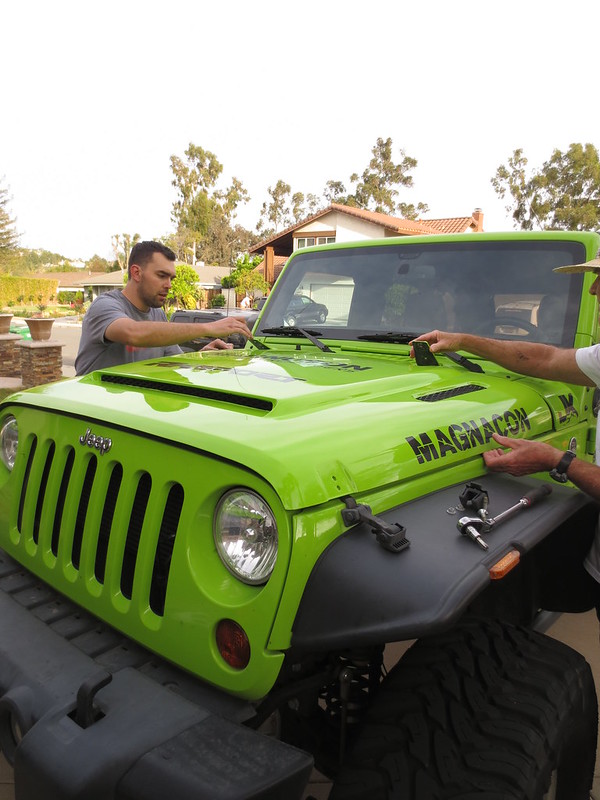
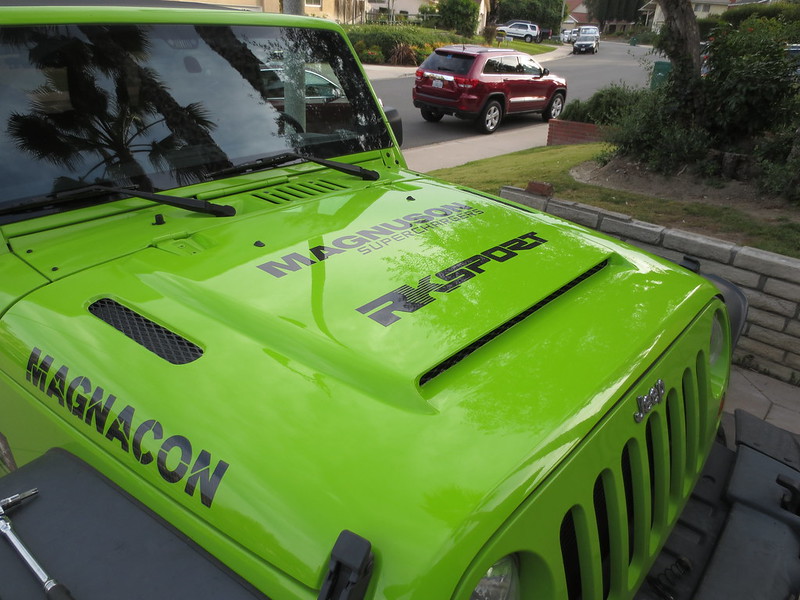
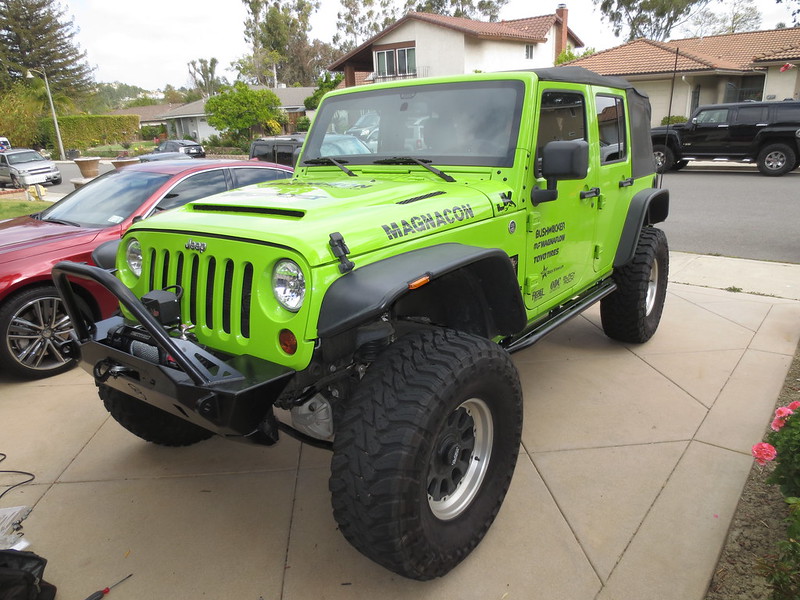
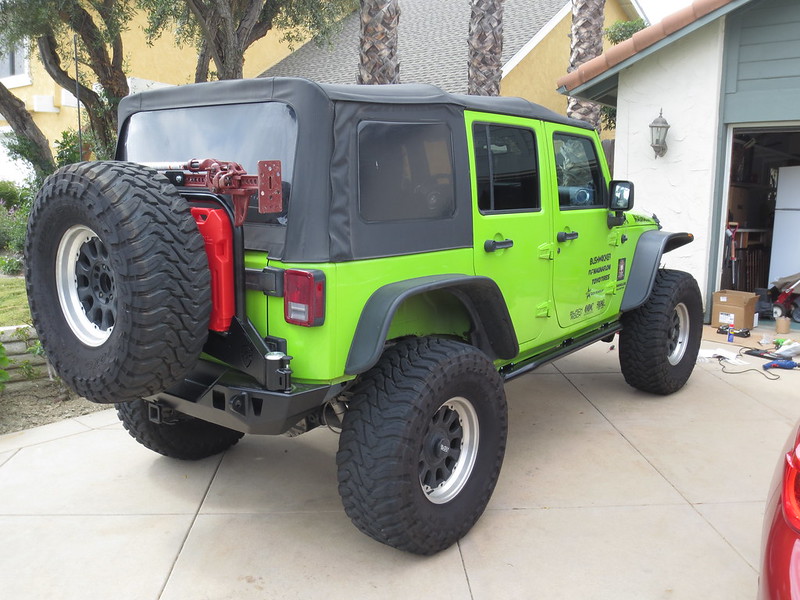
The hood is from RK Sport. It is fiberglass with a full hand laid carbon fiber upper. The hood is gorgeous in its natural state but my Jeep is gecko green and when we test fitted the hood it was just too much black for my taste. So what I did was had the hood scuffed and readied for paint. Then laid down the graphics. After the graphics I had the hood sprayed body color, then pulled the graphics and cleared the hood. So now the graphics are painted on and the carbon fiber comes through. Looks sweet in the sunlight.

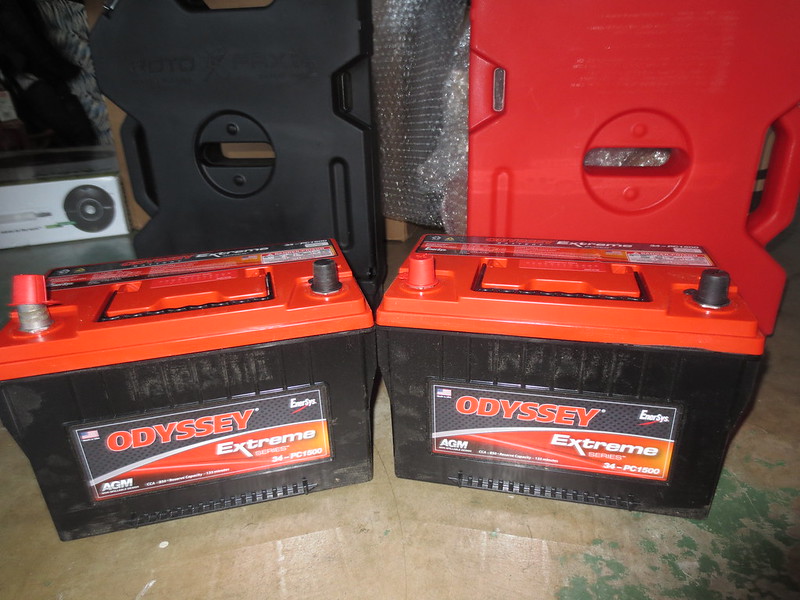
I am also installing the Genesis Offroad dual battery tray with two Odyssey batteries. This battery tray set up is gorgeous. It is well thought out and very well executed. I can't wait to install this thing.

One of the biggest parts of this build is the new Magnuson Supercharger 3.6 kit which is going on this vehicle. I was lucky enough to convince the Magnuson guys themselves to do the install. So if you are out at Moab EJS this year make sure to stop by the Magnuson booth during the vendor show. They will be doing the install LIVE AT THE SHOW. So if you have any questions about what is involved, you can watch it happen and ask any questions you have. More over I am going to be recording fuel mileage averages before and after the install. If there are any other things you would like me to monitor before and after the install, any pics you want, etc. post it up and I will do my best to get what you want to know.
The hood is from RK Sport. It is fiberglass with a full hand laid carbon fiber upper. The hood is gorgeous in its natural state but my Jeep is gecko green and when we test fitted the hood it was just too much black for my taste. So what I did was had the hood scuffed and readied for paint. Then laid down the graphics. After the graphics I had the hood sprayed body color, then pulled the graphics and cleared the hood. So now the graphics are painted on and the carbon fiber comes through. Looks sweet in the sunlight.
I am also installing the Genesis Offroad dual battery tray with two Odyssey batteries. This battery tray set up is gorgeous. It is well thought out and very well executed. I can't wait to install this thing.
One of the biggest parts of this build is the new Magnuson Supercharger 3.6 kit which is going on this vehicle. I was lucky enough to convince the Magnuson guys themselves to do the install. So if you are out at Moab EJS this year make sure to stop by the Magnuson booth during the vendor show. They will be doing the install LIVE AT THE SHOW. So if you have any questions about what is involved, you can watch it happen and ask any questions you have. More over I am going to be recording fuel mileage averages before and after the install. If there are any other things you would like me to monitor before and after the install, any pics you want, etc. post it up and I will do my best to get what you want to know.
04-10-2014, 07:22 PM
#13
JK Super Freak
Thread Starter
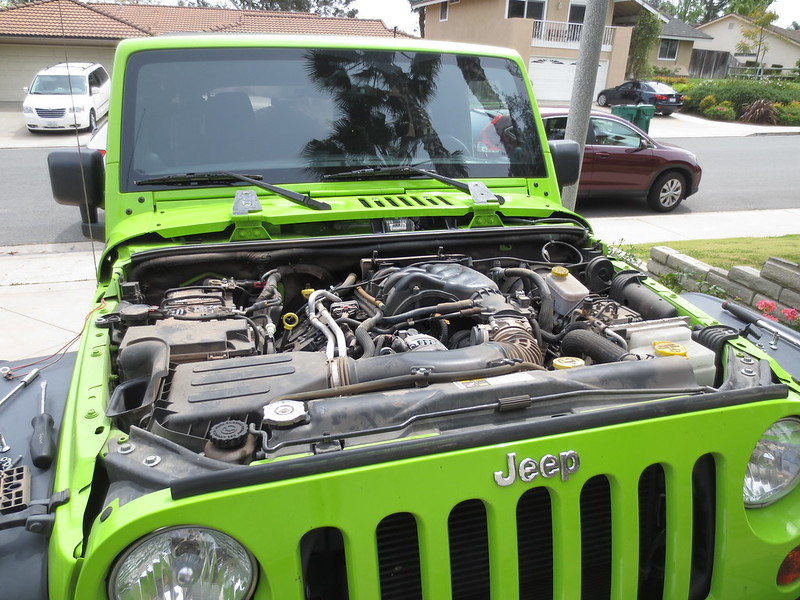
So I got started on my installs today. On the list today was getting the hood, Genesis dual battery kit and Odyssey batteries installed. So I'm starting out dead nuts stock.
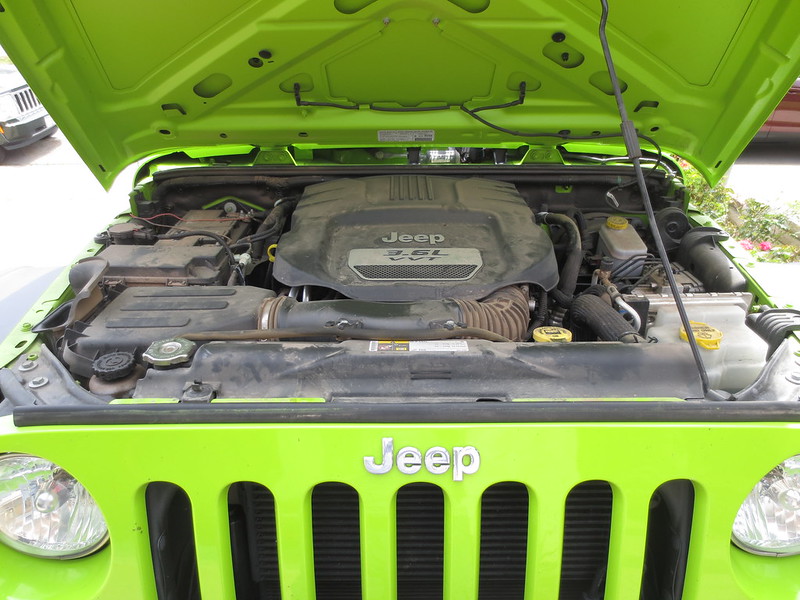
Granted it's a little dirty under there but hey it is a Jeep. The only thing under there that isn't stock is the 2 wires for my cb radio.

I like to make sure that I never wrench alone so I made sure that my spotter was on hand to help out!
First things first, off with the stock hood since it is getting replaced anyways and it gives me more room for the battery tray work.
Next thing out of the engine compartment is the air box and intake tube assemblies.
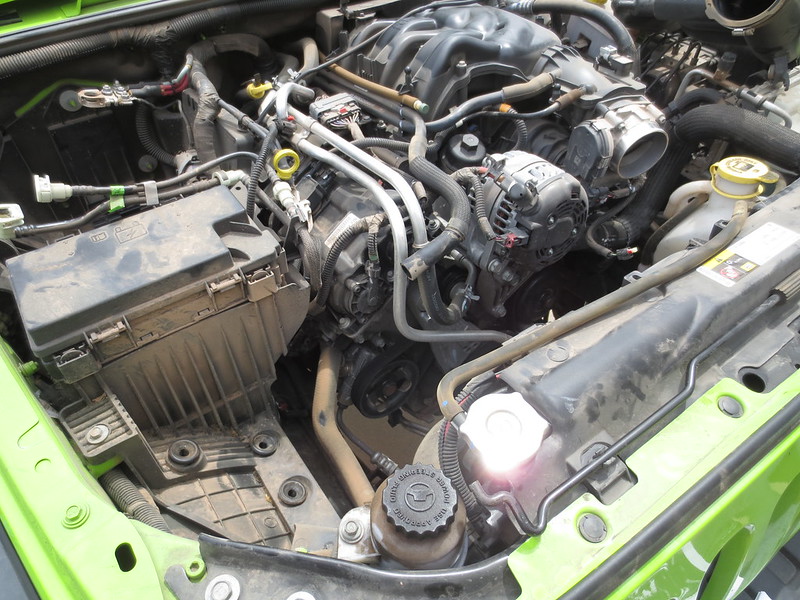
Then the battery and Evap valve both came out.
Next the PCM came out. It looks like more of a mess than it really is!
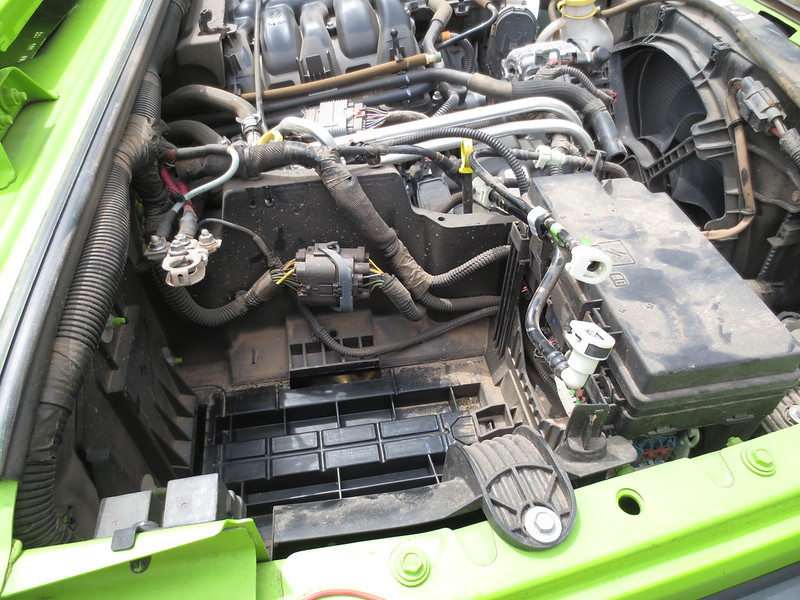
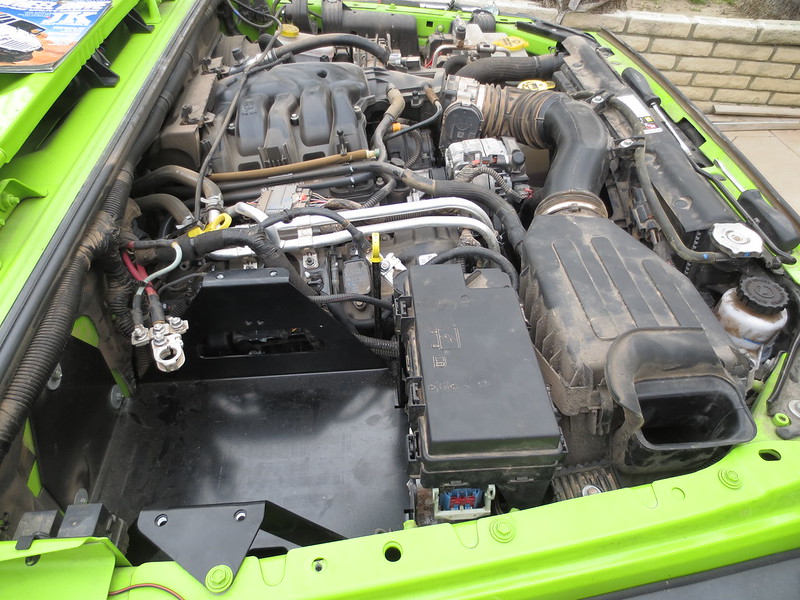
Got the battery tray pulled and out of the way.
Probably the hardest part of the job was getting the stock battery box assembly cut down so that I could use just the air box mounting piece.
Got the new battery box assembly installed and the PCM reinstalled.
The other hard part of the install was figuring out the Evap solenoid valve and hose routing. But I got that squared away.
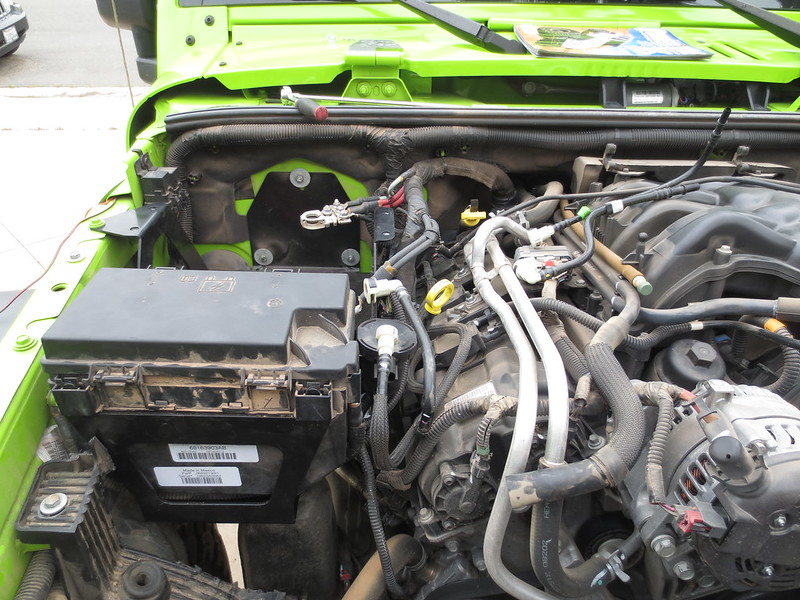
Granted it's a little dirty under there but hey it is a Jeep. The only thing under there that isn't stock is the 2 wires for my cb radio.
I like to make sure that I never wrench alone so I made sure that my spotter was on hand to help out!
First things first, off with the stock hood since it is getting replaced anyways and it gives me more room for the battery tray work.
Next thing out of the engine compartment is the air box and intake tube assemblies.
Then the battery and Evap valve both came out.
Next the PCM came out. It looks like more of a mess than it really is!
Got the battery tray pulled and out of the way.
Probably the hardest part of the job was getting the stock battery box assembly cut down so that I could use just the air box mounting piece.
Got the new battery box assembly installed and the PCM reinstalled.
The other hard part of the install was figuring out the Evap solenoid valve and hose routing. But I got that squared away.
04-10-2014, 07:37 PM
#14
JK Super Freak
Thread Starter
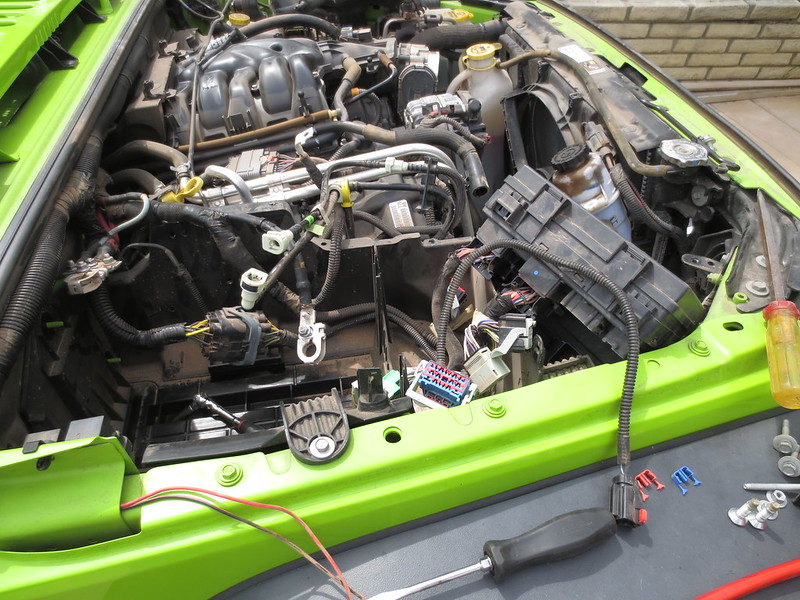
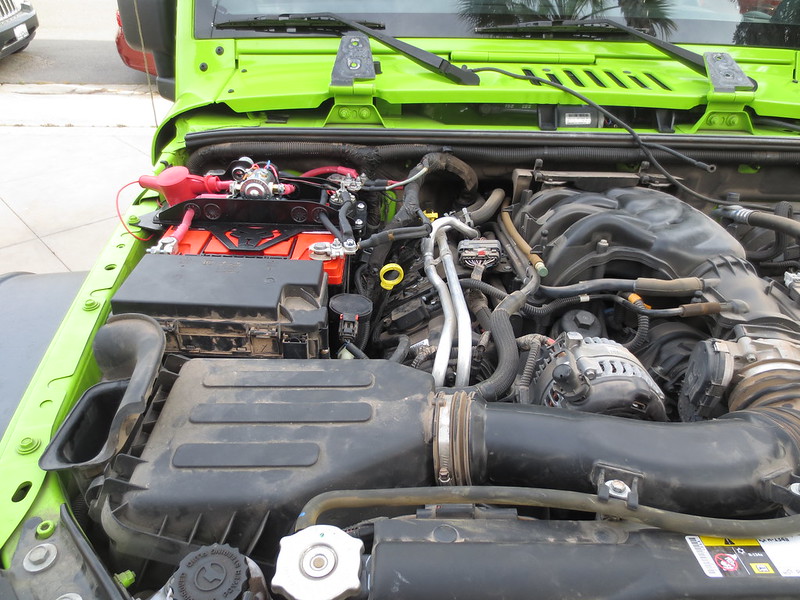
Got the intake system all put back together.
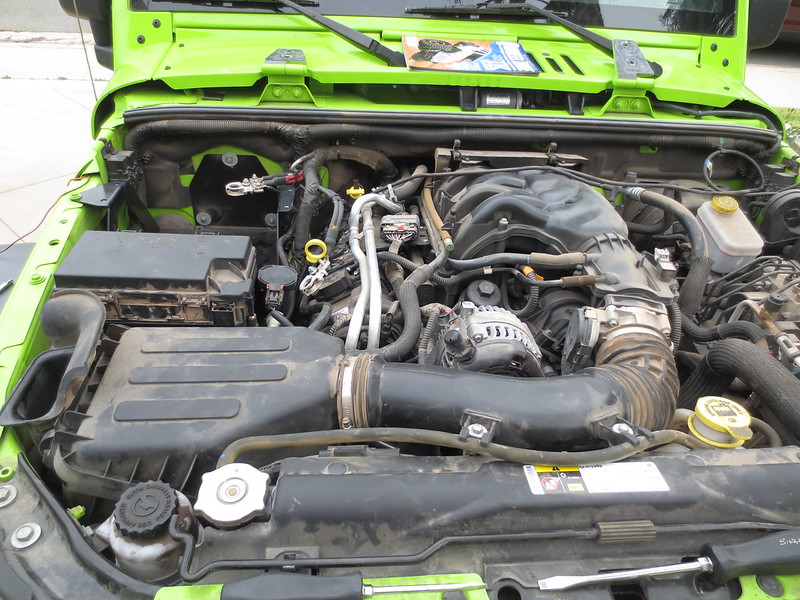
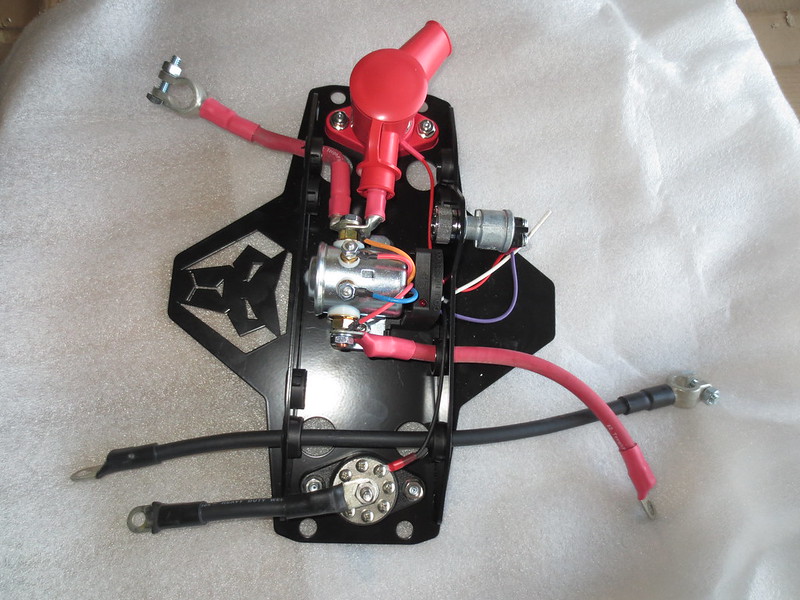
Minus the batteries and the top piece this is what the completed install looks like. I'm very pleased. The system is well thought out and makes for a like factory install.
Next in are the 2 Odyssey group 34 batteries and man they fit in there snug.
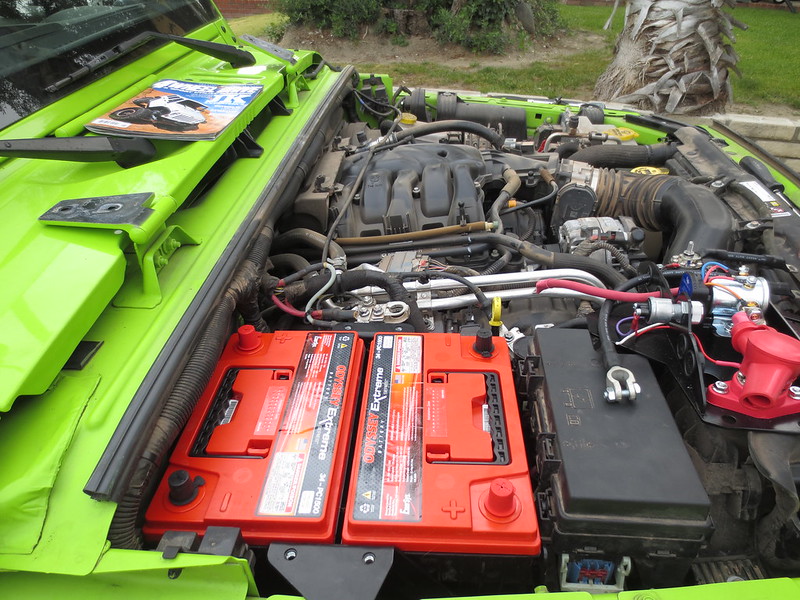
Top piece installed and batteries all connected up. Pretty straight forward on the installation.
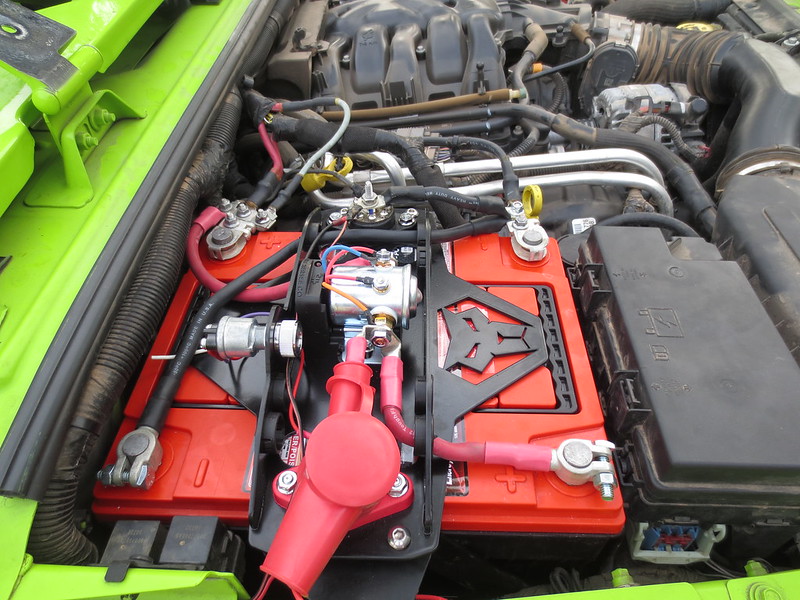
Installation complete. All said and done it took about 3 hours. But you figure in time taking pics, dealing with the dog and meeting a chatty new neighbor it was probably more along the lines of 2.5 hours. The install is pretty straight forward and the instructions to a great job of taking you step by step through the install. If your looking a dual battery system this one is hands down the most complete and well thought out system on the market. It takes out all the guess work involved in finding the right electronics to connect the batteries and it comes prewired with it's own jump starting button which is a nice touch should I ever need it.
Minus the batteries and the top piece this is what the completed install looks like. I'm very pleased. The system is well thought out and makes for a like factory install.
Next in are the 2 Odyssey group 34 batteries and man they fit in there snug.
Top piece installed and batteries all connected up. Pretty straight forward on the installation.
Installation complete. All said and done it took about 3 hours. But you figure in time taking pics, dealing with the dog and meeting a chatty new neighbor it was probably more along the lines of 2.5 hours. The install is pretty straight forward and the instructions to a great job of taking you step by step through the install. If your looking a dual battery system this one is hands down the most complete and well thought out system on the market. It takes out all the guess work involved in finding the right electronics to connect the batteries and it comes prewired with it's own jump starting button which is a nice touch should I ever need it.
04-10-2014, 07:49 PM
#15
JK Super Freak
Thread Starter
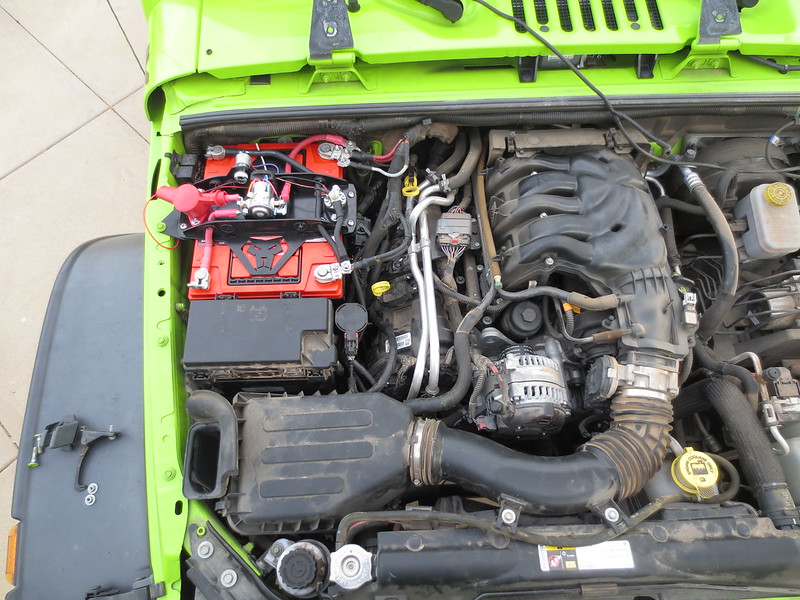
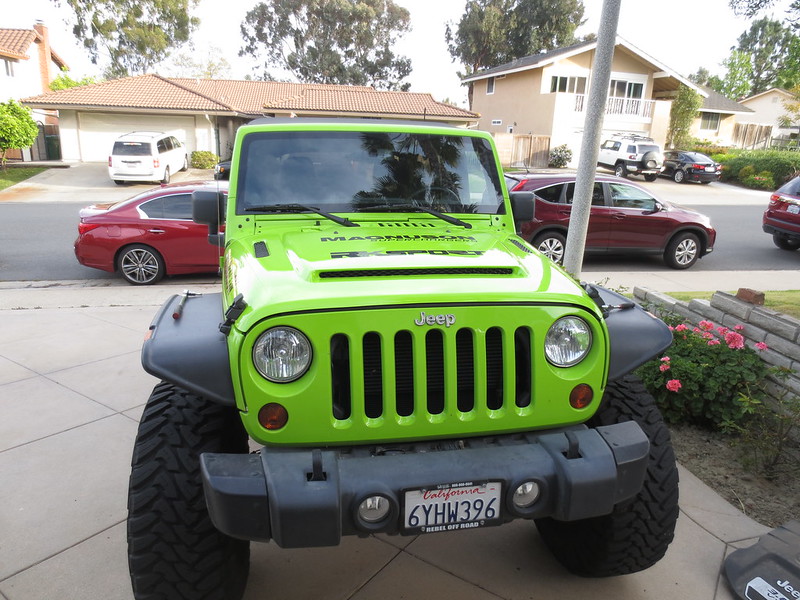
Once the battery kit was done and I tested that all electronics worked it was just a matter of slappin' on the new hood and getting it adjusted. I have to say that I love the look and quality of the RK Sport hood. I personally feel that it is a good change of pace from the other hoods out there. I do like the other hoods on the market but I wanted something that made my Jeep stand out from the crowd a little more. I really like how the hood fits and the fact that it already has the holes for the washers. Then there is the obvious fact that it just looks awesome!
I am super pumped about how the Jeep is turning out. Now I just have to hope that all the rest of the pieces fall into place in a timely manor. Hoping to get the armor half way done tomorrow if not farther. So stay tuned things change again tomorrow!

I am super pumped about how the Jeep is turning out. Now I just have to hope that all the rest of the pieces fall into place in a timely manor. Hoping to get the armor half way done tomorrow if not farther. So stay tuned things change again tomorrow!
04-11-2014, 08:13 PM
#17
JK Super Freak
Thread Starter
So it was another busy Jeep day. Started the morning off by going to 4 Wheel Parts to pick up my new Smittybilt XRC 9500 lbs winch. While I was waiting to pick up the winch I got a call from the powder coaters to let me know that my parts were done. Good thing was they are on the way back home. So I came back with a van full of Jeep parts.
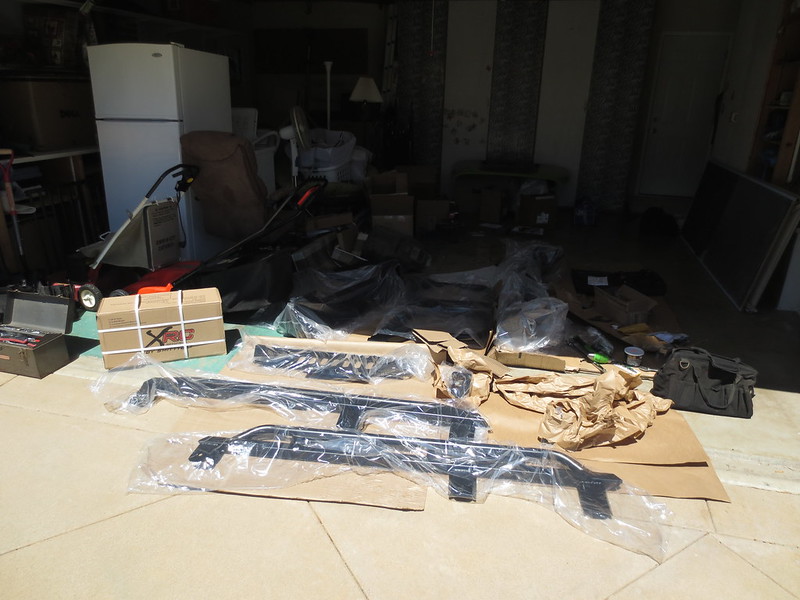
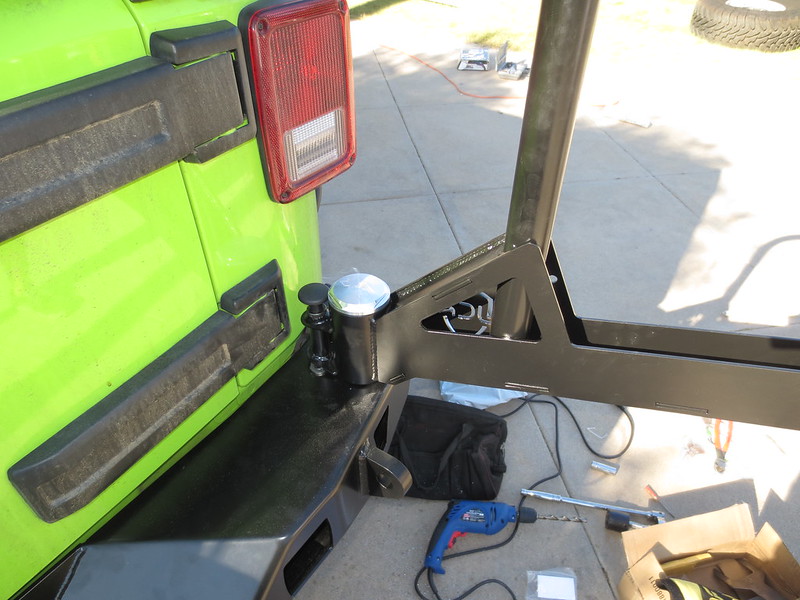
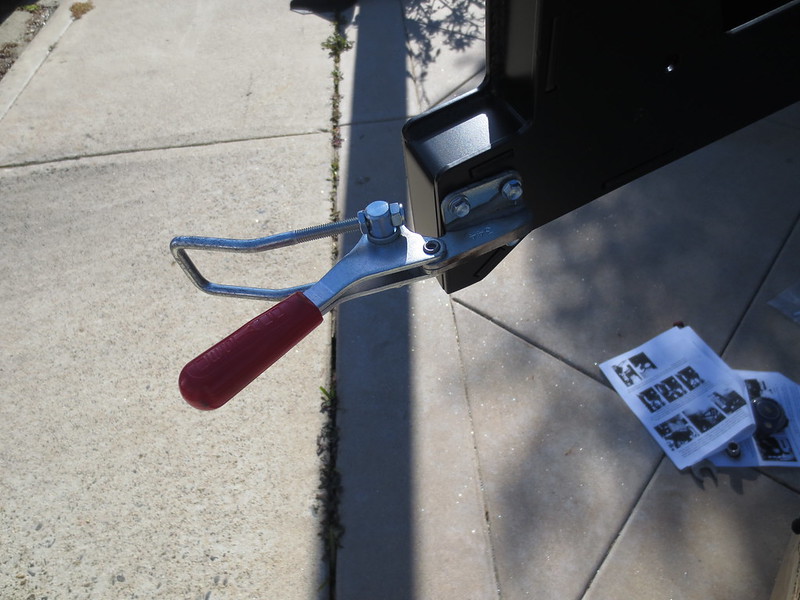
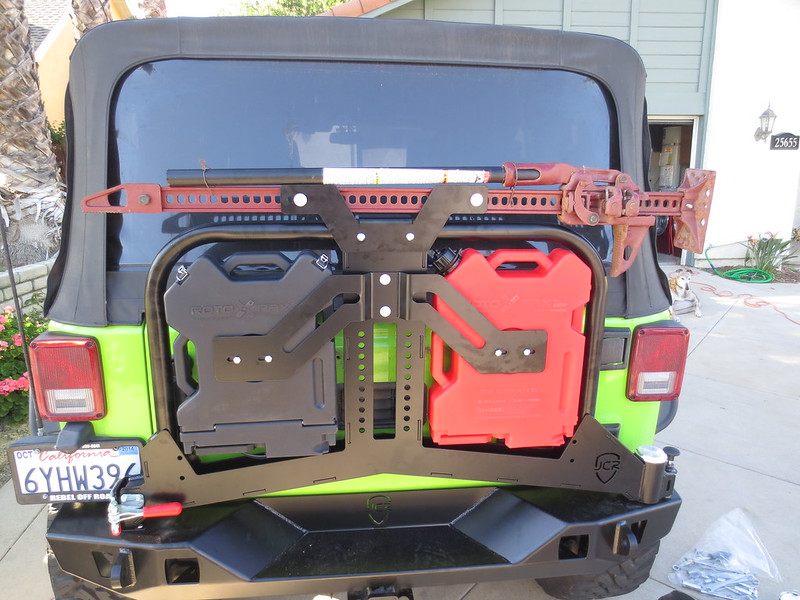
Started by pulling my old Smittybilt oversized tire carrier and I was already running no rear bumper. I fit the rear bumper to verify fitment and then started drilling for the mounting holes. I had to kind of wing it being as my printer didn't print out my drilling template quite right. So lots of measuring and fitting and drilling. But I finally got it mounted, then took it off again to mount the tire carrier spindle. Had to do a little adjusting do to the powder coat being too thick. But I finally got it on there.
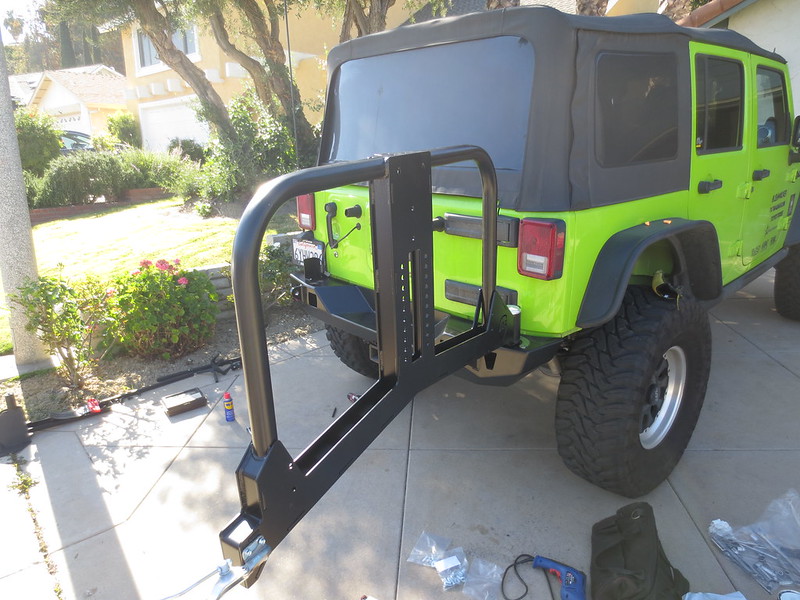
Pretty damn fine set up if you ask me. The welds and the workmanship on all the parts that I got from JCR Offroad were top notch. Everything went together as it should and was pretty straight forward. If you are mechanically inclined you could totally tackle this yourself. With the help of a friend or two just for some lifting and fitting help.
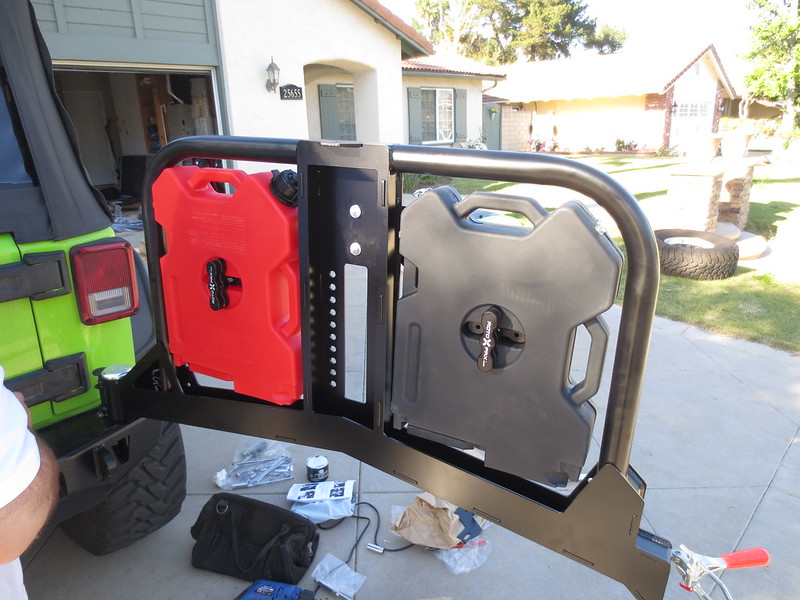
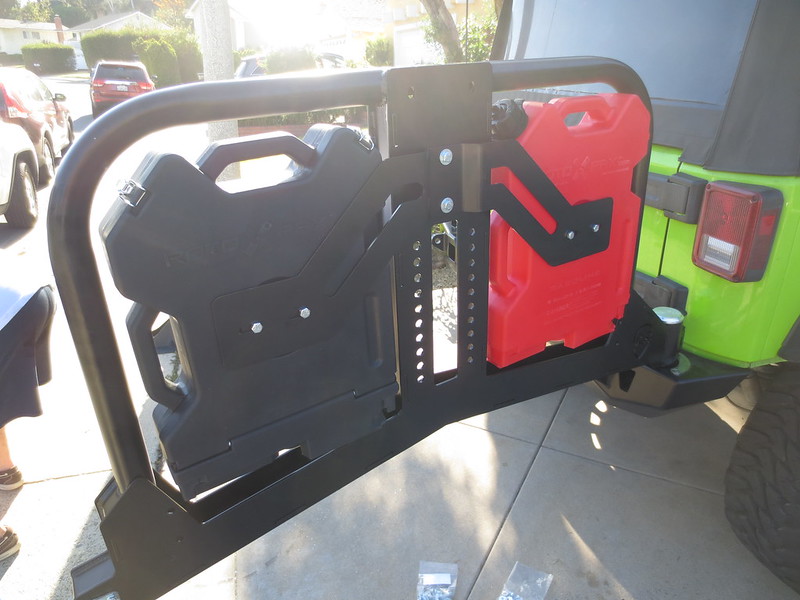
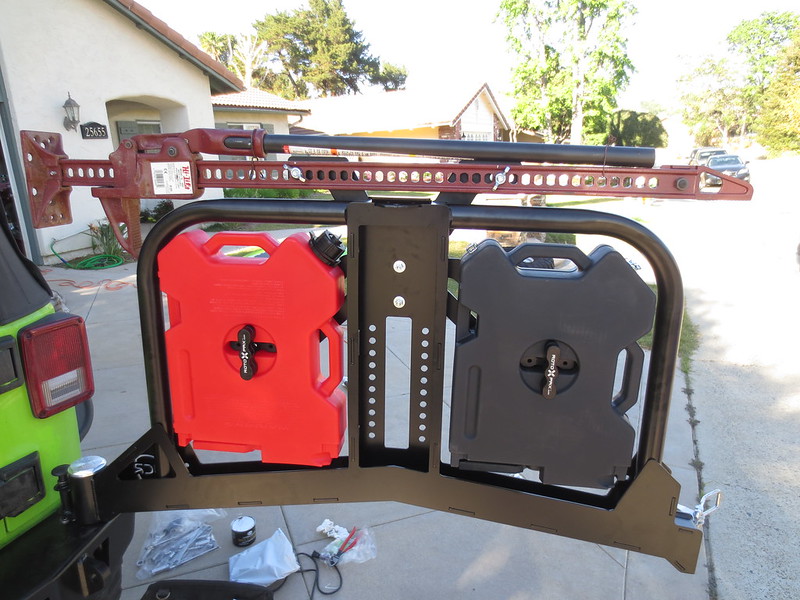
After the base carrier was installed it was time to install the Rotopax mount. Again pretty straight forward. Just bolt on and adjust.
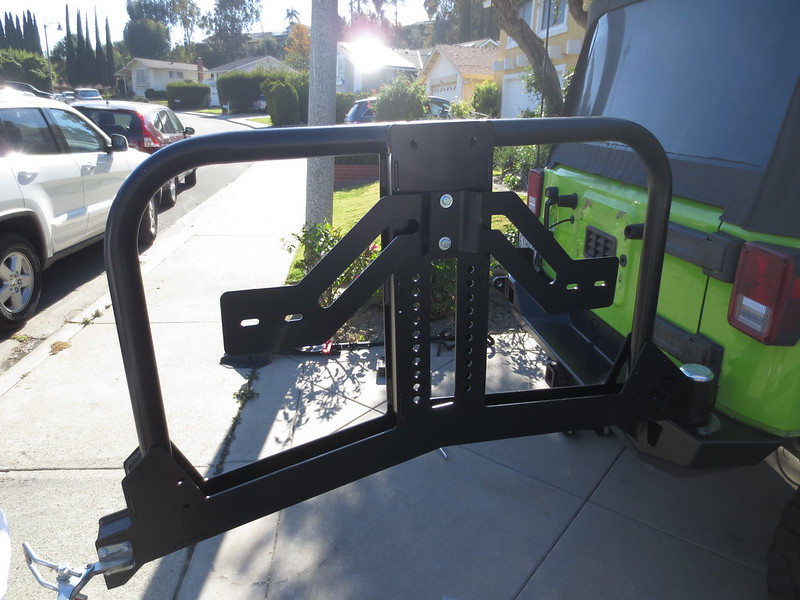

After that the hi lift jack mount went on. Again just bolt it on.
Started by pulling my old Smittybilt oversized tire carrier and I was already running no rear bumper. I fit the rear bumper to verify fitment and then started drilling for the mounting holes. I had to kind of wing it being as my printer didn't print out my drilling template quite right. So lots of measuring and fitting and drilling. But I finally got it mounted, then took it off again to mount the tire carrier spindle. Had to do a little adjusting do to the powder coat being too thick. But I finally got it on there.
Pretty damn fine set up if you ask me. The welds and the workmanship on all the parts that I got from JCR Offroad were top notch. Everything went together as it should and was pretty straight forward. If you are mechanically inclined you could totally tackle this yourself. With the help of a friend or two just for some lifting and fitting help.
After the base carrier was installed it was time to install the Rotopax mount. Again pretty straight forward. Just bolt on and adjust.
After that the hi lift jack mount went on. Again just bolt it on.
04-11-2014, 08:29 PM
#18
JK Super Freak
Thread Starter
Next up was the spare tire mount. All I had to do was measure my tire size and adjust for depth. Hardest part was getting the tire on! 37 inch Toyo's are heavy.
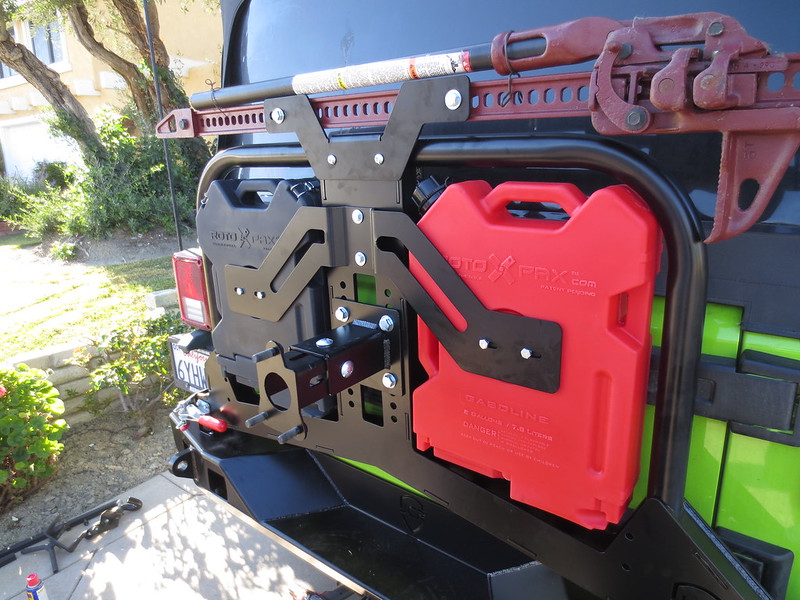
And that was it. Time consuming? Oh yeah. Test fit, check, test fit again, check, remove powder coat, drill holes, etc. you get the picture. All said and done it took about 3 or 4 hours to get the rear bumper and tire carrier on. Which personally I don't think is too bad at all. I can tell you that the tire carrier works great.
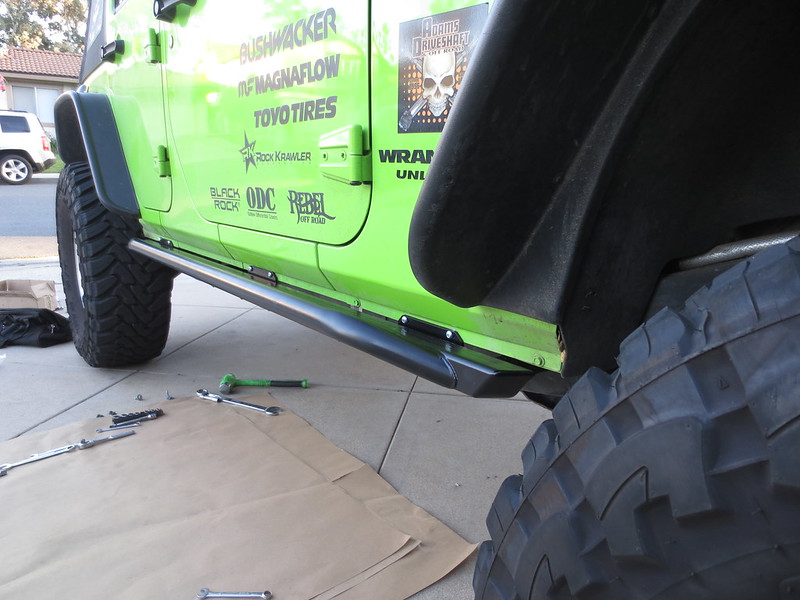
Next up was the rocker guards. I went with the Classic bolt on sliders. Install was super easy other than having to convince a few bolts into place. But that was do more to my poor driving skills than the product. Basically, remove the Rubicon sliders if you have them.
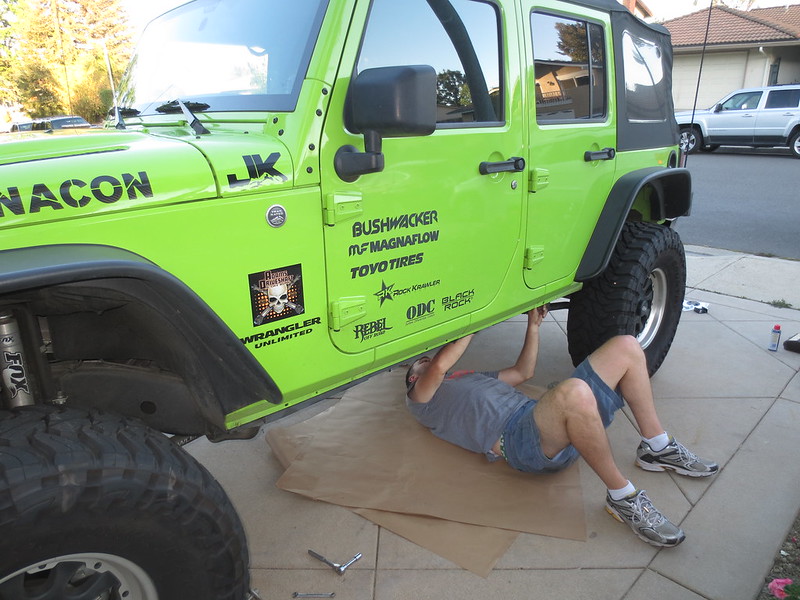
Remove the body mount bolts and install the new sliders. That's about it. 3 body bolts and 6 pinch seam bolts is what holds these on. So it's pretty easy to install as long as you have someone to help hold the slider.
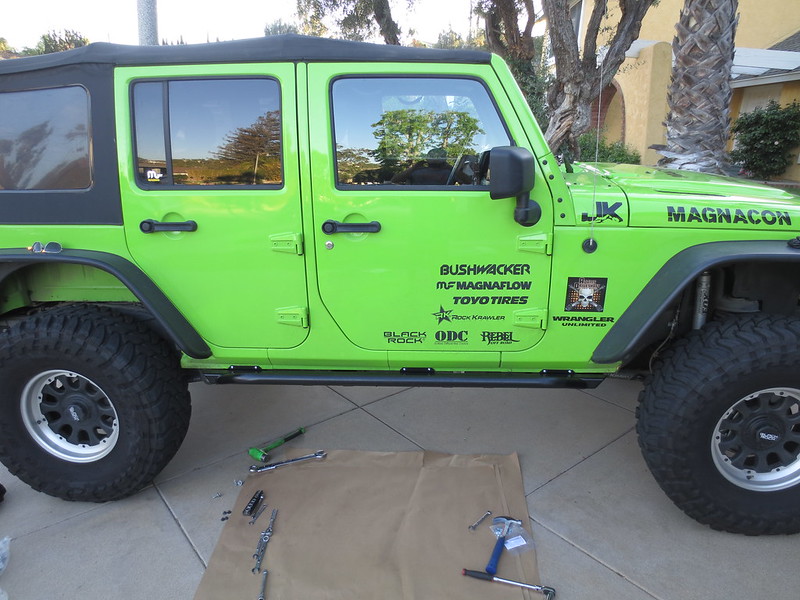
So tomorrow is front bumper, skid plate and winch day. I think that's all I have left to install. I don't know right now. Spent a lot of time under the Jeep today so I'm a little spent. Time to get some rest and get at it again tomorrow. As a side note should you intend on doing this job outside, make sure that you have sun screen near by. I forgot and I am totally paying for it right now. Man my knees feel like they're on fire! See you tomorrow.
And that was it. Time consuming? Oh yeah. Test fit, check, test fit again, check, remove powder coat, drill holes, etc. you get the picture. All said and done it took about 3 or 4 hours to get the rear bumper and tire carrier on. Which personally I don't think is too bad at all. I can tell you that the tire carrier works great.
Next up was the rocker guards. I went with the Classic bolt on sliders. Install was super easy other than having to convince a few bolts into place. But that was do more to my poor driving skills than the product. Basically, remove the Rubicon sliders if you have them.
Remove the body mount bolts and install the new sliders. That's about it. 3 body bolts and 6 pinch seam bolts is what holds these on. So it's pretty easy to install as long as you have someone to help hold the slider.
So tomorrow is front bumper, skid plate and winch day. I think that's all I have left to install. I don't know right now. Spent a lot of time under the Jeep today so I'm a little spent. Time to get some rest and get at it again tomorrow. As a side note should you intend on doing this job outside, make sure that you have sun screen near by. I forgot and I am totally paying for it right now.
Man my knees feel like they're on fire! See you tomorrow.
04-14-2014, 03:52 PM
#19
JK Super Freak
Thread Starter
Well I didn't get a chance to update the build before I left for Moab. So now that I'm off the trail I figured that I would show the front bumper, skid plate and winch install. Obviously I got started by getting rid of the front bumper and frame cover piece. I'm not quite sure what to call that piece of plastic that goes behind the front bumper so I 'm just going to call it that. Anyway, front bumper off.
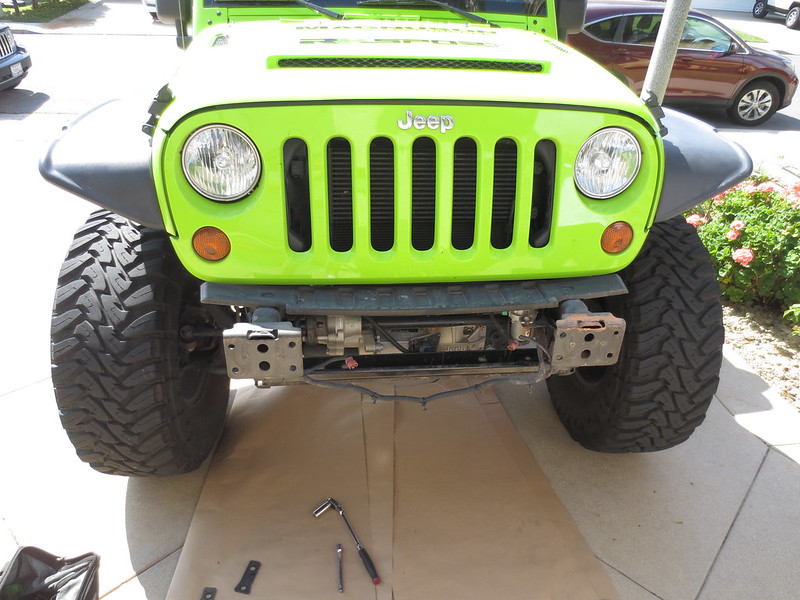
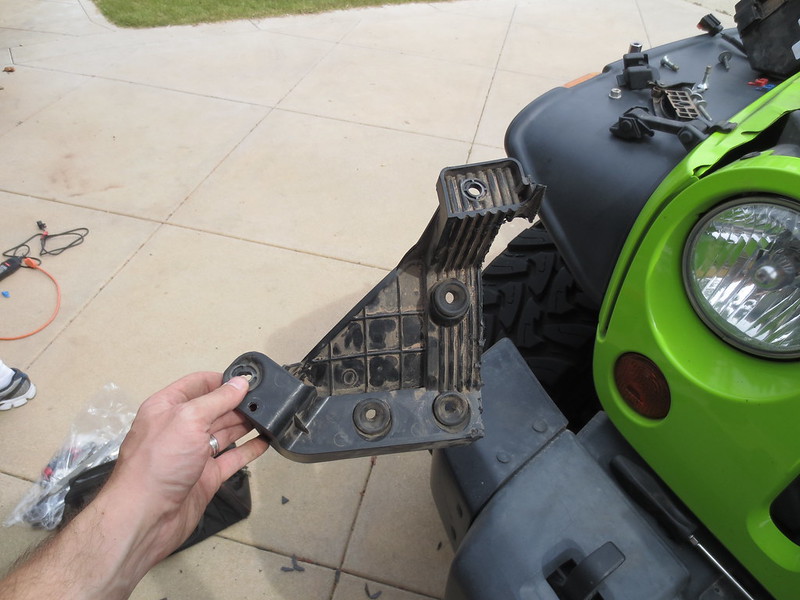
I didn't get any pictures of me removing the vacuum pump mount, mostly because I was too frustrated! Ever tried cutting off that mount with a Dremel Tool? No? Take my advice....don't. Talk about long, tedious, and irritating. But it finally came off. Got the relocation bracket installed then mounted the new JCR Offroad Mauler stubby bumper.
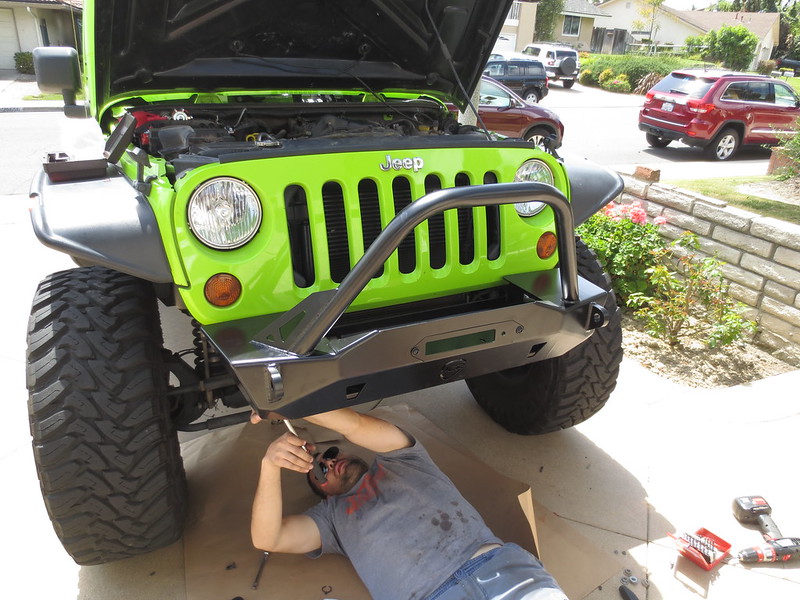
Here you can get an indea of how the vacuum pump gets relocated behind the bumper.

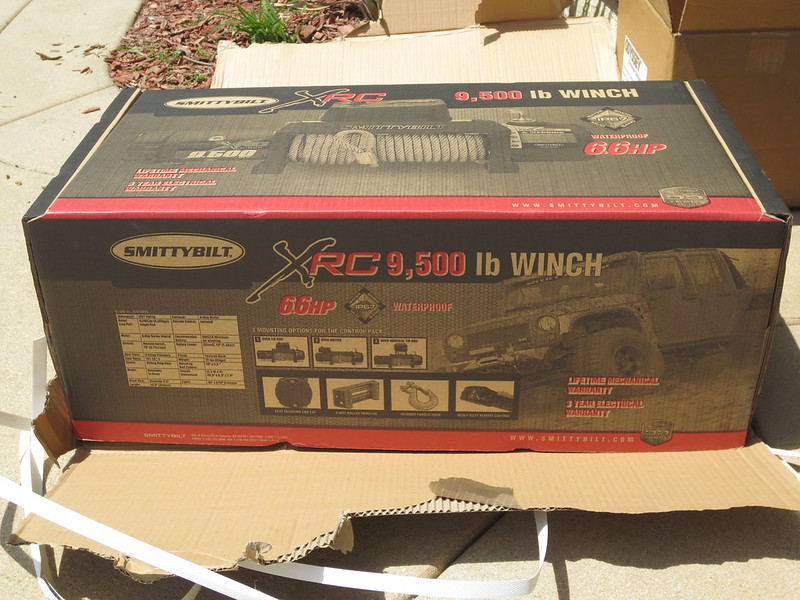
After the bumper was in place it was time for the winch. So I got the new Smittybilt XRC 9500 lbs winch. I figured that it should work good for as often as I use a winch. The winch seems like it is well built and was very straight forward to install. So I guess time will tell on the winch. I need to find a reason to use it and test it out!
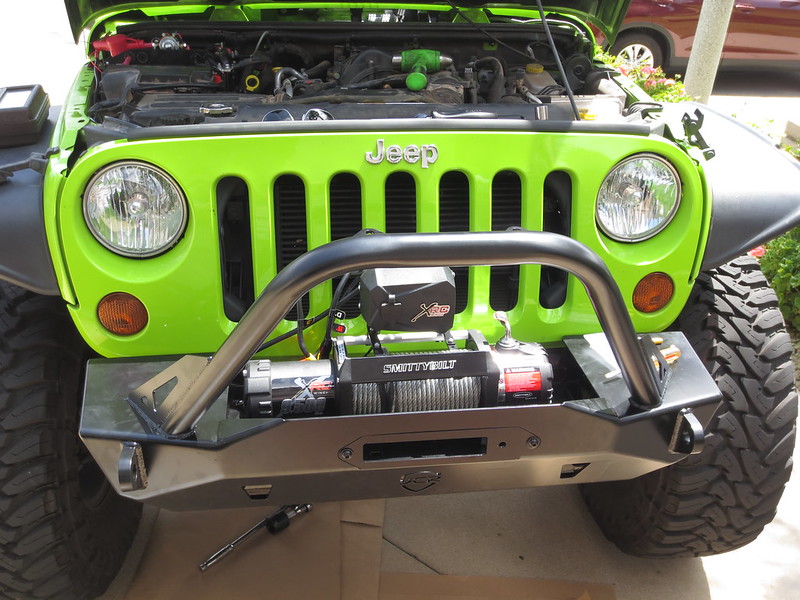
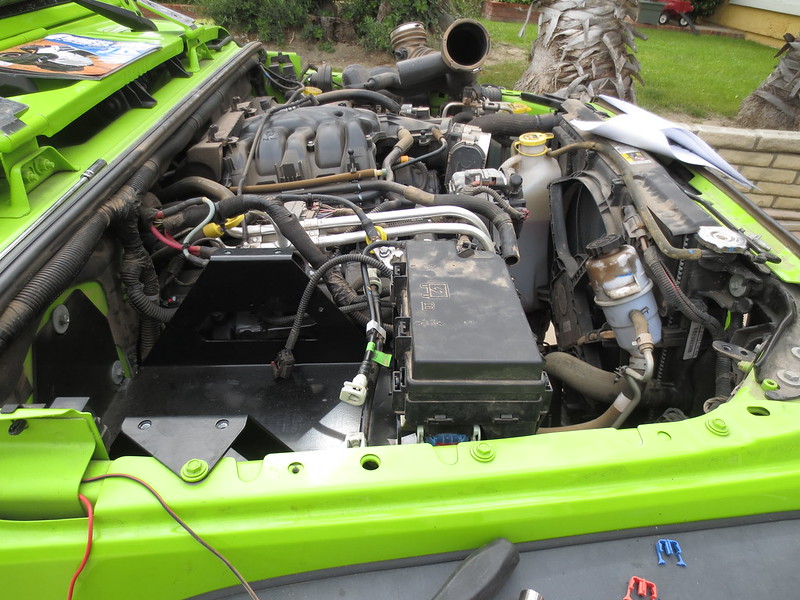
Once the winch was installed it was time for the bottom skid plate for the front bumper. Installation was literally four bolts. The hardest four bolts of my life! Not really but by this point I was ready to be done.
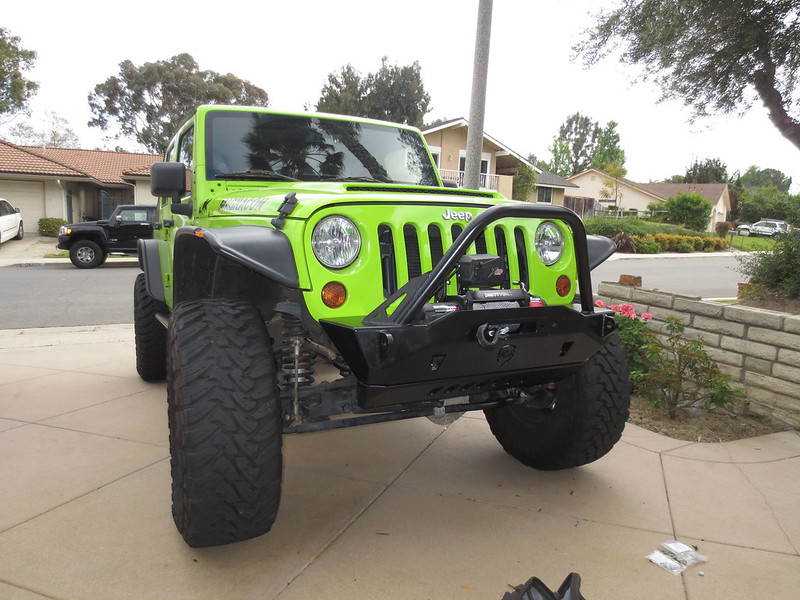
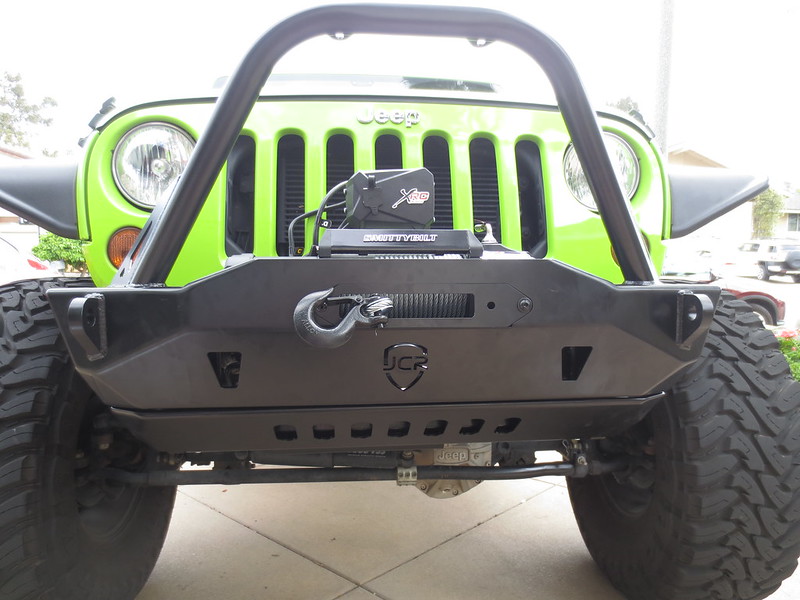
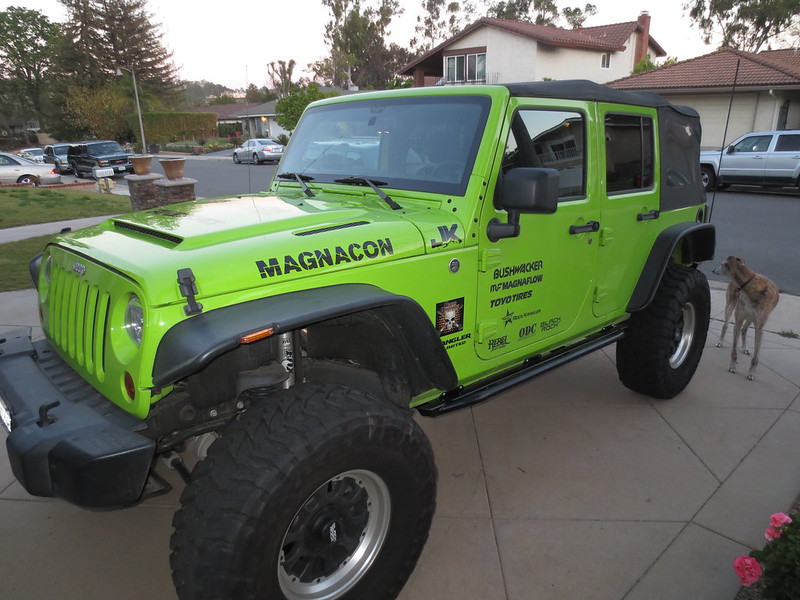
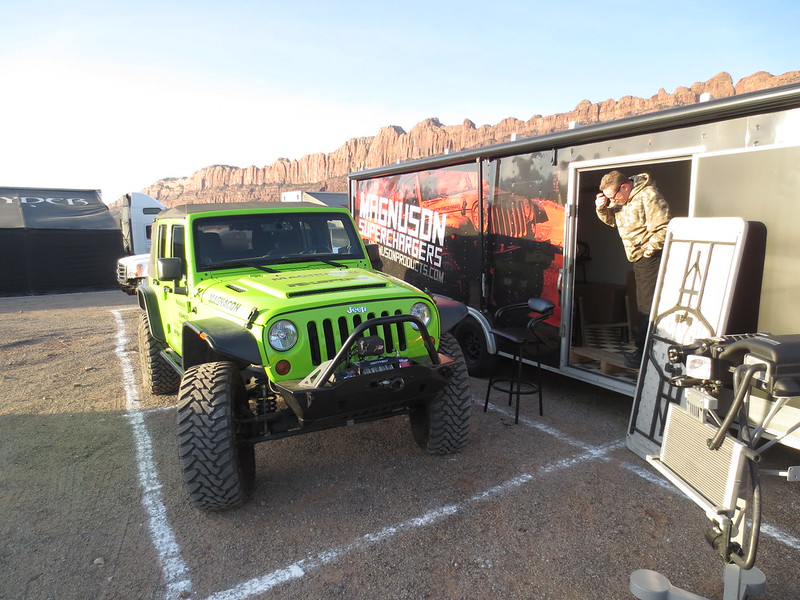
So here it is. Mostly done and ready to go to Moab. The only thing left to install is the new Magnuson Supercharger. However, the guys at Magnuson will be doing the actual install on that during the Easter Jeep Safari vendor show on Thursday and Friday. So if your in Moab swing by and check it out. Otherwise I will try to snap some pics of the install, mostly I'm just going to try to not be in their way!
I didn't get any pictures of me removing the vacuum pump mount, mostly because I was too frustrated! Ever tried cutting off that mount with a Dremel Tool? No? Take my advice....don't. Talk about long, tedious, and irritating. But it finally came off. Got the relocation bracket installed then mounted the new JCR Offroad Mauler stubby bumper.
Here you can get an indea of how the vacuum pump gets relocated behind the bumper.
After the bumper was in place it was time for the winch. So I got the new Smittybilt XRC 9500 lbs winch. I figured that it should work good for as often as I use a winch. The winch seems like it is well built and was very straight forward to install. So I guess time will tell on the winch. I need to find a reason to use it and test it out!
Once the winch was installed it was time for the bottom skid plate for the front bumper. Installation was literally four bolts. The hardest four bolts of my life! Not really but by this point I was ready to be done.
So here it is. Mostly done and ready to go to Moab. The only thing left to install is the new Magnuson Supercharger. However, the guys at Magnuson will be doing the actual install on that during the Easter Jeep Safari vendor show on Thursday and Friday. So if your in Moab swing by and check it out. Otherwise I will try to snap some pics of the install, mostly I'm just going to try to not be in their way!
04-17-2014, 03:34 PM
#20
JK Super Freak
Thread Starter
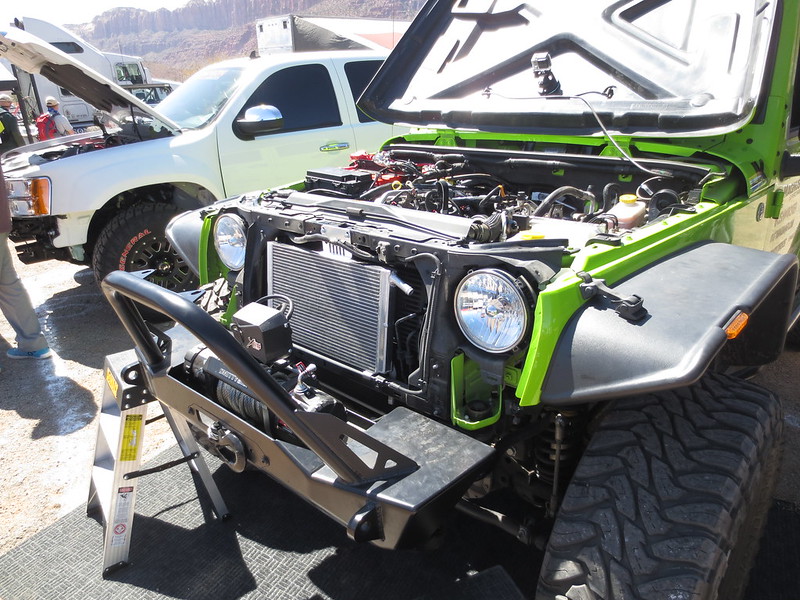
Project Magnacon got dropped off with the nice folks over at Magnuson Superchargers today. I met up with them last night to extract the stock tune from the vehicle and got to talk with them a little. Hands down some of the nicest people that I have met. I have been really lucky with my build to involve some real top flight companies but more over I have been able to meet some really genuine people in my dealings. I got to meet the boys from JCR Offroad today as well and again very nice guys. I got to chat with them and talk wheeling, they were all well informed and more than willing to talk with me. But on to the install.
The Jeep got dropped off this morning at 7 am for the vendor show and install. All of the folks at Magnuson are very friendly and more than willing to answer any questions, even a few dumb ones I had. These guys totally know their stuff.
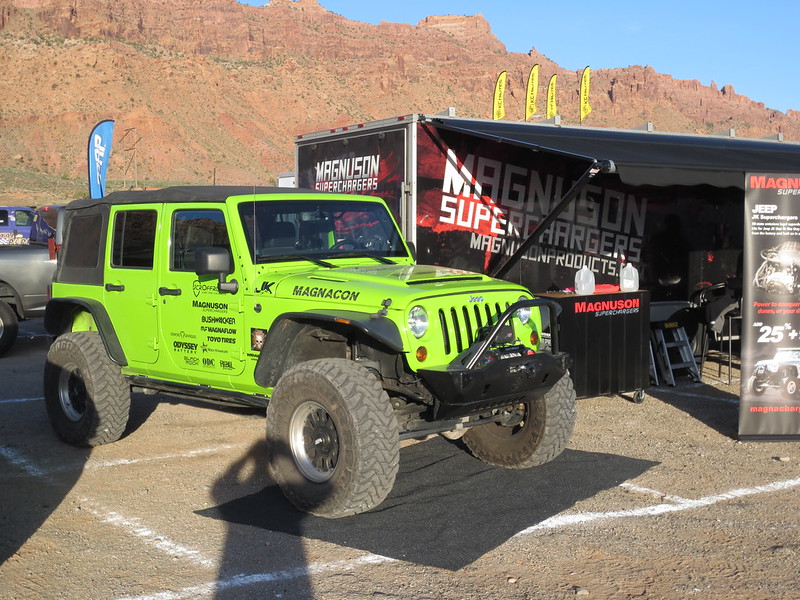
They started by pulling the grill to install the heat exchanger. They even went as far as to machine in the front end of a Jeep onto the mounting bracket. Like I said, detail oriented.
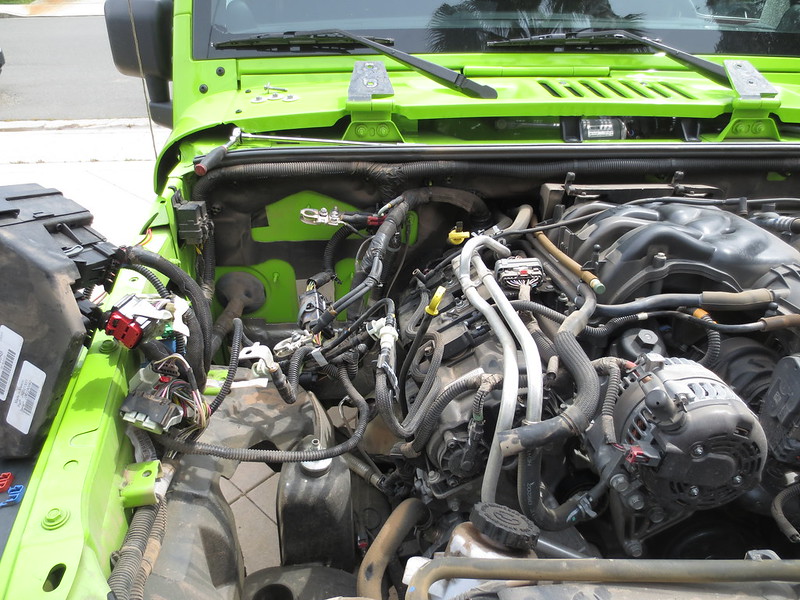
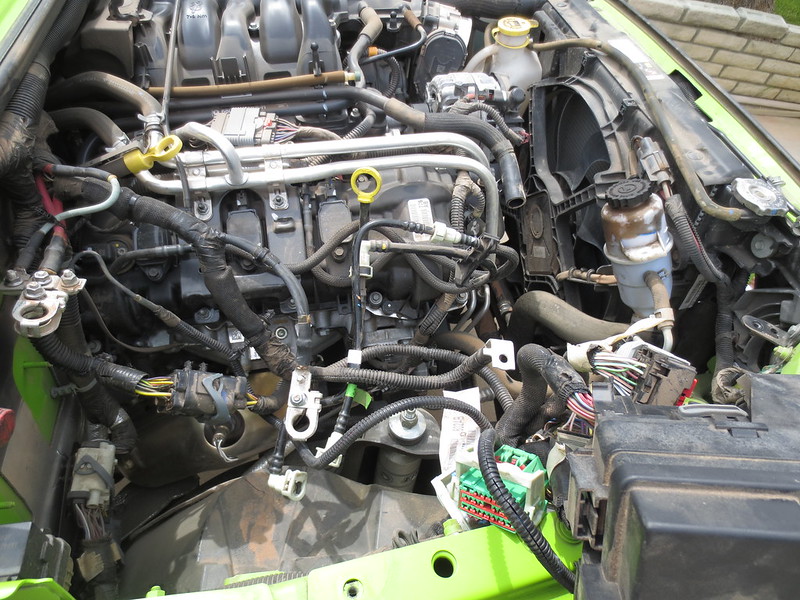
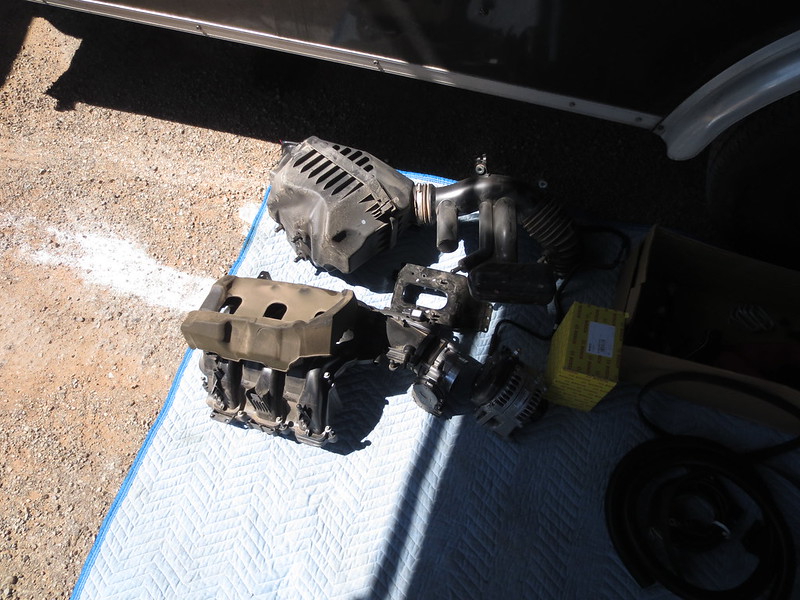
After that, off came the stock intake hose, airbox and intake manifold.
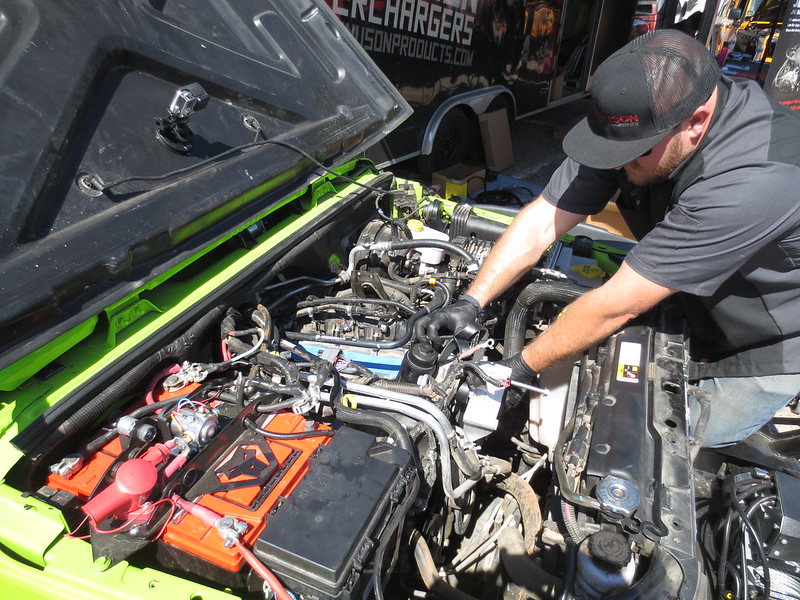
As you can tell parts are coming off quick!
Once I get back over to the show I will grab some more pics of what's going on.
The Jeep got dropped off this morning at 7 am for the vendor show and install. All of the folks at Magnuson are very friendly and more than willing to answer any questions, even a few dumb ones I had. These guys totally know their stuff.
They started by pulling the grill to install the heat exchanger. They even went as far as to machine in the front end of a Jeep onto the mounting bracket. Like I said, detail oriented.
After that, off came the stock intake hose, airbox and intake manifold.
As you can tell parts are coming off quick!
Once I get back over to the show I will grab some more pics of what's going on.