Advance Adapters Shifter Cable Upgrade Write Up!!!
 09-20-2011, 10:38 AM
#1
JK Junkie
Thread Starter
First Off, a huge thanks out to Advance Adapters for hooking up this brand new cable assembly for free!!!
It was a very interesting install and required a lot of patience and overall after the console was removed was very simple.
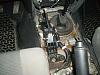
Ok, step 1, remove four t30 bolts from the driver and passenger side of the console on the front and rear side of the seats.
For me, I have a six speed and had to remove both shifter handles, the shifter boot and the entire console assembly.
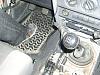
After that, I decided to remove the shifter Assembly from the floor using a 3/8" drive ratchet, 3" extension, and a 10mm deep socket.

It was a very interesting install and required a lot of patience and overall after the console was removed was very simple.
Ok, step 1, remove four t30 bolts from the driver and passenger side of the console on the front and rear side of the seats.
For me, I have a six speed and had to remove both shifter handles, the shifter boot and the entire console assembly.
After that, I decided to remove the shifter Assembly from the floor using a 3/8" drive ratchet, 3" extension, and a 10mm deep socket.
 09-20-2011, 10:43 AM
#2
JK Junkie
Thread Starter
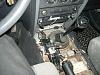
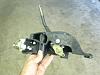
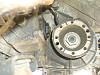
After the shifter was removed, I took it inside to get it on the bench/floor and lay it all out to work on and take pics.

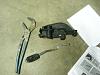
I used a pair of large channel locks, a punch tool and a BFH to knock out both pins that need to be reused and pushed back in to the new billet assembly. Be very careful not to lose the spring and plastic bushing as well, they need to be reused.
I used a pair of large channel locks, a punch tool and a BFH to knock out both pins that need to be reused and pushed back in to the new billet assembly. Be very careful not to lose the spring and plastic bushing as well, they need to be reused.
Last edited by sa29560; 09-20-2011 at 03:11 PM.
09-20-2011, 10:50 AM
#3
JK Junkie
Thread Starter
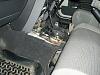
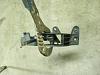
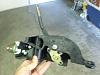
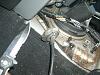
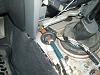
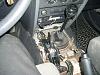
In the second to last picture in that last post you can see the shifter lever and pins reused on the new billet assembly ready to go in to the stock shifter housing. I reinstalled that and got started routing the new cable and removing the old one.
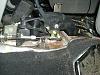
That bracket had to be installed and required drilling two holes with a 1/4" bit, took two seconds per hole. Reassemble and tighten hardware, ready to get on my back under the Jeep. Instructions call for removing the old shifter lever linkage on the t-case with a t40 bit. Just to my luck it was not a t40 but a 10mm bolt. I ended up using a 1/4" drive ratchet, Extension and 1/4" drive 10mm socket.
Second pic is with shifter lever removed and ready to get this cable out of here!!!
09-20-2011, 10:58 AM
#4
JK Junkie
Thread Starter
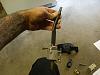
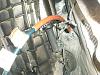
Ok, since the instructions called to remove the grommet from the stock cable if you would like to reuse it, the best way to go about this is to cut the cable. I did not have a means to do this, but found a solution nonetheless.
I started by unseating the grommet, which was a b*tch to get undone being as it is under the dash. I pulled the grommet to the end of the cable and made three tiny cuts in it in order to stretch it over the cable ends. After doing this, i pushed the cable under the dash and removed in from the bottom of the Jeep.
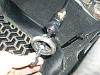
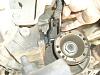
After getting the grommet back on to the new cable I began feeding it down to the new shifter lever on the t-case.
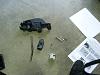
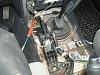
After tightening on the new shifter lever, or while tugging on it I should say, the t-case shifted into 4 low. That was just fine with me. I wanted to think that if I set the heims up with the low range already engaged I would have no issues with the throw on the shifter being too short.
Before tightening the new cable on to the console side I bolted the heim onto the t-case shifter lever and resecured it to the stock location bracket.
I started by unseating the grommet, which was a b*tch to get undone being as it is under the dash. I pulled the grommet to the end of the cable and made three tiny cuts in it in order to stretch it over the cable ends. After doing this, i pushed the cable under the dash and removed in from the bottom of the Jeep.
After getting the grommet back on to the new cable I began feeding it down to the new shifter lever on the t-case.
After tightening on the new shifter lever, or while tugging on it I should say, the t-case shifted into 4 low. That was just fine with me. I wanted to think that if I set the heims up with the low range already engaged I would have no issues with the throw on the shifter being too short.
Before tightening the new cable on to the console side I bolted the heim onto the t-case shifter lever and resecured it to the stock location bracket.
09-20-2011, 11:04 AM
#5
JK Junkie
Thread Starter
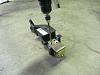
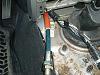
Now that everything was starting to come together, I loosely bolted the shifter assembly back to the floor of the Jeep.
I moved the lever to where it would be in order to engage the low range and loosely bolted it up to the shifter assembly.
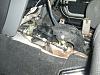
After the cable was secured I bolted down the shifter to the floor and started testing out how the shifts felt through the entire range.
Before taking it for a test drive, this was the perfect opportunity to clean up my console, being as my JK is an 07 and the top was off nearly all summer it was looking a bit rough. Used some degreaser and the hose and let it sit in the sun while I took a test drive.
I moved the lever to where it would be in order to engage the low range and loosely bolted it up to the shifter assembly.
After the cable was secured I bolted down the shifter to the floor and started testing out how the shifts felt through the entire range.
Before taking it for a test drive, this was the perfect opportunity to clean up my console, being as my JK is an 07 and the top was off nearly all summer it was looking a bit rough. Used some degreaser and the hose and let it sit in the sun while I took a test drive.
09-20-2011, 11:12 AM
#6
JK Junkie
Thread Starter
I ended up breaking my stock shifter bushings a few months back and had a 4WD light on in my dash at all times. After going for a drive and shifting all through the range nearly twenty times, the light disappeared!!!!!!!! I had hoped this would happen but was overcome with good feelings when it went away. Since everything was working as expected, it was time to reinstall the console and the four bolts holding it in place, along with the front driveline. Overall the install took almost four hours to complete.
The only thing I noticed after the install was when shifting into 4hi, if i was moving over ten to fifteen miles per hour there was a slight grunt from the t-case only while shifting. If I slowed down below ten miles an hour, I could shift completely through the range without any interference. All in all, I am very happy with the setup, and would do it all over again if it came down to it. Any one who has had issues in the past with the stock linkage, I implore you to investigate this avenue for yourself. Again, a big thanks to Advance Adapters for making this whole thing possible. Any questions, feel free to send me a pm, I am usually on this site daily and will be glad to help in any way!!!

The only thing I noticed after the install was when shifting into 4hi, if i was moving over ten to fifteen miles per hour there was a slight grunt from the t-case only while shifting. If I slowed down below ten miles an hour, I could shift completely through the range without any interference. All in all, I am very happy with the setup, and would do it all over again if it came down to it. Any one who has had issues in the past with the stock linkage, I implore you to investigate this avenue for yourself. Again, a big thanks to Advance Adapters for making this whole thing possible. Any questions, feel free to send me a pm, I am usually on this site daily and will be glad to help in any way!!!
Trending Topics
09-21-2011, 05:33 AM
#8
Very nice write up. Thanks!
I would like to know your process for attaching the cable to the t-case. In the Advanced Adapter video, the t-case was sitting on a bench when they installed the bracket. Needless to say, I doubt if you removed the t-case for this installation. Any further information would be greatly appreciated.
I would like to know your process for attaching the cable to the t-case. In the Advanced Adapter video, the t-case was sitting on a bench when they installed the bracket. Needless to say, I doubt if you removed the t-case for this installation. Any further information would be greatly appreciated.
 09-21-2011, 06:00 AM
#10
JK Super Freak

Join Date: Sep 2009
Location: USA
Posts: 1,527
Likes: 0
Received 0 Likes
on
0 Posts
Thanks for doing such a great job on the write up During the most recent JK Experience in Colorado, day one Holy Cross trail, on the second obstacle, my stock t-case shift cable broke. After seeing just how cheap that Mopar part is made, it's kind of scary to think what other areas of the JK are made with equal or lesser materials. Bottom line, a jeep dealer in a town the JKX was passing through had one in stock, $34.00 for a replacement, changed it in the parking lot of a Holiday Inn Express. I would have bought two if the dealer had another, I just hope this new one last until my Atlas 4 speed upgrade happens. Thanks again for the great job with words and photos.
During the most recent JK Experience in Colorado, day one Holy Cross trail, on the second obstacle, my stock t-case shift cable broke. After seeing just how cheap that Mopar part is made, it's kind of scary to think what other areas of the JK are made with equal or lesser materials. Bottom line, a jeep dealer in a town the JKX was passing through had one in stock, $34.00 for a replacement, changed it in the parking lot of a Holiday Inn Express. I would have bought two if the dealer had another, I just hope this new one last until my Atlas 4 speed upgrade happens. Thanks again for the great job with words and photos.