Another high beam indicator fix
 11-09-2007, 08:48 PM
#1
JK Enthusiast
Thread Starter
I know there has been a few solutions to the extremely bright high beam indicator but I've come up with one of my own.
Directions to remove most of the parts were taken from this thread: https://www.jk-forum.com/forums/jk-write-ups-39/dim-high-beam-indicator-light-19958/
1. Remove the two dash panels below the steering column, they both pull off, with clips to retain them in place. Start with the bottom most one first.
2. Remove the two small metric bolts that hold the black hood that covers the top of the instrument cluster, and then lift up on the plastic hood to remove it.
3. Release the clear plastic clips around the perimeter of the clear lens, you may need a small flat blade screwdriver, pull the clear lens strait off. Be careful of the odometer reset button.
This is where my solution changes
4. Release the black plastic clips that hold the black trim around the bezel. This is the black portion that surrounds the speedometer, tachometer, gas guage, etc.
5. With the above removed, you will have acces to the entire black overlay that has the numbers, etc printed on it.
6. Now cut 2 small pieces of 20% window tint (slightly smaller than a postage stamp)
7. Using your fingernail pull the top of the black overlay up (the area where the high beam indicator is). This is very flexible and can be pulled out at least an inch.
8. Spray the window tint and insert it on the back side of the overlay (the window tint will be sandwhiched between the overlay and the bulb area). Squeegee the tint.
9. Apply the second layer of 20% tint over the first layer. Re-squeegee.
10. Put it all back together and enjoy your brights again without beeing blinded by the indicator.
It sounds complicated but I swear it's really easy. Depending on how handy you are, this will take about 20-30 min.s to accomplish.
It's so easy a caveman could do it
With my solution the entire guage cluster looks completely stock, but you'll benifit from the dimmed indicator.
Here are a few other threads about or with fixes to this problem:
https://www.jk-forum.com/forums/showthread.php?t=19958
https://www.jk-forum.com/forums/jk-write-ups-39/hi-beam-indicator-light-dimmer-8360/
https://www.jk-forum.com/forums/show...ight=high+beam
Last edited by VBS4; 11-10-2007 at 08:13 AM.
 11-09-2007, 09:21 PM
#2
JK Freak
Join Date: Apr 2007
Location: Parker, CO
Posts: 764
Likes: 0
Received 0 Likes
on
0 Posts
I know there has been a few solutions to the extremely bright high beam indicator but I've come up with one of my own.
Directions to remove most of the parts were taken from this thread: https://www.jk-forum.com/forums/showthread.php?t=19958
1. Remove the two dash panels below the steering column, they both pull off, with clips to retain them in place. Start with the bottom most one first.
2. Remove the two small metric bolts that hold the black hood that covers the top of the instrument cluster, and then lift up on the plastic hood to remove it.
3. Release the clear plastic clips around the perimeter of the clear lens, you may need a small flat blade screwdriver, pull the clear lens strait off. Be careful of the odometer reset button.
This is where my solution changes
4. Release the black plastic clips that hold the black trim around the bezel. This is the black portion that surrounds the speedometer, tachometer, gas guage, etc.
5. With the above removed, you will have acces to the entire black overlay that has the numbers, etc printed on it.
6. Now cut 2 small pieces of 20% window tint (slightly smaller than a postage stamp)
7. Using your fingernail pull the top of the black overlay up (the area where the high beam indicator is). This is very flexible and can be pulled out at least an inch.
8. Spray the window tint and insert it on the back side of the overlay (the window tint will be sandwhiched between the overlay and the bulb area). Squeegee the tint.
9. Apply the second layer of 20% tint over the first layer. Re-squeegee.
10. Put it all back together and enjoy your brights again without beeing blinded by the indicator.
It sounds complicated but I swear it's really easy.
With my solution the entire guage cluster looks completely stock, but you'll benifit from the dimmed indicator.
Here are a few other threads about or with fixes to this problem:
https://www.jk-forum.com/forums/showthread.php?t=19958
https://www.jk-forum.com/forums/showthread.php?t=8360
https://www.jk-forum.com/forums/show...ight=high+beam
11-10-2007, 08:07 AM
#3
I know there has been a few solutions to the extremely bright high beam indicator but I've come up with one of my own.
Directions to remove most of the parts were taken from this thread: https://www.jk-forum.com/forums/showthread.php?t=19958
1. Remove the two dash panels below the steering column, they both pull off, with clips to retain them in place. Start with the bottom most one first.
2. Remove the two small metric bolts that hold the black hood that covers the top of the instrument cluster, and then lift up on the plastic hood to remove it.
3. Release the clear plastic clips around the perimeter of the clear lens, you may need a small flat blade screwdriver, pull the clear lens strait off. Be careful of the odometer reset button.
This is where my solution changes
4. Release the black plastic clips that hold the black trim around the bezel. This is the black portion that surrounds the speedometer, tachometer, gas guage, etc.
5. With the above removed, you will have acces to the entire black overlay that has the numbers, etc printed on it.
6. Now cut 2 small pieces of 20% window tint (slightly smaller than a postage stamp)
7. Using your fingernail pull the top of the black overlay up (the area where the high beam indicator is). This is very flexible and can be pulled out at least an inch.
8. Spray the window tint and insert it on the back side of the overlay (the window tint will be sandwhiched between the overlay and the bulb area). Squeegee the tint.
9. Apply the second layer of 20% tint over the first layer. Re-squeegee.
10. Put it all back together and enjoy your brights again without beeing blinded by the indicator.
It sounds complicated but I swear it's really easy.
With my solution the entire guage cluster looks completely stock, but you'll benifit from the dimmed indicator.
Here are a few other threads about or with fixes to this problem:
https://www.jk-forum.com/forums/showthread.php?t=19958
https://www.jk-forum.com/forums/showthread.php?t=8360
https://www.jk-forum.com/forums/show...ight=high+beam
Directions to remove most of the parts were taken from this thread: https://www.jk-forum.com/forums/showthread.php?t=19958
1. Remove the two dash panels below the steering column, they both pull off, with clips to retain them in place. Start with the bottom most one first.
2. Remove the two small metric bolts that hold the black hood that covers the top of the instrument cluster, and then lift up on the plastic hood to remove it.
3. Release the clear plastic clips around the perimeter of the clear lens, you may need a small flat blade screwdriver, pull the clear lens strait off. Be careful of the odometer reset button.
This is where my solution changes
4. Release the black plastic clips that hold the black trim around the bezel. This is the black portion that surrounds the speedometer, tachometer, gas guage, etc.
5. With the above removed, you will have acces to the entire black overlay that has the numbers, etc printed on it.
6. Now cut 2 small pieces of 20% window tint (slightly smaller than a postage stamp)
7. Using your fingernail pull the top of the black overlay up (the area where the high beam indicator is). This is very flexible and can be pulled out at least an inch.
8. Spray the window tint and insert it on the back side of the overlay (the window tint will be sandwhiched between the overlay and the bulb area). Squeegee the tint.
9. Apply the second layer of 20% tint over the first layer. Re-squeegee.
10. Put it all back together and enjoy your brights again without beeing blinded by the indicator.
It sounds complicated but I swear it's really easy.
With my solution the entire guage cluster looks completely stock, but you'll benifit from the dimmed indicator.
Here are a few other threads about or with fixes to this problem:
https://www.jk-forum.com/forums/showthread.php?t=19958
https://www.jk-forum.com/forums/showthread.php?t=8360
https://www.jk-forum.com/forums/show...ight=high+beam
11-10-2007, 05:50 PM
#4
JK Enthusiast
Thread Starter
Just an update:
I really got to test it out tonight. It works perfectly.
For me 2 ply's of 20% tint is perfect!
To give you an idea of how dim the high beam indicator is, turn down the brightness of your dash lights (lowest setting). The high beam indicator is just slightly brighter than the radio light on the lowest setting.
And like I mentioned before, the dash looks completely stock
Last edited by VBS4; 11-10-2007 at 06:05 PM.
 11-13-2007, 03:23 PM
#7
JK Enthusiast
Thread Starter

Trending Topics
11-15-2007, 08:49 PM
#8
JK Enthusiast
Thread Starter
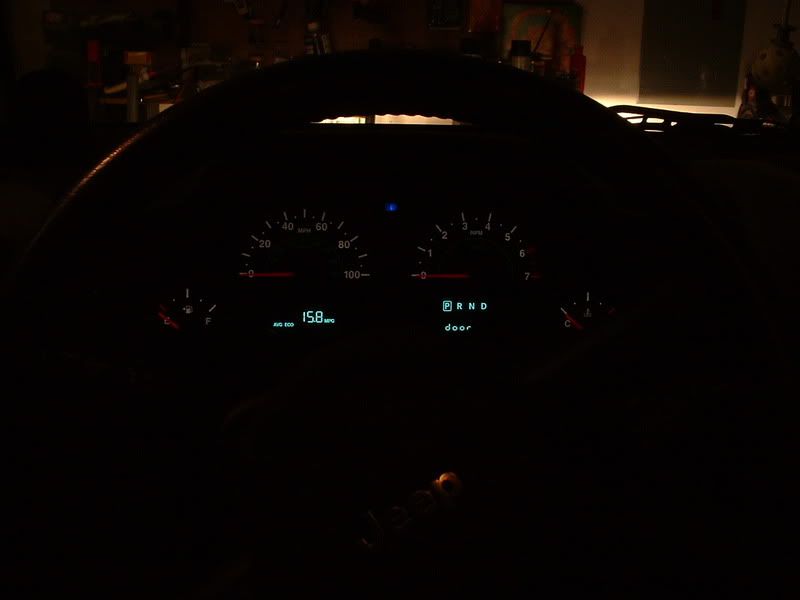
The pic hopefully isn't to dark to see on here.
This is after the tint install.
This is with no flash and only the headlights on.
You can see how dim the indicator is now
This is after the tint install.
This is with no flash and only the headlights on.
You can see how dim the indicator is now
Last edited by VBS4; 11-15-2007 at 08:51 PM.
 The ones in the rear view mirror, either.