Budget CB antenna mount, lots of pics
 07-24-2012, 03:32 PM
#1
JK Enthusiast
Thread Starter
Join Date: Jul 2012
Location: Lake City, FL
Posts: 198
Likes: 0
Received 0 Likes
on
0 Posts
Mounting a CB antenna on the tailgate of a Jeep is not optimal in any way but many want it there for different reasons. Many variables can cause tuning issues. Grounding and antenna choice are the biggest issues. Always use a top loaded antenna such as a Wilson or Firestick that has the coil on the top. Antennas with coils on the bottom are too close to vertical metal that causes RF energy return to the transmitter (standing waves). Grounding the mount to the tailgate and grounding the tailgate to the body tub are key to getting the antenna to tune. It should also cure the intermittent problems for example one day you get an antenna warning light on the radio and on other days you don't. Even with the steps I will describe in this write up expect the SWR to between 1.2:1 to 1.3:1. With alot of experience and trial and error a 1.1 is possible but I have only done that on my rig with lots of time. I usually get around 1.2 on quick installs.
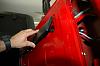
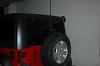
Using a truck mirror mount this is how I built a budget mount for the rear of my JK.
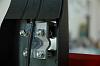
The mount will make contact with the glass of a hard top if simply mounted on the brake light riser. I took a small amount of metal (about 1/4 to 1/2") off of the curved section of the mount. Next remove the brake light from the riser. Cover the tailgate with towels to protect the paint. I used a 4inch angle grinder to cut a slit in the riser.
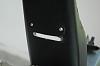
The mount will be bolted to the inside of the riser but the curved section of the mount will keep it from mounting flat.
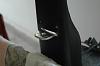
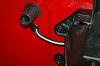
Use the mount to determine the lower section to cut out.
Cut the relief hole and check for fit.
Using a truck mirror mount this is how I built a budget mount for the rear of my JK.
The mount will make contact with the glass of a hard top if simply mounted on the brake light riser. I took a small amount of metal (about 1/4 to 1/2") off of the curved section of the mount. Next remove the brake light from the riser. Cover the tailgate with towels to protect the paint. I used a 4inch angle grinder to cut a slit in the riser.
The mount will be bolted to the inside of the riser but the curved section of the mount will keep it from mounting flat.
Use the mount to determine the lower section to cut out.
Cut the relief hole and check for fit.
 07-24-2012, 03:34 PM
#2
JK Enthusiast
Thread Starter
Join Date: Jul 2012
Location: Lake City, FL
Posts: 198
Likes: 0
Received 0 Likes
on
0 Posts
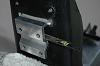
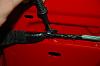
Make sure that there is enough play that you can level the mount with a small torpedo level with the vehicle on a level surface at least side to side. Front to back will be adjusted later.
Drill ONLY one hole and install the bolt. Snug it down so you can rotate the mount with a gentle tap.
Before drilling/installing the second bolt make sure the mount is level side to side. Failure to do this will most likely result in a leaning antenna. A small twist at the base will be exagerated by the antenna.
07-24-2012, 03:36 PM
#3
JK Enthusiast
Thread Starter
Join Date: Jul 2012
Location: Lake City, FL
Posts: 198
Likes: 0
Received 0 Likes
on
0 Posts
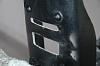
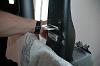
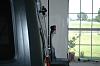
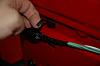
Finish the other two bolts and install the antenna on the base.
The mount should clear the glass. More clearance will be added later.
Oh boy big PROBLEM! Easy to solve.
Install 2-3 washers between the mount and the riser, ONLY on the top two bolts.
The mount should clear the glass. More clearance will be added later.
Oh boy big PROBLEM! Easy to solve.
Install 2-3 washers between the mount and the riser, ONLY on the top two bolts.
07-24-2012, 03:37 PM
#4
JK Enthusiast
Thread Starter
Join Date: Jul 2012
Location: Lake City, FL
Posts: 198
Likes: 0
Received 0 Likes
on
0 Posts
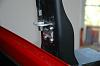
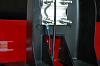
I used two washers per bolt and may do three later. You can now see more glass clearance and the antenna doesnt hit the wiper.

Now install a ground wire to the mount. I used 12ga wire. I try to use 12ga or larger wire when grounding. However wire larger than 12ga may cause problems later in the install.
Now install a ground wire to the mount. I used 12ga wire. I try to use 12ga or larger wire when grounding. However wire larger than 12ga may cause problems later in the install.
07-24-2012, 03:39 PM
#5
JK Enthusiast
Thread Starter
Join Date: Jul 2012
Location: Lake City, FL
Posts: 198
Likes: 0
Received 0 Likes
on
0 Posts
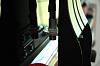
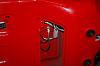
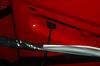
Remove the panels on the tailgate in the direction shown. You will damage the tabs if you pull the wrong side first.

Route your wires through the brake light gromet. You'll want to trim the gromet to allow the wires to pass with out laying on the metal then protect it with some RTV .
Carefuly use a small sharp object to release the latch on the zip tie and pull it free without damaging the mount or latch.
Route your wires through the brake light gromet. You'll want to trim the gromet to allow the wires to pass with out laying on the metal then protect it with some RTV .
Carefuly use a small sharp object to release the latch on the zip tie and pull it free without damaging the mount or latch.
07-24-2012, 03:42 PM
#6
JK Enthusiast
Thread Starter
Join Date: Jul 2012
Location: Lake City, FL
Posts: 198
Likes: 0
Received 0 Likes
on
0 Posts
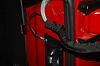
Remove the trim panel on the right side of the cargo area.
http://i48.photobucket.com/albums/f2...4/DSC_7480.jpg
http://i48.photobucket.com/albums/f2...4/DSC_7481.jpg
Undo the zip ties here the same way.

Remove the tape from the factory wires and route the antenna wire through the loom.
http://i48.photobucket.com/albums/f2...4/DSC_7483.jpg
Route the ground wire through and leave slack to ground the tailgate in the compartment on the right.

http://i48.photobucket.com/albums/f2...4/DSC_7480.jpg
http://i48.photobucket.com/albums/f2...4/DSC_7481.jpg
Undo the zip ties here the same way.
Remove the tape from the factory wires and route the antenna wire through the loom.
http://i48.photobucket.com/albums/f2...4/DSC_7483.jpg
Route the ground wire through and leave slack to ground the tailgate in the compartment on the right.
07-24-2012, 03:44 PM
#7
JK Enthusiast
Thread Starter
Join Date: Jul 2012
Location: Lake City, FL
Posts: 198
Likes: 0
Received 0 Likes
on
0 Posts
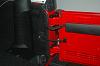
Now clean up the outside with some wire loom and use tape on the ends. I use quality Scotch brand electrical tape or equivelant. The no name stuff has cheap adhesive and I like my install to last. Don't stretch the last wrap...also cut the tape, dont pull tear it. It works but as the tape slowly contracts back to original shape the adhesive area left will attract dirt and look bad. I go one step further and paint the end of the tape with a liberal coat of liquid electrical tape all the way around the last wrap. It doesnt have good enough structure to hold the loom but it does a good job of keeping the tape from unwraping and doesn't attract dirt once it's dry.

Zip tie the cables to the factory wires near the factory ties. If you want it to look real good do it the way the next few steps show. Wrap tape where the factory does and try to replicate thier mounting. I usually take pics to remember where to put tape and position the wires.

We carefully opened the zip ties for a reason. Cut the left over tie off and make sure to leave the latch and mount in tact.

Try to find a zip tie the same width and make sure to insert it into the latch in the same direction.

Zip tie the cables to the factory wires near the factory ties. If you want it to look real good do it the way the next few steps show. Wrap tape where the factory does and try to replicate thier mounting. I usually take pics to remember where to put tape and position the wires.
We carefully opened the zip ties for a reason. Cut the left over tie off and make sure to leave the latch and mount in tact.
Try to find a zip tie the same width and make sure to insert it into the latch in the same direction.
Trending Topics
07-24-2012, 03:45 PM
#8
JK Enthusiast
Thread Starter
Join Date: Jul 2012
Location: Lake City, FL
Posts: 198
Likes: 0
Received 0 Likes
on
0 Posts
Retape the end of the loom and close the zip tie.

Connect the end of the ground wire and secure the loom in the other two zip the same as we did the other.
Button up the panels and clean up. The rest of this install will be covered in a later post.
Connect the end of the ground wire and secure the loom in the other two zip the same as we did the other.
Button up the panels and clean up. The rest of this install will be covered in a later post.
 02-18-2015, 03:54 AM
#10
I did a quick check in his post history but I don't see any follow-up to this. Maybe since nobody replied originally he didn't bother. He was active a month ago though, so you may want to try and PM him.