Carpet Removal 2012 2DR
 07-03-2012, 12:12 PM
#1
JK Enthusiast
Thread Starter
NOTE: Drain Plug Locations are a few post down
I just got done spraying Raptor bed-liner in my tub. I figured I would post some pictures for people who want to remove there carpet. The silver Jeeps seem to look the best when the carpet is removed. Don't be surprised if the paint under there doesn't look all that great. On mine the calk like around the rear wheel wells was tinted orange. Also on the 2DR there is a big ass hole right behind the b-pillar (behind the door). There is nothing great in there except for some expanding foam. I ended up cold welding an aluminum plate over that. Also there are wires that get exposed under the rear windows . I found some 3/4" wire loom at Auto Zone it covered it fine without having to remove the plugs (pictured way below in 4th post).
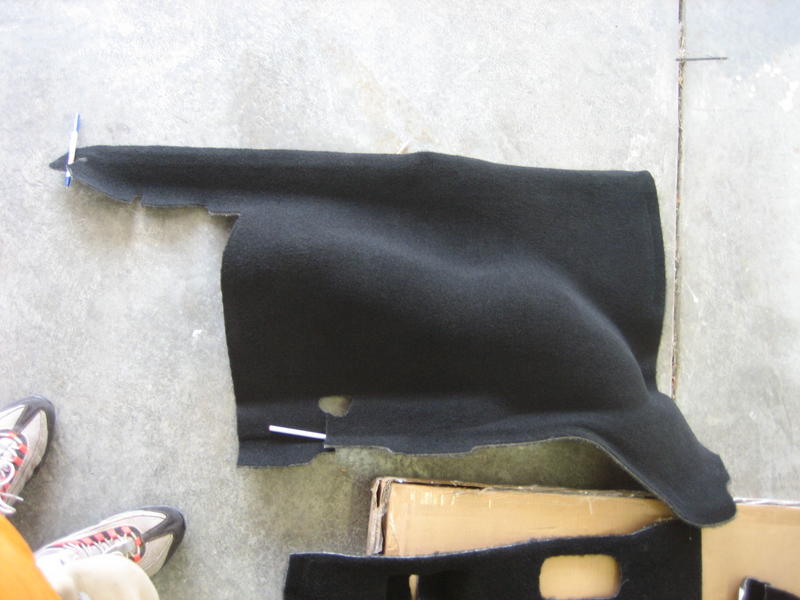
I have put pens pointing where the slits are in the carpet. Some of these slits will be cut like 80% of the way and you will need to cut about a 1/4" to get them able to come out.
You will want to start with the one in the bed
Then around the rear wheel wells
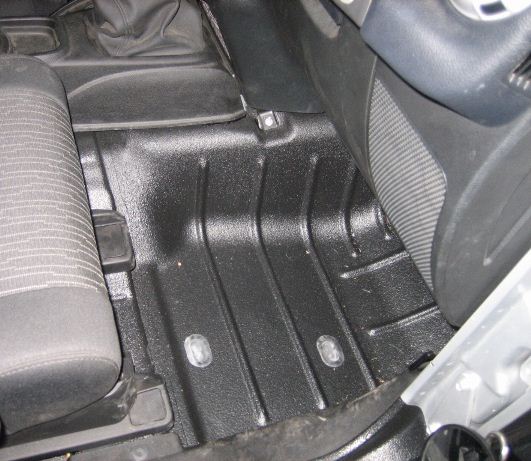
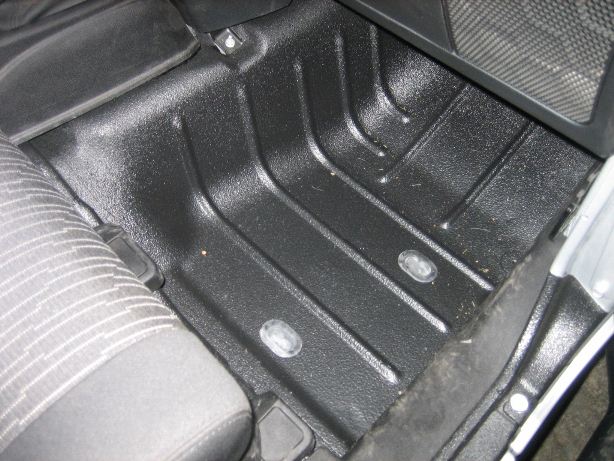
Then the rear seat foot-wells that goes behind the center console

And then finally the front foot-wells.
REMOVING REAR CARPET NOTES
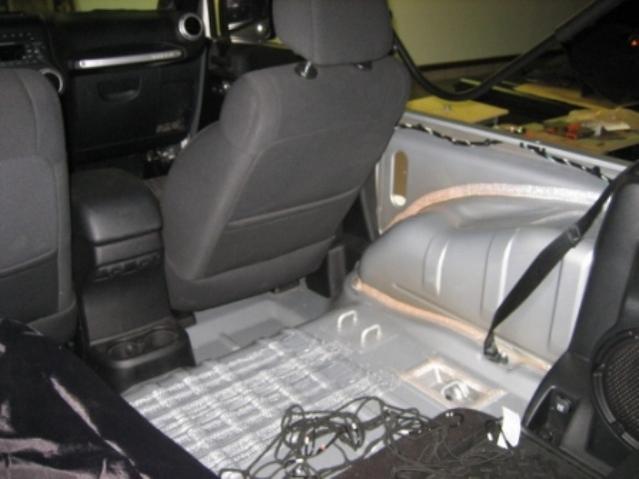
The rear most 3 carpets where super easy to remove.The middle carpet that would be the rear footwell was a bit of a challenge (It's the third picture). Clearly you want to push the seats all the way up first. I had to make a small 1/4" cut on the passenger side where the carpet wrapped around the roll bar. It was pre-cut 90 percent of the way and pretty obvious where to do it. Also under the seats there is a small hole in the carpet that goes over a bot. Before you just pull out you'll want to put your hand under there and push it off there. You can see it on the picture pretty clearly near the bottom. There is a drain hole on each foot well back there. There is no doubt this middle carpet would be a major PITA to put back in especially if you didn't take the seats out(with a 18mm and don't forget to unplug them first).
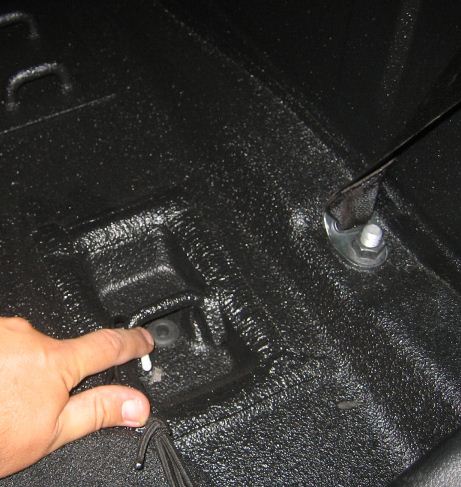
Take note of the little hole that is under the rear seat. On this picture it is hanging off of my hardtop. This rest on a grey push in bolt and needs to be lifted off before you can pull it out.

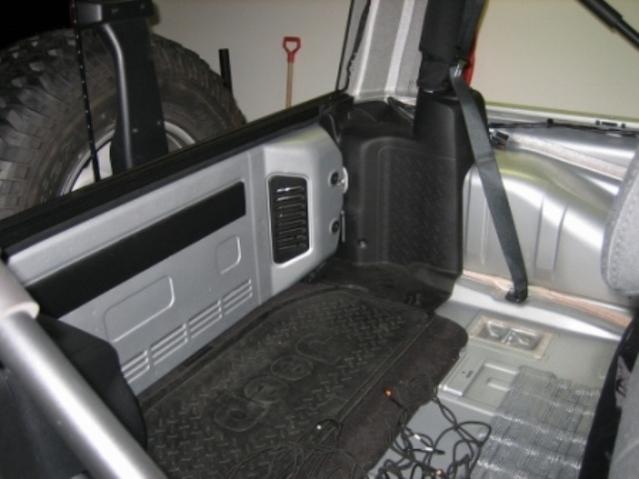
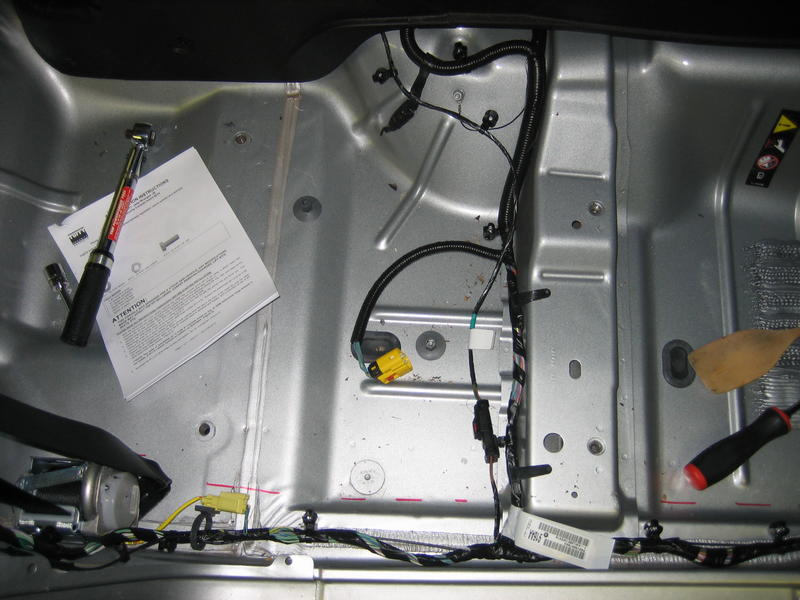
This is a picture with the grey push in bolt that you need to lift the middle carpet off. The yellow wire harness for the seat belt warning, and a drain plug is right next to it. The grey bolt will just pull off before you take off you front foot area carpet. There are 2 more of these bolts on the front carpets in the very front holding the carpet up. I'm at my picture limit so I will post those below.

I just got done spraying Raptor bed-liner in my tub. I figured I would post some pictures for people who want to remove there carpet. The silver Jeeps seem to look the best when the carpet is removed. Don't be surprised if the paint under there doesn't look all that great. On mine the calk like around the rear wheel wells was tinted orange. Also on the 2DR there is a big ass hole right behind the b-pillar (behind the door). There is nothing great in there except for some expanding foam. I ended up cold welding an aluminum plate over that. Also there are wires that get exposed under the rear windows . I found some 3/4" wire loom at Auto Zone it covered it fine without having to remove the plugs (pictured way below in 4th post).
I have put pens pointing where the slits are in the carpet. Some of these slits will be cut like 80% of the way and you will need to cut about a 1/4" to get them able to come out.
You will want to start with the one in the bed
Then around the rear wheel wells
Then the rear seat foot-wells that goes behind the center console
And then finally the front foot-wells.
REMOVING REAR CARPET NOTES
The rear most 3 carpets where super easy to remove.The middle carpet that would be the rear footwell was a bit of a challenge (It's the third picture). Clearly you want to push the seats all the way up first. I had to make a small 1/4" cut on the passenger side where the carpet wrapped around the roll bar. It was pre-cut 90 percent of the way and pretty obvious where to do it. Also under the seats there is a small hole in the carpet that goes over a bot. Before you just pull out you'll want to put your hand under there and push it off there. You can see it on the picture pretty clearly near the bottom. There is a drain hole on each foot well back there. There is no doubt this middle carpet would be a major PITA to put back in especially if you didn't take the seats out(with a 18mm and don't forget to unplug them first).
Take note of the little hole that is under the rear seat. On this picture it is hanging off of my hardtop. This rest on a grey push in bolt and needs to be lifted off before you can pull it out.
This is a picture with the grey push in bolt that you need to lift the middle carpet off. The yellow wire harness for the seat belt warning, and a drain plug is right next to it. The grey bolt will just pull off before you take off you front foot area carpet. There are 2 more of these bolts on the front carpets in the very front holding the carpet up. I'm at my picture limit so I will post those below.
Last edited by Rooster76; 07-10-2012 at 05:57 PM.
 07-03-2012, 12:14 PM
#2
JK Enthusiast
Thread Starter
REMOVAL OF THE FRONT CARPET
This is a picture from another JK
The front carpet was really easy to remove with the front seats removed. Being that I was going to bed line the tub I didn’t try the other way. There are 3 grey push bolts that you need to pull off before you start to remove it. 2 are in the very front vertical surface and one under the seat.
This is the passenger side just under the glove box
PLUGING THE HOLES
Note those sanding blocks are crap just get good sandpaper.

I got some thin aluminum and trimmed it to size. I found a Liquid Wrench spray can lid that was the perfect size to use as a stencil.
I then sanded those down and degreased them with acetone. Then I put 3 coats of self-etching primer on there for when it would get bed lined.
I used cold weld glue called J-B Kwik. It is sold in the paint department of hardware stores. There are 2 types and you most likely will want to get the quick drying type that you only have to hold in place for 4 minutes (vs 30min). It says it can hold like over 2000 pound so it should work pretty well. I sanded down the area to be glued and used some acetone to degrease it for a good connection.
There are also a couple of inch holes that are on the driver side. Maybe these are for side airbags? One is about where your left heel would be near the trim and one is under the seat area. I got some 1” plugs to fill them at Lowes. As a side note if you ever need to measure something a quarter is a perfect inch in size.

HERES A GOOD POST - LINK--> https://www.jk-forum.com/forums/stoc...2/#post2520928
This is a picture from another JK
The front carpet was really easy to remove with the front seats removed. Being that I was going to bed line the tub I didn’t try the other way. There are 3 grey push bolts that you need to pull off before you start to remove it. 2 are in the very front vertical surface and one under the seat.
This is the passenger side just under the glove box
PLUGING THE HOLES
Note those sanding blocks are crap just get good sandpaper.
I got some thin aluminum and trimmed it to size. I found a Liquid Wrench spray can lid that was the perfect size to use as a stencil.
I then sanded those down and degreased them with acetone. Then I put 3 coats of self-etching primer on there for when it would get bed lined.
I used cold weld glue called J-B Kwik. It is sold in the paint department of hardware stores. There are 2 types and you most likely will want to get the quick drying type that you only have to hold in place for 4 minutes (vs 30min). It says it can hold like over 2000 pound so it should work pretty well. I sanded down the area to be glued and used some acetone to degrease it for a good connection.
There are also a couple of inch holes that are on the driver side. Maybe these are for side airbags? One is about where your left heel would be near the trim and one is under the seat area. I got some 1” plugs to fill them at Lowes. As a side note if you ever need to measure something a quarter is a perfect inch in size.
HERES A GOOD POST - LINK--> https://www.jk-forum.com/forums/stoc...2/#post2520928
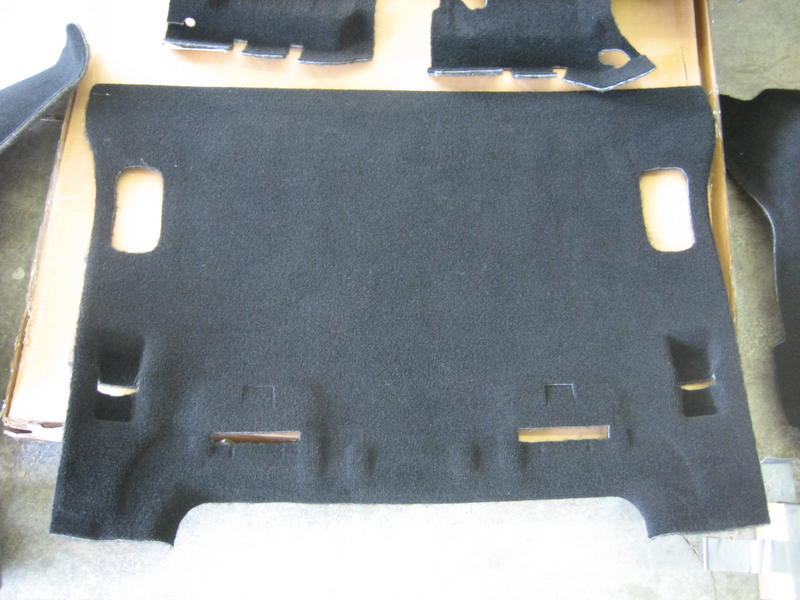
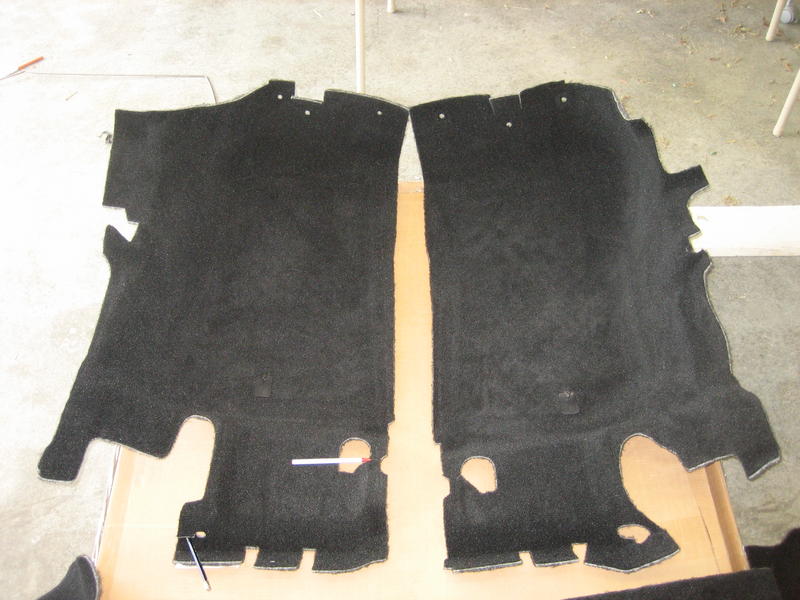
Here are some pics of the front carpets removed... I used a razor blade to make the cuts on the drivers side. I just cut around the seat frame where the front bolts are located and it made a perfect cut. Also, each carpet piece has 3 washer like fasteners that need to be removed too... you can't miss those.  Another thing to note, when I removed the drivers side carpet, I noticed a tiny rust spot on the floor board
  ... I cleaned it up though and put some paint over it
  .
.
*Drivers Side Carpet (with cut marks in yellow)

*Passenger Side Carpet (no cutting necessary)

*Underneath Carpet

Another thing to note, when I removed the drivers side carpet, I noticed a tiny rust spot on the floor board ... I cleaned it up though and put some paint over it *Drivers Side Carpet (with cut marks in yellow)
*Passenger Side Carpet (no cutting necessary)
*Underneath Carpet
Last edited by Rooster76; 07-10-2012 at 04:13 PM.
07-03-2012, 12:32 PM
#4
JK Enthusiast
Thread Starter
REMOVING THE SOUND HEAT GOOP
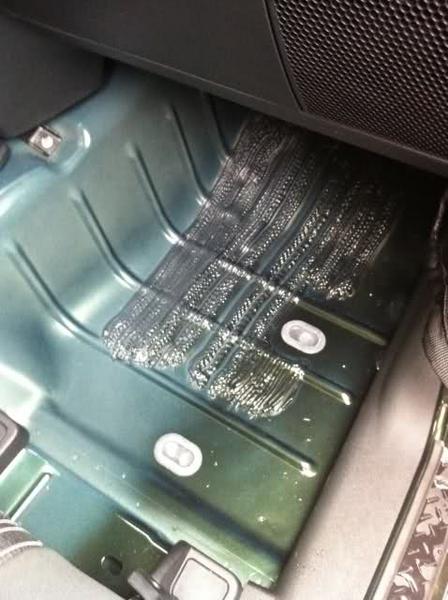
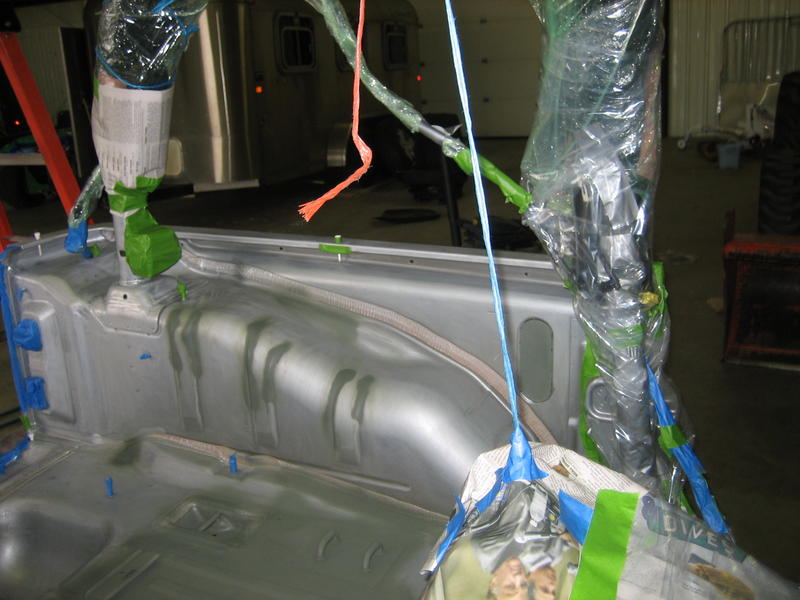
Under the front foot wells and in the back there is some thick goop that looks bad. It is prone to rusting underneath if it has ever been soaked with water. If you choose to remove this it will get pretty hot to the touch up front. About like walking in really hot sand. If you choose to remove it, I found that using a heat gun and a putty knife worked really well at removing the stuff in rather large chunks.
There is also calking that is all over the place. If you remove that you need to replace it with some good silicon to keep the seals water tight.
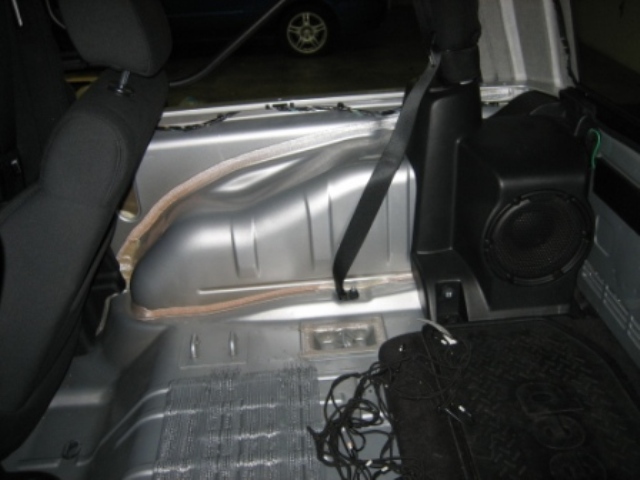
Here is the passenger footwell. The red line is where the plastic panel covers. I had it off for lineing. The stuff on the floor is what I'm calling goop and the stuff next to the wires would be the calk stuff.

You can see the rear goop here. That is a sleeping bag stuff sack that I use to store my windows rolled in towels.
I found this video showing the dry ice goop removal method that's another option.
http://www.youtube.com/watch?v=Fbb5dD98b5s&feature CARPET-LESS WITH MATS
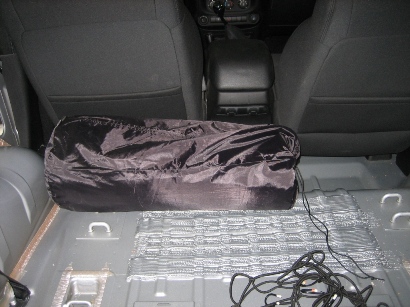
I'm using the Quadratec front liners . With the carpet removed you loose that hook that they clip into. I got some anti-slip drawer liner (sort of like a yoga mat) under them now so that they don't wiggle all over the place.
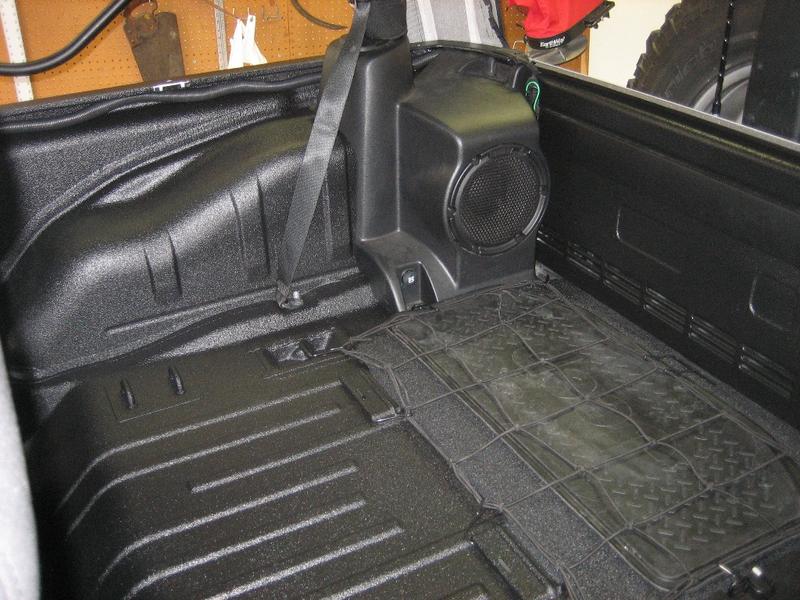
WIRE LOOM
In the picture below you can see the 3/4" Wire loom that I coverd the exposed wires with. You can also see how the Raptor Liner turned out.
Just in case you were wondering what is under the plastic pannel
Under the front foot wells and in the back there is some thick goop that looks bad. It is prone to rusting underneath if it has ever been soaked with water. If you choose to remove this it will get pretty hot to the touch up front. About like walking in really hot sand. If you choose to remove it, I found that using a heat gun and a putty knife worked really well at removing the stuff in rather large chunks.
There is also calking that is all over the place. If you remove that you need to replace it with some good silicon to keep the seals water tight.
Here is the passenger footwell. The red line is where the plastic panel covers. I had it off for lineing. The stuff on the floor is what I'm calling goop and the stuff next to the wires would be the calk stuff.
You can see the rear goop here. That is a sleeping bag stuff sack that I use to store my windows rolled in towels.
I found this video showing the dry ice goop removal method that's another option.
http://www.youtube.com/watch?v=Fbb5dD98b5s&feature CARPET-LESS WITH MATS
I'm using the Quadratec front liners . With the carpet removed you loose that hook that they clip into. I got some anti-slip drawer liner (sort of like a yoga mat) under them now so that they don't wiggle all over the place.
WIRE LOOM
In the picture below you can see the 3/4" Wire loom that I coverd the exposed wires with. You can also see how the Raptor Liner turned out.
Just in case you were wondering what is under the plastic pannel
Last edited by Rooster76; 08-15-2012 at 04:01 PM.
07-03-2012, 04:18 PM
#5
JK Enthusiast
Thread Starter
After you get your carpet out your probablly going to start to want to bed line it. Professionally its going to be $500+ with you doing all the prep work. If you want a cheaper DIY option (around $200) I would go with U-Pol Raptor if you have a compressor and Monstaliner if you want to roll it.
To try to keep this on topic I made a different post to show off the bed lining LINK --> https://www.jk-forum.com/forums/jk-s...hreads-238739/
To try to keep this on topic I made a different post to show off the bed lining LINK --> https://www.jk-forum.com/forums/jk-s...hreads-238739/
Last edited by Rooster76; 07-03-2012 at 04:24 PM.
07-10-2012, 04:05 PM
#6
JK Enthusiast
Thread Starter
THE 12 DRAIN PLUG LOCATIONS
-2 on each Front Foot wells
-Under Front Seats
-Behind Front Seats where back seat passengers would put there foot
-Small ones in the rear recessed mount area for the back seat
-Under the Jack and in hidden storage area
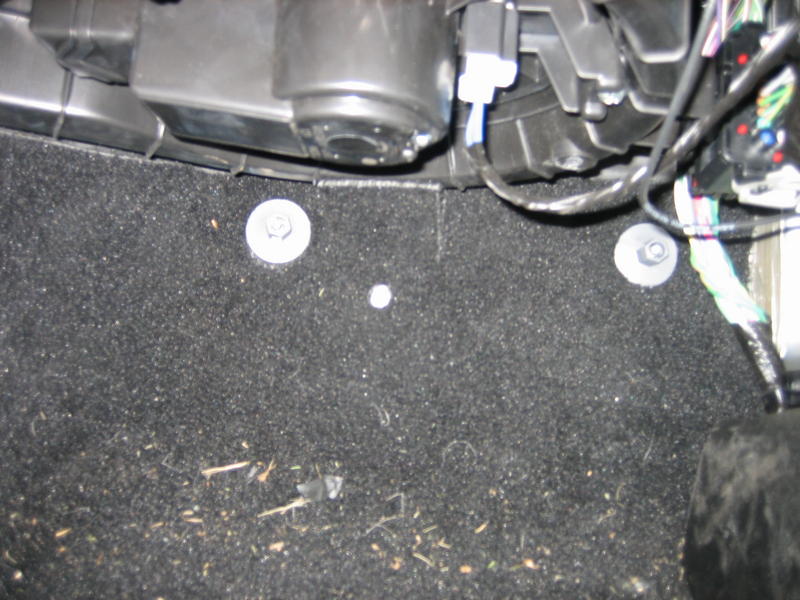
There are 2 plugs here in the front foot-wells (passenger side shown).
There's ones behind the front seat and under them
To get to the one under the seat it needs to go all the way forward (and sort of lift up that little bit). It is almost directly below the back of the seat then.


-2 on each Front Foot wells
-Under Front Seats
-Behind Front Seats where back seat passengers would put there foot
-Small ones in the rear recessed mount area for the back seat
-Under the Jack and in hidden storage area
There are 2 plugs here in the front foot-wells (passenger side shown).
There's ones behind the front seat and under them
To get to the one under the seat it needs to go all the way forward (and sort of lift up that little bit). It is almost directly below the back of the seat then.
Last edited by Rooster76; 07-10-2012 at 06:00 PM.
07-10-2012, 04:06 PM
#7
JK Enthusiast
Thread Starter
Drain Plugs on each of the rear seat mount locations
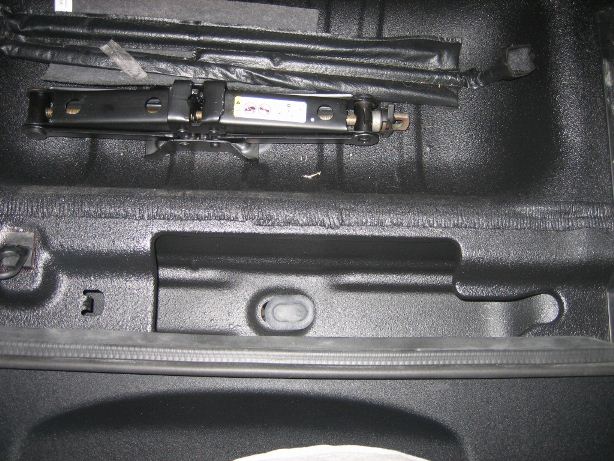
Under the Jack Plug
You need to twist this to loosen the jack so that you can get it out.
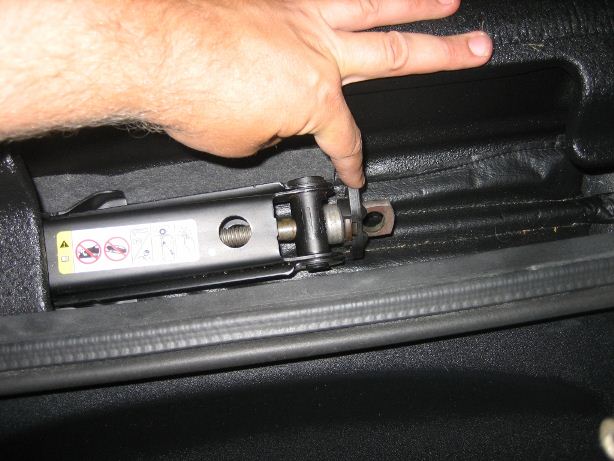
I keep this plug just a bit open because I found standing water in there after I washed the Jeep. There is a plug right under where the Jack is in this photo (bottom of the hidden compartment)
Under the Jack Plug
You need to twist this to loosen the jack so that you can get it out.
I keep this plug just a bit open because I found standing water in there after I washed the Jeep. There is a plug right under where the Jack is in this photo (bottom of the hidden compartment)
Last edited by Rooster76; 07-10-2012 at 06:02 PM.
Trending Topics
07-15-2012, 07:04 PM
#9
JK Enthusiast
Thread Starter
I was going to but ended up just sort of hoisting up the rear end. You can see it in this thread.
LINK-> https://www.jk-forum.com/forums/jk-s...hreads-238739/
The reason that I didn't take it all the way off is because you have to remove your shift knobs for it to come all the way off. A good amount of people have destroyed the knobs getting them off so I decided to pass on that.
TIPS ON REMOVING THE SHIFT KNOBS by someone who has never done it
I have heard that one way is to pry the bottom part off the shifter. Then you put a towel around the knob so it doesn't get scratched. Then putting a pair of pliers under the knob and wacking it up with a hammer. If you decide to pull it off you might want to wear a helmet or you might give yourself a black eye.
If you have a 6-speed this video will be helpful
http://www.youtube.com/watch?v=VEblyJvRvjc It looks like it is about the same with an auto after looking at this aftermarket knob instructions.
LINK-->http://www.quadratec.com/Assets/Installation/153876.pdf
This shows the inside of the knobs. With the 4WD shifter there is a clip that you can get to, to make it easier to come off. You can see how to cleanly remove the 4WD shift knob at 4:15 in the video
http://www.youtube.com/watch?v=Ht36CL7ruJw There are 2 bolts on each side near the lower rear of the center console. I'm pretty sure you have to have the seats out to see them but there super obvious then. You can see them in the picture below. There about the same height as the rear cup holders and the plastic is embosed around them. They look like weird little bolts up close but will come out with no problems using a T30 torx tool. I'm like 99.9% sure those are the only bolts you need to take out. It looks like there is a split in the center console at about the parking break that goes at an angle. When I lifted it up it didn't want to come apart there. There are a few pressure clips up near the front of the shifter knobs that will pop out.
You need to have your parking break all the way up before you can get it out. If I remember right you need to have your shifter in 2nd gear with a 6-speed. I would guess about N in an auto.
Last edited by Rooster76; 07-15-2012 at 07:10 PM.

