Climate Control Back Lighting Repair (07-10)
 03-06-2015, 06:54 PM
#1
JK Newbie
Thread Starter

The Problem:
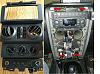
Many of the incandescent mini bulbs that back light the climate controls had burned out. Due to the mini bulbs being soldered to the circuit board within the control assembly (55111840-AE), these bulbs are considered non-replaceable by the dealer. My local dealer wanted $169.00 for the control assembly (55111840-AE).
Before:

After:

The Repair:
Remove the center dash assembly from your Jeep. There are several write-ups on removing this assembly, but it really amounts to exposing and removing the mounting screws (see red arrows), by removing the center top dash piece (lift from windshield side first) and bottom cargo net piece, (pull towards you from the top down).
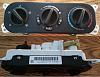
Once the center dash assembly has been removed, remove the climate control assembly. There are four Philips screws on the back side of the dash assembly.
Many of the incandescent mini bulbs that back light the climate controls had burned out. Due to the mini bulbs being soldered to the circuit board within the control assembly (55111840-AE), these bulbs are considered non-replaceable by the dealer. My local dealer wanted $169.00 for the control assembly (55111840-AE).
Before:
After:
The Repair:
Remove the center dash assembly from your Jeep. There are several write-ups on removing this assembly, but it really amounts to exposing and removing the mounting screws (see red arrows), by removing the center top dash piece (lift from windshield side first) and bottom cargo net piece, (pull towards you from the top down).
Once the center dash assembly has been removed, remove the climate control assembly. There are four Philips screws on the back side of the dash assembly.
Last edited by RCZ; 03-06-2015 at 07:16 PM. Reason: typo's

The following 2 users liked this post by RCZ:
alfonsojon (01-12-2019),
nWo (12-14-2022)
03-06-2015, 07:04 PM
#2
JK Newbie
Thread Starter
Remove the three knobs from the climate control assembly. I used two flat blade screwdrivers at 180 degrees apart from each other to evenly lift the knobs.
Remove the front cover off of the climate control assembly. There are four snaps, two on the top and two on the bottom.

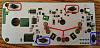
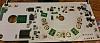
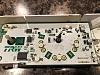
With the front cover of the climate control assembly removed, the circuit board can be easily lifted out. My Jeep had the top two larger bulbs (red boxes) and all three of the small bulbs (red arrows) burned out. The two lower bulbs (blue boxes) were still working, but I replaced them anyways while I was in there.
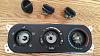
For the larger incandescent bulbs, I used #8640 14 volt bulbs. For the smaller button illumination bulbs, I used #8111 14 volt bulbs. After a lot of searching I could not find the exact replacement bulbs, but they are close enough in size and wattage. They work well and will not cause any CAN Bus errors.
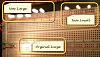
Here you can see where I compared the new bulbs with one of the original large bulbs that was still working. Unfortunately I did not have an original working smaller bulb for this comparison.
Here you can see the control board with all of the bulbs removed.
Remove the front cover off of the climate control assembly. There are four snaps, two on the top and two on the bottom.
With the front cover of the climate control assembly removed, the circuit board can be easily lifted out. My Jeep had the top two larger bulbs (red boxes) and all three of the small bulbs (red arrows) burned out. The two lower bulbs (blue boxes) were still working, but I replaced them anyways while I was in there.
For the larger incandescent bulbs, I used #8640 14 volt bulbs. For the smaller button illumination bulbs, I used #8111 14 volt bulbs. After a lot of searching I could not find the exact replacement bulbs, but they are close enough in size and wattage. They work well and will not cause any CAN Bus errors.
Here you can see where I compared the new bulbs with one of the original large bulbs that was still working. Unfortunately I did not have an original working smaller bulb for this comparison.
Here you can see the control board with all of the bulbs removed.
Last edited by RCZ; 03-06-2015 at 07:19 PM.
The following 2 users liked this post by RCZ:
alfonsojon (01-12-2019),
Johnnyhatesjazz (10-22-2020)
03-06-2015, 07:11 PM
#3
JK Newbie
Thread Starter
You will need to de-solder the bulbs / holders from the control board and then remove the bulbs from the holders. Place a new bulb in the holder, bend leads and trim appropriately.
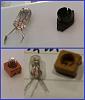
Then re-solder the bulbs while in there holders back onto the control board. This can be challenging for those inexperienced in soldering. It�s helpful to tin the bulb leads and insure there is sufficient solder on the circuit board contact pads prior to soldering the bulbs back in. The small (brown holder) bulbs are more challenging then the larger (black holder) bulbs.
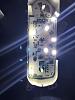
After re-installing all of the new bulbs, you can test your work by carefully applying 12 -14 volts to the circuit as shown below.
Now reassemble everything in reverse order and re-install the center dash section.

Enjoy the fact you can see your climate controls in the dark and didn't have to spend well over $100.
Then re-solder the bulbs while in there holders back onto the control board. This can be challenging for those inexperienced in soldering. It�s helpful to tin the bulb leads and insure there is sufficient solder on the circuit board contact pads prior to soldering the bulbs back in. The small (brown holder) bulbs are more challenging then the larger (black holder) bulbs.
After re-installing all of the new bulbs, you can test your work by carefully applying 12 -14 volts to the circuit as shown below.
Now reassemble everything in reverse order and re-install the center dash section.
Enjoy the fact you can see your climate controls in the dark and didn't have to spend well over $100.
The following users liked this post:
alfonsojon (01-12-2019)

 05-15-2015, 08:50 AM
#5
JK Newbie
Thread Starter
My apologies for the delayed response, I've been offline for awhile.
The cables can be tough to disconnect. There's a small barb on the pin that the cable loop snaps over. I squeezed that barb with a small pair of needle nose pliers while using a flat blade screwdriver two slide the cable loop end past the barbed latch.
The cable loops are also easier to disconnect if you disconnect the plastic cable guides that snap into the back of the control unit first.
Last edited by RCZ; 08-26-2015 at 03:36 PM.
11-01-2017, 06:38 AM
#6
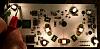
Last year I started losing bulbs in the Climate Controls also until finally the last bulb went. I was very excited to find this thread, thank you! When I did my bulb replacement, I went with mini LED bulbs which are much brighter and shouldn't fail as the old bulbs did. Two things with converting to LEDs. You need a resistor and you need to find the positive and negative sides to your leads. I traced the polarity and marked the negative leads in the attached picture.
I have a close up of the LEDs soldered in place.
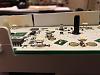
Before re-assembly, I plugged in the board to test all the lights.
The LED mini lights I used already have the resistor on the back of the light and they are dimmable! The lights have 3 SMD 3014 LED bulbs, 12V, and are 4.7mm in size. I used the same light to replace both the old large and small bulbs. A co-worker found these for me online at https://www.ebay.com/itm/20x-White-3...ZXMa6o&vxp=mtr
I absolutely love the brightness of the new bulbs and now I want to do the entire instrument cluster with LEDs!
I have a close up of the LEDs soldered in place.
Before re-assembly, I plugged in the board to test all the lights.
The LED mini lights I used already have the resistor on the back of the light and they are dimmable! The lights have 3 SMD 3014 LED bulbs, 12V, and are 4.7mm in size. I used the same light to replace both the old large and small bulbs. A co-worker found these for me online at https://www.ebay.com/itm/20x-White-3...ZXMa6o&vxp=mtr
I absolutely love the brightness of the new bulbs and now I want to do the entire instrument cluster with LEDs!
The following 3 users liked this post by thetick:
01-12-2019, 04:51 PM
#7

@RCZ @thetick Thanks so much for the information, both of you. I've been driving my Jeep for years now with no lights on the window controls and the climate control lights are starting to go out one by one. This really helps. I'll post some pictures of my LED installation (assuming I don't break it)
Cheers!
Cheers!
Trending Topics

The following users liked this post:
RCZ (11-14-2020)
02-19-2020, 04:43 AM
#9

One question: did anyone ever changed the bulb from the a/c, circulation and defroster buttons? Not the backlight, but the light that turns on when e.g. the a/c is switched on?
02-19-2020, 05:09 AM
#10
Super Moderator

I changed the backlight bulbs once, had another blow out (after I had replaced all bulbs) so I went back to a factory unit. I did not change the bulbs for the a/c, defrost, recirc- I think those are mounted directly to the board.