In Dash Winch Control
 12-23-2007, 07:24 PM
#1
JK Enthusiast
Thread Starter
Join Date: Dec 2006
Location: Nashville TN
Posts: 423
Likes: 0
Received 0 Likes
on
0 Posts
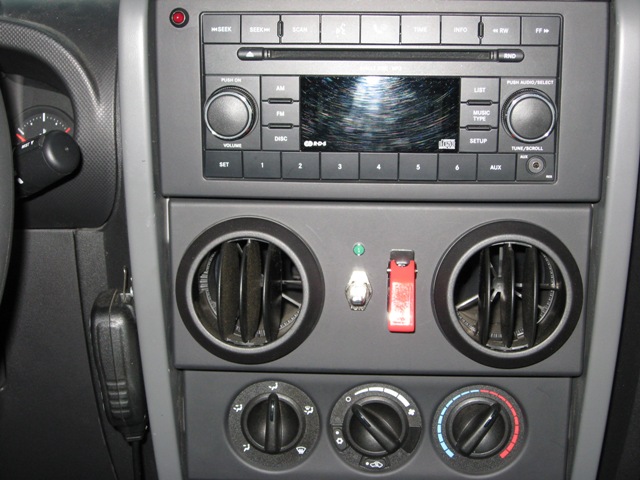
This how-to was done on a 07 JK-X, C-package without power-package. I located the controls between the center vents. If you have the power-package you would need to find an alternate location for the switches and LED.
Parts List:
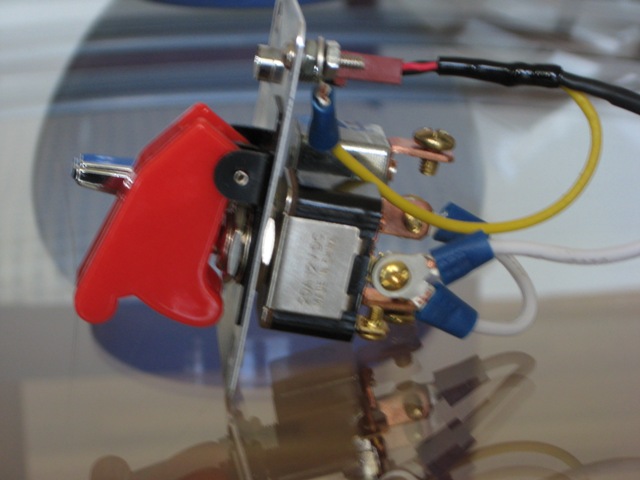
1. Racing style switch 20 AMP (Red flip up)
2. On-Off-On toggle switch 35 AMP
3. LED with resister
4. 16-14 Ring Terminals #8
5. 25 feet 4 conductor towing wire
6. wire ties
7. wire conduit
8. electrical tape
9. 2”x 3” aluminum plate
Tools:
1. drill and drill bits
2. wire cutter/stripper
3. soldering iron / solder
Idea and History:
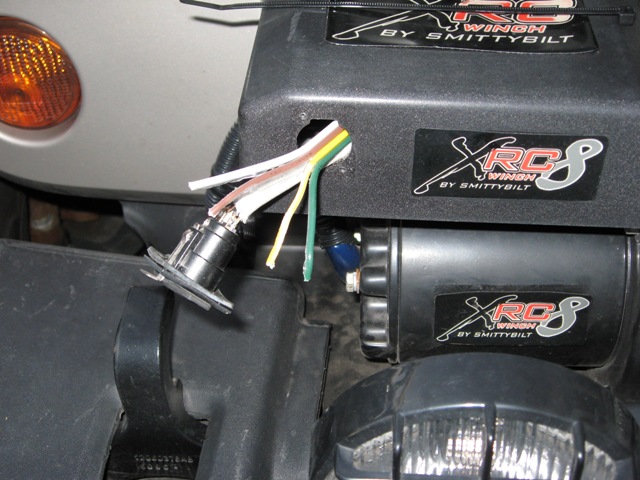
I recently had someone steal my remote cable for controlling my Smittybilt XRC8 Winch. While looking for a replacement remote winch control I found and article on in dash controls. I decided to do my own in dash controls but leave the ability to connect a standard outside remote control cable. This modification is specific to the Smittybilt winch but I am sure you could apply this to other winches base on their wiring.
Design and pre-assembly:
I used the top aluminum plate from a Radio Shack project box 2”x3” as a ground plane and template for the switches and LED. This allowed me to pre-drill the holes for proper alignment and fit before disassembling the center dash.


Step 1:
Start by running the 4 connector towing wire from the winch to the inside of the cabin. I took the same route used for my fog light through the driver’s side fire wall hole located behind the side dash cover. The wire is run in conduit and wire tied to existing harness. Use a long screw driver to poke through the fire wall foam to engine compartment to route wires. I also removed the center dash.


Step 2:
Use aluminum template to mark where to drill holes in center dash. Then drill holes.

Step 3:
Mount aluminum ground plate on backside of center dash. The plate re-enforces the plastic where the switches are mounted while acting as a ground plane for circuit. Feed the switches and LED through the back of the center dash. Then connect the wires using the 16-14 Ring Terminals #8.

Step 4:
Re-assemble center dash.

Step 5:
Older wires to the inside of the winch control socket. This allows the use of an external control as well as the in dash control.

Circuit Information:


Parts List:
1. Racing style switch 20 AMP (Red flip up)
2. On-Off-On toggle switch 35 AMP
3. LED with resister
4. 16-14 Ring Terminals #8
5. 25 feet 4 conductor towing wire
6. wire ties
7. wire conduit
8. electrical tape
9. 2”x 3” aluminum plate
Tools:
1. drill and drill bits
2. wire cutter/stripper
3. soldering iron / solder
Idea and History:
I recently had someone steal my remote cable for controlling my Smittybilt XRC8 Winch. While looking for a replacement remote winch control I found and article on in dash controls. I decided to do my own in dash controls but leave the ability to connect a standard outside remote control cable. This modification is specific to the Smittybilt winch but I am sure you could apply this to other winches base on their wiring.
Design and pre-assembly:
I used the top aluminum plate from a Radio Shack project box 2”x3” as a ground plane and template for the switches and LED. This allowed me to pre-drill the holes for proper alignment and fit before disassembling the center dash.
Step 1:
Start by running the 4 connector towing wire from the winch to the inside of the cabin. I took the same route used for my fog light through the driver’s side fire wall hole located behind the side dash cover. The wire is run in conduit and wire tied to existing harness. Use a long screw driver to poke through the fire wall foam to engine compartment to route wires. I also removed the center dash.
Step 2:
Use aluminum template to mark where to drill holes in center dash. Then drill holes.
Step 3:
Mount aluminum ground plate on backside of center dash. The plate re-enforces the plastic where the switches are mounted while acting as a ground plane for circuit. Feed the switches and LED through the back of the center dash. Then connect the wires using the 16-14 Ring Terminals #8.
Step 4:
Re-assemble center dash.
Step 5:
Older wires to the inside of the winch control socket. This allows the use of an external control as well as the in dash control.
Circuit Information:
Last edited by rfrogman; 12-23-2007 at 07:43 PM.

 Great job!
 12-23-2007, 08:02 PM
#3
JK Enthusiast
Join Date: Jun 2007
Location: Baltimore, MD
Posts: 259
Likes: 0
Received 0 Likes
on
0 Posts

 12-24-2007, 03:53 AM
#4
JK Super Freak
Join Date: Nov 2006
Location: trenton ontario canada
Posts: 1,687
Likes: 0
Received 1 Like
on
1 Post
this is really good i like it
but
the only thing i would change is a momentary switch instead of the racing switch
leavin the winch while using it engaged on, could be unsafe. momentary means u have to be there engaging it while it is in operation.
But it is very good and I applaud u as this will help me when i get around to doing mine. good use of trailer wire.
12-24-2007, 05:22 AM
#5
JK Enthusiast
Thread Starter
Join Date: Dec 2006
Location: Nashville TN
Posts: 423
Likes: 0
Received 0 Likes
on
0 Posts
I left the doors unlocked and they took everything in my center console including the remote cable. I got complacent since it was setting in my driveway. Normally no one comes on my property. Since then I added an aftermarket two stage alarm and lock my doors :-).
Last edited by rfrogman; 12-24-2007 at 08:43 AM.
12-24-2007, 05:30 AM
#6
JK Enthusiast
Thread Starter
Join Date: Dec 2006
Location: Nashville TN
Posts: 423
Likes: 0
Received 0 Likes
on
0 Posts
I appreciate the feed back. I wanted to use an On-Off-On momentary switch but could not find one at the local auto supply stores. The red racing switch is used only for power interrupt. This keeps the On-Off-On switch from activating the winch if it is accidentally hit without engaging the red racing switch. The good news is it will be easy to switch out once I find a +12v momentary On-Off-On switch.
I still need to lable the switches. I will place a lable IN and OUT above the On-Off-On switch (silver) and WINCH down the red racing switch.
I still need to lable the switches. I will place a lable IN and OUT above the On-Off-On switch (silver) and WINCH down the red racing switch.
12-24-2007, 06:57 AM
#7
JK Enthusiast
Thread Starter
Join Date: Dec 2006
Location: Nashville TN
Posts: 423
Likes: 0
Received 0 Likes
on
0 Posts

I like the look and it would work but cutting a rectangle in plastic and aluminum might be difficult.
Trending Topics
12-24-2007, 07:09 AM
#8
JK Enthusiast

Join Date: Apr 2007
Location: Atlanta, GA
Posts: 200
Likes: 0
Received 0 Likes
on
0 Posts
I'm working on the exact same project but was planning on using a key switch to activate the power instead of a covered toggle. I got a SPDT momentary toggle switch from wiringproducts.com (http://www.wiringproducts.com/index1.html) that uses a round mounting hole. They had a bunch of choices, so you might be able to find what you need if you dont' like that one.
Last edited by doojer; 12-24-2007 at 08:17 AM. Reason: edited non-sponsor link
12-24-2007, 08:42 AM
#9
JK Enthusiast
Thread Starter
Join Date: Dec 2006
Location: Nashville TN
Posts: 423
Likes: 0
Received 0 Likes
on
0 Posts
I'm working on the exact same project but was planning on using a key switch to activate the power instead of a covered toggle. I got a SPDT momentary toggle switch from wiringproducts.com (http://www.wiringproducts.com/index1.html) that uses a round mounting hole. They had a bunch of choices, so you might be able to find what you need if you dont' like that one.
Thank you for the link I will check it out.
12-27-2007, 09:38 AM
#10
JK Enthusiast
Join Date: Apr 2007
Location: Atlanta, GA
Posts: 200
Likes: 0
Received 0 Likes
on
0 Posts
Rick,
what gauge trailer wire did you end up using - 16 or 14? I'm thinking of just using an old extension cord, but it's rated at 16 gauge, 13 amp and I just wanted to make sure that would be adequate.
Thanks!
what gauge trailer wire did you end up using - 16 or 14? I'm thinking of just using an old extension cord, but it's rated at 16 gauge, 13 amp and I just wanted to make sure that would be adequate.
Thanks!