DIY Front Lower Control Arm Skids
 03-14-2013, 07:18 AM
#1
JK Enthusiast
Thread Starter
Join Date: Oct 2011
Location: Sioux Center, IA
Posts: 209
Likes: 0
Received 0 Likes
on
0 Posts
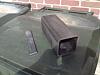
Howdy....I thought I'd contribute for once since I've used this forum for all it's great ideas. I can't lie, I saw this particular idea on another forum, but the person who did it didn't include any measurements. So I thought I'd do the same, but throw in a few details. This is a thread on building your own front lower control arm skid plates rather than buying them from a retailer. I've found the aftermarket ones to be ok, but for around ten bucks I can make my own (and make them a little tougher). Yes, you can purchase a weld-on version which will strengthen the control arm mounts, but I'm not a great welder and liked the idea of being able to remove these if I wanted. Also, these are made of 1/4 inch box steel rather than the aftermarket 3/16 steel. So here we go.
So here's the 4 inch by 4 inch box steel (1/4 inch thick) I started with. I bought a piece 10 inches long and it cost me around $10. I also bought a piece of 3/8 inch bar stock to use for spacers between the final bracket and the outside of the control arm mounts (I ended up using something else, so disregard).
Next, I used a cutting torch (which I'm not good at) to cut the top of the boxed steel off. The height of the bracket needs to be around 2 1/2 inches tall, so C-channel steel wouldn't work.
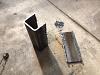
Then I cut (with torch) the steel into two 5 inch long pieces.
Now, here's where I failed to take some pictures. I measured off my control arm mount to make my bracket. The bracket ended up being about 4 1/2 inches long. The 'ears' that mount to the bolt that mounts the control arm ended up being 2 1/2 inches tall by 2 inches wide. On the rest of the bracket, I left about a 1/4 inch (measuring from the inside of the boxed steel) which I will eventually 'bend' to catch the lip of the control arm mount. I cut it with an angle grinder (with cutting blade) and then 'prettied' it up with a flap grinding wheel.
Now here's where you need to measure in according with your mount. If I had stock lower control arms, I think you could make the skids almost flush with the bottom of the bracket. But since I have the Teraflex front lower control arms, I wanted the skid to hang down a little more to clear those big control arm heads. You want to make sure the skid doesn't touch the control arm head and allows for articulation up and down. I left about 3/16 inch space allowance. I then ended up pulling the lower control arm bolt and cutting another bolt to hold the control arm in place while I measured. Then I held up the skid bracket and eye-balled where the hole should be. I used a step drillbit to get the right size.
I'm planning on making a small cut and heating up the 1/4 edge of the bracket to bend it over so that it grabs the front part of the control arm mount (like the aftermarket ones). Then I think I'll paint it up with some POR-15. I also bought some thick spacers (I forget their name) from Fastenal. I'll post more pictures as I progress. Stay tuned.
So here's the 4 inch by 4 inch box steel (1/4 inch thick) I started with. I bought a piece 10 inches long and it cost me around $10. I also bought a piece of 3/8 inch bar stock to use for spacers between the final bracket and the outside of the control arm mounts (I ended up using something else, so disregard).
Next, I used a cutting torch (which I'm not good at) to cut the top of the boxed steel off. The height of the bracket needs to be around 2 1/2 inches tall, so C-channel steel wouldn't work.
Then I cut (with torch) the steel into two 5 inch long pieces.
Now, here's where I failed to take some pictures. I measured off my control arm mount to make my bracket. The bracket ended up being about 4 1/2 inches long. The 'ears' that mount to the bolt that mounts the control arm ended up being 2 1/2 inches tall by 2 inches wide. On the rest of the bracket, I left about a 1/4 inch (measuring from the inside of the boxed steel) which I will eventually 'bend' to catch the lip of the control arm mount. I cut it with an angle grinder (with cutting blade) and then 'prettied' it up with a flap grinding wheel.
Now here's where you need to measure in according with your mount. If I had stock lower control arms, I think you could make the skids almost flush with the bottom of the bracket. But since I have the Teraflex front lower control arms, I wanted the skid to hang down a little more to clear those big control arm heads. You want to make sure the skid doesn't touch the control arm head and allows for articulation up and down. I left about 3/16 inch space allowance. I then ended up pulling the lower control arm bolt and cutting another bolt to hold the control arm in place while I measured. Then I held up the skid bracket and eye-balled where the hole should be. I used a step drillbit to get the right size.
I'm planning on making a small cut and heating up the 1/4 edge of the bracket to bend it over so that it grabs the front part of the control arm mount (like the aftermarket ones). Then I think I'll paint it up with some POR-15. I also bought some thick spacers (I forget their name) from Fastenal. I'll post more pictures as I progress. Stay tuned.
 04-02-2013, 05:32 AM
#5
JK Enthusiast
Thread Starter
Join Date: Oct 2011
Location: Sioux Center, IA
Posts: 209
Likes: 0
Received 0 Likes
on
0 Posts
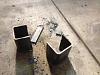
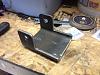
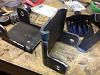
Well, I finally got back out in the garage last night to finish the metalwork on the skids. Here's a better pic of the skid marked up before cutting.
The 'X' is the material to be removed. The 'ear' of the skid is 2 inchs wide and 2.5 inches tall.
Then I spent about an hour with a metal cutting wheel on an angle grinder. It's tough cutting that 1/4 inch steel.
Then finished the cuts with a hack saw.
The 'X' is the material to be removed. The 'ear' of the skid is 2 inchs wide and 2.5 inches tall.
Then I spent about an hour with a metal cutting wheel on an angle grinder. It's tough cutting that 1/4 inch steel.
Then finished the cuts with a hack saw.
04-02-2013, 05:37 AM
#6
JK Enthusiast
Thread Starter
Join Date: Oct 2011
Location: Sioux Center, IA
Posts: 209
Likes: 0
Received 0 Likes
on
0 Posts
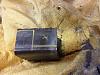
Here's a picture of the skid after grinding all the edges down with a flap grinding disc on the angle grinder.
I also made a small cut about 1/2 to 3/4 inch from the edge. This will be bent and hold the skid in place
on the control arm bracket when installed.
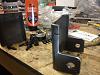
Then I used a torch to heat the metal (glowing red) and bent it with my vise grips. I reheated it and hit it
with a mini sledge a few times to get the right bend. I test fit it on the jeep. Now it's off for some POR-15
since these boys will be taking some abuse.
I also made a small cut about 1/2 to 3/4 inch from the edge. This will be bent and hold the skid in place
on the control arm bracket when installed.
Then I used a torch to heat the metal (glowing red) and bent it with my vise grips. I reheated it and hit it
with a mini sledge a few times to get the right bend. I test fit it on the jeep. Now it's off for some POR-15
since these boys will be taking some abuse.
Trending Topics
04-05-2013, 12:50 PM
#8
JK Enthusiast
Thread Starter
Join Date: Oct 2011
Location: Sioux Center, IA
Posts: 209
Likes: 0
Received 0 Likes
on
0 Posts
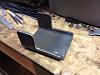
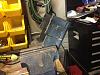
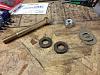
Alright....after 2 coats of POR-15 semi-gloss paint, they are finally done!! I had purchased a control arm bolt kit, but since the new
skids extend out past the control arm bracket, you need a longer bolt. I purchased two 5 inch long 9/16 bolts. It's important to make
sure the bolt has smooth shaft. This is the same reason for the CA bolt kit. You don't want the threads of the bolt grinding away at the
inner sleeve of the control arm. I also purchased a spacer for each side of the control arm (between the bracket and the 'ear' of the
skid. Unfortunately it wasn't enough and had to add a 5/8 washer also. I used a caliper and the total width of the spacer was 8.9mm or
.354 inch on each side. I'm sure you could use a bunch of washers, but it's a bit of a juggling act to get them inside of the skid but outside
of the bracket and also get the bolt to slide through while keeping everything aligned. The torque for the lower control arms is 125 ft lbs.
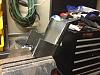
Here's a picture of the 9/16 bolt, the two thicker spacers, the two extra washers for spacers and the nylon hardened nut.
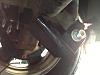
And here's a picture of the finished product. It turned out great and it's tougher than the 3/16 skids you can purchase. It was more
work than I thought it would be, but I'm glad it's done. Now to test it out at Moab!!! My wife has a cricket machine (a crafting machine
that cuts vinyl) and is planning to make some type of vinyl sticker to put on them. Skulls?? Spiderwebs??? Cute little puppies???
Hope this thread helps someone and Good Luck!!
skids extend out past the control arm bracket, you need a longer bolt. I purchased two 5 inch long 9/16 bolts. It's important to make
sure the bolt has smooth shaft. This is the same reason for the CA bolt kit. You don't want the threads of the bolt grinding away at the
inner sleeve of the control arm. I also purchased a spacer for each side of the control arm (between the bracket and the 'ear' of the
skid. Unfortunately it wasn't enough and had to add a 5/8 washer also. I used a caliper and the total width of the spacer was 8.9mm or
.354 inch on each side. I'm sure you could use a bunch of washers, but it's a bit of a juggling act to get them inside of the skid but outside
of the bracket and also get the bolt to slide through while keeping everything aligned. The torque for the lower control arms is 125 ft lbs.
Here's a picture of the 9/16 bolt, the two thicker spacers, the two extra washers for spacers and the nylon hardened nut.
And here's a picture of the finished product. It turned out great and it's tougher than the 3/16 skids you can purchase. It was more
work than I thought it would be, but I'm glad it's done. Now to test it out at Moab!!! My wife has a cricket machine (a crafting machine
that cuts vinyl) and is planning to make some type of vinyl sticker to put on them. Skulls?? Spiderwebs??? Cute little puppies???
Hope this thread helps someone and Good Luck!!
