DIY Interior Cargo Rack
 08-03-2014, 12:47 PM
#31
JK Newbie
Join Date: Jun 2012
Location: Pittsburgh, PA
Posts: 30
Likes: 0
Received 0 Likes
on
0 Posts
Thanks A'sJK for the idea and write-up! I made a few changes and happy with the result. I like being able to stow the freedom panels on the trail and keep some supplies organized.
 08-03-2014, 07:56 PM
#33
JK Freak
Join Date: Feb 2010
Location: Porterville, CA
Posts: 550
Likes: 0
Received 0 Likes
on
0 Posts
I did the same, but was able to use the same bolt holes the hardtop uses. Currently I'm running with my soft top so not sure what kind if modifications I'll need when I put the hardtop back on. I had a friend do the welding of the supports.

08-04-2014, 05:09 AM
#35
JK Newbie
Join Date: Jun 2012
Location: UTAH
Posts: 14
Likes: 0
Received 0 Likes
on
0 Posts
08-04-2014, 12:20 PM
#37
JK Newbie
Join Date: Aug 2014
Location: Italy
Posts: 31
Likes: 0
Received 0 Likes
on
0 Posts
 08-25-2014, 07:12 AM
#39
JK Enthusiast

Join Date: Oct 2006
Location: Maryland
Posts: 169
Likes: 0
Received 0 Likes
on
0 Posts
Thought I would post some pics of my storage setup. I had been running a JKU and switched back to a TJ for a while before going back to a JKUS a few months ago. I have finally gotten my rear storage set up done.
My 47qt ARB Fridge always seemed to become too high to look into and I decided this time I would keep it on the floor of the Jeep. I had an ARB slide and decided to install it on the passenger side of the rear compartment to be closer to the plugs. I made a custom bracket and installed the ARB HD wiring kit for the fridge as well as another 12-volt outlet tapped off of it. This mounts using one of the hardtop bolts and a Streamlight Flashlight mounts on top. This light utilizes the factory plug down low. My ARB LED light uses the other outlet and the ARB uses the HD wire.
I began by making a plywood floor the shape of the reversible Jeep floor mat. If I did it again I would make the left side the full width to protect the plastic. I had originally used �” plywood and double it. I later just used one sheet which made the board lighter and still thick enough to use. I may just use �” if I did it again. I then stapled an $8 floor mat I purchased at Ollies to this. The back is not 100% covered. There is no hole down to the storage area. I secured the board to the floor by using a 1” ratchet strap fished through two holes which surround the factory tie downs. The end towards the tailgate is not tied down so that I can lift the board to gain access to the storage area if necessary.
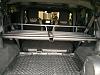
This worked well for giving me easy access to the fridge, but I wanted a shelf above and the Bestop plastic storage tray would be great – if a kit was made to fit the JKU. Since I purchased the Bestop tray and tailgate mounting kit I had half of what I needed. I decided that I would just by the JK interior kit and make it work somehow.
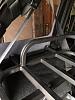
The Bestop rear bar that goes close to the tailgate worked fine. It would keep the tray above the fridge. I just needed a way to keep the end close to the seats raised. When I measured it, it appeared I needed about 23” – the exact same length of round tubes that came with the tailgate kit. I decided I would rob these pieces. I installed the second Bestop brace to the forward part of the tray and then made vertical supports from these pieces. A bolt goes through them and then a Bestop support bracket underneath takes the shear load off the bolts. The bottom of these supports attaches to some brackets that I had. These are all secured to the board using some nutserts installed through the bottom of the plywood.
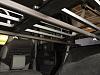
The forward part was secured, but the rear bar bolt holes needed to be redrilled to be vertical and line up with the tray holes. I flipped the rear bar 180 degrees to line up better and made my holes. The rack does not wiggle one bit. I then bolted some small aluminum trays I had built to the vertical supports over the wheel wells. These use 2” ARB straps to hold my AEV Jack Base, jumper cables, and rain gear.
The tray sits just above the back of the rear seats and does not interfere with their folding levers. Once the fridge is in place, there is room for 5-6 Pelican cases under and on the tray. I mounted to small gear bags underneath to carry incidentals. I replaced the tailgate tubes I stole with some 1” square aluminum tube and will use this to carry my Hi-Lift Jack 48” Bar –the rest of the jack is in the case.
My 47qt ARB Fridge always seemed to become too high to look into and I decided this time I would keep it on the floor of the Jeep. I had an ARB slide and decided to install it on the passenger side of the rear compartment to be closer to the plugs. I made a custom bracket and installed the ARB HD wiring kit for the fridge as well as another 12-volt outlet tapped off of it. This mounts using one of the hardtop bolts and a Streamlight Flashlight mounts on top. This light utilizes the factory plug down low. My ARB LED light uses the other outlet and the ARB uses the HD wire.
I began by making a plywood floor the shape of the reversible Jeep floor mat. If I did it again I would make the left side the full width to protect the plastic. I had originally used �” plywood and double it. I later just used one sheet which made the board lighter and still thick enough to use. I may just use �” if I did it again. I then stapled an $8 floor mat I purchased at Ollies to this. The back is not 100% covered. There is no hole down to the storage area. I secured the board to the floor by using a 1” ratchet strap fished through two holes which surround the factory tie downs. The end towards the tailgate is not tied down so that I can lift the board to gain access to the storage area if necessary.
This worked well for giving me easy access to the fridge, but I wanted a shelf above and the Bestop plastic storage tray would be great – if a kit was made to fit the JKU. Since I purchased the Bestop tray and tailgate mounting kit I had half of what I needed. I decided that I would just by the JK interior kit and make it work somehow.
The Bestop rear bar that goes close to the tailgate worked fine. It would keep the tray above the fridge. I just needed a way to keep the end close to the seats raised. When I measured it, it appeared I needed about 23” – the exact same length of round tubes that came with the tailgate kit. I decided I would rob these pieces. I installed the second Bestop brace to the forward part of the tray and then made vertical supports from these pieces. A bolt goes through them and then a Bestop support bracket underneath takes the shear load off the bolts. The bottom of these supports attaches to some brackets that I had. These are all secured to the board using some nutserts installed through the bottom of the plywood.
The forward part was secured, but the rear bar bolt holes needed to be redrilled to be vertical and line up with the tray holes. I flipped the rear bar 180 degrees to line up better and made my holes. The rack does not wiggle one bit. I then bolted some small aluminum trays I had built to the vertical supports over the wheel wells. These use 2” ARB straps to hold my AEV Jack Base, jumper cables, and rain gear.
The tray sits just above the back of the rear seats and does not interfere with their folding levers. Once the fridge is in place, there is room for 5-6 Pelican cases under and on the tray. I mounted to small gear bags underneath to carry incidentals. I replaced the tailgate tubes I stole with some 1” square aluminum tube and will use this to carry my Hi-Lift Jack 48” Bar –the rest of the jack is in the case.
Last edited by dp7197; 08-25-2014 at 07:16 AM.