DIY Sunshade
 06-09-2016, 10:25 AM
#1
JK Newbie
Thread Starter
Join Date: May 2016
Location: st. louis, mo
Posts: 7
Likes: 0
Received 0 Likes
on
0 Posts
Though the wife loves Jeeping with out the top on (the Jeep's top), I'm fairer skinned and max out after a couple hours of UVs, so we decided to get a sunshade. My usual rule of thumb is that if I can buy something of good quality and spend it only costs about 20% more than making it, I will do so.
In this case, I figured I could make a sunshade of good quality and do it for about 40-45$.
Here is the material sheet, as usual from Harbor Freight:
1 10x12 Mesh Tarp - Part# 60576 - 29.99 - 20% coupon=24$. I actually got a larger tarp for the margin of error and had enough for some screens for the rear quarter.
1 package Grommet Installation kit 103 pc - Part# 30037. Probably enough grommets to do 4 shades.
4 packages of 4 each Bungee Balls - Part# 47302. I bought more, but i always keep extra bungees on the roll cage for emergencies.
Things I had on hand that were used:
Nylon Thread
Black quickset epoxy from a bumper repair.
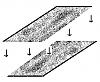
First step was to cut the tarp so I would be able to leverage the finished corners. I did this because, no matter how much a sewed, I wouldn't get an edge as nice and sturdy as the factory. After this, we pinned the two pieces together, one edge at a time, so the opposite corners would complete one edged piece when done. We did ours so the finished dimensions would be 45" wide by 69" long. I've seen shorter ones, but I wanted the back to roll over the back roll bar a bit so it didn't flap around.
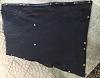
My wife sewed a bead around the edge. The only tedious part was getting the edges to line up, as the tarp had some memory and wanted to bunch up. This is why we did an edge at a time.
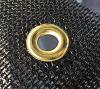
I measure how I wanted the grommets spaced by just laying the shade across the top of the jeep and marked the spots with a silver Sharpie. I used the grommet tool and punched holes with the tarp on top of an old piece of metal. Wood is too soft to use as a base for the grommet punch. If you're worried about punching through where you just sewed a bead, that is addressed later.
One thing I did later, on a couple of grommet holes and would do to all if I did this again, would be to epoxy the area around where I am punching the grommet and letting it set prior. I did this for the two holes in the top so I could mount the freedom tops without removing the shade. I think it would really reinforce each hole and almost negate the chance of the tarp becoming unwoven from stress. That being said, I think it probably isn't in any danger of coming undone.
After I got the grommets done and tested them, my wife then took it to the sewing machine again and this time stitched the crap out of it with a zigzag stitch. This negated any bead I had cut through with the grommets.
When attaching the tarp to the front hooks for the top, I just pulled the knot out of the bungee balls, cut it off and made a shorter loop. No need to try to track down shorter ones and Harbor Freights are all black.
Since we had time to kill and extra tarp, we made some triangle shades for the rear quarters of the roll cage. I don't know how necessary they are, but they look ok.
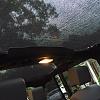
If you want more shade, you can always get more tarp and do more layers, but the two layers was sufficient for me and the difference in temperature is noticeable. That little bit of shade keeps the interior cooler and cuts down the wind a bit, but not enough to negate having the roof off in the first place. Adding another layer would definitely make pinning and sewing much more awkward.
The only thing that looks awkward is the extra grommet holes. None of the existing grommet holes in the tarp lined up with where I wanted one, so there are superfluous grommets around the perimeter, though I'm probably the only one who notices.


In this case, I figured I could make a sunshade of good quality and do it for about 40-45$.
Here is the material sheet, as usual from Harbor Freight:
1 10x12 Mesh Tarp - Part# 60576 - 29.99 - 20% coupon=24$. I actually got a larger tarp for the margin of error and had enough for some screens for the rear quarter.
1 package Grommet Installation kit 103 pc - Part# 30037. Probably enough grommets to do 4 shades.
4 packages of 4 each Bungee Balls - Part# 47302. I bought more, but i always keep extra bungees on the roll cage for emergencies.
Things I had on hand that were used:
Nylon Thread
Black quickset epoxy from a bumper repair.
First step was to cut the tarp so I would be able to leverage the finished corners. I did this because, no matter how much a sewed, I wouldn't get an edge as nice and sturdy as the factory. After this, we pinned the two pieces together, one edge at a time, so the opposite corners would complete one edged piece when done. We did ours so the finished dimensions would be 45" wide by 69" long. I've seen shorter ones, but I wanted the back to roll over the back roll bar a bit so it didn't flap around.
My wife sewed a bead around the edge. The only tedious part was getting the edges to line up, as the tarp had some memory and wanted to bunch up. This is why we did an edge at a time.
I measure how I wanted the grommets spaced by just laying the shade across the top of the jeep and marked the spots with a silver Sharpie. I used the grommet tool and punched holes with the tarp on top of an old piece of metal. Wood is too soft to use as a base for the grommet punch. If you're worried about punching through where you just sewed a bead, that is addressed later.
One thing I did later, on a couple of grommet holes and would do to all if I did this again, would be to epoxy the area around where I am punching the grommet and letting it set prior. I did this for the two holes in the top so I could mount the freedom tops without removing the shade. I think it would really reinforce each hole and almost negate the chance of the tarp becoming unwoven from stress. That being said, I think it probably isn't in any danger of coming undone.
After I got the grommets done and tested them, my wife then took it to the sewing machine again and this time stitched the crap out of it with a zigzag stitch. This negated any bead I had cut through with the grommets.
When attaching the tarp to the front hooks for the top, I just pulled the knot out of the bungee balls, cut it off and made a shorter loop. No need to try to track down shorter ones and Harbor Freights are all black.
Since we had time to kill and extra tarp, we made some triangle shades for the rear quarters of the roll cage. I don't know how necessary they are, but they look ok.
If you want more shade, you can always get more tarp and do more layers, but the two layers was sufficient for me and the difference in temperature is noticeable. That little bit of shade keeps the interior cooler and cuts down the wind a bit, but not enough to negate having the roof off in the first place. Adding another layer would definitely make pinning and sewing much more awkward.
The only thing that looks awkward is the extra grommet holes. None of the existing grommet holes in the tarp lined up with where I wanted one, so there are superfluous grommets around the perimeter, though I'm probably the only one who notices.

 06-09-2016, 11:58 AM
#3
Good work. I once had an idea of adding that material behind my smittybilt cres top except I was trying to find the material in red. I bought what I thought was the same material off amazon only to find out it was a material similar to a burlap sack. Worst $30 I've ever spent....
06-09-2016, 12:27 PM
#4
JK Newbie
Thread Starter
Join Date: May 2016
Location: st. louis, mo
Posts: 7
Likes: 0
Received 0 Likes
on
0 Posts
thanks. the only additional advice I have is to not buy anything at Harbor Freight without a coupon and to have a wife who can sew. While my version would have been sturdy, her skills made it pretty.


