DIY Tailgate Storage Bin $65
 04-05-2014, 08:09 PM
#1
JK Newbie
Thread Starter

Join Date: Jan 2014
Location: edmonton
Posts: 9
Likes: 0
Received 0 Likes
on
0 Posts
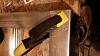
I just bought a Smittybilt 5.65 compressor and was having a hell of a time trying to find a place to mount it, I was contemplating how to mount it to the tailgate when I had an idea that might be useful to most jeepers regardless of compressor mounting needs.
Materials
-1x 10� 6� steel stud deep track, $6 Found it a drywall supplier (deep means its 2� thick)
-1x 24� x 60� bungee Cargo net, $15, Canadian Tire
-1x roll auto body repair tape, $3, CT
-1x pack of ��plastic cable clamps $3, CT
-1x rattle can of primer $5
-2x Spray on Bedliner $30
-Rivets, Self tapping screws and some small washers, a few $ if you don�t have �em, ps I got a Rivet gun @ CT for $8 on sale
The Build
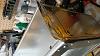
Cut your steel track into 4 pieces, 2 @ 28� and 2 @ 13�, this is for a Jk without a subwoofer, so do your due diligence and measure your rig 1st. Do your best to keep your cuts clean and straight, but if your just using shears like me then it will look like an abortion, no worries that�s what the tape is for, just bend the edges in slightly so the tape will be flat.
Assemble the box, and measure diagonally in both directions to make sure it is square, clamp the corners, drill and rivet. Do one in each corner, then flip and resquare it and rivet the back, I went 1/2� from the edges, and had two rivets in each corner on a 45*. I�m confused about that last sentence and I�m the guy that wrote it, hopefully the pictures make it clearer.
more to follow, over
Materials
-1x 10� 6� steel stud deep track, $6 Found it a drywall supplier (deep means its 2� thick)
-1x 24� x 60� bungee Cargo net, $15, Canadian Tire
-1x roll auto body repair tape, $3, CT
-1x pack of ��plastic cable clamps $3, CT
-1x rattle can of primer $5
-2x Spray on Bedliner $30
-Rivets, Self tapping screws and some small washers, a few $ if you don�t have �em, ps I got a Rivet gun @ CT for $8 on sale
The Build
Cut your steel track into 4 pieces, 2 @ 28� and 2 @ 13�, this is for a Jk without a subwoofer, so do your due diligence and measure your rig 1st. Do your best to keep your cuts clean and straight, but if your just using shears like me then it will look like an abortion, no worries that�s what the tape is for, just bend the edges in slightly so the tape will be flat.
Assemble the box, and measure diagonally in both directions to make sure it is square, clamp the corners, drill and rivet. Do one in each corner, then flip and resquare it and rivet the back, I went 1/2� from the edges, and had two rivets in each corner on a 45*. I�m confused about that last sentence and I�m the guy that wrote it, hopefully the pictures make it clearer.
more to follow, over
Last edited by INFIDELicious45; 04-05-2014 at 08:27 PM.
 04-05-2014, 08:18 PM
#2
JK Newbie
Thread Starter
Join Date: Jan 2014
Location: edmonton
Posts: 9
Likes: 0
Received 0 Likes
on
0 Posts
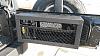
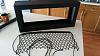
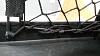
For the cargo net I drilled holes in the sides 9”, 5” and �” from the bottom and �” from the edge. For the bottom I drilled 7”, 14” and 21” from one side and 3/4“ from the bottom. (i didn't get any pics for this, take a look at the finished pic up top and it should make sense) I then riveted the plastic cable clamps in place using washers.
I drilled a few drain holes in the bottom as well.
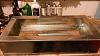
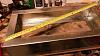
Apply the auto body tape on the corners, I used two layers just take your time and try not to crinkle it.
Attachment 543568
Prime it, then bedline it. I started on the inside 1st, do several light coats and get some extra on the corners to hide the edge of the tape.
Cut your net to fit and lace your bungee through the clamps, make it pretty then tie a reef knot in it. I left extra bungee after the knot in case I ever blow out a plastic clamp or want to adjust the tension.
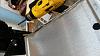
Pop off the plastic doo-hickey on your tailgate, and get a buddy to hold the unit in place so that the top edge is just under the rounded surface of the tail gate, fire in some self tappers, and light up a victory smoke.
If you are mounting an AC in yours, find a scrap piece of sheet metal and rivet it in place to beef up one end of your unit and drill your mounting holes prior to painting. Also run your wiring before installing the bin.
I drilled a few drain holes in the bottom as well.
Apply the auto body tape on the corners, I used two layers just take your time and try not to crinkle it.
Attachment 543568
Prime it, then bedline it. I started on the inside 1st, do several light coats and get some extra on the corners to hide the edge of the tape.
Cut your net to fit and lace your bungee through the clamps, make it pretty then tie a reef knot in it. I left extra bungee after the knot in case I ever blow out a plastic clamp or want to adjust the tension.
Pop off the plastic doo-hickey on your tailgate, and get a buddy to hold the unit in place so that the top edge is just under the rounded surface of the tail gate, fire in some self tappers, and light up a victory smoke.
If you are mounting an AC in yours, find a scrap piece of sheet metal and rivet it in place to beef up one end of your unit and drill your mounting holes prior to painting. Also run your wiring before installing the bin.
Last edited by INFIDELicious45; 04-05-2014 at 08:25 PM.

