DIY Tow Hitch Receiver
 01-17-2010, 05:30 PM
#1
JK Enthusiast
Thread Starter
Join Date: Oct 2008
Location: Milton, FL
Posts: 148
Likes: 0
Received 0 Likes
on
0 Posts
This will essentially look like a Rugged Ridge tow hitch receiver.
If you've still got the stock rear bumper and no tow hitch receiver then this is for you. I used professional machine shop equipment b/c that's what available to me, but for say... the 3/4" holes in the plates, you can certainly [and carefully] use other tools to get the job done with a little imagination. It's not the size of the equipment; It's how you use it!
Bill of Materials:
Mild steel plate; 1/4" thick - Scrap yard
2.5" Mild steel square tubing; 3/16" wall thickness x 8-12" long - $6
*Note* 2.5" measures flat-to-flat on the outside
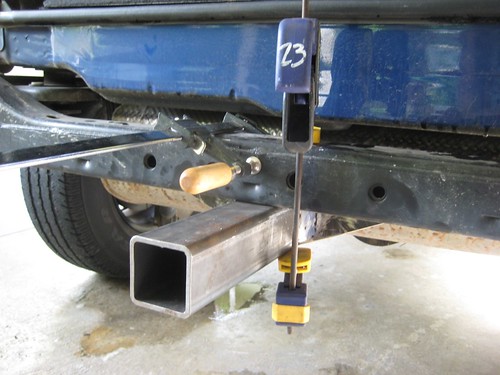
There are 2 plates that sandwich the rear frame cross member. Through the frame cross member are (4) 3/4" holes. The rear frame cross member is 2.5" tall and 3" wide; the holes are centered 1.25" above the bottom of the frame. The plates that sandwich the frame are welded on to the 2.5" square tubing, which then accepts the hitch.
Grind, cut, shear or mill your 1/4" plate to 5" x 14"
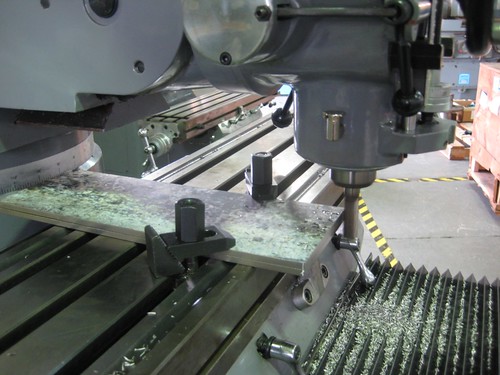
Remove the waste material on the bottom half the plate.
Be sure to de-burr/file all edges after cutting. It's a *very* good idea.
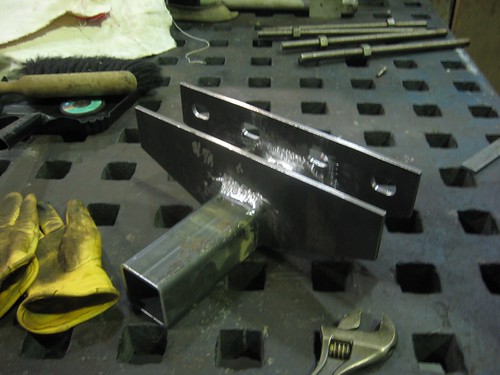
Lay-out the holes on the back plate before welding so there's no clearance issues between the drill bit and the square tubing later on. The 4 holes are spaced center to center from left to right: 3.5", 4", 3.5". With a 14" wide plate, there'll be a 1.5" margin on each side.
Weld the back plate against the square tubing. *Be sure to square off the ends of the square tube or use 90 degree magnets to hold it perpendicular!*
I ground all my welds down not for a cleaner look but b/c I'm a horrible welder. Luckily, I work as a machinist... Regardless, the top does need to ground back down to flat so there's room for the rear frame cross member to sit flush in that corner. Try to get good penetration in on that top weld so that the metals are still fused after all the grinding.
I'll keep working on it today until I have the final product done sans powdercoat.
If you've still got the stock rear bumper and no tow hitch receiver then this is for you. I used professional machine shop equipment b/c that's what available to me, but for say... the 3/4" holes in the plates, you can certainly [and carefully] use other tools to get the job done with a little imagination. It's not the size of the equipment; It's how you use it!
Bill of Materials:
Mild steel plate; 1/4" thick - Scrap yard
2.5" Mild steel square tubing; 3/16" wall thickness x 8-12" long - $6
*Note* 2.5" measures flat-to-flat on the outside
There are 2 plates that sandwich the rear frame cross member. Through the frame cross member are (4) 3/4" holes. The rear frame cross member is 2.5" tall and 3" wide; the holes are centered 1.25" above the bottom of the frame. The plates that sandwich the frame are welded on to the 2.5" square tubing, which then accepts the hitch.
Grind, cut, shear or mill your 1/4" plate to 5" x 14"
Remove the waste material on the bottom half the plate.
Be sure to de-burr/file all edges after cutting. It's a *very* good idea.
Lay-out the holes on the back plate before welding so there's no clearance issues between the drill bit and the square tubing later on. The 4 holes are spaced center to center from left to right: 3.5", 4", 3.5". With a 14" wide plate, there'll be a 1.5" margin on each side.
Weld the back plate against the square tubing. *Be sure to square off the ends of the square tube or use 90 degree magnets to hold it perpendicular!*
I ground all my welds down not for a cleaner look but b/c I'm a horrible welder.
Luckily, I work as a machinist... Regardless, the top does need to ground back down to flat so there's room for the rear frame cross member to sit flush in that corner. Try to get good penetration in on that top weld so that the metals are still fused after all the grinding.I'll keep working on it today until I have the final product done sans powdercoat.
Last edited by Sarbatche; 01-18-2010 at 03:49 AM. Reason: Adjust picture URLs
 01-18-2010, 04:10 AM
#2
JK Enthusiast
Thread Starter
Join Date: Oct 2008
Location: Milton, FL
Posts: 148
Likes: 0
Received 0 Likes
on
0 Posts
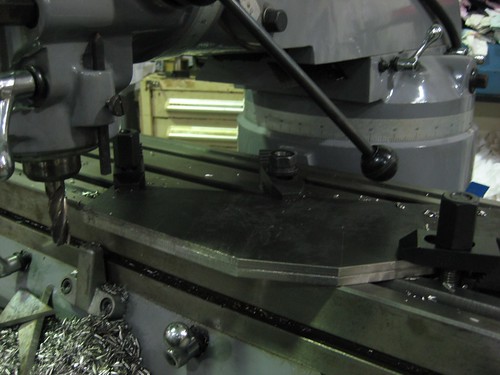
With the back plate welded on, check your square tubing and plate angle. It should be 90 degrees. Then fit up the piece to the rear frame cross member to check your work.
I noticed that the actual holes in the cross member were all over the place, and one was closer to 1/2" rather than 3/4" like the other three. So I ended up milling my 3/4" round holes in the back plate into slots for adjustment and centering. The slots are an extra 1/2" wider than the original 3/4" holes.
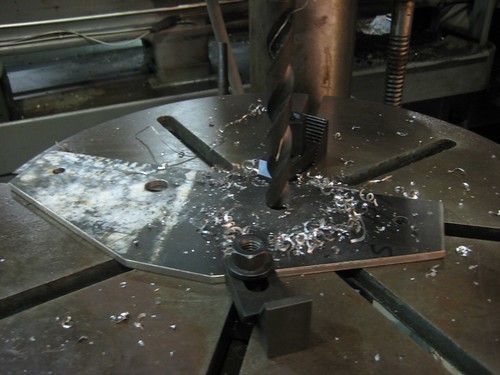
Additionally, take your second 1/4" plate and remove the section for the square tube to fit into. I used a 5/8" end mill and the radius just happened to fit exactly over the radius on the square tubing.
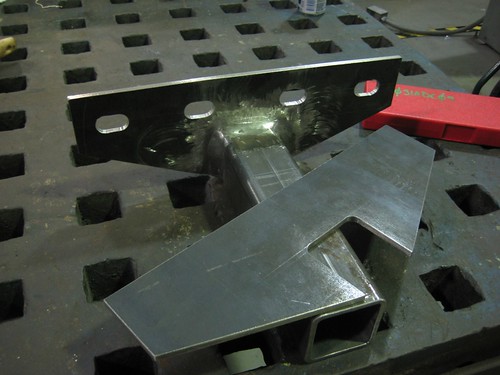
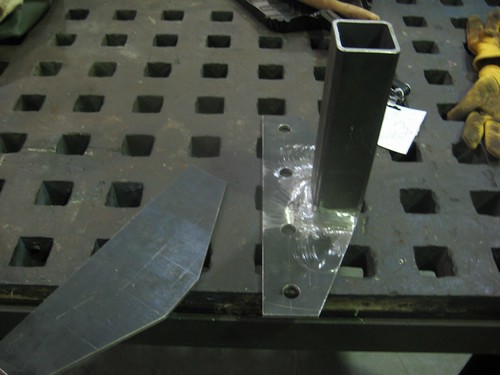
Weld both sides of the second plate in place. I chanced upon a piece of solid 3" wide solid square steel bar and used that to keep the second plate at a right angle to the hitch receiver and the correct distance from the back plate.
Check the work again on the rear cross member to make sure your plates aren't too close together. This was a tight enough fit that I had to use a pipe clamp to get it the last 1/2" up. I think there must have been a weld bead protruding from the frame.
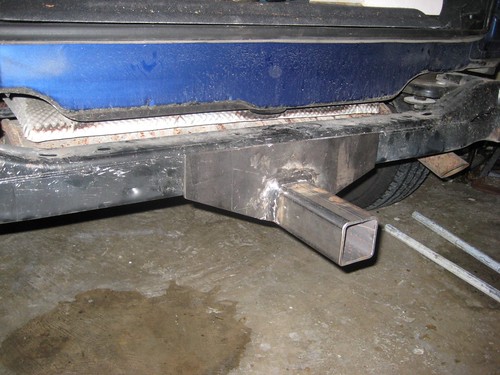
Chuck up your stock bumper to see how much receiver stock is sticking out. This would have definitely caught up on a rock!
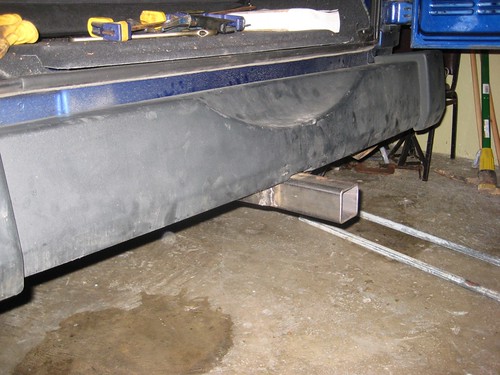
Scribe a line with the bumper in place so that you know where to cut.

Tomorrow is the last day! Chop off the end of the square tubing to length and mill the 4 slots in the second plate.


I noticed that the actual holes in the cross member were all over the place, and one was closer to 1/2" rather than 3/4" like the other three.
So I ended up milling my 3/4" round holes in the back plate into slots for adjustment and centering. The slots are an extra 1/2" wider than the original 3/4" holes.Additionally, take your second 1/4" plate and remove the section for the square tube to fit into. I used a 5/8" end mill and the radius just happened to fit exactly over the radius on the square tubing.
Weld both sides of the second plate in place. I chanced upon a piece of solid 3" wide solid square steel bar and used that to keep the second plate at a right angle to the hitch receiver and the correct distance from the back plate.
Check the work again on the rear cross member to make sure your plates aren't too close together. This was a tight enough fit that I had to use a pipe clamp to get it the last 1/2" up. I think there must have been a weld bead protruding from the frame.
Chuck up your stock bumper to see how much receiver stock is sticking out. This would have definitely caught up on a rock!
Scribe a line with the bumper in place so that you know where to cut.
Tomorrow is the last day! Chop off the end of the square tubing to length and mill the 4 slots in the second plate.
01-18-2010, 05:24 AM
#3
JK Newbie
Join Date: May 2009
Location: GA
Posts: 56
Likes: 0
Received 0 Likes
on
0 Posts
Nice job and enjoy seeing the process.
I know clearance is an issue, but if you aren't a rock crawler, you may want it a bit long. Using my stock receiver and a bike carrier or standard basket, the spare tire is in the way. I had to buy an 8" extension tube so I could clear the spare. At least with the extension tube, I can always remove it when not needed, but it is just one more thing to carry & requires another pin & lock. Just FYI.
Of course, you can always put another one on the front & then there's no issue with the spare....
01-18-2010, 11:28 AM
#4
JK Enthusiast
Thread Starter
Join Date: Oct 2008
Location: Milton, FL
Posts: 148
Likes: 0
Received 0 Likes
on
0 Posts
That front hitch isn't a bad idea at all, especially if your doing a modular winch set-up. I've seen older Jeeps and Cherokees have harnesses front and back, then swap the winch between hitch receivers. My bikes sit on a spare tire carrier as it is now anywho.

 01-19-2010, 05:24 PM
#7
JK Enthusiast
Thread Starter
Join Date: Oct 2008
Location: Milton, FL
Posts: 148
Likes: 0
Received 0 Likes
on
0 Posts
...$6
I grabbed the 1/4" plate from a scrap bin that had most of the material picked out with a plasma cutter, so the rectangles I took were a little iffy in getting. The square tubing was the only piece of metal that I bought. The equipment, drill bits, end mills and welding rod were on hand.
I grabbed the 1/4" plate from a scrap bin that had most of the material picked out with a plasma cutter, so the rectangles I took were a little iffy in getting. The square tubing was the only piece of metal that I bought. The equipment, drill bits, end mills and welding rod were on hand.
Trending Topics
01-19-2010, 06:10 PM
#8
JK Jedi Master
...$6
I grabbed the 1/4" plate from a scrap bin that had most of the material picked out with a plasma cutter, so the rectangles I took were a little iffy in getting. The square tubing was the only piece of metal that I bought. The equipment, drill bits, end mills and welding rod were on hand.
I grabbed the 1/4" plate from a scrap bin that had most of the material picked out with a plasma cutter, so the rectangles I took were a little iffy in getting. The square tubing was the only piece of metal that I bought. The equipment, drill bits, end mills and welding rod were on hand.
$80 doesn't look so bad anymore.
Nice job, though.
01-19-2010, 07:48 PM
#9
JK Enthusiast
Thread Starter
Join Date: Oct 2008
Location: Milton, FL
Posts: 148
Likes: 0
Received 0 Likes
on
0 Posts
I didn't use to have this sort of access to equipment and I still did the same level of stuff:
1) Use a hacksaw or cutoff wheel (preferable) to get your plate to size. You could even have the scrap yard cut it for you; they'll probably have the tools to shear what you need.
2) Use a hand held drill (w/ cord for torque) for the holes. Be sure to center punch and center drill first, or the bit will wander.
3) Use a cheap 110V welding unit to put the plate and square tube together. File the edges of the metal joints sufficiently to get better penetration with a weak welder and perform multiple passes.
4) Drink beer and shower. Possibly in that order.
Fabricating at home can be done very cheaply. One of my Warrant Officers built his own welder from a diesel truck's alternator and a riding lawnmower motor. He also fab'd a tapered shaft for that same welding set-up by putting metal rod in a Craftsman drill press and filing the taper onto it.
01-19-2010, 08:01 PM
#10
JK Jedi Master
You forgot the $50,000 hydraulic shear that I used to get the 1/4" plate to size...
I didn't use to have this sort of access to equipment and I still did the same level of stuff:
1) Use a hacksaw or cutoff wheel (preferable) to get your plate to size. You could even have the scrap yard cut it for you; they'll probably have the tools to shear what you need.
2) Use a hand held drill (w/ cord for torque) for the holes. Be sure to center punch and center drill first, or the bit will wander.
3) Use a cheap 110V welding unit to put the plate and square tube together. File the edges of the metal joints sufficiently to get better penetration with a weak welder and perform multiple passes.
4) Drink beer and shower. Possibly in that order.
Fabricating at home can be done very cheaply. One of my Warrant Officers built his own welder from a diesel truck's alternator and a riding lawnmower motor. He also fab'd a tapered shaft for that same welding set-up by putting metal rod in a Craftsman drill press and filing the taper onto it.