GPS, Camera, & Onboard Computer System Install
 12-13-2009, 05:45 PM
#1
JK Enthusiast
Thread Starter
Join Date: Sep 2007
Location: Conifer, CO
Posts: 171
Likes: 0
Received 0 Likes
on
0 Posts
This has been the most complicated modification I’ve done to date. This is going to be a LONG post! Here is a wiring diagram of what the finished product looks like:
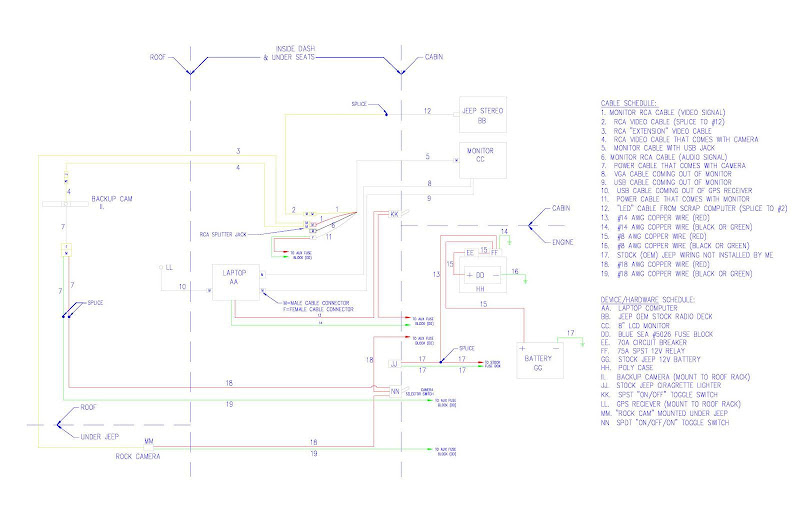
Download the full resolution pdf of the wiring diagram here.
I described a portion of this system previously in my post called “auxiliary fuse block”. This provided an auxiliary fuse block to connect all of my accessories I added in this build and for ones I’m planning in the future.
The finished system includes the following parts:
1. Onboard Computer System
2. Topo USA GPS Navigation with detailed, extensive trail maps of the entire United States. Coupled with a large LCD monitor, this is a powerful program that can help you find your way through the backcountry better than any hand held device.
3. 8” LCD Touch-Screen Computer Monitor and DVD screen to watch movies via the stock jeep in-dash player.
4. Backup Camera for keeping an eye on your trailer when towing, and for backing up when wheeling.
5. “Rock Cam” Under Jeep camera to check your clearance over obstacles
6. Switch Panel for future loads including the following:
a. Backup Lights
b. Brush Guard Mounted Driving Lights
c. LED Rock Lights
d. CB Radio
e. Computer (to keep the battery from charging every time the engine is on)
The first step in the project was to select a suitable laptop computer. I have a HP dv1000 laptop that I bought before I went on a world trip a few years ago. It’s taken some abuse but still runs pretty fast and has enough speed and memory to run Topo USA 8.0. It’s also small enough to fit nicely under the passenger seat.

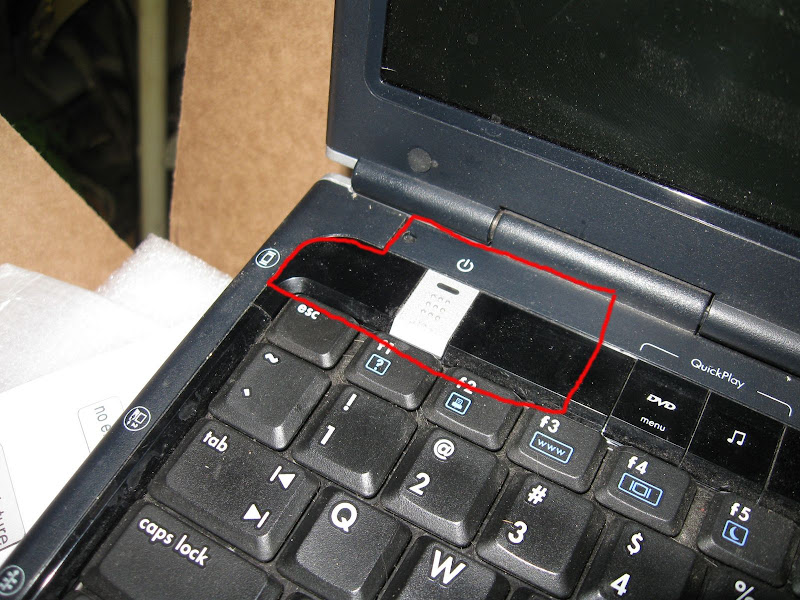
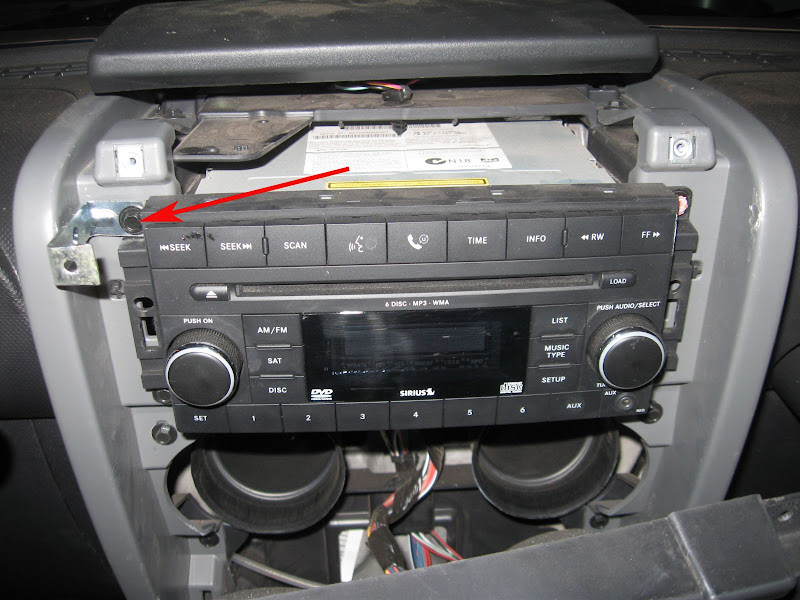
The main problem with most laptops is that the power switch is located under the lid (see red arrow in the photo), making it impossible to turn the computer on and off without taking the laptop out from under the seat and out of any box you put it in. You can buy “Car PC’s” which don’t have this problem, but I didn’t want to spend the money. I decided to mod my laptop instead.
I used a dremel to cut out the plastic over the area containing the power button.
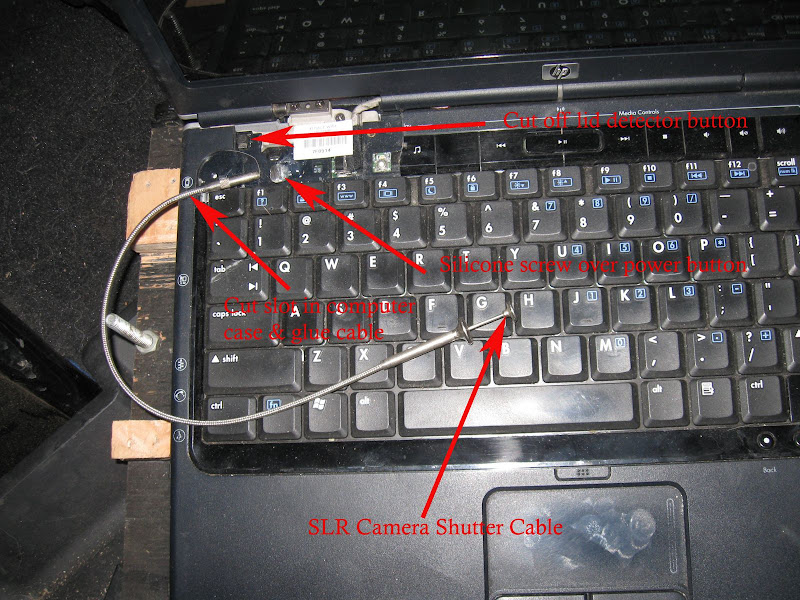
Once the actual button underneath the plastic key was exposed, I used flexible 100% silcone sealant to glue a small screw onto the circuit boards power button. I ground half of the head of the screw down at a 45 deg angle first. Then I cut a slit into the side of the laptop case and glued an old school camera “remote” cable in place. This allows me to close the lid of the computer and just push the remote cable which hits the angled top of the screw glued to the power button, turning it on or off. You might be able to avoid this if you have a computer with a brand new battery that can sit in hibernate mode for extended periods of time between engine startups. I also cut off the little rubber “button” which told the laptop that the lid/screen was closed. This way, the computer doesn’t enter power save or hibernate when I have the lid closed and the computer stored under the seat.
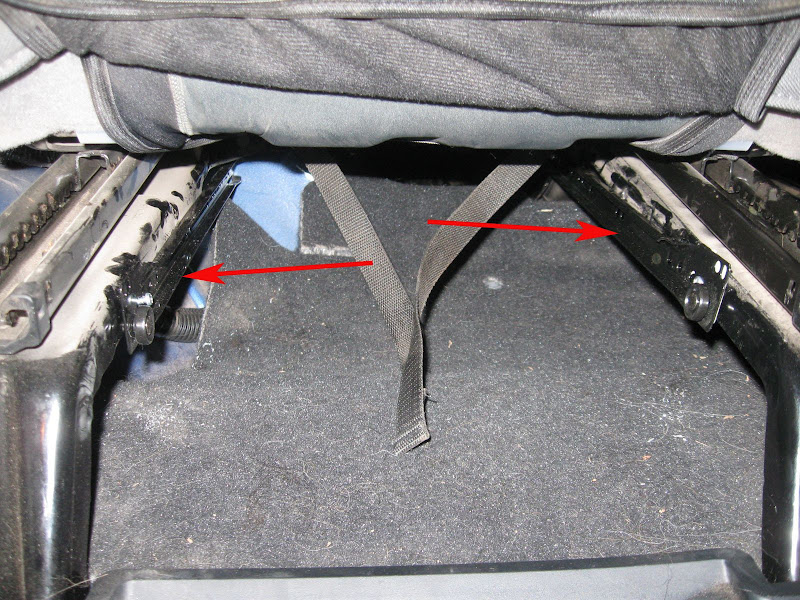
Next I built a mounting system for the laptop under the passenger seat. I wanted it to be raised off the floor in case of minor water accumulation (say from leaving the jeep in the rain). I also need to access the computer. So I bought some cheap drawer slides from Home Depot and screwed them into the seat brackets.
I cut a piece of plywood to size and mounted the other half of the drawer slides to it. It fits under the seat like this:
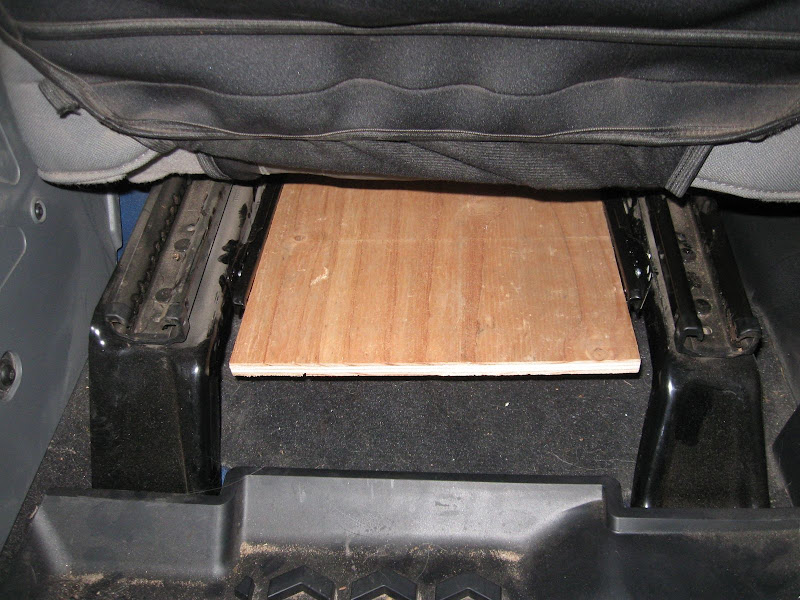
Next I mounted some wood strips to the top of the plywood to elevate the latptop since the laptop “breathes” through vents on its underside. I don’t want it to overheat.

Then using thin metal bar stock from a local steel supplier, I welded a rectangular frame to enclose the laptop.

Next I used a FedEx envelope which is made of Tyvek. Tyvek is dust and waterproof, but breathable “material” that is super strong. I glued it to the metal frame using Gorilla Glue.
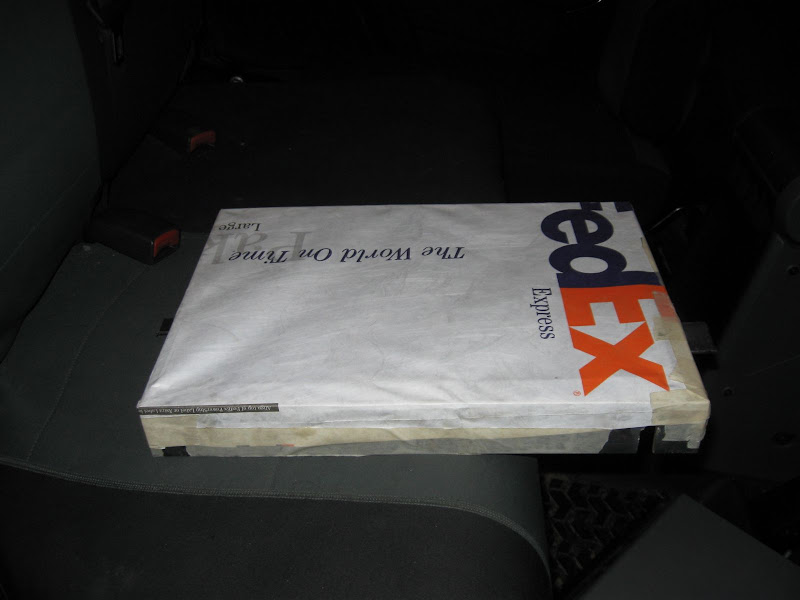
I added tabs with bolts to hold the “lid” down over the latptop. The whole assembly fits onto the drawer slides and tucks under the seat.

Next I turned my attention to the monitor.
I needed a place to mount it that it would be easy to manipulate the touch screen. With a touch screen no mouse or keyboard is needed. That makes using Topo USA on the go really nice. I saw others mount a 7” screen above the rear view mirror, but I knew my cables wouldn’t be long enough, and it would be uncomfortable working on the screen at that height. Next option was to mount to the top of the dash, but it takes up too much of your view out the windshield. This could be problematic offroading, plus I didn’t think it would be stable enough during heavy offroading. I came up with a system to mount it in front of the stock radio. You may be wondering at this point why I didn’t just get an in-dash car pc or a double din stereo with monitor. Read about that at the end of this post.
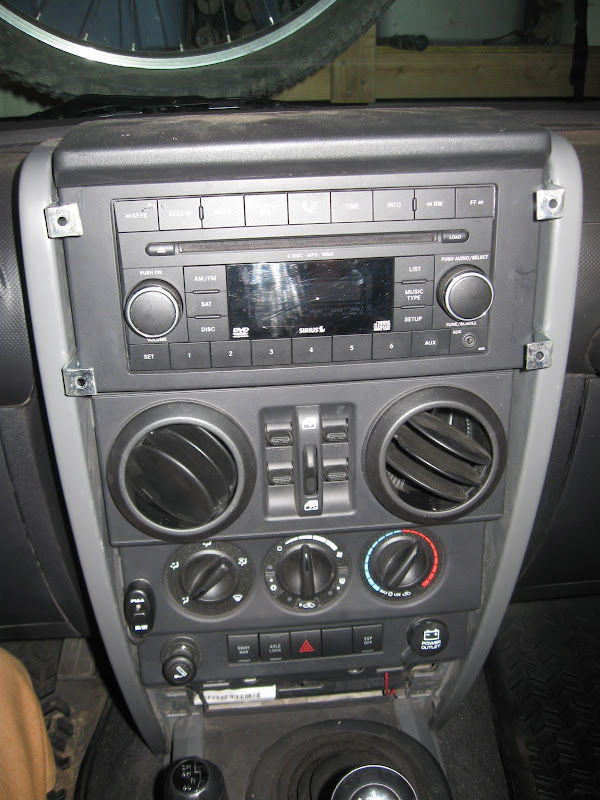
I didn’t want to drill any holes in my dash in case I reconfigure my system in the future. After taking the front of the dash plastic off, I noticed 4 nice screws that hold the stereo in place.
I used shelf brackets from home depot like this:
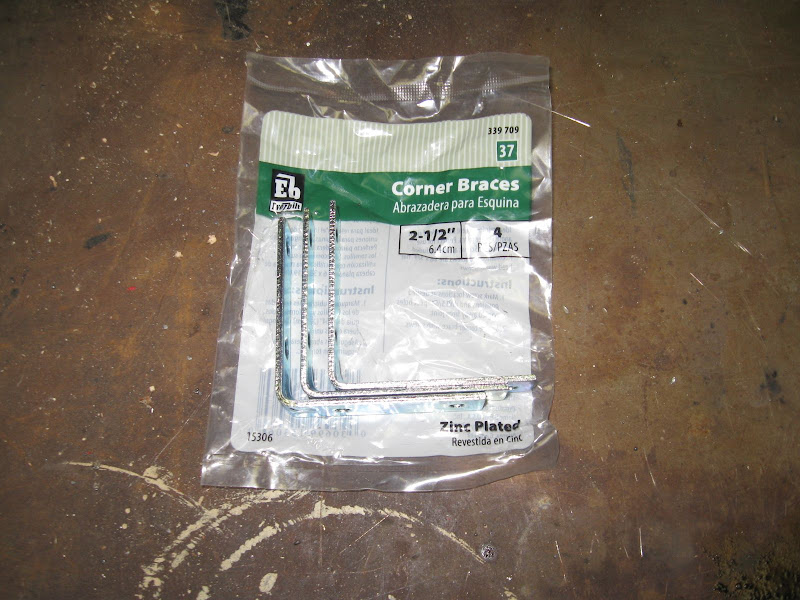
I cut them down to size and bent them into shape. They mount like this:
Getting the dash back into place is tricky. You have to put three brackets on, then wiggle the dash back under them, and install the 4th bracket after the dash is loosely in place. You don’t have much room, but with a tiny socket set I managed it.
Since I finished the project, I went back and used some rubber weather stripping. I cut out a little square and put it on the top two brackets. This way, when the monitor mounting plate is attached, it doesn’t rattle or squeak.
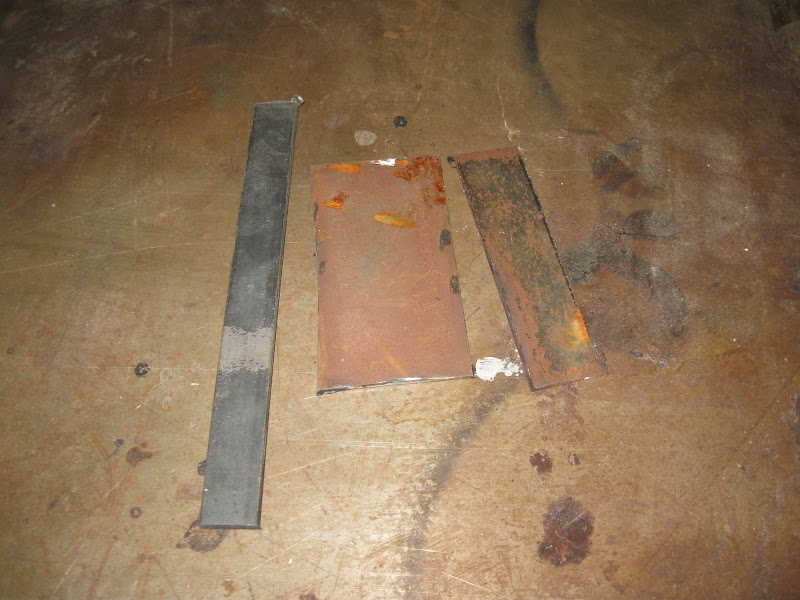
Next I made a mounting plate that attaches to the back of my monitor in the place where the monitor’s original dash mounting bracket was supposed to connect. I used thin sheet steel scraps I had laying around, like this:
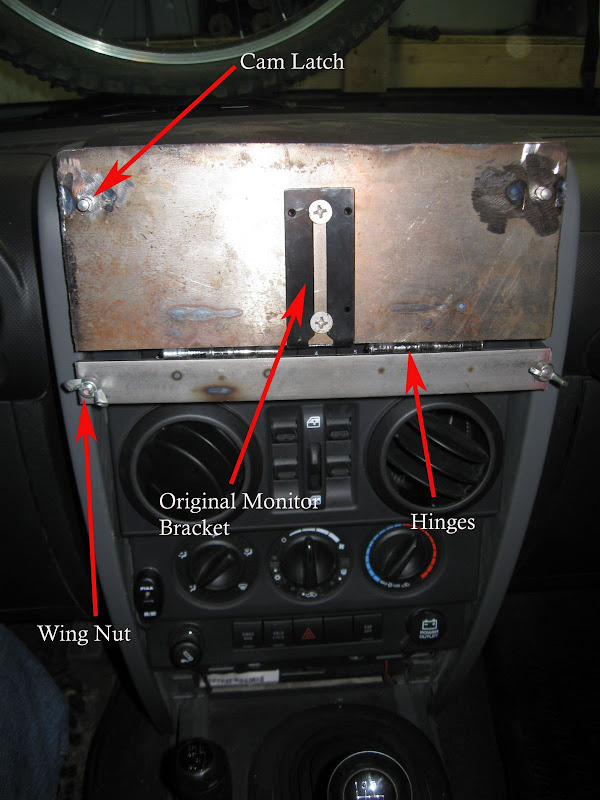
I ordered tiny little “cam latches” from McMaster Carr’s. They have little “spring” wires in the back that put increased tension on the bracket as you turn the handle that sticks out the front of the mounting plate. The mounting plate has two halves. The top half holds the monitor, the bottom half is hinged and has wing nuts holding it in place. This allows the whole assembly to be quickly taken off the dash, leaving only the little mounting brackets behind. You can store the monitor in your glove box or seat pocket out of the way when not in use.
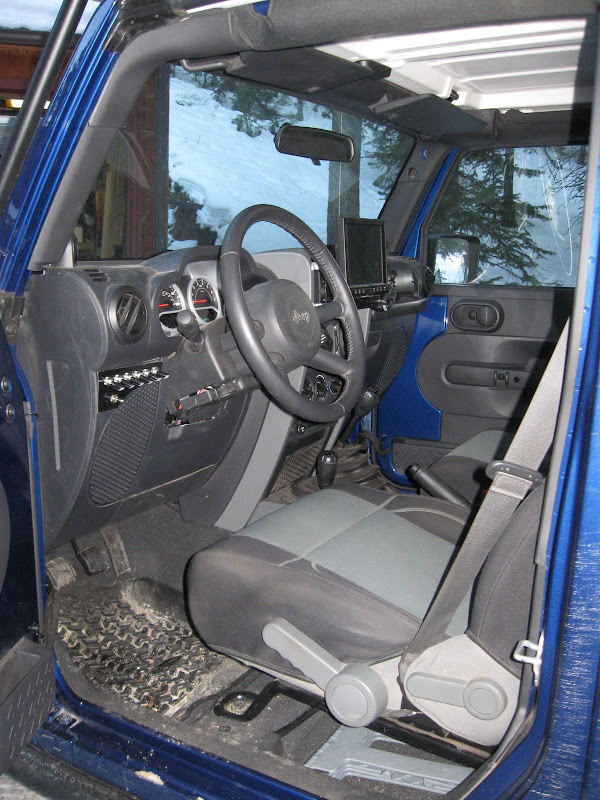
Here’s a look at the setup.
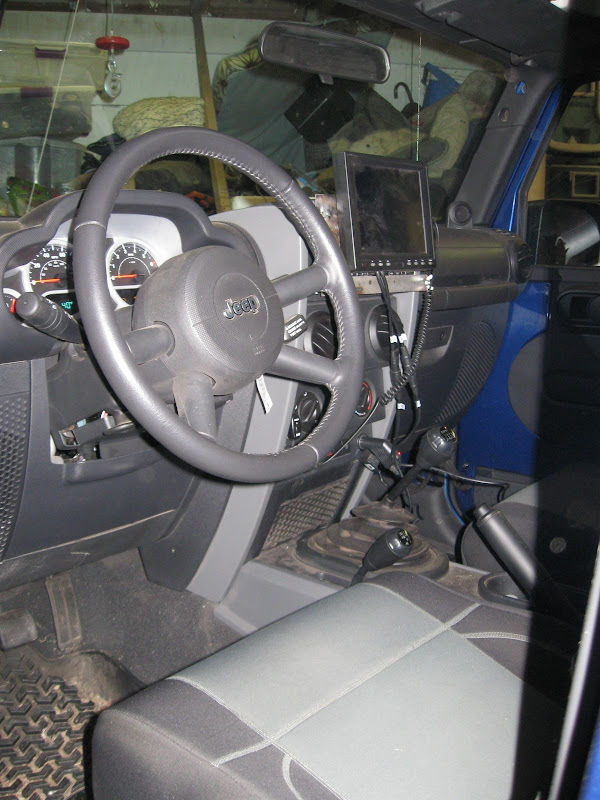
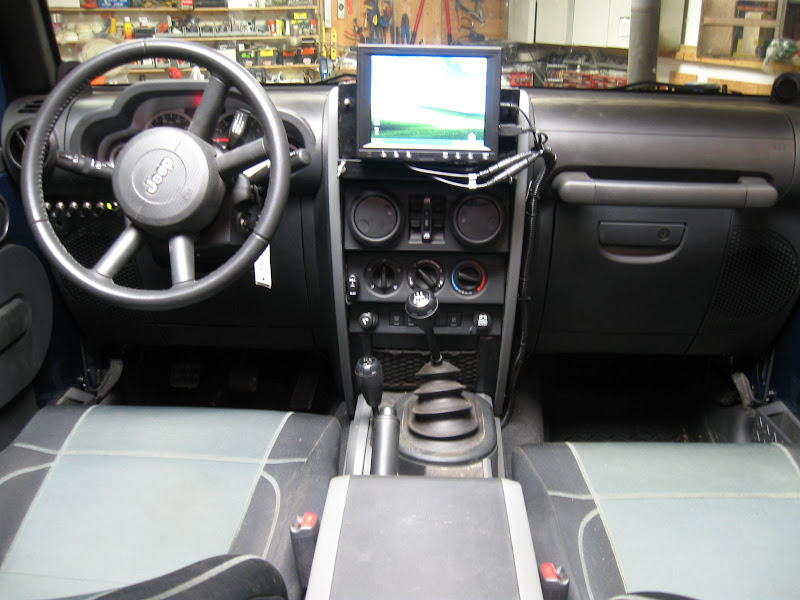
Here is what it looks like with the monitor attached:
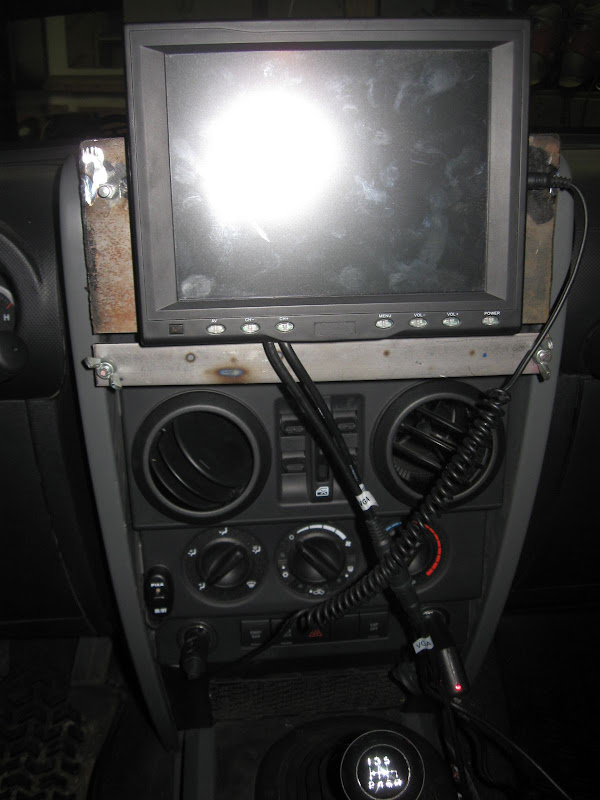
This puts the monitor at a nice comfortable spot for both drive and passenger to see and use.
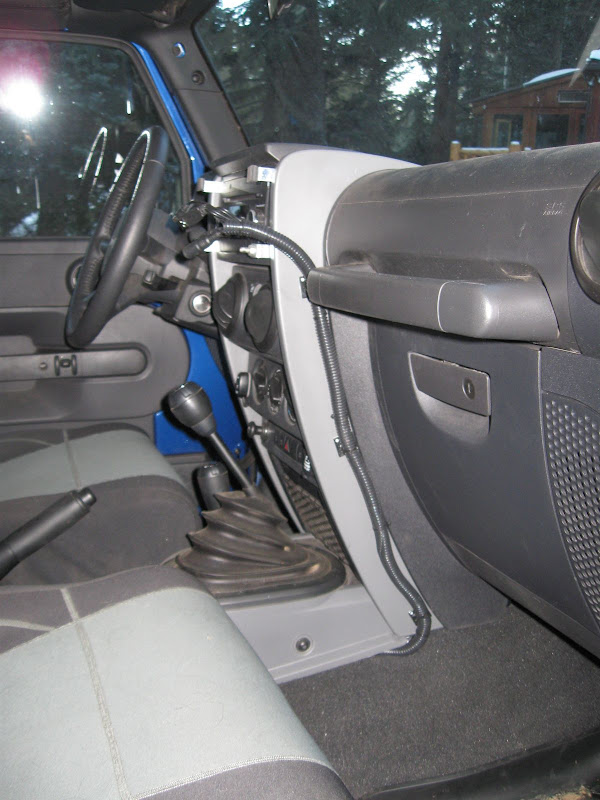
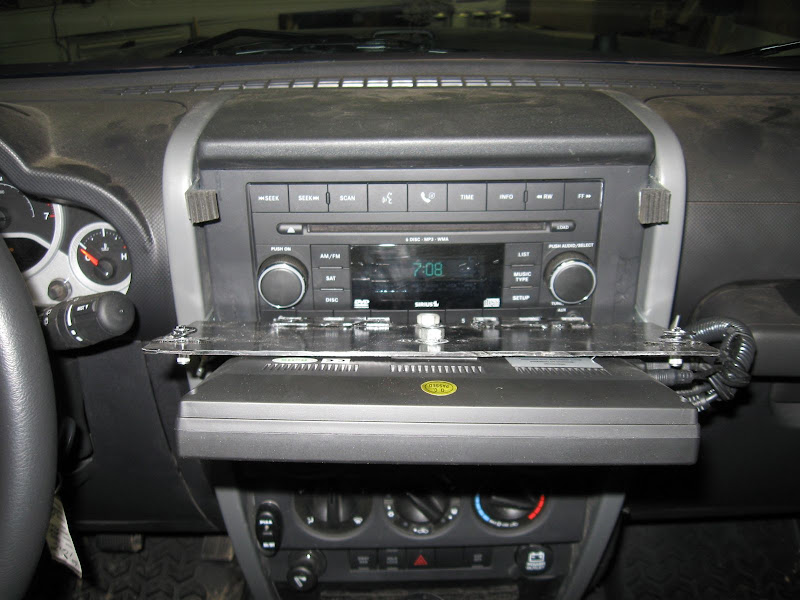
If you need to use the radio, you twist the cam latches and the top half with the monitor folds down. I decided not to run all of the cables behind the dash for a few reasons. 1. I couldn’t figure a way for the cables to exit the dash at the monitor location without drilling holes. 2. A fair amount of the cable would be exposed anyway since the monitor has the cables coming out of the bottom front before the cable “jacks”. 3. I’m lazy and didn’t want to tear apart the whole dash. 3. Technology changes, and when this system is out of date, I don’t holes left in the dash. I just bundled the wires and used the plastic automotive wire jacket to run up the side of the dash. I used zip ties and those sticky back squares to mount it to the dash.
Next I took apart the dash again once I knew my stem worked and took out the stereo. Using the writeup from a member on the JK Forum, I connected an “LED” power wire from a dead pc at work to the correct pins on the back of the stock stereo unit.
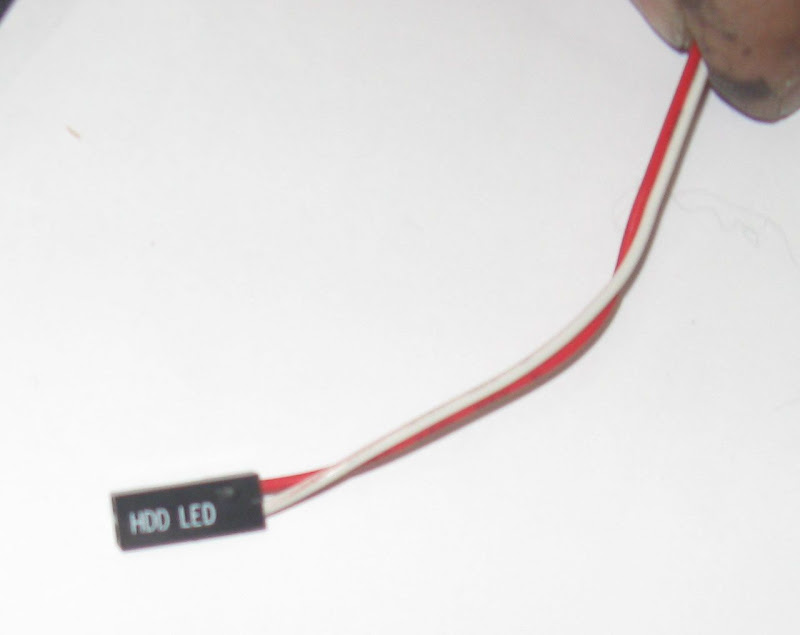
The unit plays dvd’s but the jeep has no screen to show the video. So, all you have to do is hook up your own monitor, and presto, you have movies in your jeep! (Don’t watch while driving). You take a yellow RCA cable and spice it to the HDD LED wire. The RCA just plugs into the AV input on your monitor. Make sure you know which is ground and which is power (see the writeup HERE)

Here is what the back of the unit looks like with the HDD LED wire plugged in. I took the forum’s advice and secured the wire to the back of the unit with a screw and washer to keep the LED wire from getting pulled loose.

Next I started working on my switch panel. There are 5 possible locations as I see it:
1. Door Pillar (windshield column)
2. Above rear view mirror
3. Between vents in center dash if you don’t have power mirrors
4. Below center dash in front of shifter
5. Above driver’s side in-dash speaker
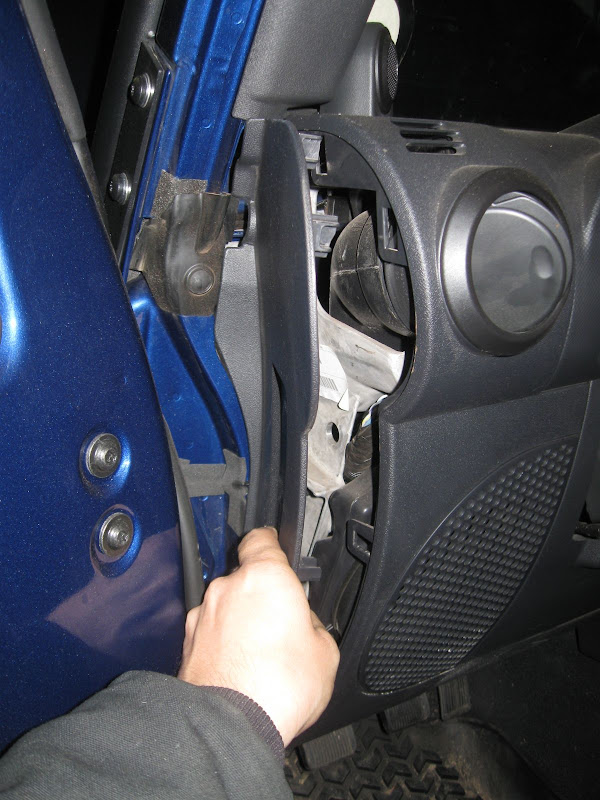
I chose location 5 since it was easy to get wires in and out of this spot. You just pop the side panel like this:
I drew up the area in Autocad to plan out my panel.
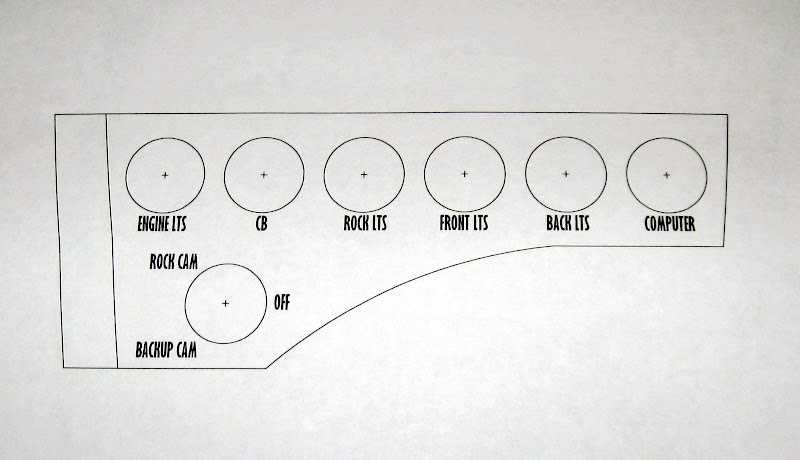
Then I transferred the pattern to steel and cut it out.
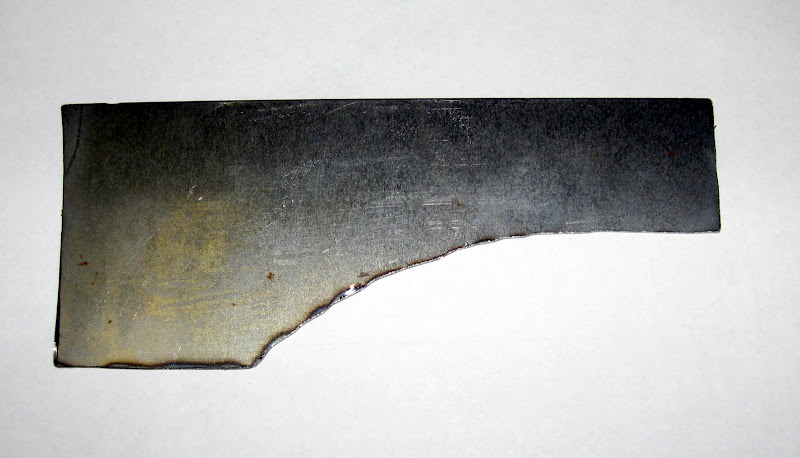
Next I drilled my holes for the switches:

Then I placed the steel over the dash and drilled out the dash holes

As it turns out, the original switches I purchased on ebay were faulty. They blow the fuse every time you switch them. So, I had to buy some new ones at Radio Shack. They aren’t quite a nice looking, but they are much better quality. As a result, the holes I drilled in the dash are about Ľ” too high and the larger Radio Shack switches hit some plastic inside the dash here:

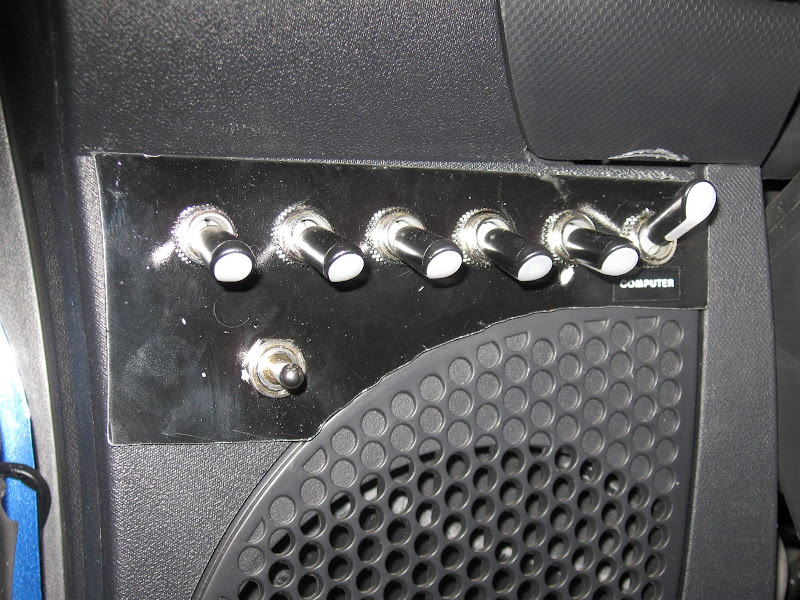
This meant I had to enlarge the dash holes to allow the switches to shift down slightly. Now my metal plate doesn’t line up with the dash correctly. I will remake it later when I have time. This didn’t turn out as well as I hoped. Nonetheless, here is the end result:
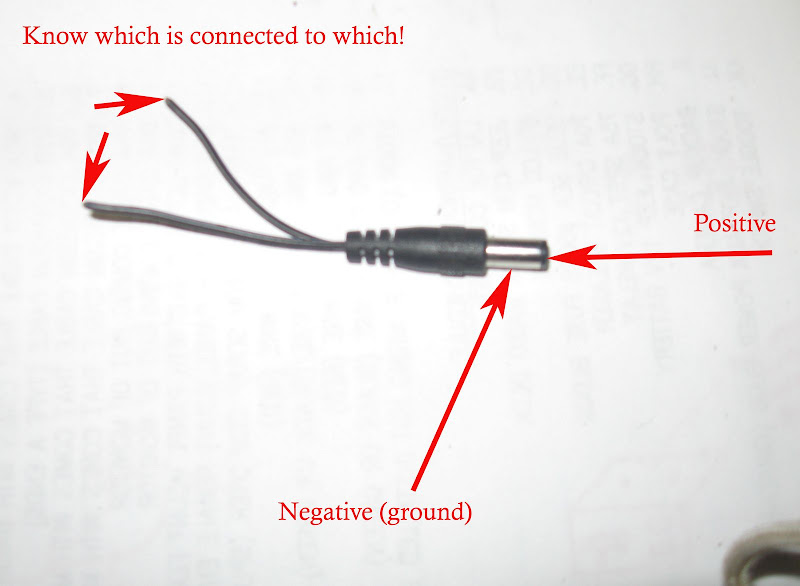
When I was running power the monitor I made a huge mistake. I spliced a 12V power jack to a power feed from my aux fuse block, but I failed to pay attention to which wire coming out of the jack should be positive and which negative. Luck would have it that I did it backwards. When I hooked up the monitor, I TOTALLY fried it! It popped and sizzled, smoke came out… not good. So, I had to buy a new one. Don’t make the same mistake I did, check using a voltmeter which is which wire. Read more here. On mine (and I think all 12V jacks) the center should be connected to the positive terminal of your car battery, and the outside to ground.
I purchased a cheapo backup camera on ebay for $20. It was meant to mount to your license plate. I decided to mount it here instead:
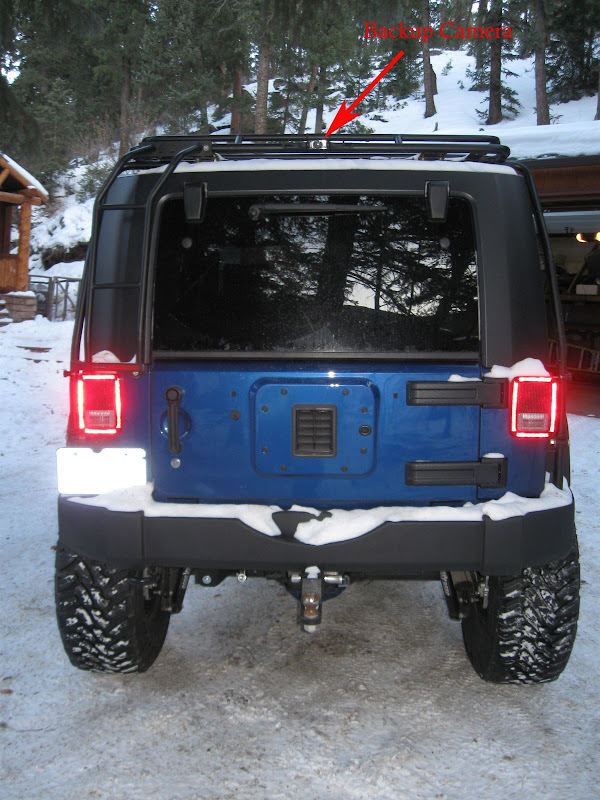
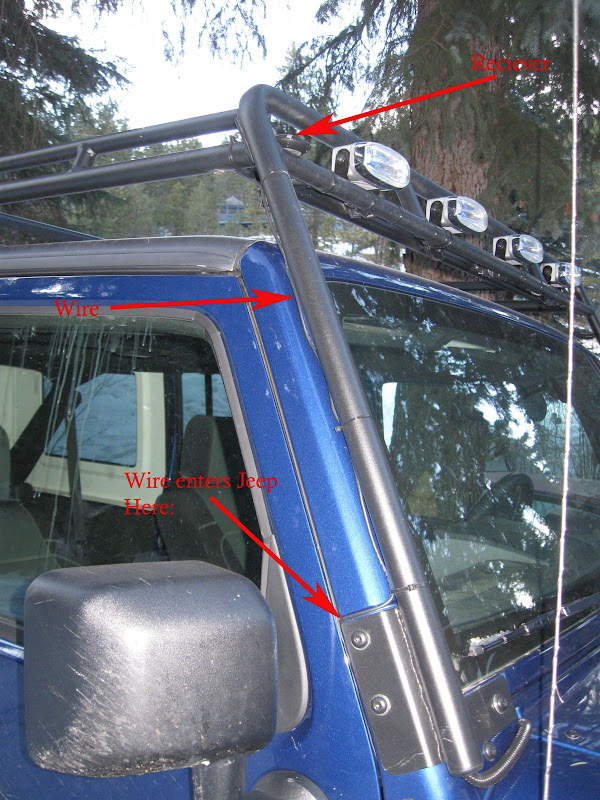
I ran the power cable from my auxiliary fuse block and the rca cable from my monitor a/v input. The wires go the back of the jeep inside, then come out under the hard top and travel up the arm of my Gobi rack. The camera is mounted at the top of the rack giving my a bird’s eye view of everything behind me. When I’m pulling my camping trailer, this is especially nice to I see over it.

Lastly I installed a magnetic GPS receiver I also bought on ebay. I mounted this to the front of my Gobi rack, here:
Additional Background:
I researched a lot of different options to run my gps system. My main goal was to run Topo USA. My first preference was to find an affordable double-din in-dash stereo replacement unit. I’d be able to just take out the stock stereo and drop in a slick new unit that did the following:
- Touch Screen
- Car Computer with Windows XP
- Double Din
- No motorized screen (these flop around and will break offroad)
- Radio
- DVD Player (for movies)
Amazingly, it is exceptionally difficult to find a product that does all of these things. I almost placed an order for a RevoSys X400 2DIN Car PC for $584. Then I found it has no radio tuner. Are you kidding me? Another option is the XENARC MDT-X7000™ which costs $675. But I’m afraid of that screen breaking offroading.
They also make those remote “car pc’s” which are just a cpu that you mount in your trunk or under a seat. But I didn’t really want to buy a computer when I already had a laptop I could use. I’m sure in a few years the in-dash units will be cheap and will contain all the features you could ever want. At that time I’ll probably swap out my current system for something simple.
Future Additions:
You can see in a previous photo that there is a silver toggle switch below the row of LED switches. All of the LED switches are SPST (single pole single throw) switches, or in other words they are “On/Off “. The silver toggle is a DPDT (double pole double throw) “on/off/on” switch. I will wire the power wires (positive only) to the switch from two different cameras; the backup camera, and a “rock camera” mounted under the jeep to watch my clearance. Since I only have two A/V inputs into the monitor and one is used for the dvd player, I decided to switch between the rock cam and the backup cam with a toggle switch. The rock camera is a small CCTV camera that I bought a few years ago to make a helmet cam system.
Its waterproof, but I’m going to mount it inside a jar anyway since road grime will be tough on it.
I just shopped around the grocery store to find the right size jar without makings or patterns in the glass on the bottom of the jar. In the end I used a jar of baby food. I’ll be mounting this somewhere near the back axle pointing towards the front of the jeep. Maybe it will help my choose my line in difficult situations.
Well, that’s about it. I’m sure I’ll make some additions and changes in future. But for now, overall, it seems to work great and I’m happy with it. It’s a big improvement over my wife having a laptop in her lap every time we take the jeep out!
You can still access the radio, by turning the cam latches and flipping down the monitor, like this:
Download the full resolution pdf of the wiring diagram here.
I described a portion of this system previously in my post called “auxiliary fuse block”. This provided an auxiliary fuse block to connect all of my accessories I added in this build and for ones I’m planning in the future.
The finished system includes the following parts:
1. Onboard Computer System
2. Topo USA GPS Navigation with detailed, extensive trail maps of the entire United States. Coupled with a large LCD monitor, this is a powerful program that can help you find your way through the backcountry better than any hand held device.
3. 8” LCD Touch-Screen Computer Monitor and DVD screen to watch movies via the stock jeep in-dash player.
4. Backup Camera for keeping an eye on your trailer when towing, and for backing up when wheeling.
5. “Rock Cam” Under Jeep camera to check your clearance over obstacles
6. Switch Panel for future loads including the following:
a. Backup Lights
b. Brush Guard Mounted Driving Lights
c. LED Rock Lights
d. CB Radio
e. Computer (to keep the battery from charging every time the engine is on)
The first step in the project was to select a suitable laptop computer. I have a HP dv1000 laptop that I bought before I went on a world trip a few years ago. It’s taken some abuse but still runs pretty fast and has enough speed and memory to run Topo USA 8.0. It’s also small enough to fit nicely under the passenger seat.
The main problem with most laptops is that the power switch is located under the lid (see red arrow in the photo), making it impossible to turn the computer on and off without taking the laptop out from under the seat and out of any box you put it in. You can buy “Car PC’s” which don’t have this problem, but I didn’t want to spend the money. I decided to mod my laptop instead.
I used a dremel to cut out the plastic over the area containing the power button.
Once the actual button underneath the plastic key was exposed, I used flexible 100% silcone sealant to glue a small screw onto the circuit boards power button. I ground half of the head of the screw down at a 45 deg angle first. Then I cut a slit into the side of the laptop case and glued an old school camera “remote” cable in place. This allows me to close the lid of the computer and just push the remote cable which hits the angled top of the screw glued to the power button, turning it on or off. You might be able to avoid this if you have a computer with a brand new battery that can sit in hibernate mode for extended periods of time between engine startups. I also cut off the little rubber “button” which told the laptop that the lid/screen was closed. This way, the computer doesn’t enter power save or hibernate when I have the lid closed and the computer stored under the seat.
Next I built a mounting system for the laptop under the passenger seat. I wanted it to be raised off the floor in case of minor water accumulation (say from leaving the jeep in the rain). I also need to access the computer. So I bought some cheap drawer slides from Home Depot and screwed them into the seat brackets.
I cut a piece of plywood to size and mounted the other half of the drawer slides to it. It fits under the seat like this:
Next I mounted some wood strips to the top of the plywood to elevate the latptop since the laptop “breathes” through vents on its underside. I don’t want it to overheat.
Then using thin metal bar stock from a local steel supplier, I welded a rectangular frame to enclose the laptop.
Next I used a FedEx envelope which is made of Tyvek. Tyvek is dust and waterproof, but breathable “material” that is super strong. I glued it to the metal frame using Gorilla Glue.
I added tabs with bolts to hold the “lid” down over the latptop. The whole assembly fits onto the drawer slides and tucks under the seat.
Next I turned my attention to the monitor.
I needed a place to mount it that it would be easy to manipulate the touch screen. With a touch screen no mouse or keyboard is needed. That makes using Topo USA on the go really nice. I saw others mount a 7” screen above the rear view mirror, but I knew my cables wouldn’t be long enough, and it would be uncomfortable working on the screen at that height. Next option was to mount to the top of the dash, but it takes up too much of your view out the windshield. This could be problematic offroading, plus I didn’t think it would be stable enough during heavy offroading. I came up with a system to mount it in front of the stock radio. You may be wondering at this point why I didn’t just get an in-dash car pc or a double din stereo with monitor. Read about that at the end of this post.
I didn’t want to drill any holes in my dash in case I reconfigure my system in the future. After taking the front of the dash plastic off, I noticed 4 nice screws that hold the stereo in place.
I used shelf brackets from home depot like this:
I cut them down to size and bent them into shape. They mount like this:
Getting the dash back into place is tricky. You have to put three brackets on, then wiggle the dash back under them, and install the 4th bracket after the dash is loosely in place. You don’t have much room, but with a tiny socket set I managed it.
Since I finished the project, I went back and used some rubber weather stripping. I cut out a little square and put it on the top two brackets. This way, when the monitor mounting plate is attached, it doesn’t rattle or squeak.
Next I made a mounting plate that attaches to the back of my monitor in the place where the monitor’s original dash mounting bracket was supposed to connect. I used thin sheet steel scraps I had laying around, like this:
I ordered tiny little “cam latches” from McMaster Carr’s. They have little “spring” wires in the back that put increased tension on the bracket as you turn the handle that sticks out the front of the mounting plate. The mounting plate has two halves. The top half holds the monitor, the bottom half is hinged and has wing nuts holding it in place. This allows the whole assembly to be quickly taken off the dash, leaving only the little mounting brackets behind. You can store the monitor in your glove box or seat pocket out of the way when not in use.
Here’s a look at the setup.
Here is what it looks like with the monitor attached:
This puts the monitor at a nice comfortable spot for both drive and passenger to see and use.
If you need to use the radio, you twist the cam latches and the top half with the monitor folds down. I decided not to run all of the cables behind the dash for a few reasons. 1. I couldn’t figure a way for the cables to exit the dash at the monitor location without drilling holes. 2. A fair amount of the cable would be exposed anyway since the monitor has the cables coming out of the bottom front before the cable “jacks”. 3. I’m lazy and didn’t want to tear apart the whole dash. 3. Technology changes, and when this system is out of date, I don’t holes left in the dash. I just bundled the wires and used the plastic automotive wire jacket to run up the side of the dash. I used zip ties and those sticky back squares to mount it to the dash.
Next I took apart the dash again once I knew my stem worked and took out the stereo. Using the writeup from a member on the JK Forum, I connected an “LED” power wire from a dead pc at work to the correct pins on the back of the stock stereo unit.
The unit plays dvd’s but the jeep has no screen to show the video. So, all you have to do is hook up your own monitor, and presto, you have movies in your jeep! (Don’t watch while driving). You take a yellow RCA cable and spice it to the HDD LED wire. The RCA just plugs into the AV input on your monitor. Make sure you know which is ground and which is power (see the writeup HERE)
Here is what the back of the unit looks like with the HDD LED wire plugged in. I took the forum’s advice and secured the wire to the back of the unit with a screw and washer to keep the LED wire from getting pulled loose.
Next I started working on my switch panel. There are 5 possible locations as I see it:
1. Door Pillar (windshield column)
2. Above rear view mirror
3. Between vents in center dash if you don’t have power mirrors
4. Below center dash in front of shifter
5. Above driver’s side in-dash speaker
I chose location 5 since it was easy to get wires in and out of this spot. You just pop the side panel like this:
I drew up the area in Autocad to plan out my panel.
Then I transferred the pattern to steel and cut it out.
Next I drilled my holes for the switches:
Then I placed the steel over the dash and drilled out the dash holes
As it turns out, the original switches I purchased on ebay were faulty. They blow the fuse every time you switch them. So, I had to buy some new ones at Radio Shack. They aren’t quite a nice looking, but they are much better quality. As a result, the holes I drilled in the dash are about Ľ” too high and the larger Radio Shack switches hit some plastic inside the dash here:
This meant I had to enlarge the dash holes to allow the switches to shift down slightly. Now my metal plate doesn’t line up with the dash correctly. I will remake it later when I have time. This didn’t turn out as well as I hoped. Nonetheless, here is the end result:
When I was running power the monitor I made a huge mistake. I spliced a 12V power jack to a power feed from my aux fuse block, but I failed to pay attention to which wire coming out of the jack should be positive and which negative. Luck would have it that I did it backwards. When I hooked up the monitor, I TOTALLY fried it! It popped and sizzled, smoke came out… not good. So, I had to buy a new one. Don’t make the same mistake I did, check using a voltmeter which is which wire. Read more here. On mine (and I think all 12V jacks) the center should be connected to the positive terminal of your car battery, and the outside to ground.
I purchased a cheapo backup camera on ebay for $20. It was meant to mount to your license plate. I decided to mount it here instead:
I ran the power cable from my auxiliary fuse block and the rca cable from my monitor a/v input. The wires go the back of the jeep inside, then come out under the hard top and travel up the arm of my Gobi rack. The camera is mounted at the top of the rack giving my a bird’s eye view of everything behind me. When I’m pulling my camping trailer, this is especially nice to I see over it.
Lastly I installed a magnetic GPS receiver I also bought on ebay. I mounted this to the front of my Gobi rack, here:
Additional Background:
I researched a lot of different options to run my gps system. My main goal was to run Topo USA. My first preference was to find an affordable double-din in-dash stereo replacement unit. I’d be able to just take out the stock stereo and drop in a slick new unit that did the following:
- Touch Screen
- Car Computer with Windows XP
- Double Din
- No motorized screen (these flop around and will break offroad)
- Radio
- DVD Player (for movies)
Amazingly, it is exceptionally difficult to find a product that does all of these things. I almost placed an order for a RevoSys X400 2DIN Car PC for $584. Then I found it has no radio tuner. Are you kidding me? Another option is the XENARC MDT-X7000™ which costs $675. But I’m afraid of that screen breaking offroading.
They also make those remote “car pc’s” which are just a cpu that you mount in your trunk or under a seat. But I didn’t really want to buy a computer when I already had a laptop I could use. I’m sure in a few years the in-dash units will be cheap and will contain all the features you could ever want. At that time I’ll probably swap out my current system for something simple.
Future Additions:
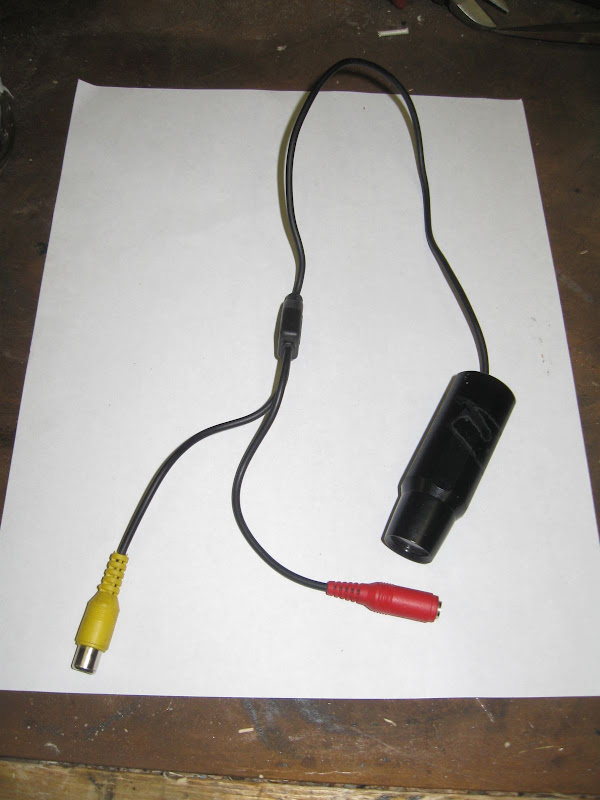
You can see in a previous photo that there is a silver toggle switch below the row of LED switches. All of the LED switches are SPST (single pole single throw) switches, or in other words they are “On/Off “. The silver toggle is a DPDT (double pole double throw) “on/off/on” switch. I will wire the power wires (positive only) to the switch from two different cameras; the backup camera, and a “rock camera” mounted under the jeep to watch my clearance. Since I only have two A/V inputs into the monitor and one is used for the dvd player, I decided to switch between the rock cam and the backup cam with a toggle switch. The rock camera is a small CCTV camera that I bought a few years ago to make a helmet cam system.
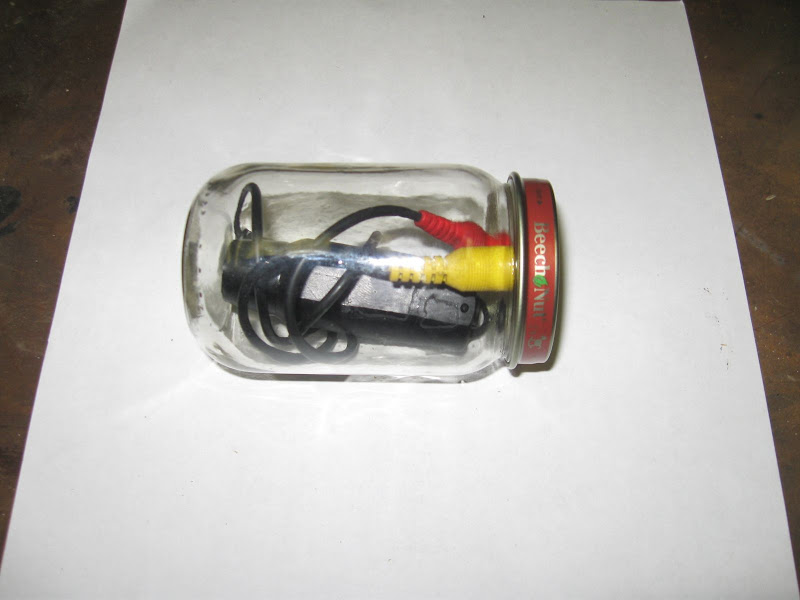
Its waterproof, but I’m going to mount it inside a jar anyway since road grime will be tough on it.
I just shopped around the grocery store to find the right size jar without makings or patterns in the glass on the bottom of the jar. In the end I used a jar of baby food. I’ll be mounting this somewhere near the back axle pointing towards the front of the jeep. Maybe it will help my choose my line in difficult situations.
Well, that’s about it. I’m sure I’ll make some additions and changes in future. But for now, overall, it seems to work great and I’m happy with it. It’s a big improvement over my wife having a laptop in her lap every time we take the jeep out!
You can still access the radio, by turning the cam latches and flipping down the monitor, like this:
 12-13-2009, 06:28 PM
#2
JK Enthusiast
Join Date: Aug 2007
Location: San Antonio, Tx
Posts: 273
Likes: 0
Received 0 Likes
on
0 Posts
Cool, you should put sometype of dash camera, have video proof of the idiots out there and their driving. Might come in handy in an accident where someone is not being honest, or you could offer other drivers involved in accidents that you have recorded, a copy for a "minimal" fee. Neither party ever feels they are at fault so you probably could sell copies to everyone involved.
Nice work.
Stacy
Nice work.
Stacy
12-14-2009, 07:48 PM
#3
JK Newbie
Join Date: Apr 2009
Location: Durango, Colorado
Posts: 15
Likes: 0
Received 0 Likes
on
0 Posts
Nice write up
So if your installing a computer, I assume you'll run Topo on it? Which is by far a great option. you can use google earth, along with a GPS receiver through a program called earth bridge. It's pretty awesome to have google earth and all the benefits it has in real time,with actual locations. Makes routing a breeze.
I use a Garmin widescreen with a "clear" topo running on top of City Navigator. Sort of gives me the best of both worlds. Not a fully functional off road GPS, by any means, but it does the basics this way.
05-10-2010, 08:06 AM
#5
JK Newbie

Join Date: May 2010
Location: Columbia, SC
Posts: 5
Likes: 0
Received 0 Likes
on
0 Posts
I know this thread is old but it is right along the lines of what I am looking to do.
I have a 4 door Jeep JK. I was looking at the dash the other day and realized that the top panel that covers the radio is the perfect size for an "eee pc." I know the panel its self pops off without much work. What I am thinking of doing is mounting a hinge on the panel, then installing a touch screen into it and mounting the pc with keyboard on top of the radio. If you are familiar with the eee pc you know it is very tiny and should fit without problem.
What I am wondering is how practical is this? I would need to remove some of the plastic under the panel in order to fit the motherboard and there is a little box thing mounted under the panel. I don't know what that is.
I was going to mount a bead of rubber along the edges of the panel as well so that when it is closed no water/dust can get in. It is, after all, a Jeep.
Thoughts?
