EVO + TeraFlex leveling kit on 2012 Rubi
 10-28-2011, 06:03 PM
#1
JK Jedi Master
Thread Starter

Join Date: Nov 2006
Location: .
Posts: 15,170
Likes: 0
Received 0 Likes
on
0 Posts
I couldn't wait to get my 2012 Rubi a little taller than stock. I first called Andrew at Off Road Evolution and ordered the front springs that go with their 1.5" HD leveling kit. The kit would normally come with 3/4" spacers for the rear, but I wanted a little taller to compensate for the weight of our travel trailer, so I called David at Northridge4x4 and ordered some TeraFlex 1" rear spring spacers.
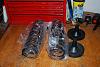
This is the kit as it arrived at my house.
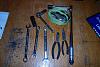
This after noon I started my lift install. I first put on my oldest JK-Forum.com T-shirt, to set the proper attitude and mood. I then collected the tools and equipment that I thought I would need.
I took measurements from the bottom lip of the fender flares to the ground. Surprisingly this distance was 36" on all four flares.
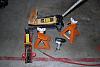
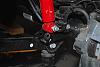
I started wit the front end. While the JK was still on the ground I removed the lower, axle side, track bar bolt, the lower sway bar links. Next I jacked up the JK and placed jack stands in either side of the frame, just behind the lower control arm mounts.
After securing the JK on the jack stands I removed both front wheels then removed the lower bolt on the shocks.
This is the kit as it arrived at my house.
This after noon I started my lift install. I first put on my oldest JK-Forum.com T-shirt, to set the proper attitude and mood. I then collected the tools and equipment that I thought I would need.
I took measurements from the bottom lip of the fender flares to the ground. Surprisingly this distance was 36" on all four flares.
I started wit the front end. While the JK was still on the ground I removed the lower, axle side, track bar bolt, the lower sway bar links. Next I jacked up the JK and placed jack stands in either side of the frame, just behind the lower control arm mounts.
After securing the JK on the jack stands I removed both front wheels then removed the lower bolt on the shocks.
Last edited by Robar; 10-28-2011 at 06:16 PM.
 10-28-2011, 06:13 PM
#2
JK Jedi Master
Thread Starter
Join Date: Nov 2006
Location: .
Posts: 15,170
Likes: 0
Received 0 Likes
on
0 Posts
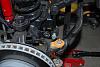
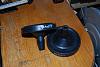
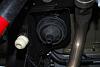
I then lowered the jack that was supporting the front axle until the front springs were easily removable. After removing both front springs I compared the stock spring to the EVO HD spring.
The stock spring is on the right in the above pic. The stock spring had 8 coils and the EVO HD spring had 11 coils.
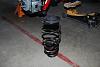
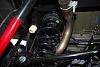
Next I installed the EVO HD springs.
Make sure the bottom of the spring is properly seated in the spring perch.
From here raised the axle a little to reconnect the lower shock mount, lower sway bar mounts, and track bar. I used a ratchet strap to assist me in lining up track bar.
I made sure to adequately tighten the shock and sway bar mounts.
Please, for everything that is good in the world, properly torque the track bar bolts to 125 Ft. lbs.
Reinstall the wheels and torque the lugs evenly.
Next is to lower the JK off of the jack stands and pull it around so the back is in the garage.
10-28-2011, 06:34 PM
#3
JK Jedi Master
Thread Starter
Join Date: Nov 2006
Location: .
Posts: 15,170
Likes: 0
Received 0 Likes
on
0 Posts
The rear springs had about the same process. I jacked up the rear axle and set the frame of the JK on jack stands, just in front of the lower control arm mounts.
I removed the e-brake bracket from the bottom of the tub, as not to over stretch the lines. I again removed the lower shock bolts, the lower sway bar bolts. From there I removed the rear wheels.
After removing the wheels I disconnected the rear brake line brackets and loosened the ABS lines from the frame.
You can then lower the axle far enough down to easily remove the rear springs and spring isolator.
Next I installed the TeraFlex 1" spacers. The spacers are designed to snap into the bottom of the tub.
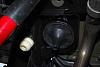
Then add the stock spring isolator to the TeraFlex spacers.
The next logical thing would be to reinstall the stock springs, which I did. Make sure that the top of the stock spring is seated evenly in the rim of the stock isolator.
After installing the springs I raised the axle up, reconnected the lower shock mounts and sway bar mounts, and reconnected the brake line brackets. Be sure to tighten everything up, reinstall the rear wheels, and remove the jack stands to lower the tires to the ground.
I then took the JK for a spin around the block making sharp turns in both directions before pulling back into the garage to again check the torque on all of the wheels and the front track bar. I did not notice enough change to need to recenter the steering wheel. If I notice a change later I will make that adjustment as needed.
I do not have any after pics, yet, as I was tired and it was dark.
I did the install alone and it took me about three and a half hours, without rushing.
Upon remeasuring the fender flares the front flares were now 37.5" high and the rear were at 37" giving me right at 1.5" of lift in the front and 1" in the rear.
More pics will be added when I can take some full shots in the daylight.
I removed the e-brake bracket from the bottom of the tub, as not to over stretch the lines. I again removed the lower shock bolts, the lower sway bar bolts. From there I removed the rear wheels.
After removing the wheels I disconnected the rear brake line brackets and loosened the ABS lines from the frame.
You can then lower the axle far enough down to easily remove the rear springs and spring isolator.
Next I installed the TeraFlex 1" spacers. The spacers are designed to snap into the bottom of the tub.
Then add the stock spring isolator to the TeraFlex spacers.
The next logical thing would be to reinstall the stock springs, which I did. Make sure that the top of the stock spring is seated evenly in the rim of the stock isolator.
After installing the springs I raised the axle up, reconnected the lower shock mounts and sway bar mounts, and reconnected the brake line brackets. Be sure to tighten everything up, reinstall the rear wheels, and remove the jack stands to lower the tires to the ground.
I then took the JK for a spin around the block making sharp turns in both directions before pulling back into the garage to again check the torque on all of the wheels and the front track bar. I did not notice enough change to need to recenter the steering wheel. If I notice a change later I will make that adjustment as needed.
I do not have any after pics, yet, as I was tired and it was dark.
I did the install alone and it took me about three and a half hours, without rushing.
Upon remeasuring the fender flares the front flares were now 37.5" high and the rear were at 37" giving me right at 1.5" of lift in the front and 1" in the rear.
More pics will be added when I can take some full shots in the daylight.
 10-31-2011, 05:42 PM
#7
JK Jedi Master
Thread Starter
Join Date: Nov 2006
Location: .
Posts: 15,170
Likes: 0
Received 0 Likes
on
0 Posts
Not yet. I'm hoping to get some this week.
I'll take a look and get back with you.
I'll take a look and get back with you.
Trending Topics
10-31-2011, 06:18 PM
#8
JK Jedi Master
Thread Starter
Join Date: Nov 2006
Location: .
Posts: 15,170
Likes: 0
Received 0 Likes
on
0 Posts
