Extend Breather Hoses with Pictures - Axle & Transfer Case - 2012 Manual 2DR
 09-04-2012, 08:28 PM
#1
JK Enthusiast
Thread Starter
There are breather hoses on both axles, the transfer case, and auto transmission. On manual transmission there is a breather under the shift boot (at least I have seen a picture of a 3.8L there). They are there to let gases escape with changing temperature. If you lift your Jeep you may need to extend your breathers on your axles so they don't come off when flexing. Another reason to extend your breather hoses is to raise them up where they are less likely to ingest water and contaminate your oil. It's something everyone with a snorkel, or who plays in water should do. It cost about $20 or less.
http://www.youtube.com/watch?v=PbxL2m6CUhw KITS ARE ONE OPTION TO CHECK OUT
There are also kits you can buy. River Raider makes one were all the hoses get connected and put into the air box. I don't like that idea personally because if differential oil was to somehow overflow it could get into the transfer case. It is way more air tight on the other hand. There is also a kit that I have seen that uses an accordion type of rubber bag attached to the axles instead of using hoses. If you would rather try to fab something yourself I'll show you what I have done on my 2012 manual 2DR.
EDIT: There is a good post that show the install of a River Raider Kit if you want to reverse engineer or use it. https://www.jk-forum.com/forums/modi...7/#post3320835
WHAT'S NEEDED
REAR BREATHER EXTENSION
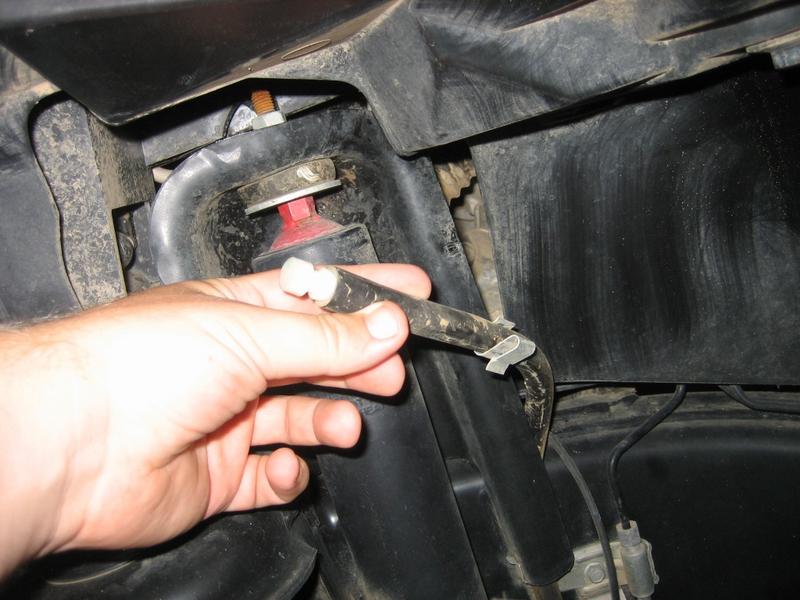
This breather stock goes from the top of the passenger side of the axle to the top of the passenger wheel well behind the plastic liner.

This is taken on my back looking up into the back of the rear passenger wheel well. You can almost see where it terminates about where my finger is.

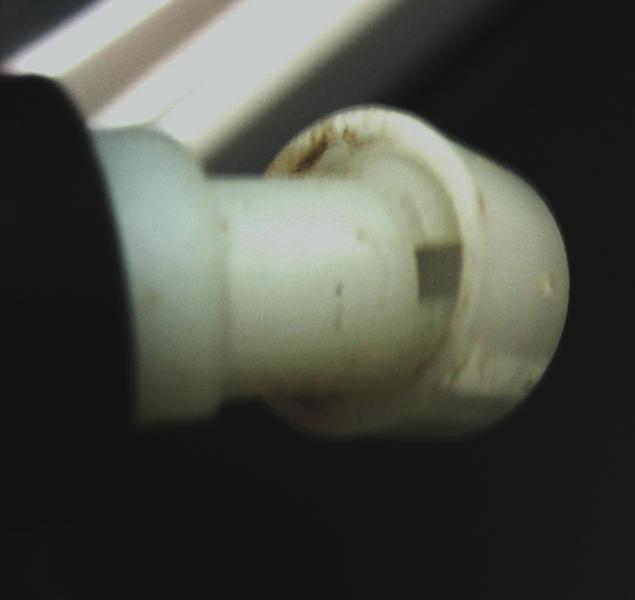
This is the termination cap. It will allow water in. It's basically like a little wiggle cap on top of the tube to deflect splashes.
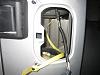
What I have done is cut off the end and extended that into the rear tail light area. When your removing the tail light you want to only remove the 2 innermost screws. That will allow the whole light to come off. The outside ones just hold on some trim (and have a slightly larger screw.) I would recommend putting the screws back in a few turns after you remove the light so that you don't loose one in the bumper like I did. You can see the 2 screws that hold the break light on below.
Here you can see I put a packing strap down a hole that ends up behind the plastic wheel well liner.

Now on my back (with saftey glasses) I used a grabber tool and flash light to fish that packing strap down. I had to push the plastic wheel liner out of the way.

Now I cut off the end with the jiggle cap and used the hose mender to add in the extra hose. You can see in the picture below what the end looks like. There is bolt that it will just pull off of with some pressure directly out from the bolt. That clear plastic retainer piece, that holds the factory hose to the bolt, is taped to the hose with 2 wraps of black tape.

I used 4' of fuel line back here, and I could have easily gotten away with only 3'. Actually I cut 6" off and still have plenty of slack if I add a lift later. I think 2' (a popular size to buy it pre-cut) would be a very tight fit with the route I took. There is also a hole you can use in the bottom of the tail light that others have used. On my 2012 they put a ton of foam in there that blocked me from going that direction. I taped the packing strap to the hose to feed it though the hole.
Here you can see where I was able to just barely get a zip tie through to hold the fuel line up as high as possible. If you put your finger up there you'll see it's a very tight fit. I used 2 about 8" ties to get the job done. There is also a bar that I guess holds the light in that I used to zip tie to. You can see it in the first tail light picture. Then I used some Duct Tape and secured it to the wall right were it fed through just for good measure.
I re-used the terminal jiggle cap. You can see were the end of the line is here. You can also run it up by the tail light wire and into the roll bar. I personally think this is plenty high and dry for me. You can also see in this picture how the brake light doesn't screw in on the outside.

http://www.youtube.com/watch?v=PbxL2m6CUhw KITS ARE ONE OPTION TO CHECK OUT
There are also kits you can buy. River Raider makes one were all the hoses get connected and put into the air box. I don't like that idea personally because if differential oil was to somehow overflow it could get into the transfer case. It is way more air tight on the other hand. There is also a kit that I have seen that uses an accordion type of rubber bag attached to the axles instead of using hoses. If you would rather try to fab something yourself I'll show you what I have done on my 2012 manual 2DR.
EDIT: There is a good post that show the install of a River Raider Kit if you want to reverse engineer or use it. https://www.jk-forum.com/forums/modi...7/#post3320835
WHAT'S NEEDED
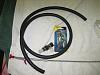
- 5/16" fuel line. I have read that this is the factory size on another forum. I have heard of people using 1/4" fuel line. It can be bought by the foot at AutoZone.
- 3/8" Hose Mender. If your going to totally replace the hoses you won't need this. I'm just cutting off and extending mine. I tried 5/16" size and it was way to small. 3/8" fits water tight to say the least, and probably doesn't need to be clamped.

- Worm Drive Clamps

- Utility Knife or something to cut the hose
- Safety Glasses you'll be looking up were dirt can and will drop in your eye
- Grabber Tool to fish the line through

- Duck Tape
- Zip Ties
- Philips screw driver to get the break light off
REAR BREATHER EXTENSION
This breather stock goes from the top of the passenger side of the axle to the top of the passenger wheel well behind the plastic liner.
This is taken on my back looking up into the back of the rear passenger wheel well. You can almost see where it terminates about where my finger is.
This is the termination cap. It will allow water in. It's basically like a little wiggle cap on top of the tube to deflect splashes.
What I have done is cut off the end and extended that into the rear tail light area. When your removing the tail light you want to only remove the 2 innermost screws. That will allow the whole light to come off. The outside ones just hold on some trim (and have a slightly larger screw.) I would recommend putting the screws back in a few turns after you remove the light so that you don't loose one in the bumper like I did. You can see the 2 screws that hold the break light on below.
Here you can see I put a packing strap down a hole that ends up behind the plastic wheel well liner.
Now on my back (with saftey glasses) I used a grabber tool and flash light to fish that packing strap down. I had to push the plastic wheel liner out of the way.
Now I cut off the end with the jiggle cap and used the hose mender to add in the extra hose. You can see in the picture below what the end looks like. There is bolt that it will just pull off of with some pressure directly out from the bolt. That clear plastic retainer piece, that holds the factory hose to the bolt, is taped to the hose with 2 wraps of black tape.
I used 4' of fuel line back here, and I could have easily gotten away with only 3'. Actually I cut 6" off and still have plenty of slack if I add a lift later. I think 2' (a popular size to buy it pre-cut) would be a very tight fit with the route I took. There is also a hole you can use in the bottom of the tail light that others have used. On my 2012 they put a ton of foam in there that blocked me from going that direction. I taped the packing strap to the hose to feed it though the hole.
Here you can see where I was able to just barely get a zip tie through to hold the fuel line up as high as possible. If you put your finger up there you'll see it's a very tight fit. I used 2 about 8" ties to get the job done. There is also a bar that I guess holds the light in that I used to zip tie to. You can see it in the first tail light picture. Then I used some Duct Tape and secured it to the wall right were it fed through just for good measure.
I re-used the terminal jiggle cap. You can see were the end of the line is here. You can also run it up by the tail light wire and into the roll bar. I personally think this is plenty high and dry for me. You can also see in this picture how the brake light doesn't screw in on the outside.
Last edited by Rooster76; 12-03-2012 at 11:57 AM.
 09-04-2012, 08:29 PM
#2
JK Enthusiast
Thread Starter
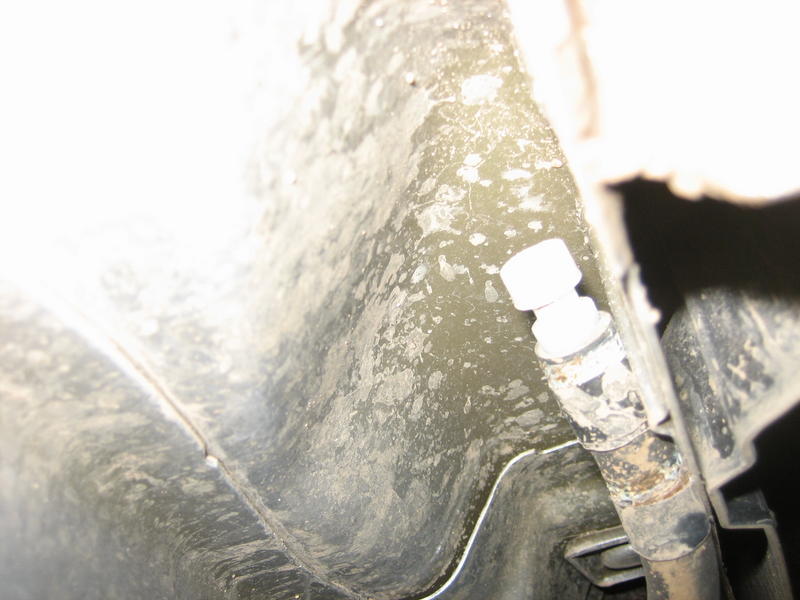
FRONT AXLE BREATHER HOSE
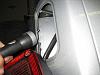
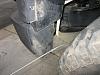
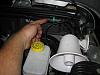
The front axle breather hose goes from the top driver side of the axle to up near the top of the shock. It really isn't covered much from splashing water, or even if you were pressure washing in there. You can see it by just looking over the front driver tire next to the shock. There is a clip that holds it up that you can see in the picture. My finger is on the jiggle cap.

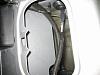
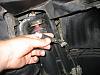
This is a view from under the hood driver side. Your not going to be able to get at the end of the hose from here, but you can stick your hand down and feel it. The cap is just on the other side of some plastic that I'm pointing to. If you reach down by were my thumb is under that plastic it's right there.

I haven't yet extended this one but will likely soon. You want to make sure if any fluid was to escape from the hose it isn't going to drop on anything hot. Of course you need to make sure you keep the hose off anything that is going to get really hot.
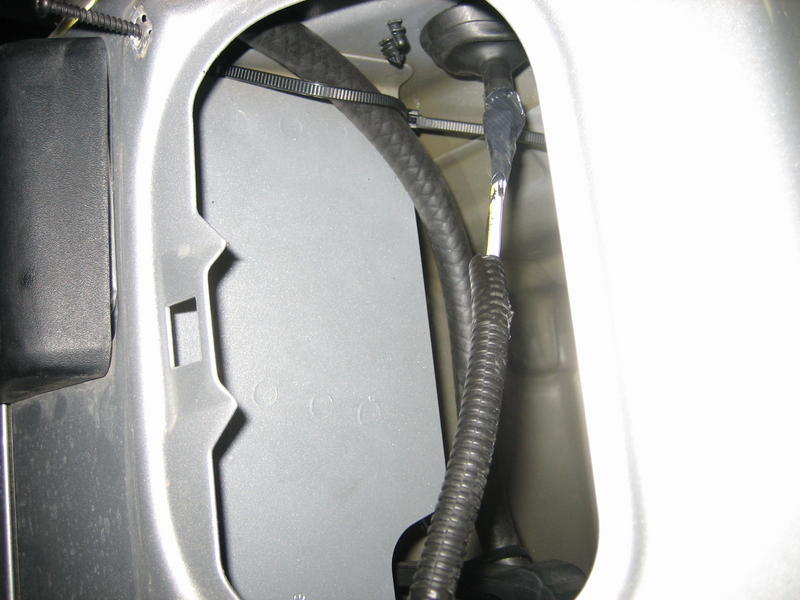
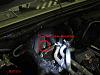
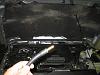
TRANSFER CASE
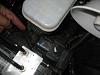
This is a 3.6L 2012 so it might look different on earlier JK's. Basically you need to take off the plastic cover off the engine. It just pops off with a bit of a tug. Then you can see what I'm assuming is the transfer case breather. I didn't actually track it all the way back. I'm on the fence about extending this one. It's in a pretty good location but could get raised up about 6" to make it even better. This picture is taken from the passenger side pointing toward the back.
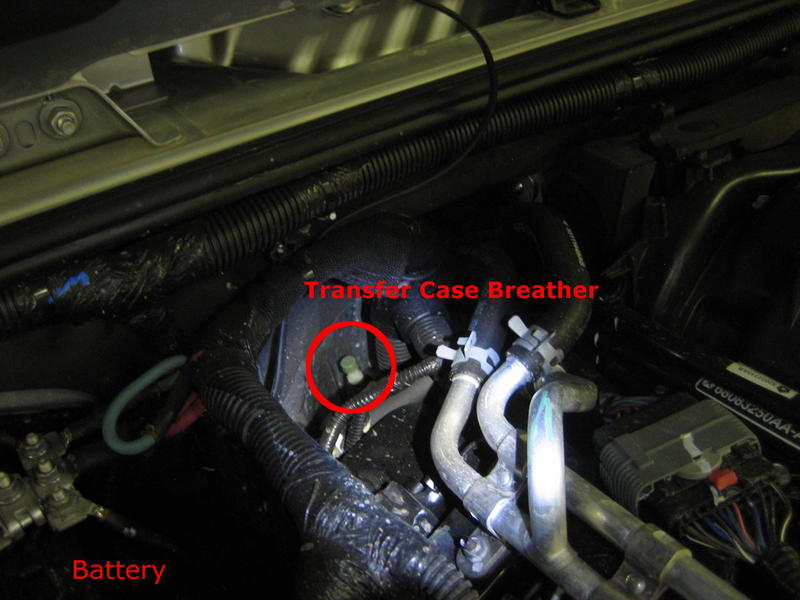
The hose starts in the middle top engine side of the transfer case. I'm not even sure if you could get a camera up there to take a picture of it. I have seen some JK Owners on another forum point it out with pictures.
ALRIGHT LETS SEE HOW YOU DID YOURS
If you have pictures or advise about extending your breathers post them up This thread really needs someone to show how to extend the auto transmission breather.
You might want to check out this write-up ->Project-JK.com - Jeep JK Wrangler Resource � Jeep JK Wrangler Axle Breather Hose Extension
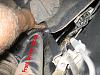
The front axle breather hose goes from the top driver side of the axle to up near the top of the shock. It really isn't covered much from splashing water, or even if you were pressure washing in there. You can see it by just looking over the front driver tire next to the shock. There is a clip that holds it up that you can see in the picture. My finger is on the jiggle cap.
This is a view from under the hood driver side. Your not going to be able to get at the end of the hose from here, but you can stick your hand down and feel it. The cap is just on the other side of some plastic that I'm pointing to. If you reach down by were my thumb is under that plastic it's right there.
I haven't yet extended this one but will likely soon. You want to make sure if any fluid was to escape from the hose it isn't going to drop on anything hot. Of course you need to make sure you keep the hose off anything that is going to get really hot.
TRANSFER CASE
This is a 3.6L 2012 so it might look different on earlier JK's. Basically you need to take off the plastic cover off the engine. It just pops off with a bit of a tug. Then you can see what I'm assuming is the transfer case breather. I didn't actually track it all the way back. I'm on the fence about extending this one. It's in a pretty good location but could get raised up about 6" to make it even better. This picture is taken from the passenger side pointing toward the back.
The hose starts in the middle top engine side of the transfer case. I'm not even sure if you could get a camera up there to take a picture of it. I have seen some JK Owners on another forum point it out with pictures.
ALRIGHT LETS SEE HOW YOU DID YOURS
If you have pictures or advise about extending your breathers post them up
This thread really needs someone to show how to extend the auto transmission breather.You might want to check out this write-up ->Project-JK.com - Jeep JK Wrangler Resource � Jeep JK Wrangler Axle Breather Hose Extension
Last edited by Rooster76; 09-06-2012 at 03:54 AM.
09-05-2012, 04:07 AM
#4
JK Freak
Join Date: Jul 2011
Location: Independence and Lexington, KY (depends on the time of year)
Posts: 717
Likes: 0
Received 0 Likes
on
0 Posts
Thanks for the write up, definitely cleared this up for me! Im gonna do this soon, since I do a lot of water/mud runs. As long as I don't go up to the doors it looks like I should be fine? Please correct me if I'm wrong 
Edit: not meanin to hijack the thread either. I'm sure that other users as well as myself could have some peace of mind knowing that.
Edit: not meanin to hijack the thread either. I'm sure that other users as well as myself could have some peace of mind knowing that.
09-05-2012, 04:15 AM
#5
JK Enthusiast
Join Date: Nov 2010
Location: Covington, GA
Posts: 329
Likes: 0
Received 0 Likes
on
0 Posts
Thanks! I noticed these when I did my lift, they would def pop off under flex. I was looking at them like WTF does this do? Why is the breather there functionally?
09-05-2012, 06:42 AM
#6
JK Enthusiast
Thread Starter
Thanks for the write up, definitely cleared this up for me! Im gonna do this soon, since I do a lot of water/mud runs. As long as I don't go up to the doors it looks like I should be fine? Please correct me if I'm wrong
Edit: not meanin to hijack the thread either. I'm sure that other users as well as myself could have some peace of mind knowing that.
Edit: not meanin to hijack the thread either. I'm sure that other users as well as myself could have some peace of mind knowing that.
HOW SAFE IS IT STOCK
I think that your pretty safe for highway driving. For off-road use I think it is worth the $20 to mod them. When you go through a decent water puddle your wheel wells will fill with water. That could get some water/gunk in the breathers that are basically located in the top of wheel wells. They have a cap on there that will block most of splashes, but it's defiantly not a one way valve. If you did submerged to the top of the fenders you would be sucking in water like a straw, and would really want to change your differential oil ASAP. As a side note, if your in water for extend periods of time its a good idea to change your diff oil also. You can see how to do that here ->Project-JK.com - Jeep JK Wrangler Resource � Jeep JK Wrangler Maintenance Differential Fluid Change Write-Up. I have heard that right after messing around with water you can drain out a bit of the differential oil. The water being heavier should be at the bottom. If it's contaminated it will look milky and should be totally replace. Otherwise you can just top it off.
THIS DOESN'T WATER PROOF A MANUAL TRANSMISSION WHEN SHIFTING
With a manual transmission even with the breathers extended you still should not shift in water that is above the bottom of your transmission. It has a big vent hole that cannot be sealed. When you push the clutch in water (and more worrisome is what's in it) can get in by the clutch plate. As long as you don't shift while submerged you should be good. The proper way to deal with that is to first be in 4-Low. Then if you stall you can restart without clutching. With an auto it's not an issue going from drive to reverse, though you might want to extend it's breather.
If your hoses came off at the axles and you were later driving through water or heavy dust, that would suck. You should put some worm drive clamps on the hose at the axles to keep them in place.
Last edited by Rooster76; 09-05-2012 at 08:15 AM.
Trending Topics
 09-07-2012, 05:17 PM
#9
JK Enthusiast
Thread Starter
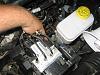
I extended the front axle breather today. It was pretty painless. I didn't even remove the wheel. This is a picture of the front driver wheel well over the tire. After sliding off the silver clip holding it in place you have plenty of hose to work with. Then I just slid the clip back on after I extended the hose.
This is a picture showing the hose mender. I used a 3/8" hose mender on a 5/16" hose so it was a very tight fit. If I had some hair spray I would have wet it down really good first with that. It would help it slip in and hold it tight after it dries. Same trick you use for bike grips. I tried to use the mud spots on the top of the hood to find a place to extend the hose to.

I'm sure you can figure out a good way to worm it to were ever you want to put the hose. I took this picture so I guess I will show how I fished mine though. I found a few spots to zip tie it down along the way. The extended hose comes out right were I have my finger on it. Then it wraps around the thing with a blue mark on it. You can see it continue back up near the center of the horn.

This is were I relocated the end. You can just see the white cap behind some other factory wireing. That's about 2 foot and 3 inches of hose. (had 3' chopped 9")
That white speaker horn I have there is to yell at people with my CB. I find it helpful for expressing myself to road bikers who don't use the bike paths.

This is a close up the jiggle cap. There is holes on both sides under the cap that are about the size of a pencil lead. Even with the cap submerged it would probably not take on water very fast. I personally feel pretty cool with keeping my transfer case breather alone. The axle breathers being in the wheel well deserve to be extended. Especially because all the parts cost less than $15.

This is a picture showing the hose mender. I used a 3/8" hose mender on a 5/16" hose so it was a very tight fit. If I had some hair spray I would have wet it down really good first with that. It would help it slip in and hold it tight after it dries. Same trick you use for bike grips. I tried to use the mud spots on the top of the hood to find a place to extend the hose to.
I'm sure you can figure out a good way to worm it to were ever you want to put the hose. I took this picture so I guess I will show how I fished mine though. I found a few spots to zip tie it down along the way. The extended hose comes out right were I have my finger on it. Then it wraps around the thing with a blue mark on it. You can see it continue back up near the center of the horn.
This is were I relocated the end. You can just see the white cap behind some other factory wireing. That's about 2 foot and 3 inches of hose. (had 3' chopped 9")
That white speaker horn I have there is to yell at people with my CB. I find it helpful for expressing myself to road bikers who don't use the bike paths.
This is a close up the jiggle cap. There is holes on both sides under the cap that are about the size of a pencil lead. Even with the cap submerged it would probably not take on water very fast. I personally feel pretty cool with keeping my transfer case breather alone. The axle breathers being in the wheel well deserve to be extended. Especially because all the parts cost less than $15.
Last edited by Rooster76; 10-27-2012 at 02:18 PM.
10-26-2012, 10:15 AM
#10
JK Enthusiast
Join Date: Feb 2011
Location: NJ
Posts: 348
Likes: 0
Received 0 Likes
on
0 Posts
Thanks for the write up. I did this today. Axles were easy with your pictures. It was a pain to reach the transfer case breather. After a while I realized it was easier to get it from under the Jeep.