Homemade Rear Cargo Trunk for $48!!!!

 02-11-2016, 08:42 AM
#302
JK Newbie


Join Date: Feb 2016
Location: Pensacola Florida
Posts: 15
Likes: 0
Received 0 Likes
on
0 Posts
I see quite a few write ups showing the use of Particle Board or Press Board...
You guys do realize that stuff is going to draw in moisture and then the glue pressed together with wood is going to start crumbling...
I used a 3/4" Pressure treated Plywood, it doesnt look anything like some of those guys...
I will add some pics I am doing like the first one but a bit different.
I rotated the side rail down instead of up so I dont have any edge and it can not be accessed from the top side at all.
I am attaching to side of Ply wood to attach to rails.
I also am installing 2 L7 15" Square Subs...lol
In the forward facing board behind the seat...solves two problems at once plus looks great.
I was able to grab my Hardware for 24 bucks Rails.
and then 19 for indoor outdoor carpet Grey only dark color they had a lowes.
Then some screws and bolts total out door with adhesive spray 12 bucks i was at 88 bucks.
I will update in a few hours...
I will have to agree this is not a single day project, unless you are excellent at woodworking.
I had to measure three or four times and keep hacking away at it section by section...
I now have Stained the wood facing forward and carpeted the rear side. I have completed the forward top deck board with cut outs for the Seat belt re-coilers.
I am now letting the glue cure on the rear section carpet, then in am I can start to bolt top section to front section then anchor to body across bottom.
Then attached sides to wood then to body and work my way back.
Once I complete the securing part of all decking I will then install the amp mounted upside down to front inside top section. Then wire Speakers.
Last edited by Markwhite; 02-11-2016 at 07:06 PM.
02-12-2016, 03:14 PM
#304
JK Newbie
Join Date: Feb 2016
Location: Pensacola Florida
Posts: 15
Likes: 0
Received 0 Likes
on
0 Posts
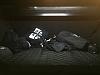
Ok I have completed my install and it was two full days...
But I had added work...see...
2 L7 15" Square Subs installed with Kicker Amp.
Stained and clear coated with Polyurethane...
I added a couple of brackets across seam and 1/4 out from center to make front board and rear board stay level with each other...
I screwed the Plywood sideways to brace support. Then worked it down to tighten up the Torque Bolts I used in the hardtop mount location, mine can be run with hard top or soft top.
I used 13 dollar a spray can of Adhesive 3M spray to secure carpet to wood.
Wired up amp using an empty slot on SPOD for remote of sub amp... which also has min power shut off to ensure start...
If I want to remove a panel I may as well remove since it is in permanently....mounted...
Last edited by Markwhite; 02-12-2016 at 03:20 PM.
03-01-2016, 11:54 AM
#305
JK Newbie

Join Date: Nov 2014
Location: United States
Posts: 74
Likes: 0
Received 0 Likes
on
0 Posts
These are all pretty impressive but I am curious. Has anyone tried to make one with metal instead of wood. Im referencing the metal sheets you can buy from Home Depot which appears to be the same as the stuff the containers that go in pick ups use.I guess its about 1/8" thick but could be wrong. Anyway, i was thinking about making one with that and was curious if anyone else did.
03-01-2016, 07:49 PM
#306
JK Newbie
Join Date: Oct 2015
Posts: 38
Likes: 0
Received 0 Likes
on
0 Posts
UPDATED!!!!! I covered it with truck carpet. See the end... NO, it's not waterproof, and NO it's not as secure as a lock box, but it's sufficient to keep prying eyes out of my cargo area, carry my golf clubs or packages from the mall. I used existing holes & only spent $48. $ 9 one 8' sheet of 5/8" plywood $26 four 24" angle iron w/ holes $ 8 one quart of flat black exterior paint from Walmart $ 5 various nuts, bolts, washers & a can of Rustolem High Heat Enamel $48 total cost to build this trunk!! I had the guy at Lowes cut the 8' sheet of plywood down to 5' x 4' and 3' x 4' sections. You'll only need the 5' section to make all 3 pieces. Step 1 - paint the parts (those metal brackets get HOT in the sun!!) Step 2 - pull back the carpet & put one side under the side rails Step 3 - use the 2 rear most holes that your hard top bolts into & fasten the angle iron to the vehicle. I used 1.5" 1/4" bolts, washers and a rubber washer that sits on the paint to prevent scratches Step 4 - get another piece of angle iron & face it the opposite way, use 2 1/4" bolts to fasten it together. This will be the support for the cargo cover. Step 5 - I cut 2 pieces for the top, just for ease of lifting it in & out. Step 5 is cut the piece that backs up to the rear seat. View from underneath/inside the cargo area (yes I have a subwoofer): Step 6 - cut the 2nd piece to fit the top. I cut mine to fit WITH the bar that attaches to the rear window. Step 7 - With both top pieces in place, go to the underside of the planks & use a marker to color in the holes thru the metal brackets. This will show you where to drill the holes. Step 8 - Remove the planks, drill holes from the bottom side. Place them back onto the brackets & hopefully your bolts will slide into place from the top, thru the wood & thru the bracket. Secure w/ nuts. Step 9 - cut out the back piece that will go behind the rear seats. Step 10 - Secure with brackets from inside the cargo area Step 11 - Once everything fits perfectly with bolts, remove & paint. I applied 2 coats. Step 12 - Reassemble & all a cargo net if you like! It's pretty tough, but I wouldn't stand on it. I didn't want to have to cut metal to make a brace across the middle, but you could easily add a 5' length of bar across the middle, or whatever. From this, I'm sure you guys can modify & improve it. UPDATED - STEP 13!!! Step 13 - One $8 roll of truck carpet from Walmart (found in the floor mat section) & a can of spray adhesive. I covered it with the carpet & left the brackets exposed so that I can attach a cargo net or bungee cords on top if needed. You could cover it if you like...whatever suits your needs. I did, however, cover the rear edge so that it won't cut the soft top when it's folded down.
05-01-2016, 03:05 AM
#307
JK Newbie
Join Date: Nov 2013
Posts: 75
Likes: 0
Received 0 Likes
on
0 Posts
The only problem I have had with my rear deck is seeing inside the tub at night. I bought a 12" LED strip light and wired it to the dome light so that it comes on when I open the tailgate.
09-15-2018, 08:10 AM
#308
JK Newbie

Join Date: Sep 2018
Location: virginia beach, va
Posts: 2
Likes: 0
Received 0 Likes
on
0 Posts
Hey,
I'm super late to this party, but each DIY cover is awesome- and I'm inspired.
But, I have a question... Since your cover rests on the top of the tub, how did you access the nut below the tub lip to bolt it down? I'm guessing the nut was loose and you just 'winged it until it caught thread? I would like to make mine removable and can't figure out how to keep the nut permanently there. Thoughts?? Help!
Thanks man!
RonDav
02-28-2019, 01:23 PM
#309
JK Newbie
Join Date: Nov 2012
Location: Urbana Il
Posts: 74
Likes: 0
Received 0 Likes
on
0 Posts


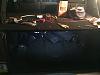
Here is my attempt. I needed to protect a very cool sub enclosure. By matching angle up I was able to create a lip for the wood to set on. I have cut the wood and will carpet tomorrow.
02-28-2019, 01:53 PM
#310
JK Jedi Master
I had an Erector Set back in the '50s and '60s, so I was right at home building all sorts of things with this stuff over the years. Dexion is what I've always known it as.