Installation if the Smittybilt XRC Atlas bumper and my thoughts on it!
 04-22-2015, 12:16 PM
#1
JK Enthusiast
Thread Starter
Join Date: Oct 2010
Location: Los Angeles,CA
Posts: 109
Likes: 0
Received 0 Likes
on
0 Posts
Ok, so here goes nothing. There is another install thread on jeep forum but i figured we needed our own and because I would like to demonstrate what troubles I had with it and how I dealt with it all. This bumper is going on a 2014 wrangler sport! Bear with me on this post because I haven't done this before because the last time I wrote something long here, it logged me out and I gave up and didn't want to write it all over again. Anyways, please enjoy! And I don't know if this is allowed here but shoutout to Eric at Offroad Elements for his amazing prices on everything he's gotten me, including this bumper!! Thanks Eric 

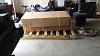
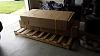
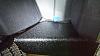
First thing first, grab a brew because it was a long night getting this bumper in. I began the install at about 4 or 5pm and it took me until 4am to finish! The bumper came packed really well and came by 18 wheeler on a pallet! I unpacked the tire carrier portion and moved it to the side as well as all the tiny packages. My first thought was that geeze this thing is heavy!
My trusty steed was with me all night! lol
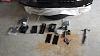
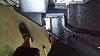
Once most of the stuff was unpacked, I got to work on removing my old bumper, tow hitch, and tow hook! The bolts on the tow hitch were put on by the hands of god!! When you take these off, and any other bolts at that, spray some lubricant on the threads. It will penetrate into the pores and help you more than you think!
NOTE: I don't have a picture of this later on but of the 4 tow hitch bolts, I refer to the rightmost bolt in the picture under this sentence when I install the bumper.
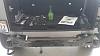
After removing all the old hardware, be sure to clean off as much dirt as you can (this will be your only chance for a fully clean ride next time haha) because in the two holes at the corner of the frame is where the mounting plates for the bumper will go. If there is anything in there, it could cause alignment issues later on if it bolts on top of dirt, or even possibly loosen up if the dirt clears later on. I didn't really take pictures of some of the self explanatory stuff or anything already pictured in the manual. Use this to accompany your installation and learn from my mistakes because deciphering the manual was tedious at times!
First thing first, grab a brew because it was a long night getting this bumper in. I began the install at about 4 or 5pm and it took me until 4am to finish!
The bumper came packed really well and came by 18 wheeler on a pallet! I unpacked the tire carrier portion and moved it to the side as well as all the tiny packages. My first thought was that geeze this thing is heavy!My trusty steed was with me all night! lol
Once most of the stuff was unpacked, I got to work on removing my old bumper, tow hitch, and tow hook! The bolts on the tow hitch were put on by the hands of god!! When you take these off, and any other bolts at that, spray some lubricant on the threads. It will penetrate into the pores and help you more than you think!
NOTE: I don't have a picture of this later on but of the 4 tow hitch bolts, I refer to the rightmost bolt in the picture under this sentence when I install the bumper.
After removing all the old hardware, be sure to clean off as much dirt as you can (this will be your only chance for a fully clean ride next time haha) because in the two holes at the corner of the frame is where the mounting plates for the bumper will go. If there is anything in there, it could cause alignment issues later on if it bolts on top of dirt, or even possibly loosen up if the dirt clears later on. I didn't really take pictures of some of the self explanatory stuff or anything already pictured in the manual. Use this to accompany your installation and learn from my mistakes because deciphering the manual was tedious at times!
Last edited by Big-D#28; 04-22-2015 at 01:32 PM.
 04-22-2015, 01:32 PM
#2
JK Enthusiast
Thread Starter
Join Date: Oct 2010
Location: Los Angeles,CA
Posts: 109
Likes: 0
Received 0 Likes
on
0 Posts
It wouldn't let me post anymore pics on my last post (memory cap?) so here goes another.
The bumper itself is heavy and well built! Paint was done just fine with no flaking or blemishes and the welds seemed fine. I will do a closer inspection later on! Now onto mounting it... There are 8 bolts to be accounted for. 4 long bolts that go through to the center part of the frame where the tow hitch was, and 2 on the sides of the whole frame that go through one wall and bolt to a plate. If you look at the third picture on my first post, these plates are the lowest two pieces of the ones laid out on the floor.
After wrestling the bumper onto the frame, with the help of a friend, I have a few recommendations!
1. This bumper, in my case, was a very tight fit on the sides. Remember when I said wipe all the dirt? lol Well do that, but also note that it helped when I wiped just a tab bit of oil on the sides to help it slide in. After a while, the paint wore down enough that it was not as bad to remove or adjust.
2. Place something on top of the bumper on the far edges to protect your quarter panels. When wiggling this in the first time, it didn't move smoothly. The corner jerked up and hit my quarter panel taking a chip off the bottom side right down to the metal. No worries though its only a very small knick that nobody will ever see, but I do have it covered with tape now until some touch up paint comes in tomorrow to prevent rusting.
3. Bolt in the middle bolts first and then move on to the sides. Once its bolted pretty tightly, you should check the fitment before using a torque wrench to torque it down!
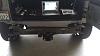
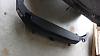
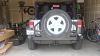
Here is where I hit a few snags and where the "shittybilt" attention to detail comes in. First of all, the bolt on the far right where the tow hitch was (as noted before) did not go in! This was liveable and I didn't mind at first. Secondly, the bumper seemed like it fit in well until the two bolts on the right side were tightened down. Once done, this thing was practically touching my quarter panel on the right side! I tried everything from unbolting and rebolting in these first, to using a jack to lift it up before bolting. I even had my friend stand on it at the corner!! Any big bumps and this bumper was sure to hit. Not to mention the tire carrier was not even on yet. Take a look at the pictures....
Here you can see the knick where the bumper hit in the middle.
Here you can see how close the bumper is!
Plan B: This was originally plan A but I figured if the bumper fitment was corrected then I could live without the bolt that did not go in. Besides this would take longer... Time to unbolt the bumper and file down the holes!
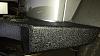
So, one thing to mention is that this is some really thick steel. I had no idea how I should have approached it without my grinder here (I am up north for school) so I first used a drill bit, then moved to a Dremel, then in the end just used a file to grind it down for god knows how long. The bolt in the middle that wouldn't fit was filed down about 8mm towards the right. And the two bolts on the right were filed on the top by about 8mm as well to hopefully bring the bumper down once tightened. At this point it was about 2 trips to the store later, and already 11:30 at night. Here is the fitment after it was bolted down again and finally torqued down (for the third time). It is now a perfect fit and lines up evenly and without interference.

The bumper itself is heavy and well built! Paint was done just fine with no flaking or blemishes and the welds seemed fine. I will do a closer inspection later on! Now onto mounting it... There are 8 bolts to be accounted for. 4 long bolts that go through to the center part of the frame where the tow hitch was, and 2 on the sides of the whole frame that go through one wall and bolt to a plate. If you look at the third picture on my first post, these plates are the lowest two pieces of the ones laid out on the floor.
After wrestling the bumper onto the frame, with the help of a friend, I have a few recommendations!
1. This bumper, in my case, was a very tight fit on the sides. Remember when I said wipe all the dirt? lol Well do that, but also note that it helped when I wiped just a tab bit of oil on the sides to help it slide in. After a while, the paint wore down enough that it was not as bad to remove or adjust.
2. Place something on top of the bumper on the far edges to protect your quarter panels. When wiggling this in the first time, it didn't move smoothly. The corner jerked up and hit my quarter panel taking a chip off the bottom side right down to the metal. No worries though its only a very small knick that nobody will ever see, but I do have it covered with tape now until some touch up paint comes in tomorrow to prevent rusting.
3. Bolt in the middle bolts first and then move on to the sides. Once its bolted pretty tightly, you should check the fitment before using a torque wrench to torque it down!
Here is where I hit a few snags and where the "shittybilt" attention to detail comes in. First of all, the bolt on the far right where the tow hitch was (as noted before) did not go in! This was liveable and I didn't mind at first. Secondly, the bumper seemed like it fit in well until the two bolts on the right side were tightened down. Once done, this thing was practically touching my quarter panel on the right side! I tried everything from unbolting and rebolting in these first, to using a jack to lift it up before bolting. I even had my friend stand on it at the corner!! Any big bumps and this bumper was sure to hit. Not to mention the tire carrier was not even on yet. Take a look at the pictures....
Here you can see the knick where the bumper hit in the middle.
Here you can see how close the bumper is!
Plan B: This was originally plan A but I figured if the bumper fitment was corrected then I could live without the bolt that did not go in. Besides this would take longer... Time to unbolt the bumper and file down the holes!
So, one thing to mention is that this is some really thick steel. I had no idea how I should have approached it without my grinder here (I am up north for school) so I first used a drill bit, then moved to a Dremel, then in the end just used a file to grind it down for god knows how long. The bolt in the middle that wouldn't fit was filed down about 8mm towards the right. And the two bolts on the right were filed on the top by about 8mm as well to hopefully bring the bumper down once tightened. At this point it was about 2 trips to the store later, and already 11:30 at night. Here is the fitment after it was bolted down again and finally torqued down (for the third time). It is now a perfect fit and lines up evenly and without interference.
Last edited by Big-D#28; 04-22-2015 at 02:24 PM.
04-22-2015, 01:57 PM
#3
JK Enthusiast
Thread Starter
Join Date: Oct 2010
Location: Los Angeles,CA
Posts: 109
Likes: 0
Received 0 Likes
on
0 Posts
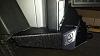
The final step now was to bolt on the tire carrier! This step literally took some helping hands but here is how you tackle it. First I test fitted the carrier to see how many washers I would be able to fit. There was a little bit of room and at first I thought I would be able to fit a big washer on the bottom and a smaller washer on the top. After fighting and wrestling with it, I just stuck with using one big washer on the bottom because that was more important. If anything was to wear down the paint the most, it would be just that! The bumper sort of angles at the top so the last washer on top doesn't look like it would fit very well but I may try again later once it wears down a bit.

Note that when bolting it in, the order is as follows. Put the washers used and place the tire carrier, then push the metal insert through the bumper making sure it goes in through the bumper/washer (if used here)/tire carrier/washer (recommended here)/then through the bottom of the bumper. There is a hole in the bumper on the bottom too, which may seem awkward to place, but after some blood sweat and tears it will go in! When placing the 6 inch bolt through everything, make sure you place the giant washer on top of the cam and through everything and then into the weird looking nut with a stick tack welded to it (you can break the stick off later). I have seen some people have problems with the way the bumper fit onto the pin on the other side or even with rubbing onto the bumper itself, but mine fit spot on as you can see below. Note that it looks like it isn't by a bit, but the bumper is not actually in the latch.
NOTE: Do not torque the main bolt that is holding up the tire carrier until later!!!
Here is where I don't have pics but I will describe what I did. So first lay your tire on the floor upside down and bolt down the sizes of the actual tire carrier portion, the manual does explain this just fine. After you determine your sizes and whatnot, go ahead and mount it, as well as any other gas cans and accessories you may have. I just had a friend with a close enough weight approximation sit on my tire while i did this step. Once all of the weight was on, use that cam where the tire carrier bolts in to adjust the height of the tire carrier. Be careful not to slam the tire carrier because if its too low, you will scratch the bumper! After you set the height using the offset cam, you can use the allen bolt to lock that in place and then torque and cap it with the decorative end piece.
Behold!!! The bumper in its full glory!
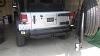
End Notes: It looks SICK and its as sturdy as can be! The paint did flake off under some bolts but I am not worried about that. The paint is done right in the parts that are visible is all that matters. The bolts are grade 8.8 and the bumper is made of SAE 316 steel which will resist corrosion in water as well as salt water "Marine grade". I already noted the things to look out for during the process but it should be fairly simple. A helping hand is most definitely needed! If you have any questions or any requests, ask away! Hope you enjoyed that
Note that when bolting it in, the order is as follows. Put the washers used and place the tire carrier, then push the metal insert through the bumper making sure it goes in through the bumper/washer (if used here)/tire carrier/washer (recommended here)/then through the bottom of the bumper. There is a hole in the bumper on the bottom too, which may seem awkward to place, but after some blood sweat and tears it will go in! When placing the 6 inch bolt through everything, make sure you place the giant washer on top of the cam and through everything and then into the weird looking nut with a stick tack welded to it (you can break the stick off later). I have seen some people have problems with the way the bumper fit onto the pin on the other side or even with rubbing onto the bumper itself, but mine fit spot on as you can see below. Note that it looks like it isn't by a bit, but the bumper is not actually in the latch.
NOTE: Do not torque the main bolt that is holding up the tire carrier until later!!!
Here is where I don't have pics but I will describe what I did. So first lay your tire on the floor upside down and bolt down the sizes of the actual tire carrier portion, the manual does explain this just fine. After you determine your sizes and whatnot, go ahead and mount it, as well as any other gas cans and accessories you may have. I just had a friend with a close enough weight approximation sit on my tire while i did this step. Once all of the weight was on, use that cam where the tire carrier bolts in to adjust the height of the tire carrier. Be careful not to slam the tire carrier because if its too low, you will scratch the bumper! After you set the height using the offset cam, you can use the allen bolt to lock that in place and then torque and cap it with the decorative end piece.
Behold!!! The bumper in its full glory!
End Notes: It looks SICK and its as sturdy as can be! The paint did flake off under some bolts but I am not worried about that. The paint is done right in the parts that are visible is all that matters. The bolts are grade 8.8 and the bumper is made of SAE 316 steel which will resist corrosion in water as well as salt water "Marine grade". I already noted the things to look out for during the process but it should be fairly simple. A helping hand is most definitely needed! If you have any questions or any requests, ask away! Hope you enjoyed that
Last edited by Big-D#28; 04-22-2015 at 04:42 PM.
04-22-2015, 05:53 PM
#4

Sweet thread. My son helped with mine and it was a bear but not 12 hours of pain!! 
Couple things that may help you...I put a washer or two between the striker and the bumper to space the striker a bit out to enable it to latch easier.
I am at a point after several months where the base of the jerry can holders very very lightly rub the bumper. I think now it's just about made its way through the powder coat so eh. I've tried adjusting the cam lock but one notch either way messes with my alignment.
Your last 2 digits of your plate seem covered. I picked up an off road only plate for the spare tire and it looks rad and doesn't give Johnny Law a reason to pull you over.
Congrats...I love this bumper/carrier.
04-22-2015, 06:22 PM
#5
JK Enthusiast
Thread Starter
Join Date: Oct 2010
Location: Los Angeles,CA
Posts: 109
Likes: 0
Received 0 Likes
on
0 Posts
Sweet thread. My son helped with mine and it was a bear but not 12 hours of pain!!
Couple things that may help you...I put a washer or two between the striker and the bumper to space the striker a bit out to enable it to latch easier.
I am at a point after several months where the base of the jerry can holders very very lightly rub the bumper. I think now it's just about made its way through the powder coat so eh. I've tried adjusting the cam lock but one notch either way messes with my alignment.
Your last 2 digits of your plate seem covered. I picked up an off road only plate for the spare tire and it looks rad and doesn't give Johnny Law a reason to pull you over.
Congrats...I love this bumper/carrier.
In that case, I would have it not rubbing than lightly rubbing. Id imagine bumps and stuff won't help that either haha Ill check out that offered plate too! i figured ill be needing one soon. I just got this done yesterday so ill need to order it. Thanks!
04-22-2015, 07:03 PM
#6
Mine has no problem closing actually!
In that case, I would have it not rubbing than lightly rubbing. Id imagine bumps and stuff won't help that either haha Ill check out that offered plate too! i figured ill be needing one soon. I just got this done yesterday so ill need to order it. Thanks!
In that case, I would have it not rubbing than lightly rubbing. Id imagine bumps and stuff won't help that either haha Ill check out that offered plate too! i figured ill be needing one soon. I just got this done yesterday so ill need to order it. Thanks!
04-23-2015, 12:42 AM
#7
JK Enthusiast
Thread Starter
Join Date: Oct 2010
Location: Los Angeles,CA
Posts: 109
Likes: 0
Received 0 Likes
on
0 Posts
This is crazy! I looked up the brakets to relocate it and its about 30 bucks plus another 15 for just the plug where the old plate was. My plan of attack is this: I am going to model that plug using a CAD program and 3d print it on my printer, along with a new bracket to relocate the plate somewhere else. I just found some lights for license plates on amazon for 10 bucks. BAM 10 bucks and I have a much better and much cheaper mount lol
Trending Topics
05-13-2015, 04:28 PM
#9
JK Enthusiast
Thread Starter
Join Date: Oct 2010
Location: Los Angeles,CA
Posts: 109
Likes: 0
Received 0 Likes
on
0 Posts
I dont have an antenna but I am sure you can get a mount and bolt it somewhere lol there are extra holes all over the tire carrier portion where I am sure you can either get a bracket or make some sort of bracket extension and just bolt it there. What are the requirements for bolting an antenna? Does it need any major clearance or anything?