JK - Inner Axle Seal
 04-29-2015, 10:41 PM
#1
JK Super Freak
Thread Starter
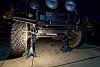
This was done on the front axle of a Dana 44 with factory locker. All models follow the same basic principle though.
It doesn't hurt to wash the Jeep a bit as you will be underneath for a good portion of it.
First off is to drain the dif of fluid as we will have to open it up.
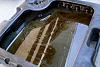
Hopefully yours looks better ... half of mine was water.
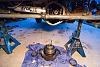
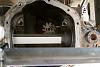
Next is to lift it up. Higher the better so you give yourself ample room to work. Put the transmission in neutral, chock the rear wheels, and take the front wheels off.

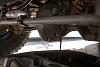
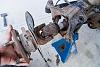
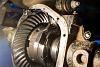
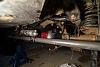
Pop your diff cover off of the differential.
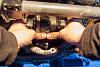
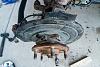
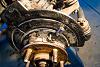
Remove the 21mm bolts holding the caliper to the hub.
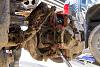
Tie off the caliper to something nearby. I bunged mine to the lower control arm to prevent the brake line from stretching.
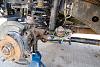
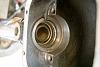
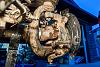
Using a 13mm 12 point socket, remove the 3 bolts holding the hub bearing in.
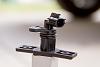
Undo the one bolt holding the wheel speed sensor. Alternatively you could follow the wire and disconnect it near the back of the shock tower. Considering the nightmare I had unplugging and replugging that connector I opted to simply remove the wheel speed sensor from the hub.
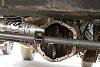
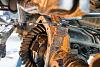
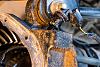
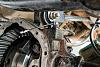
At this point the hub with axle attached should slide out. If it is rusted and refuses to budge you can cheat a bit. Take a small 2-3" extension and place it between the u joint and the middle of the C. Crank the wheel back the opposite direction and this will force the hub and axle out. It is good to reset it at the 180 degree point so you are pressing it out relatively evenly.
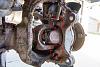
Once separated, gently pull the hub and axle out of the axle tube.
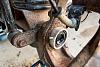
Sure sign it is leaking junk into the tube.
Be sure to do the same for both sides. At this point the driver and passenger axle should both be on the ground.
Back to the differential, if you do not have a locker then you could skip this step. This will disconnect the locker wire. At the top of the differential there is a single bolt holding a connector which needs to be removed.
One unbolted the entire connector lifts out of the housing so you can disconnect it. Mine was stubborn so I started prying on the bolt side of it and it snapped leaving no way to rescure the connector back to the housing and unable to seal it.
With the connector lifted upwards, unplug it by pressing the small tab on the 'inside of the diff portion of the plug'
Undo the four 19mm bearing cap bolts. Do not mix up these bolts or the orientation of the bearing caps as they will need to go back in the same way they came out.
Keep their orientation as is.
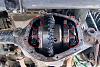
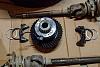
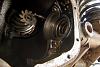
Grab the carrier with both hands and remove it from the housing. Be careful of the side as there are shims and follow the same principle. They should not be mixed up side to side. It is a little challenging to remove the gears with the tie rod in place. I was able to move the tie rod down a bit and the drag link upwards which allowed me to get the carrier mostly out and slide it to the drivers side before being free
With everything removed, now is a good time to look at your empty diff with the axles and gears out and wonder wtf you got yourself into...
Designate your no walk zone and make sure the orientation of your bearing caps and shims is kept in the same position as when they were removed (The shims can be spun but not swapped sides)
Looking back into the diff, try to clean out as much as you can. You will need a long pipe or a seal puller if you have one. I opted for a pipe. Insert it from outside of the axle tube and wack the end to push the seals into the diff.
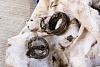
If you have never had the axles out, you should have the seal and two indexing rings. These are not needed and should be discarded. Similar to the tabs on rotors they are just used to assist on assembly.
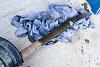
I filled up a shopping bag full of rags soaked with mud, oil, grease, water, and god knows what else. Tubs were packed with garbage. Once everything is cleaned out you should be left with nice clean pipes and a clean housing.

To put the new seals in I used a 1-1/2" socket. A standard seal press cannot be used as the center portion of the seal is pliable and the outer portion is flimsy. The only portion that could take a hit is the inner ring.
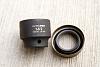
Holding the socket in the seal
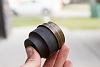
My pipe didn't allow for a bigger extension so I put a 1/2 to 3/8th reducer on the socket and the longest extension I could find. Being long I figured it would allow the socket to stay as straight as possible.
Place a bit of grease or oil on the outside of the seal and put it in place. Put your seal press inside the tube and give it a few good hits to set it in place.
You should feel the seal seated solidly in the axle tub and about a cm of the tube visible before it. Press both sides into place. I lubed up the rubber portion of the seal on the tube side to help prevent the axle snagging on the seal as it is being inserted.
Time to put the carrier back into place. Do not forget about the shims and end caps.
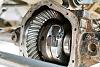
Attach the bearing caps and torque the four 19mm bolts down to 80ft lbs on a Dana 44. I believe the D30/35 was ~45ft-lbs? Don't quote me though!
A stop at the dealer for a new connector. I broke the left end of it where the bolt goes through upon removal.
Make sure to attach the wire of the locker to the connector before bolting it down to the housing.
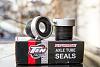
I was debating about putting the axle seals in that I got last year but after finding half of the rockies in my axle tubes I decided to give it a shot.
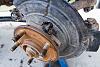
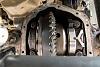
Gently place the axles back into the shafts and be cautious of the inner seal. Keen listeners will notice I put the brake shields on the the wrong sides and subsequently had to pull the axles and swap them, doh.
Tighten the three 12 point bolts holding the hub in place.
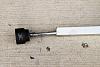
Bolt in your wheel speed sensor (brake shield is still backwards in this photo)
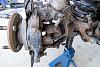
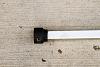
For reference, this is what the shield should look like on the passenger side of the JK
Don't have a photo of it... but put the brake rotors back on and reattach the brake calipers. Wheels can go back on the Jeep at this point.
Differential cover and be put on and filled with 1.35 quarts of your favorite 75w-90 gear oil. I took the chance to repaint the diff cover as well.
Take the Jeep off the stands, torque down the lug nuts, remove the wheel chocks, and take it for a spin. I tried 4 low/high and enabling/disabling the front locker and everything works. If you did this yourself you saved yourself $630 bucks vs going to the dealer!
It doesn't hurt to wash the Jeep a bit as you will be underneath for a good portion of it.
First off is to drain the dif of fluid as we will have to open it up.
Hopefully yours looks better ... half of mine was water.
Next is to lift it up. Higher the better so you give yourself ample room to work. Put the transmission in neutral, chock the rear wheels, and take the front wheels off.
Pop your diff cover off of the differential.
Remove the 21mm bolts holding the caliper to the hub.
Tie off the caliper to something nearby. I bunged mine to the lower control arm to prevent the brake line from stretching.
Using a 13mm 12 point socket, remove the 3 bolts holding the hub bearing in.
Undo the one bolt holding the wheel speed sensor. Alternatively you could follow the wire and disconnect it near the back of the shock tower. Considering the nightmare I had unplugging and replugging that connector I opted to simply remove the wheel speed sensor from the hub.
At this point the hub with axle attached should slide out. If it is rusted and refuses to budge you can cheat a bit. Take a small 2-3" extension and place it between the u joint and the middle of the C. Crank the wheel back the opposite direction and this will force the hub and axle out. It is good to reset it at the 180 degree point so you are pressing it out relatively evenly.
Once separated, gently pull the hub and axle out of the axle tube.
Sure sign it is leaking junk into the tube.
Be sure to do the same for both sides. At this point the driver and passenger axle should both be on the ground.
Back to the differential, if you do not have a locker then you could skip this step. This will disconnect the locker wire. At the top of the differential there is a single bolt holding a connector which needs to be removed.
One unbolted the entire connector lifts out of the housing so you can disconnect it. Mine was stubborn so I started prying on the bolt side of it and it snapped leaving no way to rescure the connector back to the housing and unable to seal it.
With the connector lifted upwards, unplug it by pressing the small tab on the 'inside of the diff portion of the plug'
Undo the four 19mm bearing cap bolts. Do not mix up these bolts or the orientation of the bearing caps as they will need to go back in the same way they came out.
Keep their orientation as is.
Grab the carrier with both hands and remove it from the housing. Be careful of the side as there are shims and follow the same principle. They should not be mixed up side to side. It is a little challenging to remove the gears with the tie rod in place. I was able to move the tie rod down a bit and the drag link upwards which allowed me to get the carrier mostly out and slide it to the drivers side before being free
With everything removed, now is a good time to look at your empty diff with the axles and gears out and wonder wtf you got yourself into...
Designate your no walk zone and make sure the orientation of your bearing caps and shims is kept in the same position as when they were removed (The shims can be spun but not swapped sides)
Looking back into the diff, try to clean out as much as you can. You will need a long pipe or a seal puller if you have one. I opted for a pipe. Insert it from outside of the axle tube and wack the end to push the seals into the diff.
If you have never had the axles out, you should have the seal and two indexing rings. These are not needed and should be discarded. Similar to the tabs on rotors they are just used to assist on assembly.
I filled up a shopping bag full of rags soaked with mud, oil, grease, water, and god knows what else. Tubs were packed with garbage. Once everything is cleaned out you should be left with nice clean pipes and a clean housing.
To put the new seals in I used a 1-1/2" socket. A standard seal press cannot be used as the center portion of the seal is pliable and the outer portion is flimsy. The only portion that could take a hit is the inner ring.
Holding the socket in the seal
My pipe didn't allow for a bigger extension so I put a 1/2 to 3/8th reducer on the socket and the longest extension I could find. Being long I figured it would allow the socket to stay as straight as possible.
Place a bit of grease or oil on the outside of the seal and put it in place. Put your seal press inside the tube and give it a few good hits to set it in place.
You should feel the seal seated solidly in the axle tub and about a cm of the tube visible before it. Press both sides into place. I lubed up the rubber portion of the seal on the tube side to help prevent the axle snagging on the seal as it is being inserted.
Time to put the carrier back into place. Do not forget about the shims and end caps.
Attach the bearing caps and torque the four 19mm bolts down to 80ft lbs on a Dana 44. I believe the D30/35 was ~45ft-lbs? Don't quote me though!
A stop at the dealer for a new connector. I broke the left end of it where the bolt goes through upon removal.
Make sure to attach the wire of the locker to the connector before bolting it down to the housing.
I was debating about putting the axle seals in that I got last year but after finding half of the rockies in my axle tubes I decided to give it a shot.
Gently place the axles back into the shafts and be cautious of the inner seal. Keen listeners will notice I put the brake shields on the the wrong sides and subsequently had to pull the axles and swap them, doh.
Tighten the three 12 point bolts holding the hub in place.
Bolt in your wheel speed sensor (brake shield is still backwards in this photo)
For reference, this is what the shield should look like on the passenger side of the JK
Don't have a photo of it... but put the brake rotors back on and reattach the brake calipers. Wheels can go back on the Jeep at this point.
Differential cover and be put on and filled with 1.35 quarts of your favorite 75w-90 gear oil. I took the chance to repaint the diff cover as well.
Take the Jeep off the stands, torque down the lug nuts, remove the wheel chocks, and take it for a spin. I tried 4 low/high and enabling/disabling the front locker and everything works. If you did this yourself you saved yourself $630 bucks vs going to the dealer!
Last edited by Vladimer; 04-29-2015 at 11:06 PM.
 04-30-2015, 04:04 PM
#3
JK Newbie
Join Date: Mar 2012
Location: Gilbert, AZ
Posts: 62
Likes: 0
Received 0 Likes
on
0 Posts
Your replacement seals look like the old design. I had a b*tch of a time getting the new two piece seals in without bending them. Ended up having to reuse one of the old seals. (I decided to replace them at the same time I was sleeving the axle as a percaution)
04-30-2015, 04:58 PM
#5
JK Junkie

Join Date: Jan 2013
Location: CT
Posts: 3,440
Likes: 0
Received 0 Likes
on
0 Posts
Same here, pain in the ass. I stuck with the old seals.
04-30-2015, 06:43 PM
#6
JK Jedi Master
I have found those "indexing rings" to be very helpful in holding the axle shaft in close alignment with the seal during installation, thereby preventing damage to the seal.

Trending Topics
05-01-2015, 09:29 AM
#8
JK Super Freak
Thread Starter
That is a good tip. Did you put the indexing ring on before inserting the axle into the shaft? Or leave it pressed against the seal. I put the outers on so my only choice was leaving it in the tube and was worried they wouldn't line up and just cause a lot of grief. Lubed up the inner one a bit to help the shaft slide over it.
05-01-2015, 12:54 PM
#9
JK Jedi Master
That is a good tip. Did you put the indexing ring on before inserting the axle into the shaft? Or leave it pressed against the seal. I put the outers on so my only choice was leaving it in the tube and was worried they wouldn't line up and just cause a lot of grief. Lubed up the inner one a bit to help the shaft slide over it.
In your case, couldn't you have put the outer seal on the axle shaft up by the u-joint, then installed the guides as outlined above, and installed the whole works as a unit? Before pushing the axle home, slide the outer seal into the end of the tube.
Last edited by ronjenx; 05-01-2015 at 01:54 PM.
06-10-2015, 10:15 AM
#10
JK Super Freak
Thread Starter
On the axle shaft installations I have done, I cleaned the tube as well as I could so the plastic guides wouldn't push any debris into the diff housing. I then cleaned the axle shafts and the removed guides, lubed the shaft's splines and the smooth surface that rides in the seal, and installed the guides (two on each shaft) onto the shafts with the concave sides facing each other. This will minimize the tendency for them to slide up the axle during installation, or slide off the axle on the next removal.
In your case, couldn't you have put the outer seal on the axle shaft up by the u-joint, then installed the guides as outlined above, and installed the whole works as a unit? Before pushing the axle home, slide the outer seal into the end of the tube.
In your case, couldn't you have put the outer seal on the axle shaft up by the u-joint, then installed the guides as outlined above, and installed the whole works as a unit? Before pushing the axle home, slide the outer seal into the end of the tube.