Kargo master install
 08-01-2015, 01:09 PM
#211
Installed mine a few weeks ago. Heres a few thoughts for those shopping the rack.
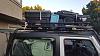
-the mount configuration seems to have changed for the a-pillar attachments. There are now 5 bolt locations as opposed to the 3 on previous models. I was initially worried because I have an AEV snork, but the mounts are very stout and I like it better. As you can see in the pics you will need to grind off and smooth out the passenger side a-pillar bracket for the snork. After shaving, it fits fine married with the snorkel brackets. One other concern was my rear bumper. I run a Barricade Trail Force. I did not want any metal on metal contact so I notched the rear supports to clear. Easy.
As far as the assembly. Not rocket science but you will need to separate your parts and concentrate because the directions are lame. I assembled the 4 mounts on first after I painted them over. Torque them down. I also painted the a-pillar hardware over because it was stainless and looked odd. I then sprayed the unassembled interior tube connections with paint. Once dry I filled the long tubes with expanding foam. The legs and hoops of the rack are not hollow. They have a type of welded plug on the inside of the female ends. The foam helps with sound. When you flick it the legs go thud instead of ding. Keeps the rack from howling from wind.
Once all dried I then assembled the cage on the ground using the supplied hardware and silicone. I took care to wipe off any excess silicone on the exterior joints. After assembled I used corregated pipe tape on the 8 joints and roughed up the tape. Its water and weatherproof and doesnt shrink. I then painted the rack also painting over the tape. Once dry I had a few friends help me place it on the jeep. Its not heavy but cumbersome enough that you need extra hands.
Much like doing a lift, dont tighten down the 4 rack to mount points until you have allowed the rack to rest on all 4 points. Then torque down. No elbow grease needed. Also, the front mounts did not come with rubber gasket so I added 2 to the front a-pillar mounts to avoid metal to metal contact.
After a test ride I added some nylon paracord to the front crossmember which helps eliminate any howling. Now no noise really to speak of. I plan on keeping this on year round so I did not investigate into any type of disconnects on the front. To lower the soft top its way easier to install quick disconnects on the soft top rear roll bar mounts to lower the soft top anyways. I plan on using this for ocean kayaks and "torpedo style" cargo boxes for use when vacation travelling.
Overall this rack is mega sturdy, doesnt creak or moan...atleast not how I put it together. The tape on the joints turned out good as I have no worries about rust or drips and looks pretty seemless. Bottom line...I would buy this and spend some time dressing it better for long term durability. The price is unbeatable if your needs are like mine. Best part if I get tired of it I can unbolt it and leave no evidence it was there. Hope this helps. Btw...still fits in my garage...315/70 on 2.5" lift.
Last edited by A'sJK; 08-01-2015 at 07:34 PM.
 08-03-2015, 10:05 PM
#212
JK Newbie

Join Date: Mar 2015
Location: Fresno, CA
Posts: 20
Likes: 0
Received 0 Likes
on
0 Posts
So, an here's an update a few weeks after the original installation. I attended the Jeepers Jamboree on the Rubicon a few weeks ago with the Kargo Master Kongo cage installed. I saw the Kargo Master guys and their new as-of-yet-released setups and have to say that they look AMAZING. Much lower profile than my Kongo Cage and they said that the new Safari rack will have a solid flood instead of slats, which is awesome. They were super guys nice as well.
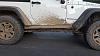
Now, on to the bad news. Since this was my first time running my Metal Cloak lift, we definitely over-packed for the trip and brought a few tools that I wouldn't necessarily have brought under normal circumstances. I don't have a hi-lift jack so I had to lug along a floor jack (LOL) to make any trail repairs. If I had to estimate my total weight on the roof rack, I'd say that it was around 300-350 lbs. We ended up taking a HARD hit on the right rock slider, so hard that it actually dented the slider and moved the entire slider up about an inch and a half.
Dent

Moved Rock Slider
It was so hard that I'm honestly surprised that the damn air bags didn't go off. If you're unfamiliar with the stock setup, the rear brackets are made to (I assume) rest just above the stock bumper. Since I'm running a Poison Spider Rock Brawler I rear bumper the rear mounting brackets have nothing to rest on. Since the rear brackets had nothing to bound against, they BOTH ended up rather severely bent.
Left Rear Bracket
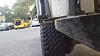
Right Rear Bracket
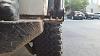
On top of the rear brackets getting bent, the passenger side cross member of the Congo Cage also got bent.
Bent cross member
Also, I forgot to get pictures of it, but several of the rails of the Safari rack ended up pretty severely bent as well. If I'm completely honest, the rear brackets worried me even before we went on the trip. They were obviously starting to bend a little even with a fairly light load a couple of weeks before this occurred and, IMHO, the rear brackets need an optional gusset to reinforce them in the event of having a rear bumper that is shorter than the stock bumper. I'm not sure about the bent cross member as we were well below the maximum reported capacity (500 lbs) that Kargo Master puts on their website.
Now, on to the bad news. Since this was my first time running my Metal Cloak lift, we definitely over-packed for the trip and brought a few tools that I wouldn't necessarily have brought under normal circumstances. I don't have a hi-lift jack so I had to lug along a floor jack (LOL) to make any trail repairs. If I had to estimate my total weight on the roof rack, I'd say that it was around 300-350 lbs. We ended up taking a HARD hit on the right rock slider, so hard that it actually dented the slider and moved the entire slider up about an inch and a half.
Dent
Moved Rock Slider
It was so hard that I'm honestly surprised that the damn air bags didn't go off. If you're unfamiliar with the stock setup, the rear brackets are made to (I assume) rest just above the stock bumper. Since I'm running a Poison Spider Rock Brawler I rear bumper the rear mounting brackets have nothing to rest on. Since the rear brackets had nothing to bound against, they BOTH ended up rather severely bent.
Left Rear Bracket
Right Rear Bracket
On top of the rear brackets getting bent, the passenger side cross member of the Congo Cage also got bent.
Bent cross member
Also, I forgot to get pictures of it, but several of the rails of the Safari rack ended up pretty severely bent as well. If I'm completely honest, the rear brackets worried me even before we went on the trip. They were obviously starting to bend a little even with a fairly light load a couple of weeks before this occurred and, IMHO, the rear brackets need an optional gusset to reinforce them in the event of having a rear bumper that is shorter than the stock bumper. I'm not sure about the bent cross member as we were well below the maximum reported capacity (500 lbs) that Kargo Master puts on their website.
Last edited by McDeth; 08-03-2015 at 10:07 PM.