My 4wd shifter repair.
 12-04-2010, 07:46 PM
#1
JK Newbie
Thread Starter

Join Date: Oct 2010
Location: Meraux, LA
Posts: 43
Likes: 0
Received 0 Likes
on
0 Posts
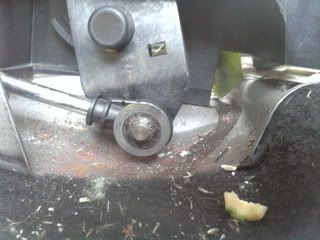
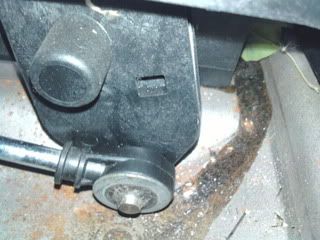
Sooo Black 08 X and I decided to go on a little trail ride today. As I was making my way down the trail and I decided to stop and put it in 4H. Well it didn't want to go so I tried it again doing about 2mph and the shifter was still bound up as I applied a little more force it popped all the way forward. That was all she wrote, it was now freely moving as if the cable snapped. Bryant and I crawled underneath and the transfer case cable was connected and intact. We then proceded to remove the center console which turned out to be a pita. However we were able to find out that the transfer case cable had popped of the the 4wd shifter linkage. So luckily I was able to drive back home and take the center console off and discover that the plastic bushing inside the cable had disintegrated.
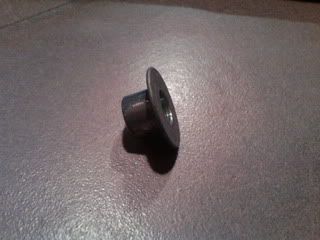
I know my repair is not o.e. but I feel it will outlast the crappy plastic bushing. I used a metal collar that was used on my 05 yfz450 atv to secure the plastics to the frame. It sits inside a dimple in the plastic fairings and a bolt passes through the center and threads into the frame. It is around $3.00 and the part number is 90387-06024-00. Needless to say it fits perfectly inside the cable eyelet and has about a 1/64" of play around the pin on the 4wd shifter linkage. It isn't even noticeable. Below are some pictures of the collar for visual reference. As well as a quick center console removal how to.

**** For those trying to get the center console off, pull the ebrake all the way up until you think it's going to break then pull a little more . Next remove the 4wd shifter knob. Some people use a crescent wrench around the shaft with a rag to protect it from scratching it up and a hammer to beat the knob off. I just grabbed it and pulled mine off. Finally remove the four larger hex head screws and the small panel forward of the shifter that just pops out. You can also remove the shifter surround but I don't believe it's necessary.****
I know my repair is not o.e. but I feel it will outlast the crappy plastic bushing. I used a metal collar that was used on my 05 yfz450 atv to secure the plastics to the frame. It sits inside a dimple in the plastic fairings and a bolt passes through the center and threads into the frame. It is around $3.00 and the part number is 90387-06024-00. Needless to say it fits perfectly inside the cable eyelet and has about a 1/64" of play around the pin on the 4wd shifter linkage. It isn't even noticeable. Below are some pictures of the collar for visual reference. As well as a quick center console removal how to.
**** For those trying to get the center console off, pull the ebrake all the way up until you think it's going to break then pull a little more . Next remove the 4wd shifter knob. Some people use a crescent wrench around the shaft with a rag to protect it from scratching it up and a hammer to beat the knob off. I just grabbed it and pulled mine off. Finally remove the four larger hex head screws and the small panel forward of the shifter that just pops out. You can also remove the shifter surround but I don't believe it's necessary.****
Last edited by ArtsRx7; 12-05-2010 at 01:18 PM.


Trending Topics
12-05-2010, 01:58 PM
#8
JK Enthusiast
Join Date: Jul 2010
Location: New Orleans
Posts: 216
Likes: 0
Received 0 Likes
on
0 Posts
Good job art. We need to do this to mine soon just so save the hassel on the trail one day. Ready for next saturday. We going to have a bit of work on our hands. 
12-05-2010, 02:13 PM
#9
JK Enthusiast
Join Date: Aug 2010
Location: VERMONT
Posts: 413
Likes: 0
Received 0 Likes
on
0 Posts
Great info and writeup: JUst one piece of friendly advice. I am sure you know that the JK's 4x4 system is not synchronous, if tyring to engage 4wd , and the shifter is showing stifness or hesitance, let the jeep slowly roll a couple of feet and re-try. It will engage smoothly. I was told by a long time Jeep mechanic , that the plasctic parts were meant to brake, to save the transfer case from internal damage from improperly engagement of the non synchronous 4x4 system.
No doubt , overtime from use , age and heat from the tranny and heat from the exhaust ,, due to the location of the linkage parts , will brake without prior notice. Now that you made the mods, be easy on your engagement of the 4x4 system, now that the force you use on the shifter will now be fully transffered to the transfer case with no brake away bushing.
Just looking out for you, as mentioned you did a nice write up and work, jsut wanted to save you some $$$ from large repairs.
CHEERS
12-05-2010, 03:08 PM
#10
JK Jedi Master
Lots of machines have a "weak link", designed into them. I don't think the JK transfer case linkage is one of them. If it were designed to break, there would be only one cheap plastic part, not one on each end. Damage can be done to the t-case well before the plastic clip breaks.
I think it's a cost savings design, as it is plastic, and can be installed in a snap on the assembly line; no tools required.
I think it's a cost savings design, as it is plastic, and can be installed in a snap on the assembly line; no tools required.