New Rugged Ridge Hood Lift Kit Wrire-up & Install Guide
 08-31-2015, 10:32 PM
#1
JK Junkie
Thread Starter
Rugged Ridge Hood Lift Kit Write-Up
2007-2016 Jeep JK Wranglers
Sku: 11252.51
Price: $74.99 on average
Product Description
Eliminate the factory prop rod with a pair of gas charged hood lifts. This kit includes all the brackets and gas shocks needed to clean up the under hood appearance of your rig. The kit is functional as the hood prop rod, so the factory rod will no longer be in the way while working underneath the hood of your Wrangler.
About Rugged Ridge
Rugged Ridge develops and sells Jeep parts accessories for the growing Jeep and off road enthusiast market. Rugged Ridge is a division of Omix-ADA, the market-leader for replacement and restoration Jeep parts. With this know-how and experience the Rugged Ridge pedigree is well established in the Jeep market and with the Jeep enthusiast. Realizing that there was a need for new Jeep accessories, the Rugged Ridge brand was established in 2005 to fill that need. Rugged Ridge has designed and manufactured over 3,000 products for the Jeep market and continues to develop hundreds of additional Jeep accessories each year. Many of the recent developed Jeep accessories are patented, like the Jeep floor liners, Jeep snorkel and Jeep XHD modular bumpers. Count on Rugged Ridge to provide you with true and proven Jeep parts and accessories.
Rugged Ridge Warranty Information
Limited 5-Year Warranty
Subject to the terms, exclusions and limitations herein and with respect only to products first sold in the United States, Omix-ADA warrants to the initial retail purchaser (“purchaser”) only that when installed and used on purchaser’s vehicle according to supplied product installation instructions and/or warnings, purchaser’s Omix-ADA product shall be free of defects in material and workmanship for five (5) years.
Detailed warranty information can be found at
Rugged Ridge 11252.51 Hood Lift Kit, 07-15 Jeep Wrangler (JK)
My thoughts
I have now owned three different hood lift kits and I’m happy to say this is the best designed setup yet! Unlike Rugged Ridge’s kit, others will dent parts of Jeep, drilling involved, and some even make hood sit crooked! The Rugged Ridge Hood Lift Kit is all bolt on and they took time to make sure this was the best kit on the market. I would recommend this to anyone looking for a hood lift.
Install Time & Install Rating
20-45 minutes
Very simple install minus the bracket on hood side. It can be a little tricky but still easy enough for pretty much anyone to do.
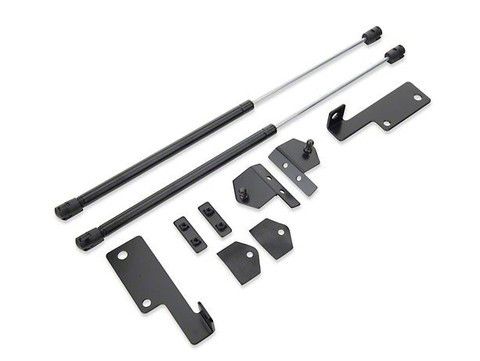
What comes in kit
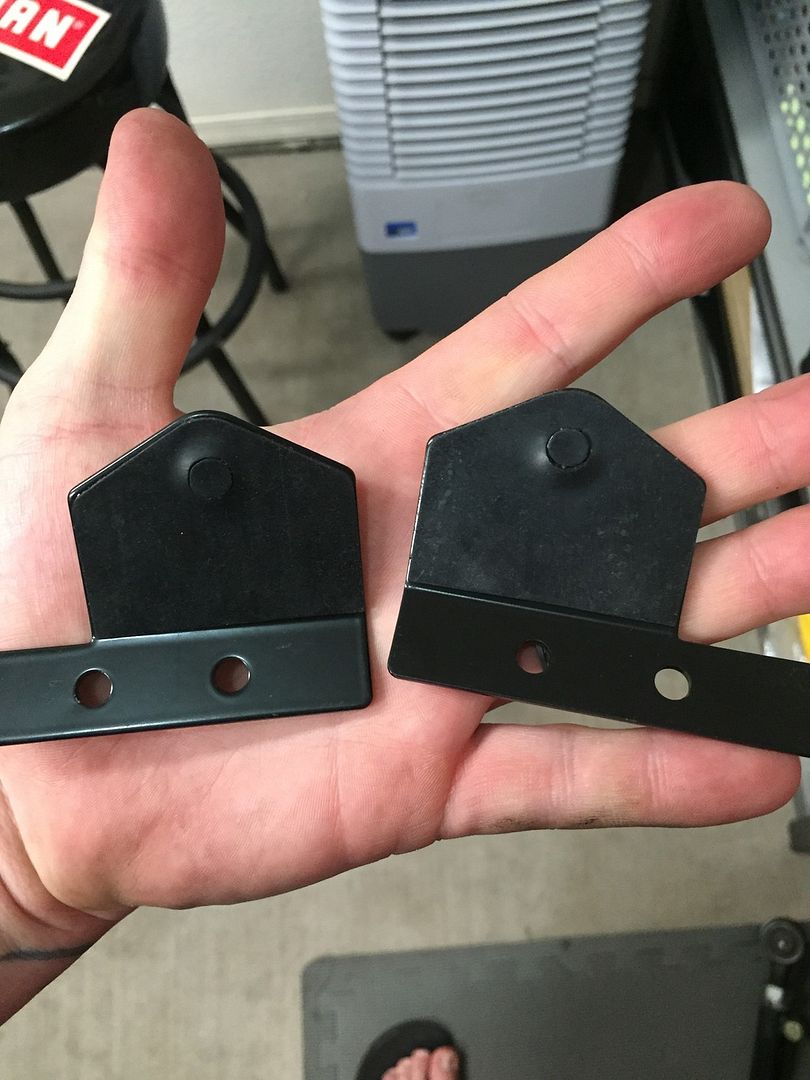
(2) Lower Mounting Brackets
(2) Upper Mounting Brackets
(2) Nut Plates
(2) Threaded Ball Stud
(2) Nyloc Nut
(2) M6 x 18 Bolt
(2) M6 Nyloc Nut
(4) M6 Washer
(4) M5 x 16 Bolt
(4) M5 Washer
(2) Struts
(2) Rubber Gasket
Tools needed
� Ratchet Wrench
8mm Socket
10mm Socket
13mm Socket
10mm Wrench
13mm Wrench
Side Snips
Cold Beverage
Rugged Ridge Hood Lift Kit Install Guide
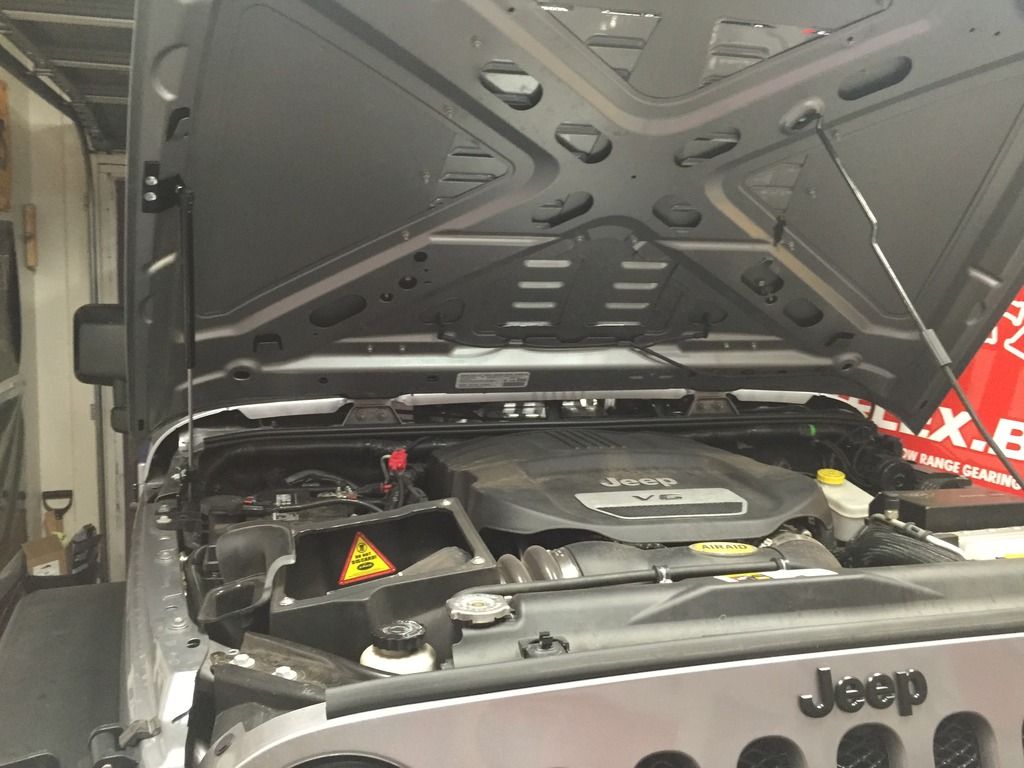
Step 1
Open Hood
• If you are new to Jeep, there is no hood pop lever in Jeep.
• At front of hood open latches on each side then pull center lever under hood to open.
• Once hood is lifted, use factory hood prop and place into hood prop insert in hood.
Note: I have Rugged Ridge hood latches but open pretty much the same way.
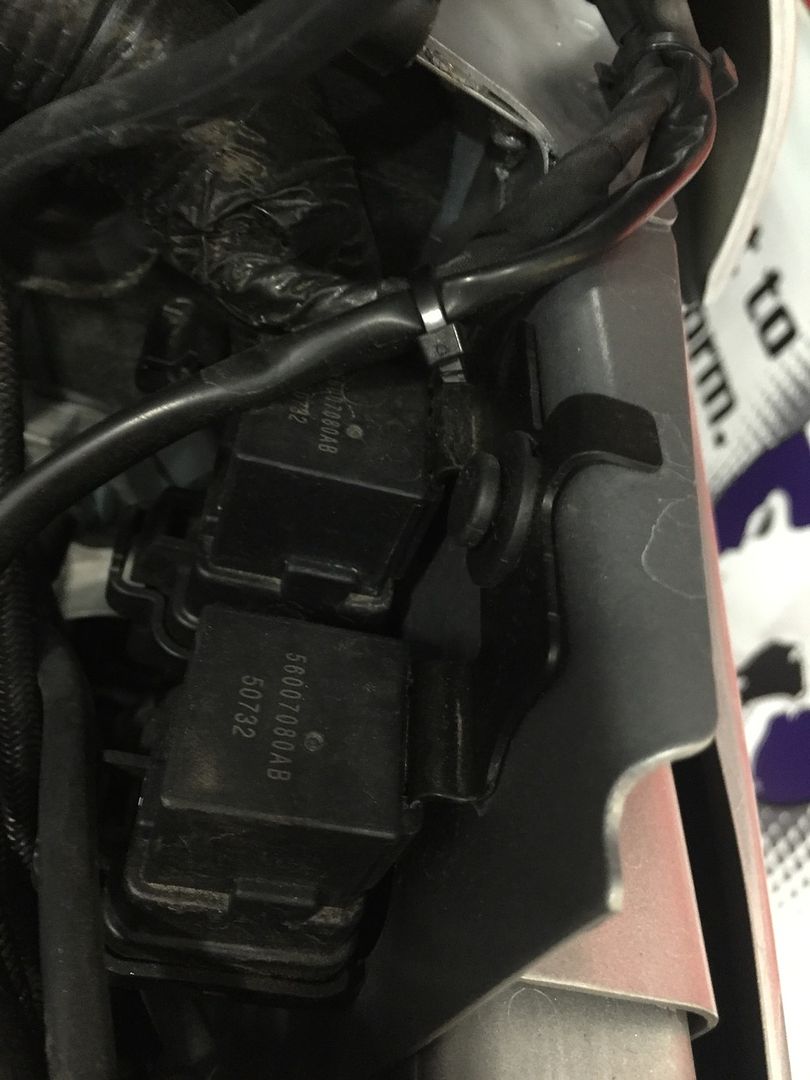
Step 2
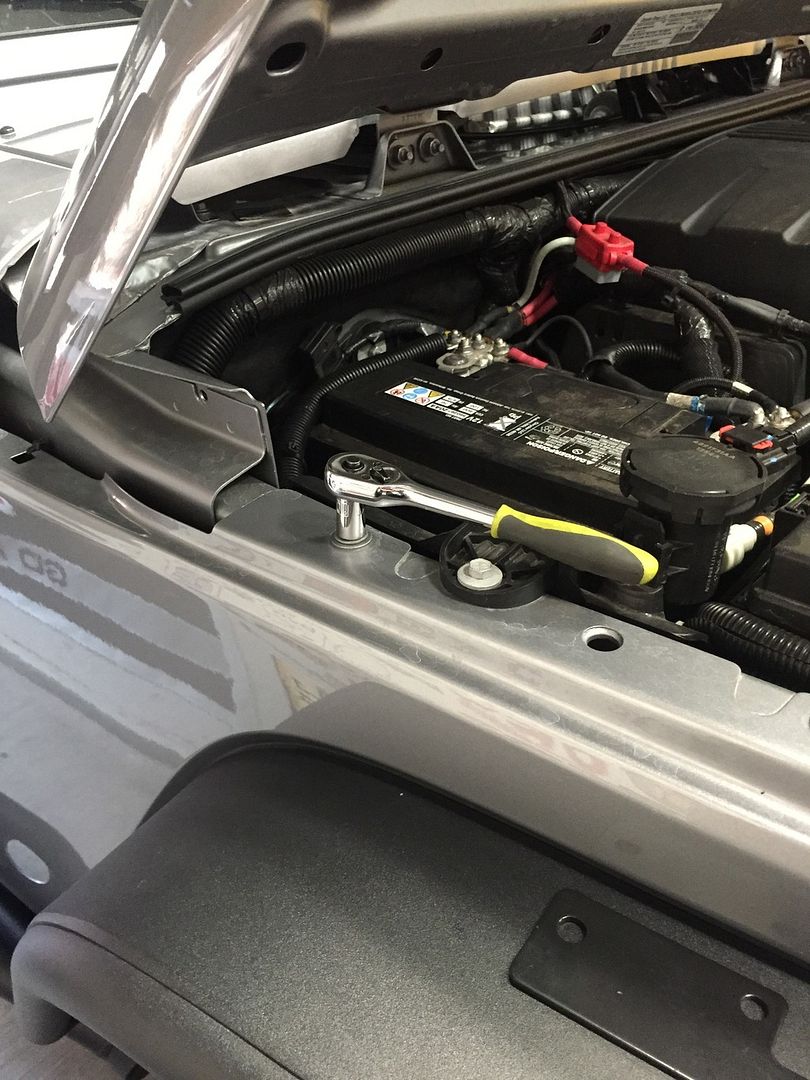
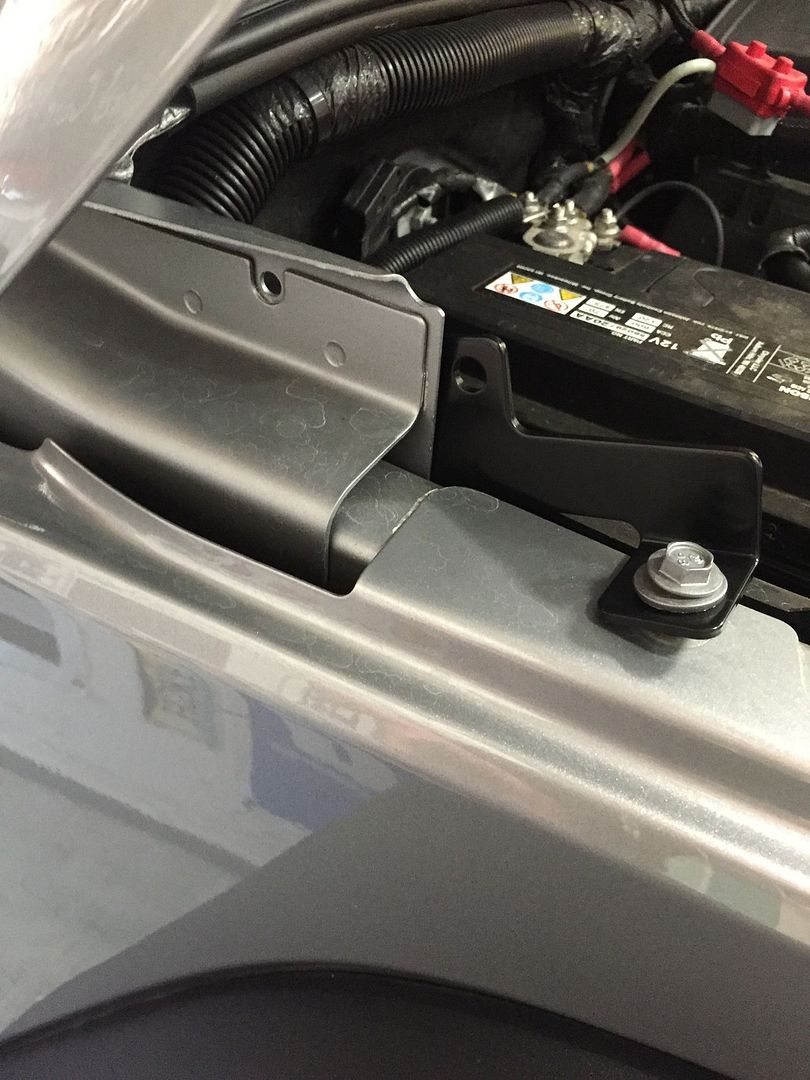
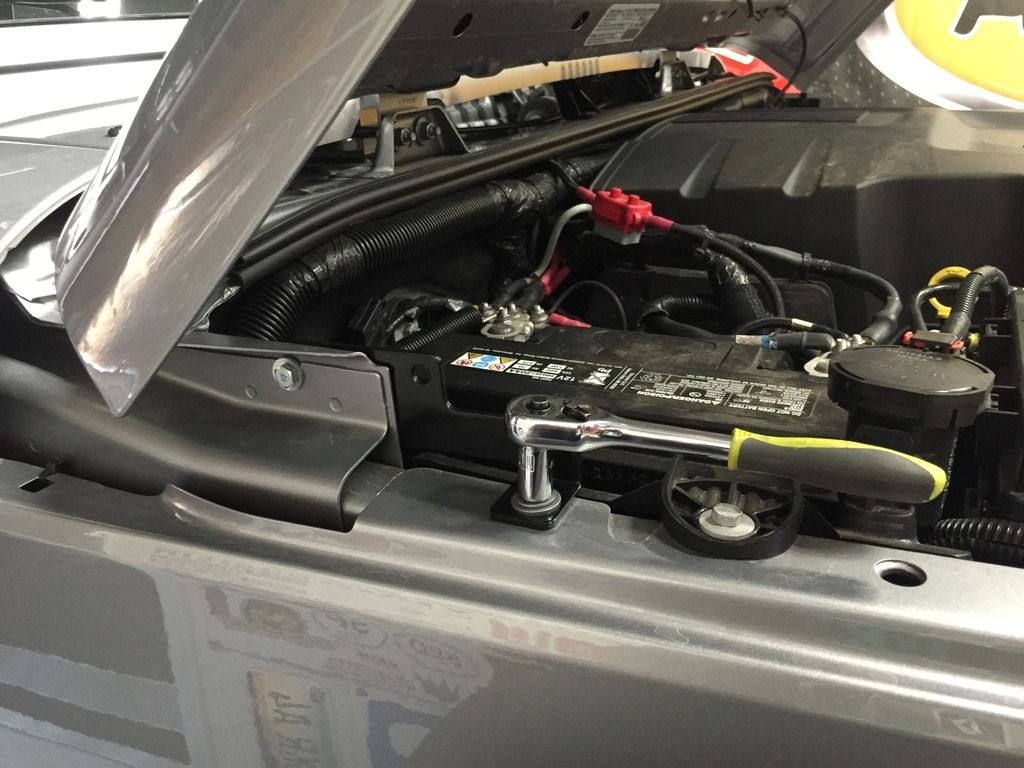
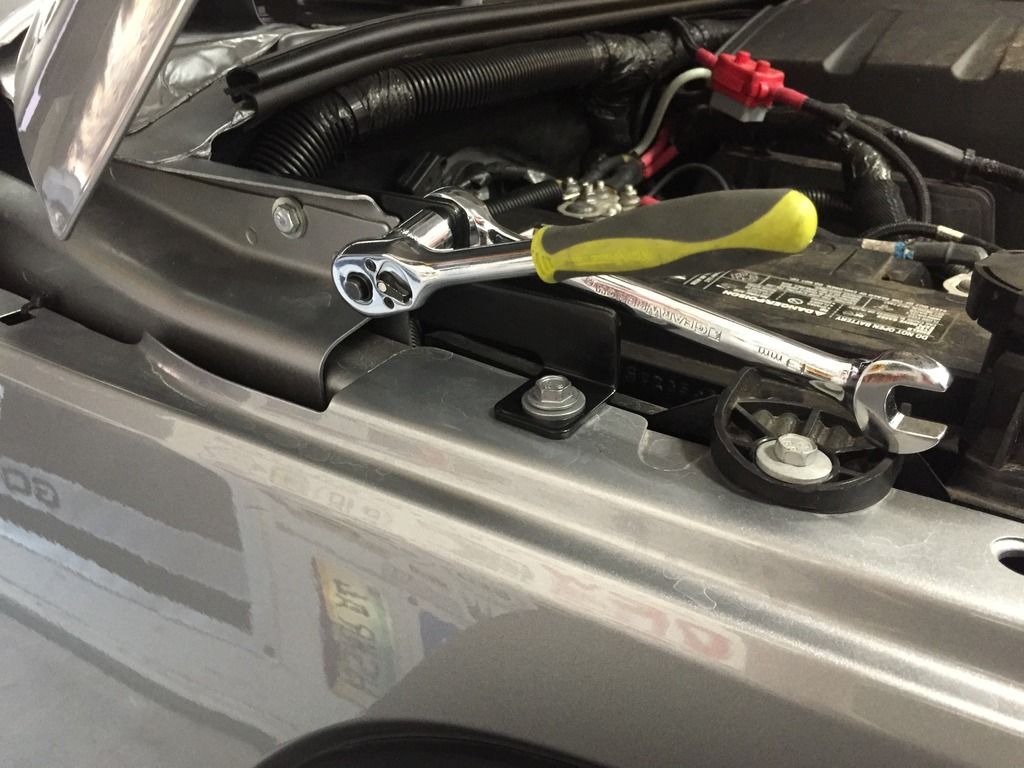
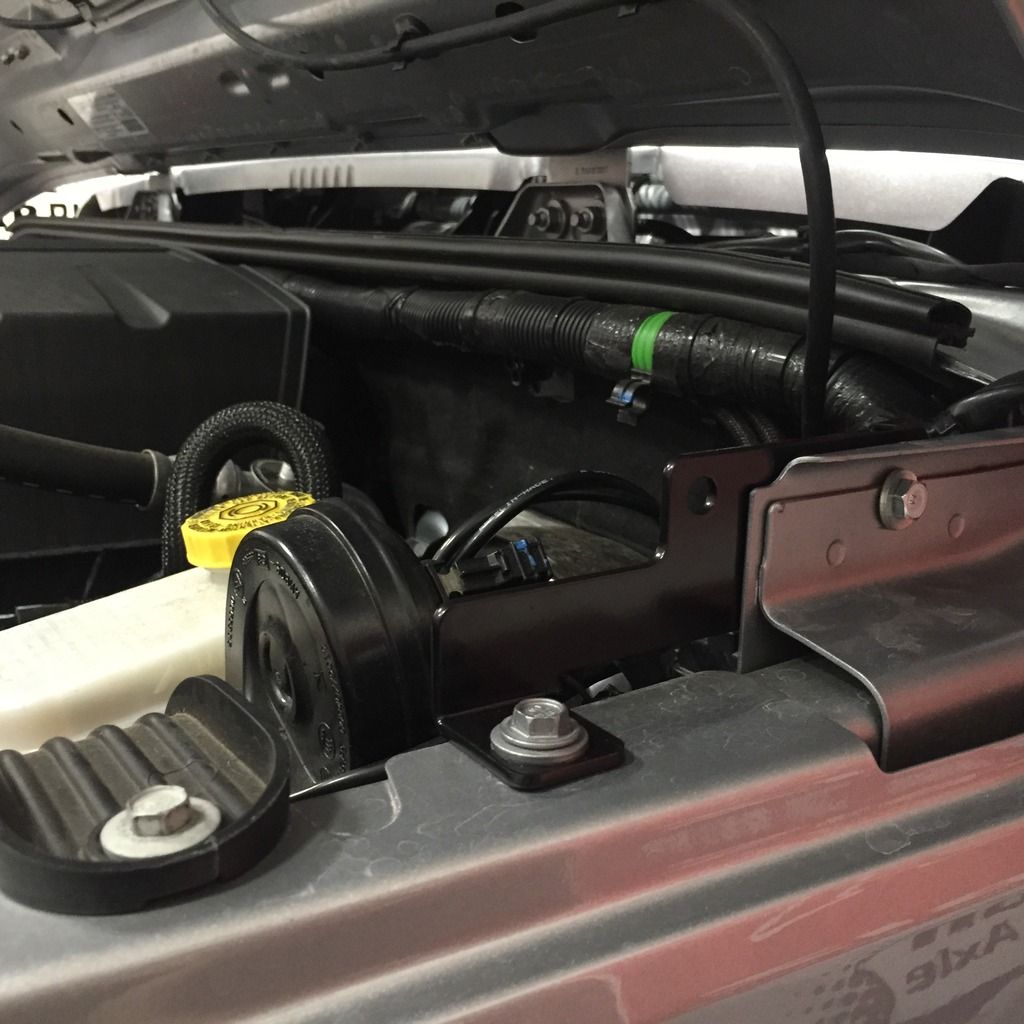
Install Lower Mounting Bracket & Threaded Ball Stud (Passenger Side)
• Remove the 10mm bolt closest to fire wall on body of Jeep.
• Loosely attach lower mounting bracket with same bolt you just removed.
• The bracket needs to go behind body sheet metal, not in front of.
• Insert M6 bolt with M6 washer through existing body hole and bracket. Then place another M6 and M6 nyloc nut on bolt end.
• Tighten down the 10mm body bracket now and then the M6 bolt part of bracket.
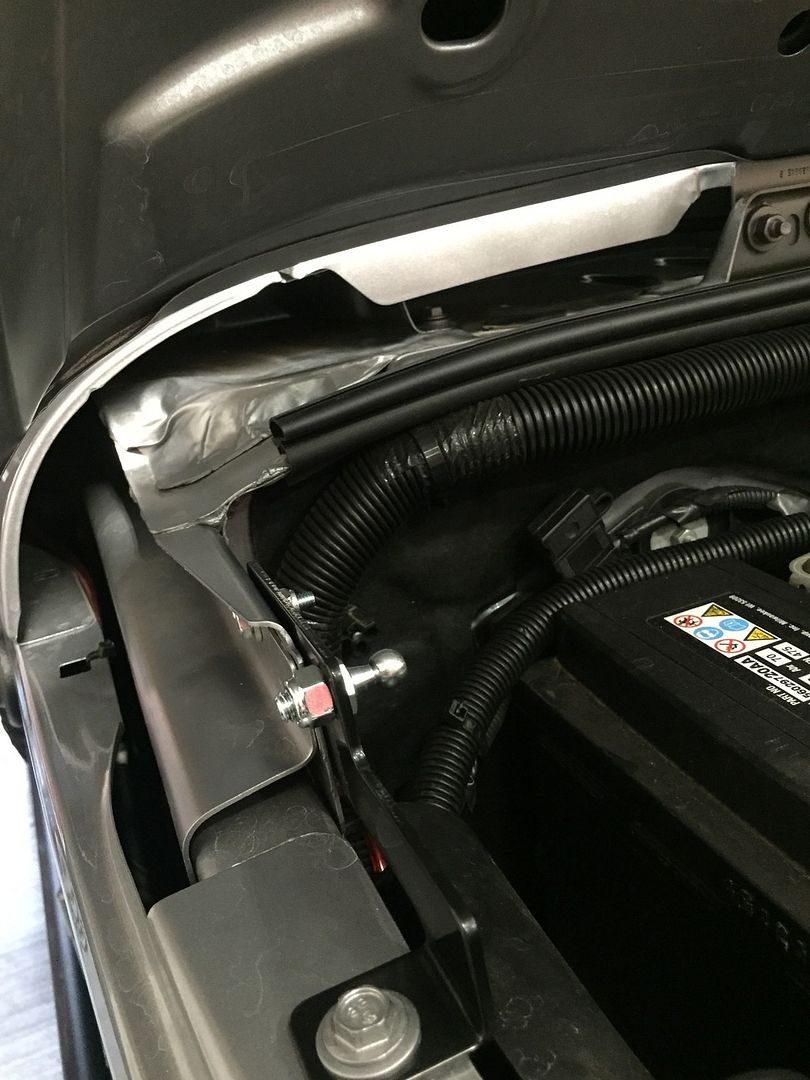
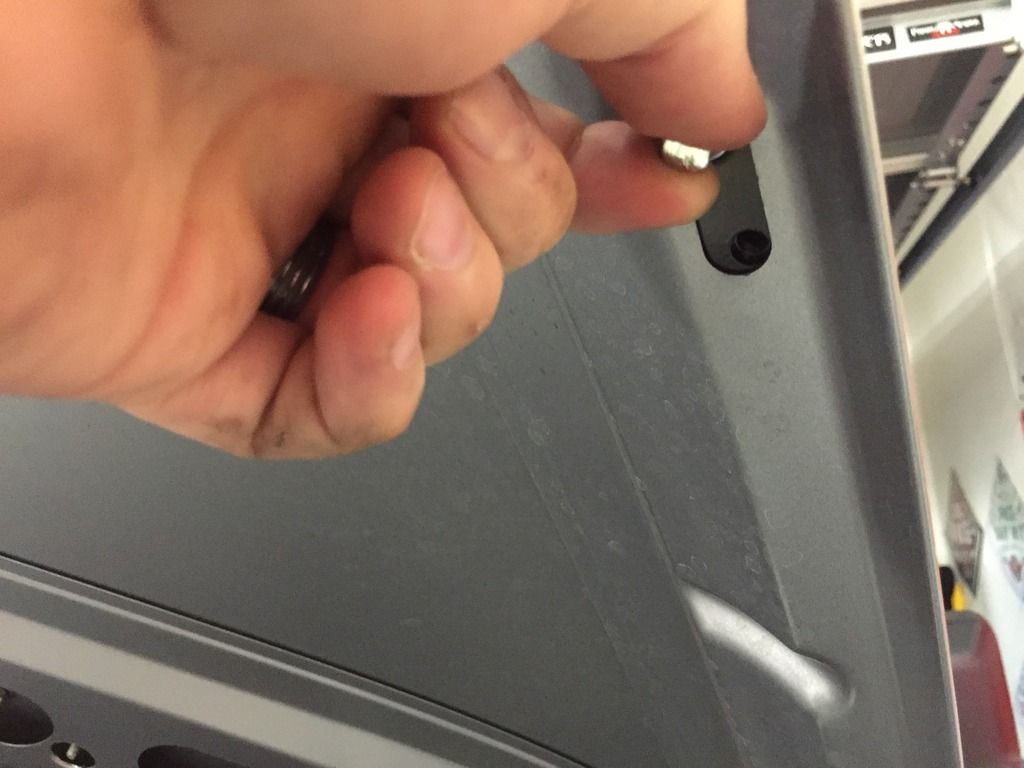
• Now that bracket is tightened down, install the threaded ball stud and nyloc nut. (Ball stud needs to be on engine side of bracket.)
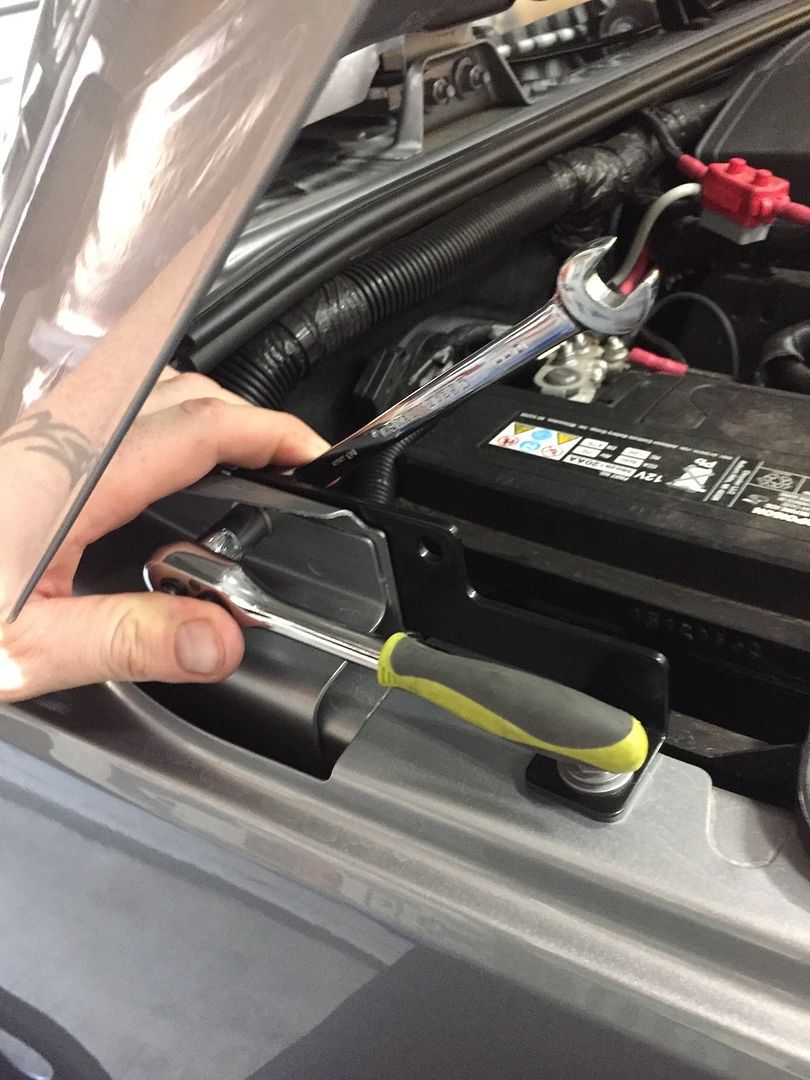
• Use � ratchet, 10mm wrench and 10mm socket for bolt on body and bracket.
• Use � ratchet, 13mm socket, and 13mm wrench for ball stud and nut.
Step 3
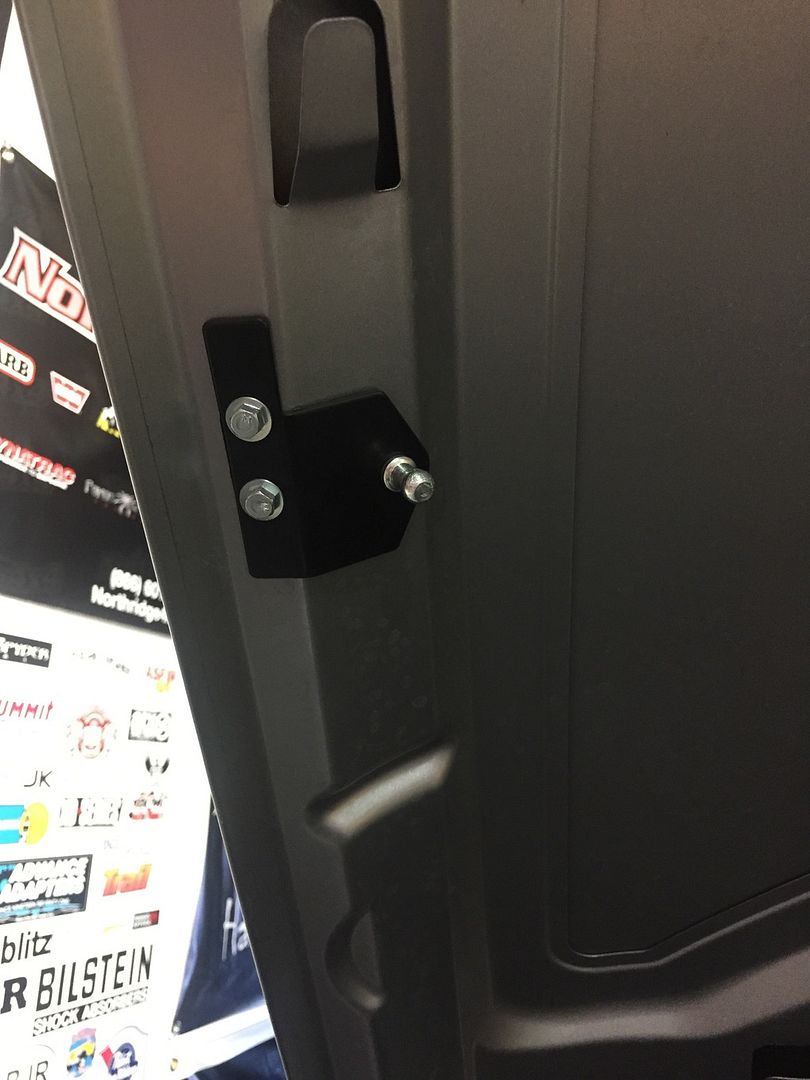
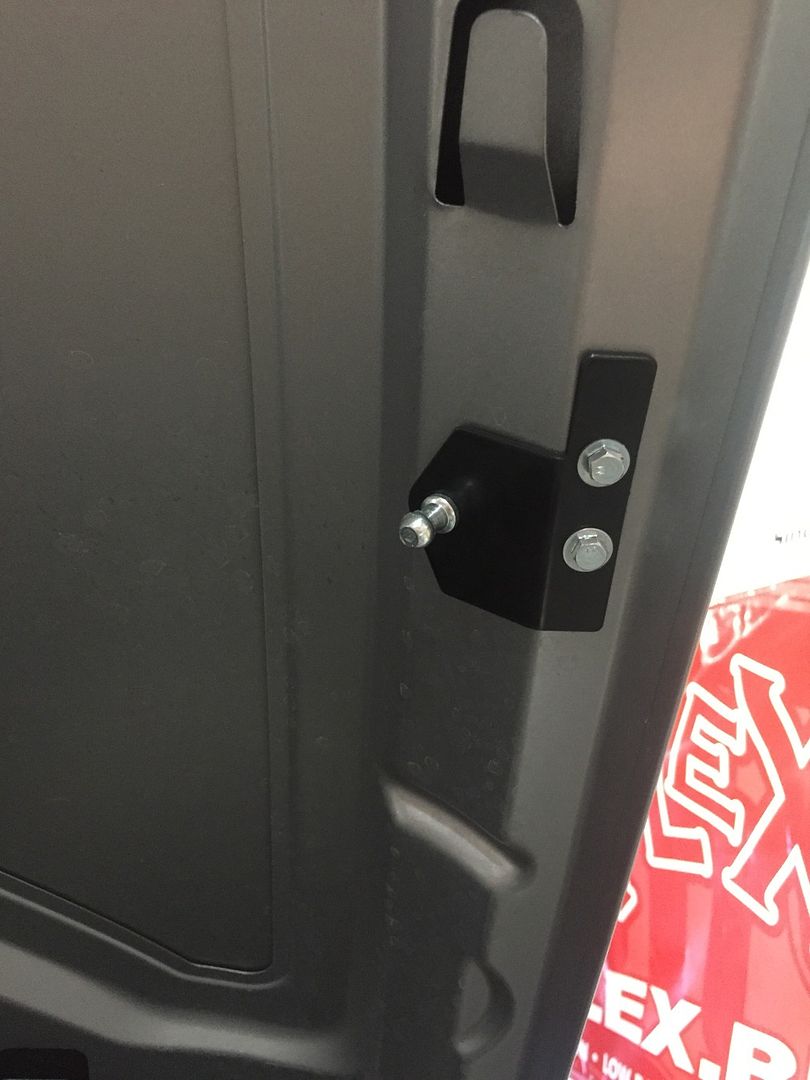
Install Upper Mounting Bracket
• Remove the backing tape from the rubber gasket and attach to upper mounting bracket.
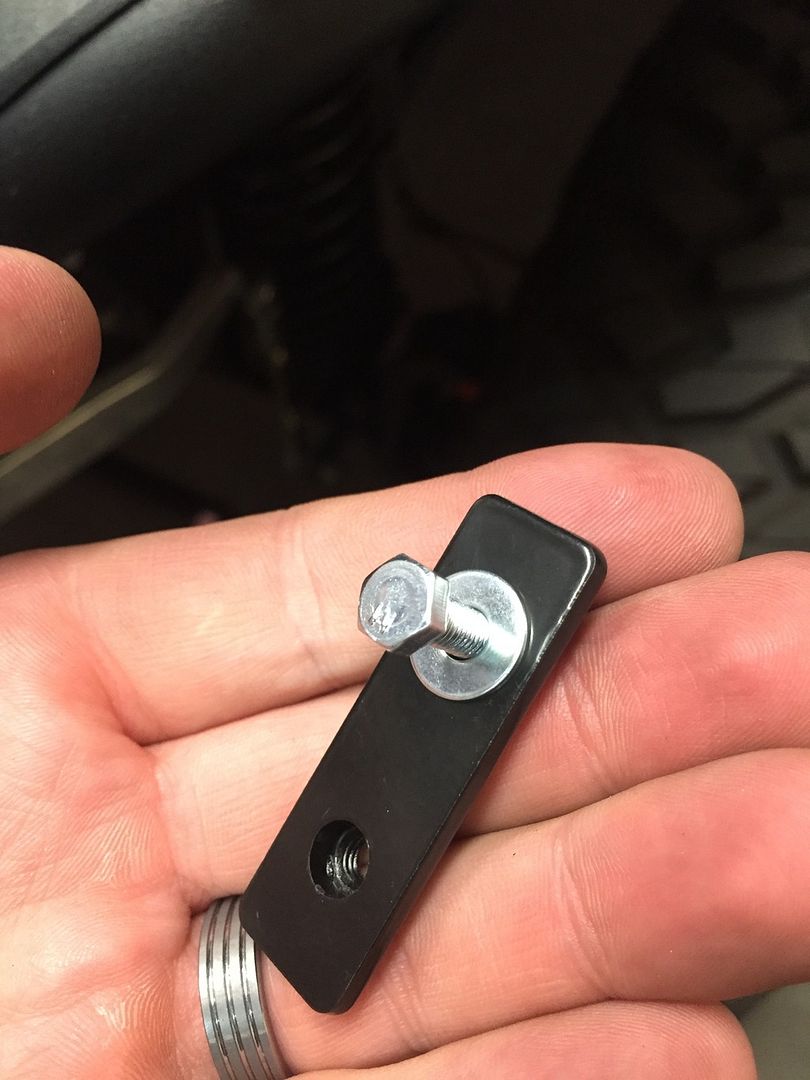
• Install one M5 bolt into nut plate and screw in until right before bolt goes through plate. Have another M5 bolt with washer through mounting bracket ready.
• Slide the nut plate into factory hole in hood. Hold in place while you screw in other bolt and bracket. Once other bolt with washer is screwed in, remove the bolt you were using to hold plate in and run through bracket with washer.
• Tighten both bolts down with � ratchet and 8mm socket. Tighten until snug, don’t overtighten.
• Note: Rugged Ridge I installed part of upper bracket is a little different than Rugged Ridge's Instructions.
• This is the only part of install that can be tricky.
• Don’t use washer, just bolt. (I didn’t take correct photo for passenger side.)
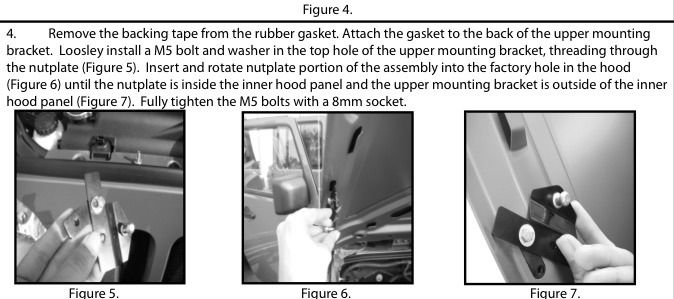
• Here is Rugged Ridge's Instructions.
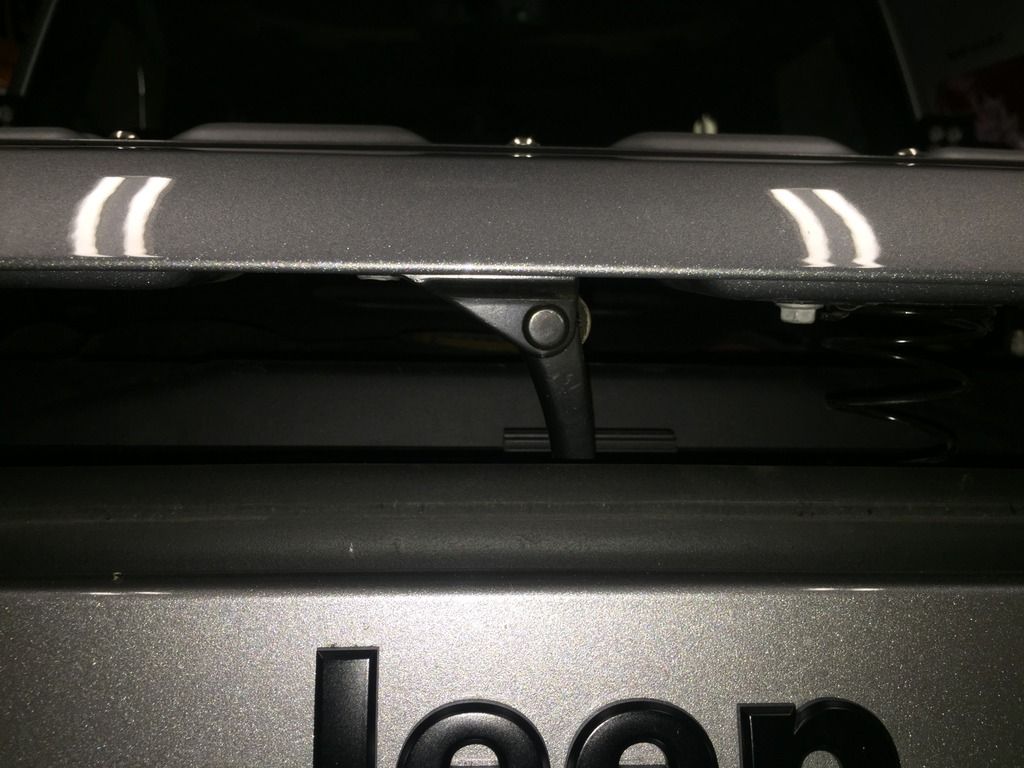
Step 4
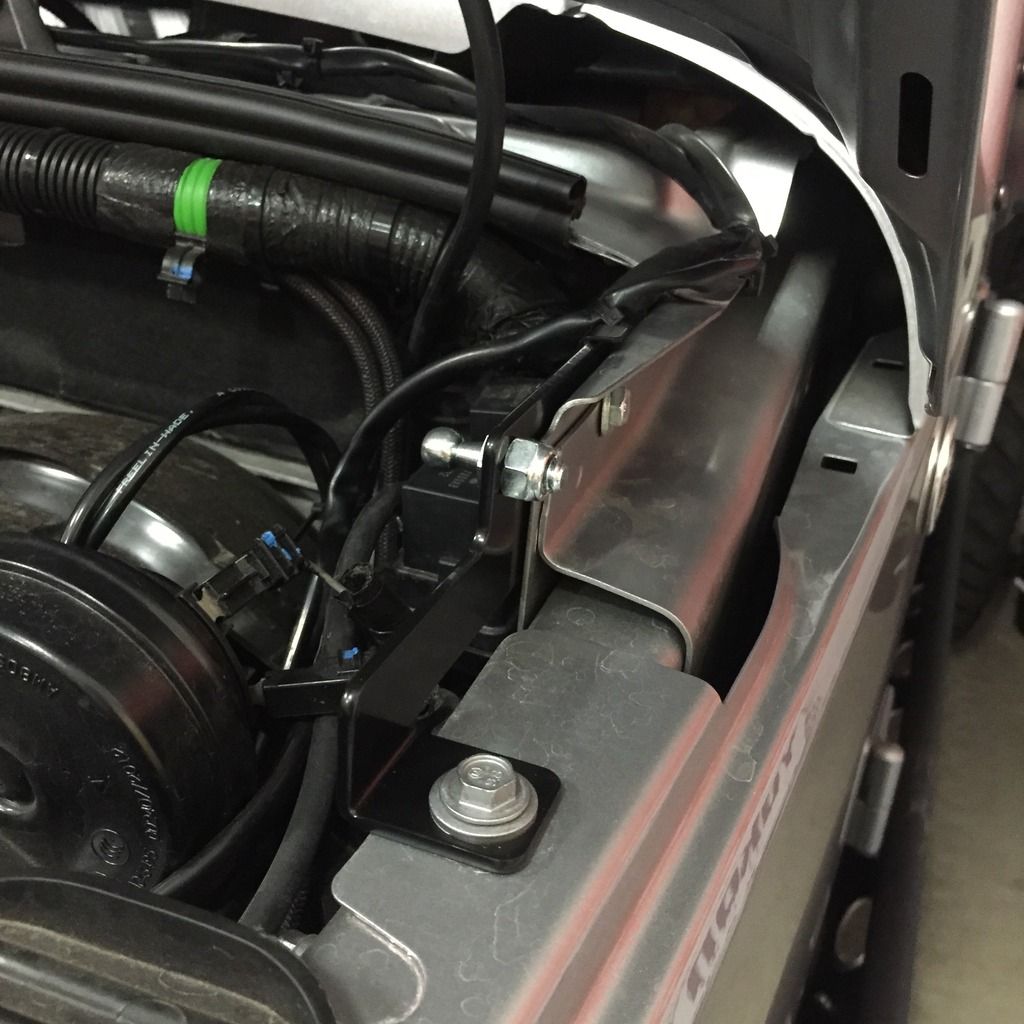
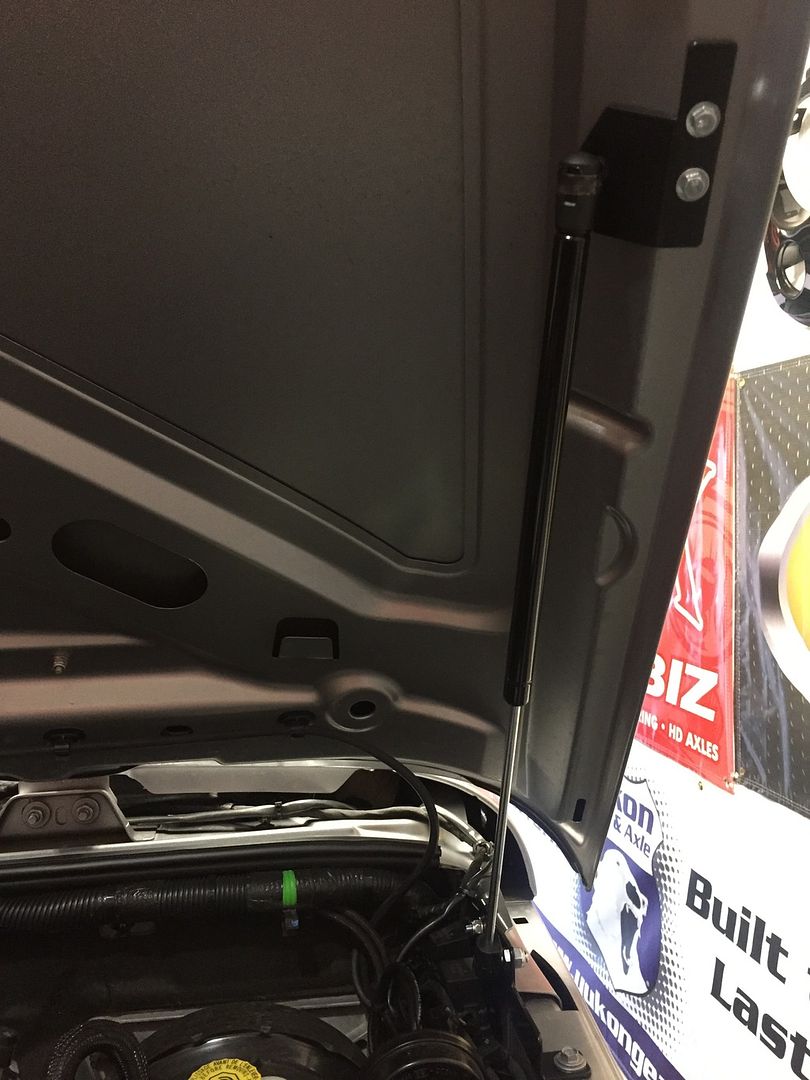
Install Strut
• Install strut just by pressing them into both ball studs.
• You will need to remove hood prop for just a second while you lift hood to proper height to get both parts of strut attached.
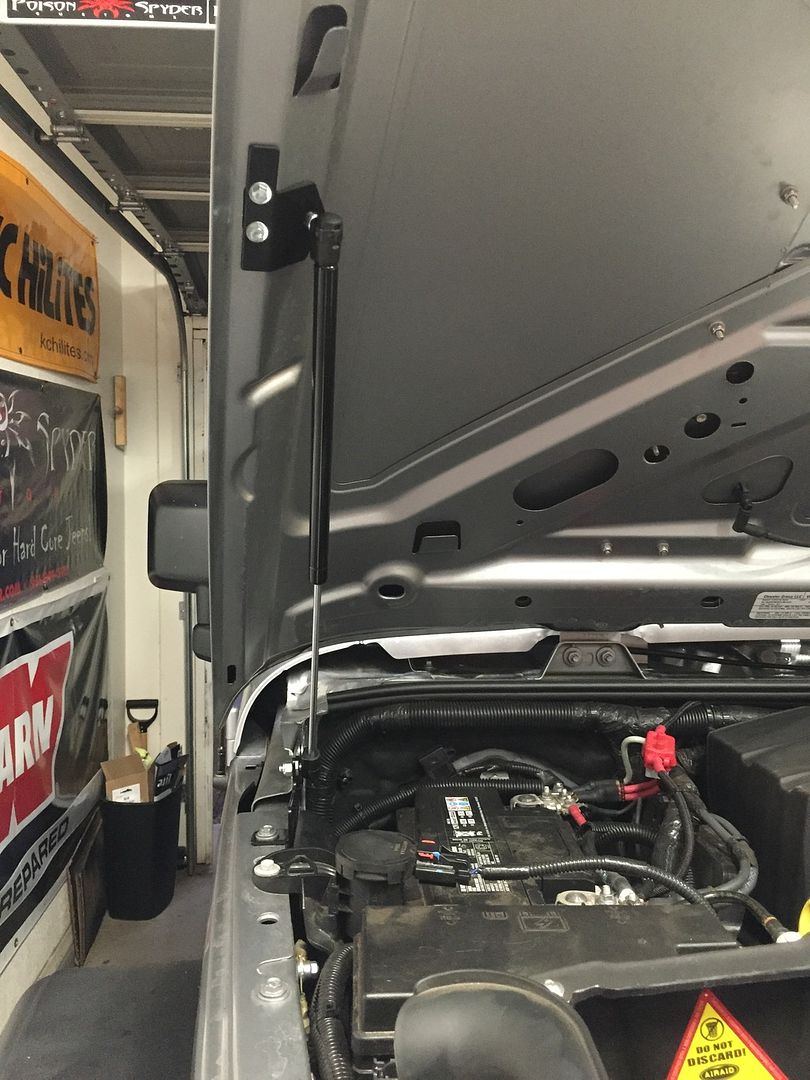
NOTE: HOOD STILL NEEDS TO BE PROPPED WITH FACTORY HOOD PROP ONCE STRUT IS INSTALLED! FAILURE TO USE FACTORY HOOD PROP CAN RESULT IN INJURYY, OR DAMAGE TO JEEP.
Your passenger side part of Rugged Ridge Hood Lift is now installed. Make sure you are still using factory hood prop before moving to driver side of install.
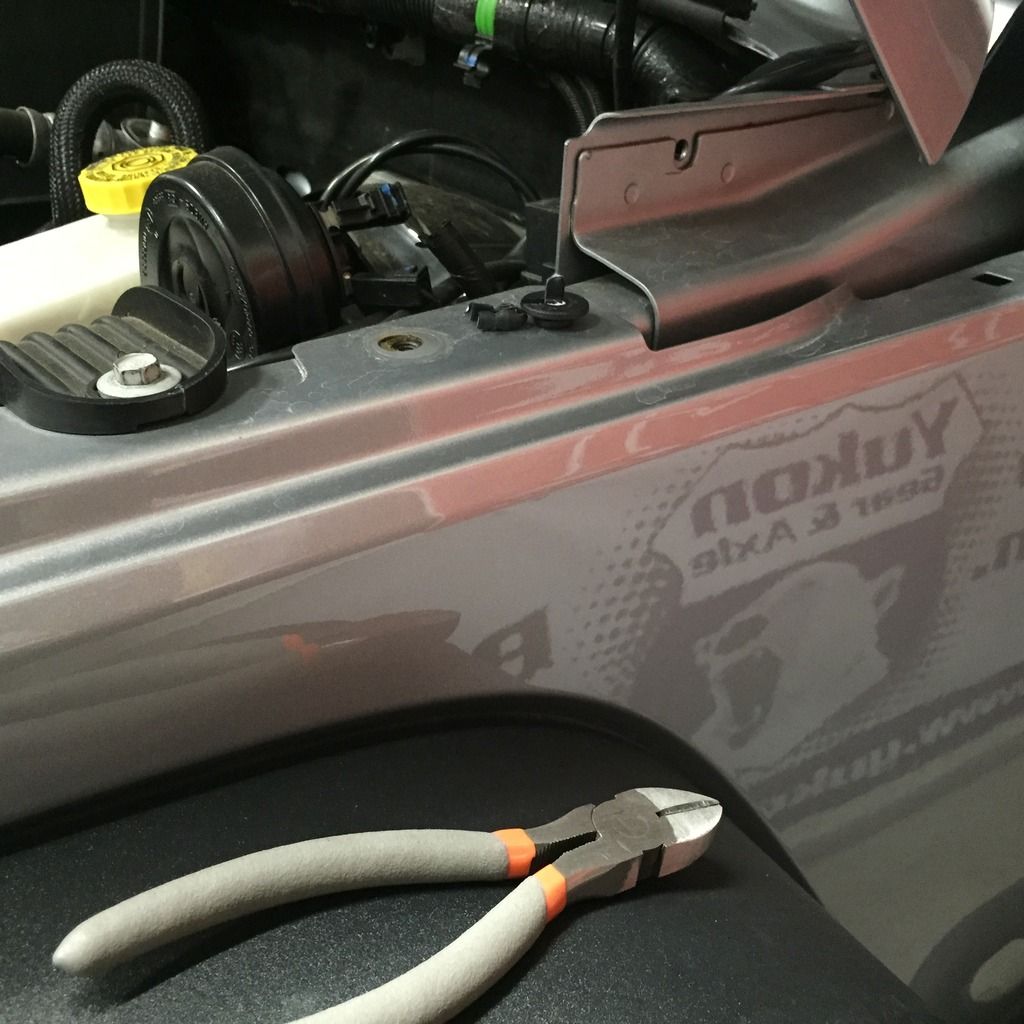
Step 5
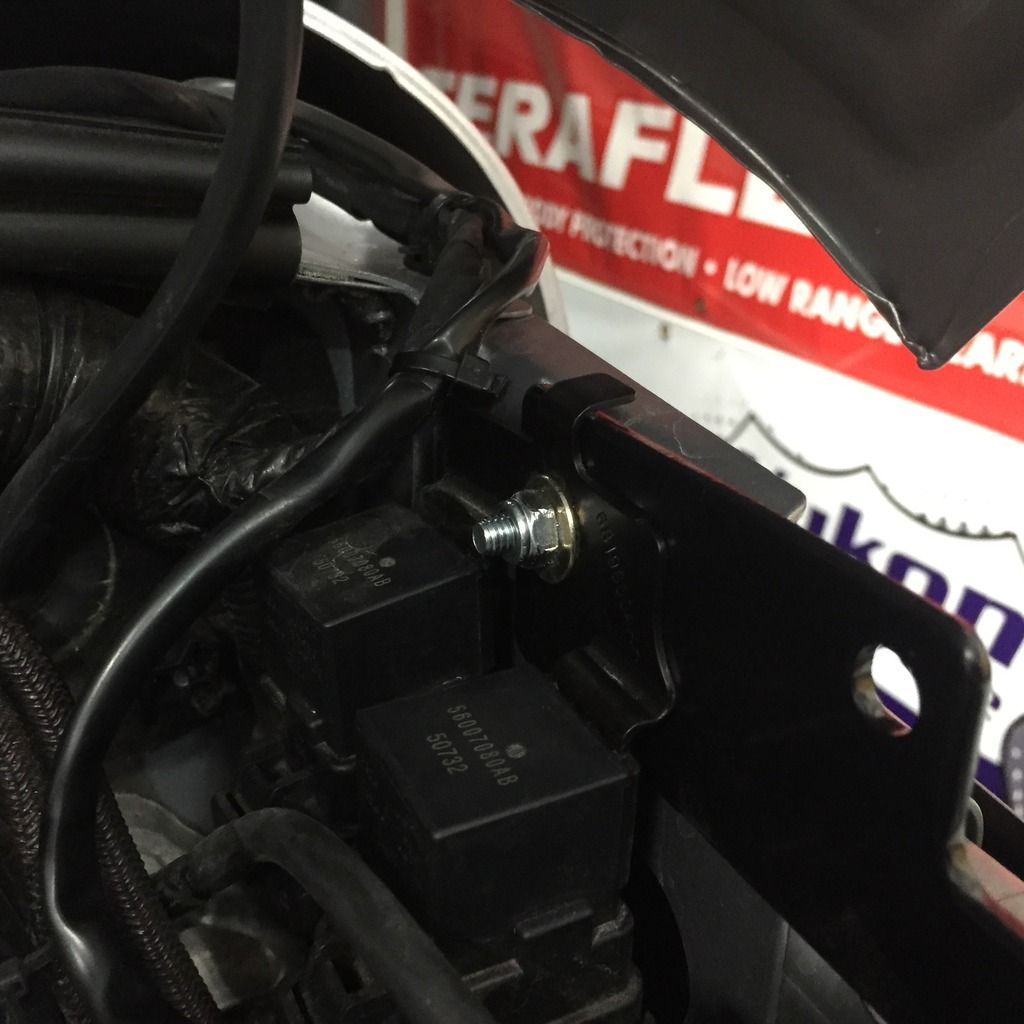
Install Lower Mounting Bracket & Threaded Ball Stud
(Repeating Passenger Side with two extra steps)
• Remove the 10mm bolt closest to fire wall on body of Jeep.
• Use side snips and remove the plastic bolt holding mounting tab.
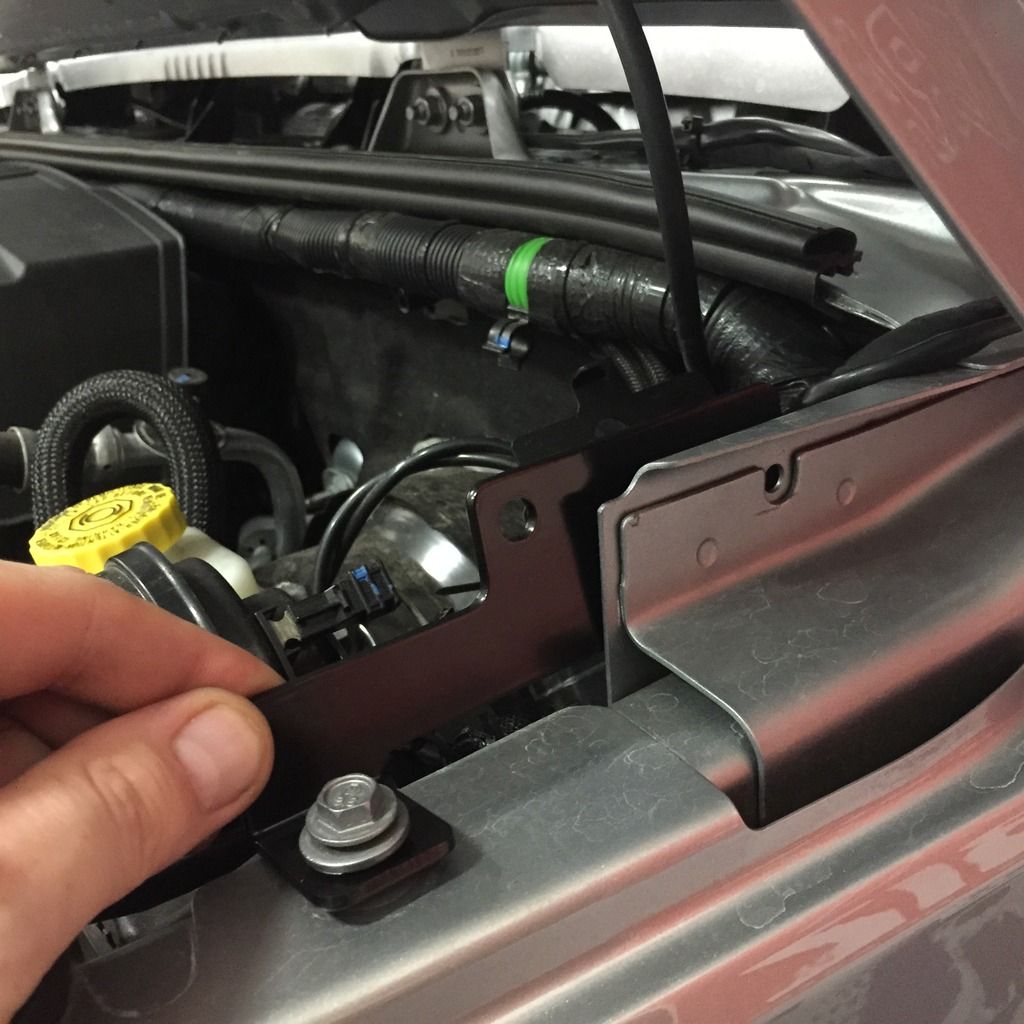
• Loosely attach lower mounting bracket with same bolt you just removed.
• The bracket needs to go behind body sheet metal, not in front of.
• Insert M6 bolt with M6 washer through existing body hole, mounting tab, and bracket. Then place another M6 and M6 nyloc nut on bolt end making sure tab is mounted against bracket.
• Tighten down the 10mm body bracket now and then the M6 bolt part of bracket.
• Now that bracket is tightened down, install the threaded ball stud and nyloc nut. (Ball stud needs to be on engine side of bracket.)
• Use � ratchet, 10mm wrench and 10mm socket for bolt on body and bracket.
• Use � ratchet, 13mm socket, and 13mm wrench for ball stud and nut.
Step 6
Install Upper Mounting Bracket
• Remove the backing tape from the rubber gasket and attach to upper mounting bracket.
• Install one M5 bolt into nut plate and screw in until right before bolt goes through plate. Have another M5 bolt with washer through mounting bracket ready.
• Slide the nut plate into factory hole in hood. Hold in place while you screw in other bolt and bracket. Once other bolt with washer is screwed in, remove the bolt you were using to hold plate in and run through bracket with washer.
• Tighten both bolts down with � ratchet and 8mm socket. Tighten until snug, don’t overtighten.
• This is the only part of install that can be tricky.
• Note: Rugged Ridge I installed part of upper bracket is a little different than Rugged Ridge's Instructions.
• Don’t use washer.
• Here is Rugged Ridge's Instructions.
Step 7
Install Strut
• Install strut just by pressing them into both ball studs.
• You will need to remove hood prop for just a second while you lift hood to proper height to get both parts of strut attached.
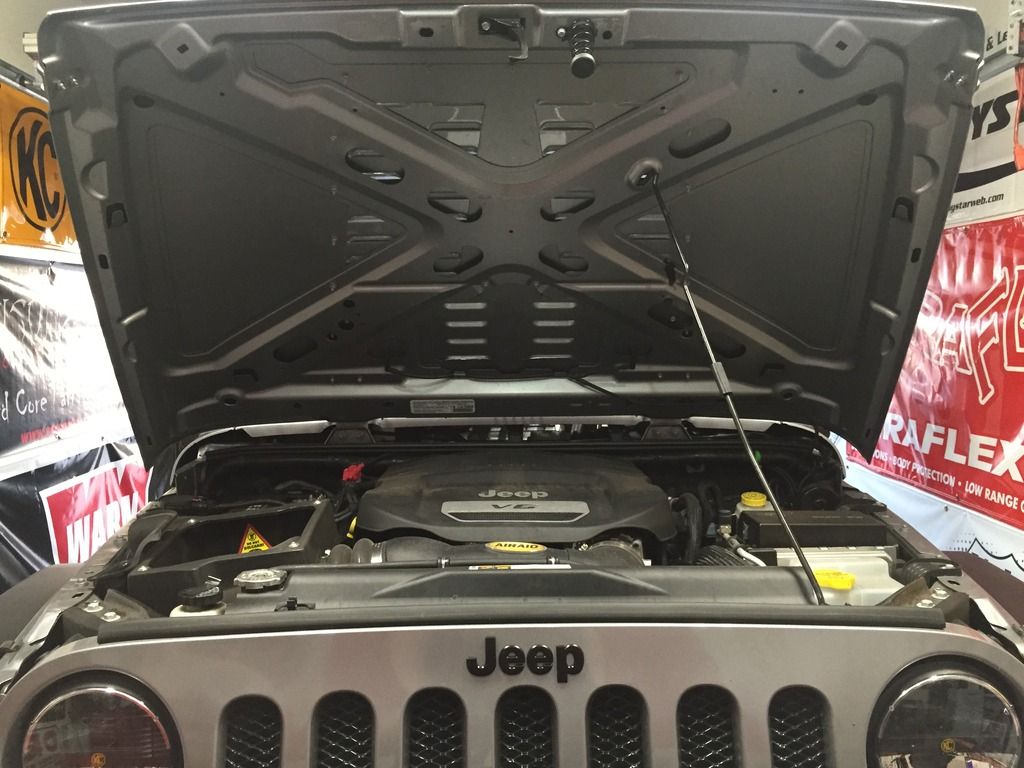
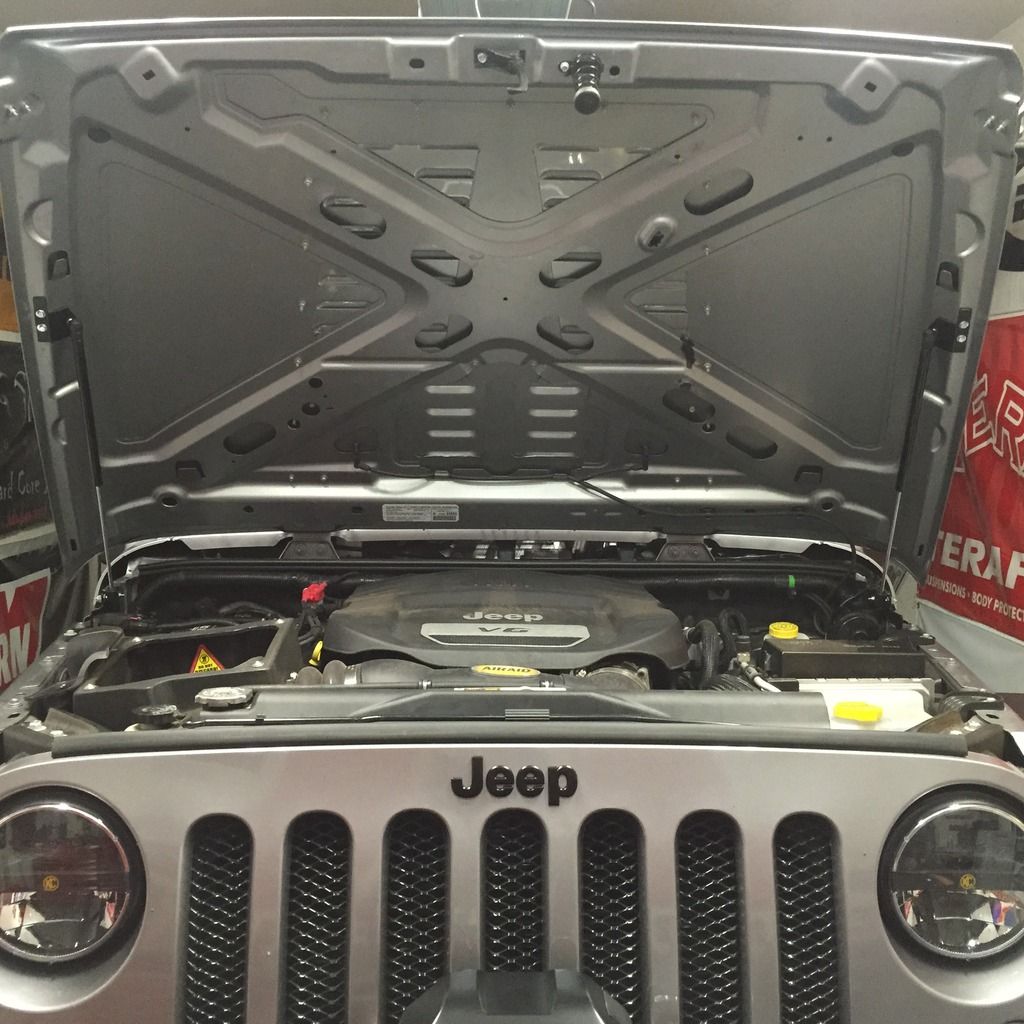
CONGRATUALTIONS!!
Your new Rugged Ridge Hood Lift Kit is installed and your hood can be supported without the factory hood prop. You can now place your factory hood prop back into mount and close and latch hood.

If you have any further questions for Rugged Ridge their Facebook page and website link is below.
www.facebook.com/ruggedridge
Jeep Accessories, Bumpers, Lift Kits, Seat Covers, Soft Tops, Wheels, Winches by Rugged Ridge
(Click hi-lited links)
If you have any questions for me, please PM me on forum or by email.
hskr4x4@gmail.com
Thanks for taking the time to read over my write-up!
2007-2016 Jeep JK Wranglers
Sku: 11252.51
Price: $74.99 on average
Product Description
Eliminate the factory prop rod with a pair of gas charged hood lifts. This kit includes all the brackets and gas shocks needed to clean up the under hood appearance of your rig. The kit is functional as the hood prop rod, so the factory rod will no longer be in the way while working underneath the hood of your Wrangler.
About Rugged Ridge
Rugged Ridge develops and sells Jeep parts accessories for the growing Jeep and off road enthusiast market. Rugged Ridge is a division of Omix-ADA, the market-leader for replacement and restoration Jeep parts. With this know-how and experience the Rugged Ridge pedigree is well established in the Jeep market and with the Jeep enthusiast. Realizing that there was a need for new Jeep accessories, the Rugged Ridge brand was established in 2005 to fill that need. Rugged Ridge has designed and manufactured over 3,000 products for the Jeep market and continues to develop hundreds of additional Jeep accessories each year. Many of the recent developed Jeep accessories are patented, like the Jeep floor liners, Jeep snorkel and Jeep XHD modular bumpers. Count on Rugged Ridge to provide you with true and proven Jeep parts and accessories.
Rugged Ridge Warranty Information
Limited 5-Year Warranty
Subject to the terms, exclusions and limitations herein and with respect only to products first sold in the United States, Omix-ADA warrants to the initial retail purchaser (“purchaser”) only that when installed and used on purchaser’s vehicle according to supplied product installation instructions and/or warnings, purchaser’s Omix-ADA product shall be free of defects in material and workmanship for five (5) years.
Detailed warranty information can be found at
Rugged Ridge 11252.51 Hood Lift Kit, 07-15 Jeep Wrangler (JK)
My thoughts
I have now owned three different hood lift kits and I’m happy to say this is the best designed setup yet! Unlike Rugged Ridge’s kit, others will dent parts of Jeep, drilling involved, and some even make hood sit crooked! The Rugged Ridge Hood Lift Kit is all bolt on and they took time to make sure this was the best kit on the market. I would recommend this to anyone looking for a hood lift.
Install Time & Install Rating
20-45 minutes
Very simple install minus the bracket on hood side. It can be a little tricky but still easy enough for pretty much anyone to do.
What comes in kit
(2) Lower Mounting Brackets
(2) Upper Mounting Brackets
(2) Nut Plates
(2) Threaded Ball Stud
(2) Nyloc Nut
(2) M6 x 18 Bolt
(2) M6 Nyloc Nut
(4) M6 Washer
(4) M5 x 16 Bolt
(4) M5 Washer
(2) Struts
(2) Rubber Gasket
Tools needed
� Ratchet Wrench
8mm Socket
10mm Socket
13mm Socket
10mm Wrench
13mm Wrench
Side Snips
Cold Beverage
Rugged Ridge Hood Lift Kit Install Guide
Step 1
Open Hood
• If you are new to Jeep, there is no hood pop lever in Jeep.
• At front of hood open latches on each side then pull center lever under hood to open.
• Once hood is lifted, use factory hood prop and place into hood prop insert in hood.
Note: I have Rugged Ridge hood latches but open pretty much the same way.
Step 2
Install Lower Mounting Bracket & Threaded Ball Stud (Passenger Side)
• Remove the 10mm bolt closest to fire wall on body of Jeep.
• Loosely attach lower mounting bracket with same bolt you just removed.
• The bracket needs to go behind body sheet metal, not in front of.
• Insert M6 bolt with M6 washer through existing body hole and bracket. Then place another M6 and M6 nyloc nut on bolt end.
• Tighten down the 10mm body bracket now and then the M6 bolt part of bracket.
• Now that bracket is tightened down, install the threaded ball stud and nyloc nut. (Ball stud needs to be on engine side of bracket.)
• Use � ratchet, 10mm wrench and 10mm socket for bolt on body and bracket.
• Use � ratchet, 13mm socket, and 13mm wrench for ball stud and nut.
Step 3
Install Upper Mounting Bracket
• Remove the backing tape from the rubber gasket and attach to upper mounting bracket.
• Install one M5 bolt into nut plate and screw in until right before bolt goes through plate. Have another M5 bolt with washer through mounting bracket ready.
• Slide the nut plate into factory hole in hood. Hold in place while you screw in other bolt and bracket. Once other bolt with washer is screwed in, remove the bolt you were using to hold plate in and run through bracket with washer.
• Tighten both bolts down with � ratchet and 8mm socket. Tighten until snug, don’t overtighten.
• Note: Rugged Ridge I installed part of upper bracket is a little different than Rugged Ridge's Instructions.
• This is the only part of install that can be tricky.
• Don’t use washer, just bolt. (I didn’t take correct photo for passenger side.)
• Here is Rugged Ridge's Instructions.
Step 4
Install Strut
• Install strut just by pressing them into both ball studs.
• You will need to remove hood prop for just a second while you lift hood to proper height to get both parts of strut attached.
NOTE: HOOD STILL NEEDS TO BE PROPPED WITH FACTORY HOOD PROP ONCE STRUT IS INSTALLED! FAILURE TO USE FACTORY HOOD PROP CAN RESULT IN INJURYY, OR DAMAGE TO JEEP.
Your passenger side part of Rugged Ridge Hood Lift is now installed. Make sure you are still using factory hood prop before moving to driver side of install.
Step 5
Install Lower Mounting Bracket & Threaded Ball Stud
(Repeating Passenger Side with two extra steps)
• Remove the 10mm bolt closest to fire wall on body of Jeep.
• Use side snips and remove the plastic bolt holding mounting tab.
• Loosely attach lower mounting bracket with same bolt you just removed.
• The bracket needs to go behind body sheet metal, not in front of.
• Insert M6 bolt with M6 washer through existing body hole, mounting tab, and bracket. Then place another M6 and M6 nyloc nut on bolt end making sure tab is mounted against bracket.
• Tighten down the 10mm body bracket now and then the M6 bolt part of bracket.
• Now that bracket is tightened down, install the threaded ball stud and nyloc nut. (Ball stud needs to be on engine side of bracket.)
• Use � ratchet, 10mm wrench and 10mm socket for bolt on body and bracket.
• Use � ratchet, 13mm socket, and 13mm wrench for ball stud and nut.
Step 6
Install Upper Mounting Bracket
• Remove the backing tape from the rubber gasket and attach to upper mounting bracket.
• Install one M5 bolt into nut plate and screw in until right before bolt goes through plate. Have another M5 bolt with washer through mounting bracket ready.
• Slide the nut plate into factory hole in hood. Hold in place while you screw in other bolt and bracket. Once other bolt with washer is screwed in, remove the bolt you were using to hold plate in and run through bracket with washer.
• Tighten both bolts down with � ratchet and 8mm socket. Tighten until snug, don’t overtighten.
• This is the only part of install that can be tricky.
• Note: Rugged Ridge I installed part of upper bracket is a little different than Rugged Ridge's Instructions.
• Don’t use washer.
• Here is Rugged Ridge's Instructions.
Step 7
Install Strut
• Install strut just by pressing them into both ball studs.
• You will need to remove hood prop for just a second while you lift hood to proper height to get both parts of strut attached.
CONGRATUALTIONS!!
Your new Rugged Ridge Hood Lift Kit is installed and your hood can be supported without the factory hood prop. You can now place your factory hood prop back into mount and close and latch hood.
If you have any further questions for Rugged Ridge their Facebook page and website link is below.
www.facebook.com/ruggedridge
Jeep Accessories, Bumpers, Lift Kits, Seat Covers, Soft Tops, Wheels, Winches by Rugged Ridge
(Click hi-lited links)
If you have any questions for me, please PM me on forum or by email.
hskr4x4@gmail.com
Thanks for taking the time to read over my write-up!
Last edited by Hskr4x4; 09-01-2015 at 08:34 AM.

 09-02-2015, 03:07 AM
#5
JK Junkie
Thread Starter
Any year with a rubicon underhood insulator needs to take an extra step and cut small area out on each side. Just put the upper mount that has rubber backing on insulator, trace and cut out with razor blade. Might take all of 2 minutes to do it
09-02-2015, 04:54 AM
#6
JK Freak
Join Date: Apr 2011
Location: Lakeland, Florida
Posts: 719
Likes: 0
Received 0 Likes
on
0 Posts
I like the idea of the gas charged hood lifts for those times when you need to check/fill fluids. On the other hand, when I'm under there doing mods, replacing battery or other maintenance, I prefer to rest the hood against the windshield frame so it's completely out of the way. It seems to me the lifts might be in the way of side access to the engine compartment. 
If there was a quick way to disconnect the lifts so they would be out of the way and the hood could be leaned back, I would be more inclined to go this route. Maybe they already just pop on and off? Hard to tell from the write up.
Just a thought.
If there was a quick way to disconnect the lifts so they would be out of the way and the hood could be leaned back, I would be more inclined to go this route. Maybe they already just pop on and off? Hard to tell from the write up.
Just a thought.
09-02-2015, 05:19 AM
#7
JK Junkie
Thread Starter
There is a metal isolator on strut. Slide flat head screw driver in groove and barely pull away from shock and you can remove. Very very simple to remove for when leaning hood all the way back. Sorry I didn't put that in write-up
Trending Topics
09-04-2015, 03:37 AM
#10
Former Member

Join Date: Mar 2007
Location: The great State of Reality
Posts: 1,195
Likes: 0
Received 0 Likes
on
0 Posts
Yup have cut mat for previous version of strut installation. Super easy. Just was wondering if necessary for these new brackets. Couldn't tell by pics w/o mat. Thanks for great write up.