Notes on a TeraFlex 2.5” Spring Lift
 08-15-2008, 09:51 PM
#1
JK Super Freak
Thread Starter
Join Date: Oct 2007
Location: Phoenix, AZ
Posts: 1,572
Likes: 0
Received 0 Likes
on
0 Posts
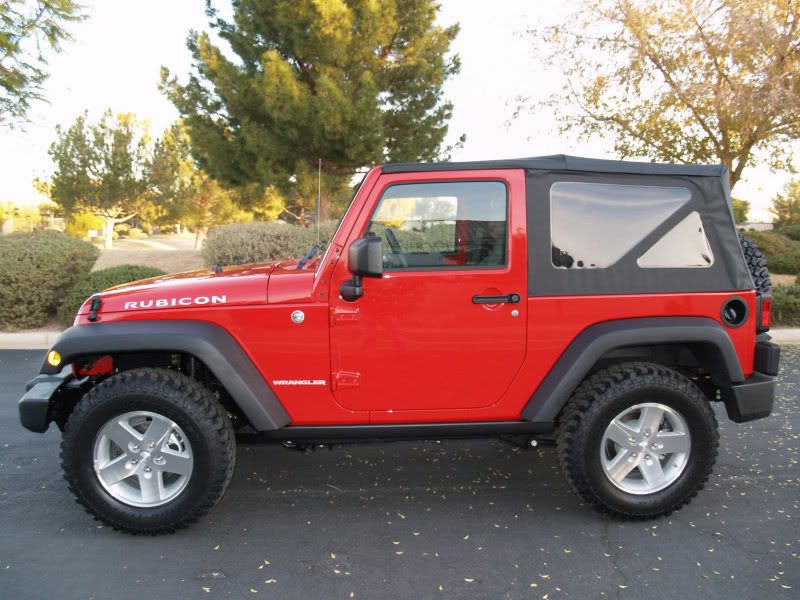
On my 2 door Rubicon I just finished installing a TeraFlex 2.5” Spring Lift with adapters (to keep my good shocks).
There’s actually a lot of information available that is helpful for this install - TeraFlex 2.5” BB, 2.5” Spring and 3” Spring instructions, WOL TeraFlex 2.5” BB installation, and numerous threads regarding TeraFlex 2.5” kits. Here's a link to the current instructions from TeraFlex: http://www.teraflex.biz/downloads/dl...structions.pdf.
In this thread I thought I would just point out some additional information and issues I found when installing mine. I do have a lot more pictures than I posted here, so if you would like to see more let me know.
Here’s what comes with the kit:
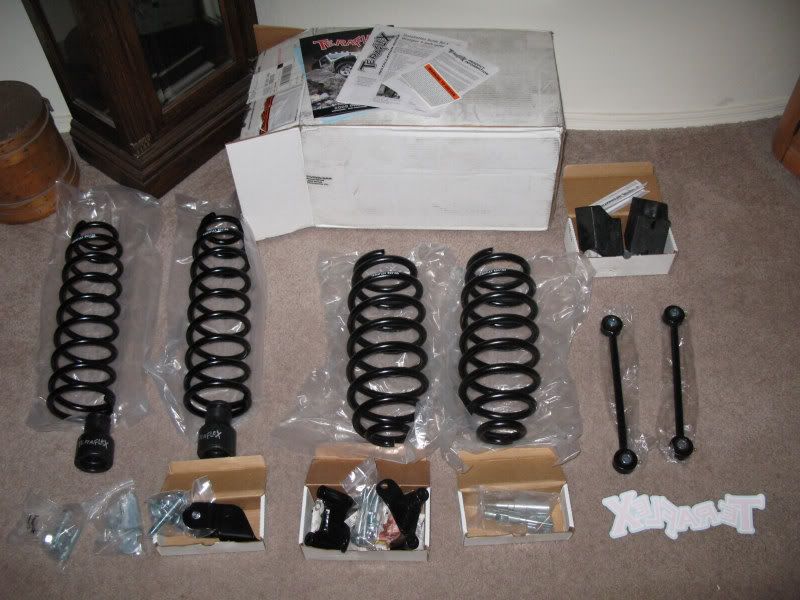
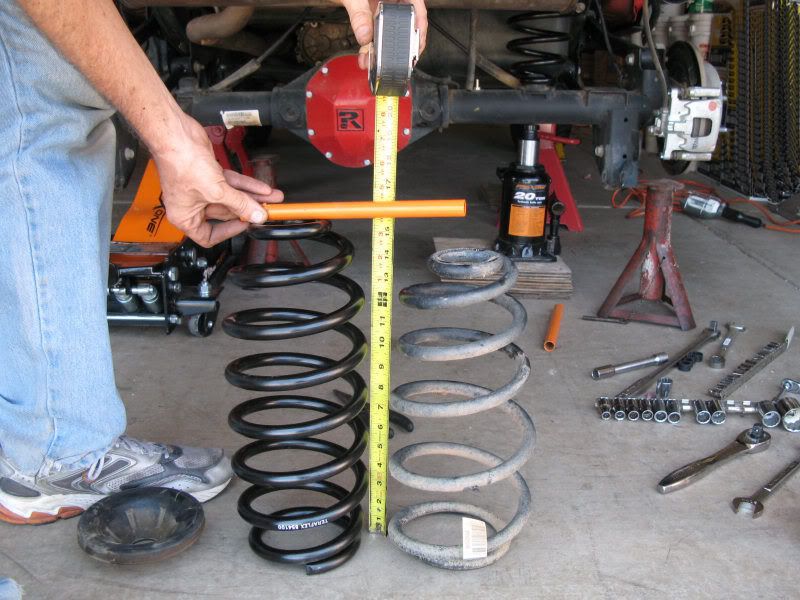
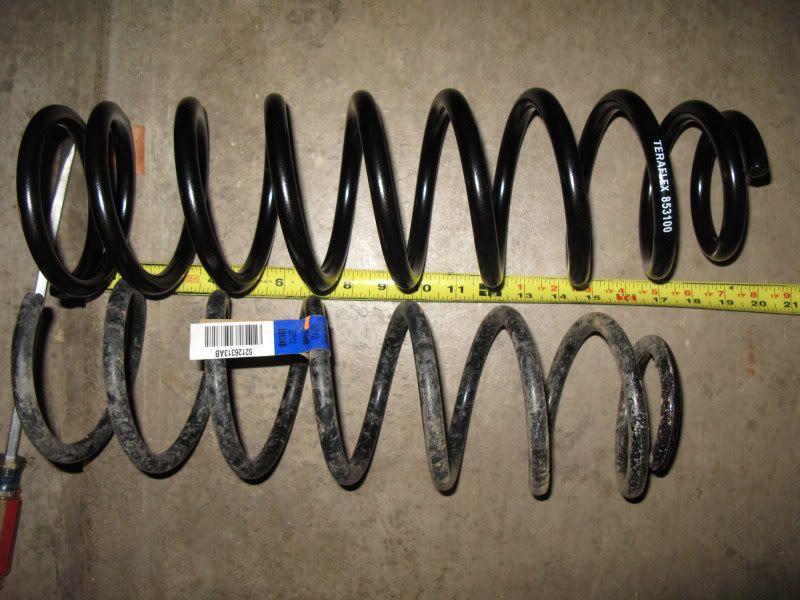
Here’s a picture of a new TeraFlex rear spring (on the left - about 1.5” higher) and the stock spring:
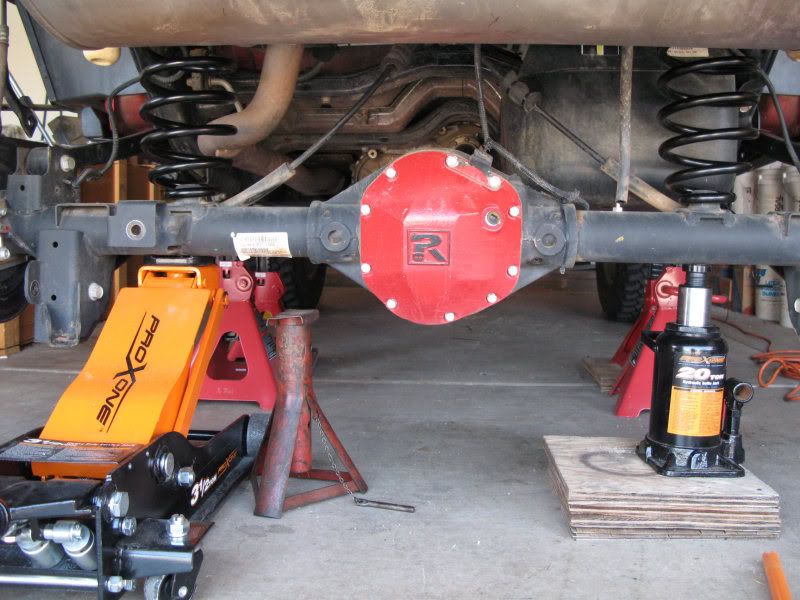
Both new springs set in place. It’s a lot easier to do if you have two jacks:
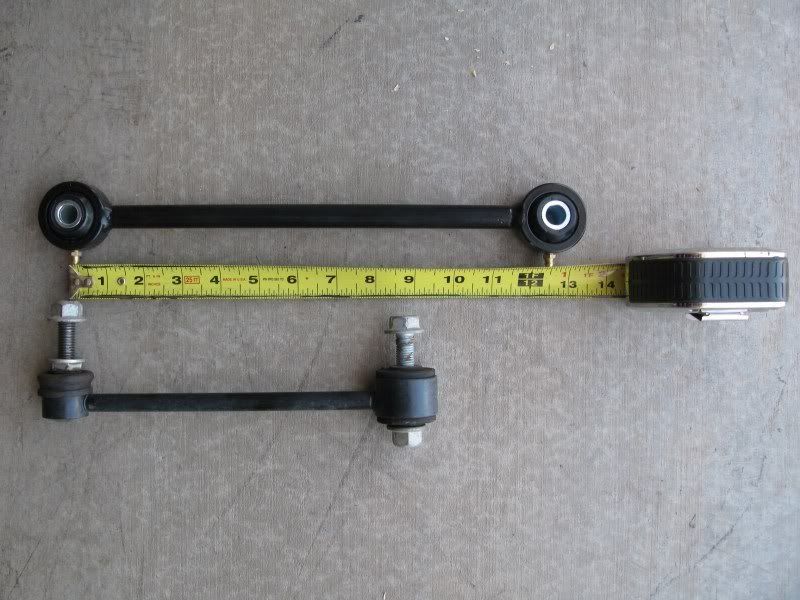
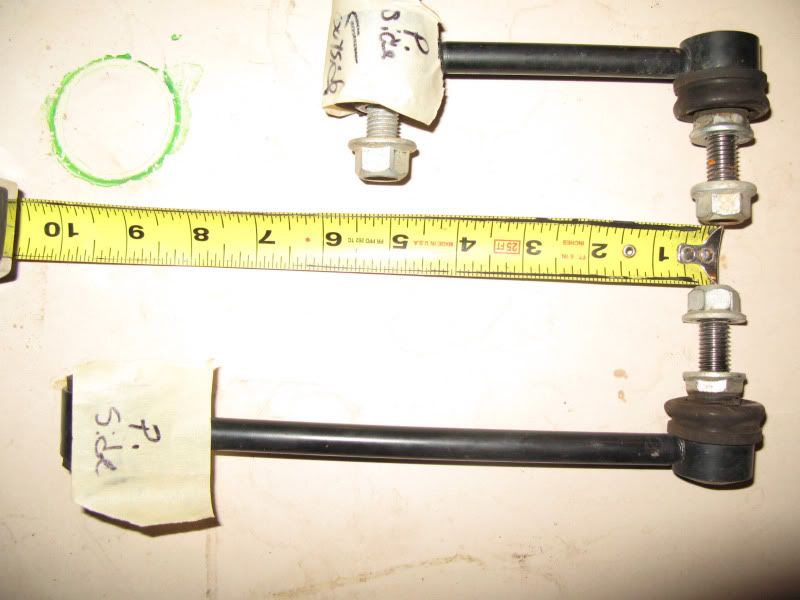
Here’s a new rear TeraFlex sway bar link (on top - about 3.75” longer), and the stock sway bar link:
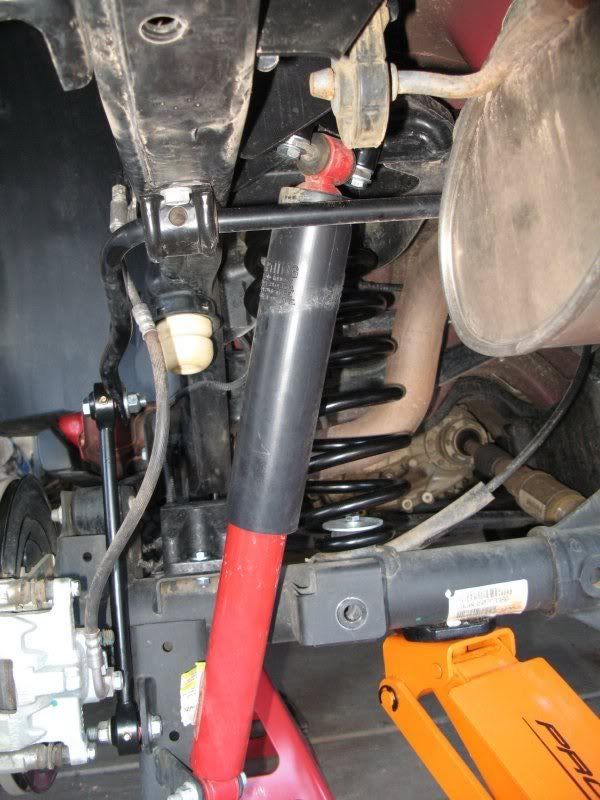
OK, a problem. I tried to install the TeraFlex sway bar link on the inside of the bracket on the axle (per TeraFlex instructions), but the hole in the bracket for the link is drilled too close to the front part of the bracket and so the bottom link would not fit squarely in the hole. Instead of drilling a new hole, or purchasing a new link, or grinding down the TeraFlex link, I decided to install the rear links in the stock position (on the outside of the bracket and the sway bar). This (stock) position gives you plenty of clearance on the inside (frame) side, but as you’ll see later it makes for a tight clearance on the wheel side:
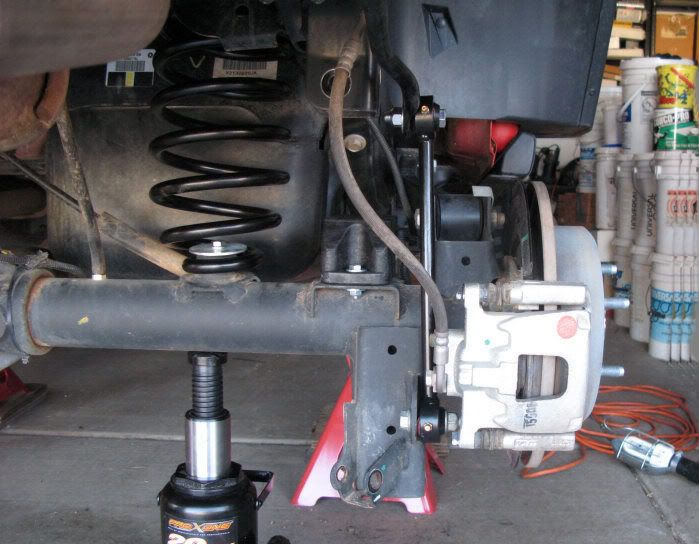
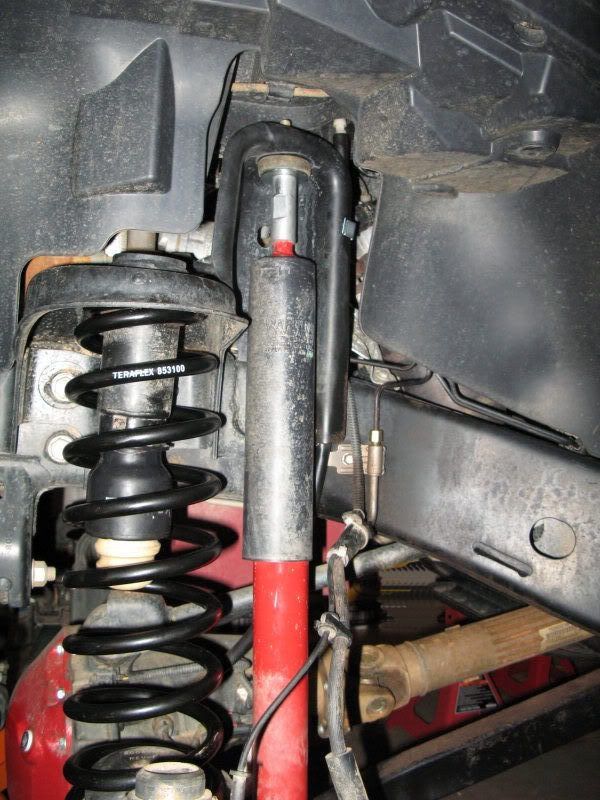
You can see a small part of the top of the shock adapter in this pic - the adapters have 3 mounting points and appear to be very strong:
Here’s a shot where I “simulated” fill flex:
And almost full compression:
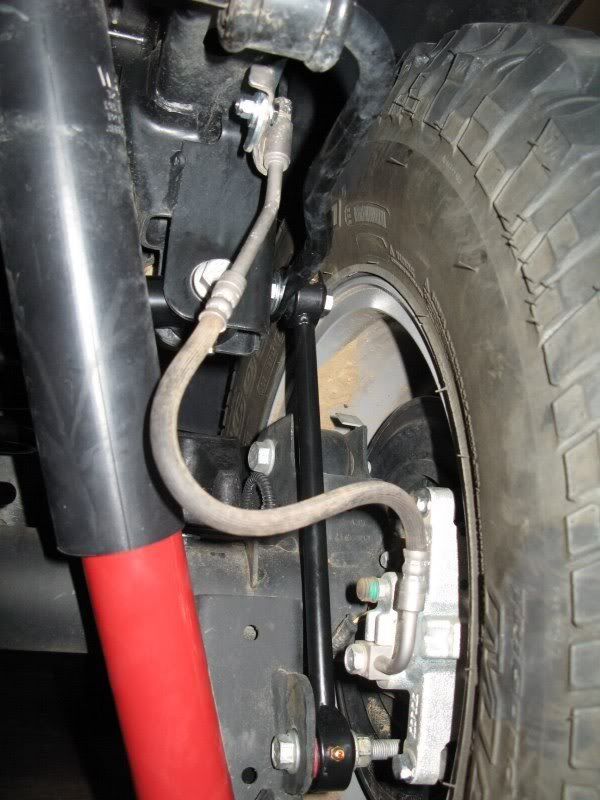
Here’s where you can see the clearance problem that occurs when mounting the sway bar links on the outside. The distance from the head of the nut on the top of the link to the wheel is about 3/8”. I felt that wasn’t good enough so I opted for spacers (as a side note TeraFlex recommends spacers or wheels with the correct spacing too):
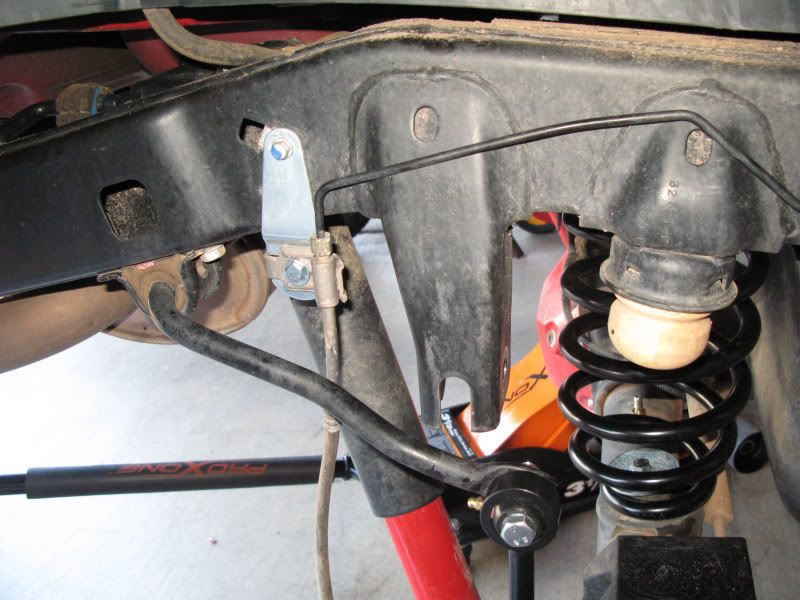
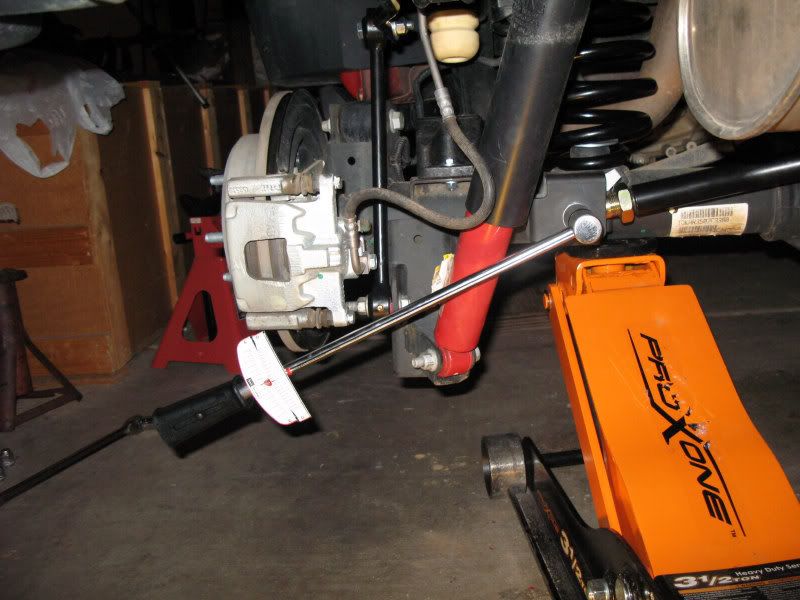
I purchased Currie front and rear adjustable trac bars (I’ll probably do a quick write-up on them) instead of using the supplied TeraFlex relocation bracket. I found it a lot easier to jack up the axle to slide the bolt in, and then lower the axle to wheel level and torque with the wheel off:
On to the front (Note: On my Rubicon I disconnected the front sway bar with the e-disconnect switch before doing the install). Here’s a TeraFlex spring (on top - about 3” longer) and the stock drivers side spring (my stock passenger side and drivers side springs have different part numbers):
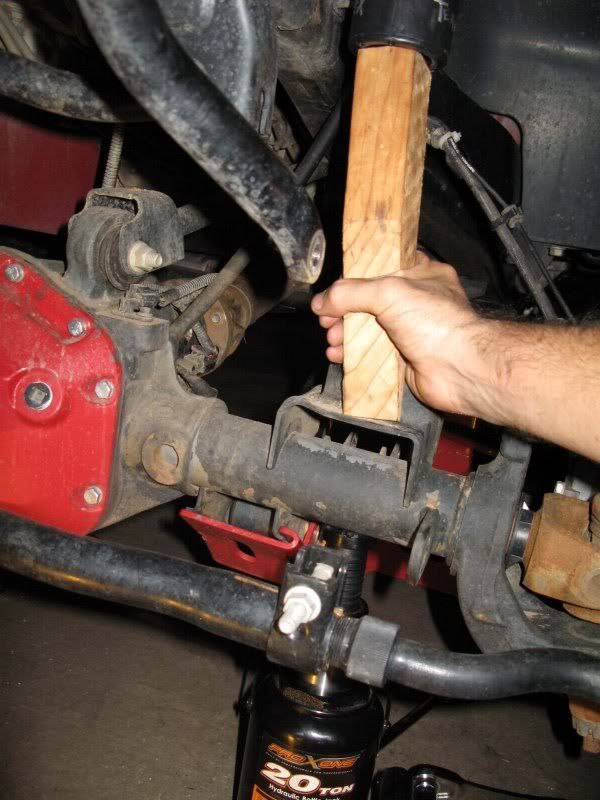
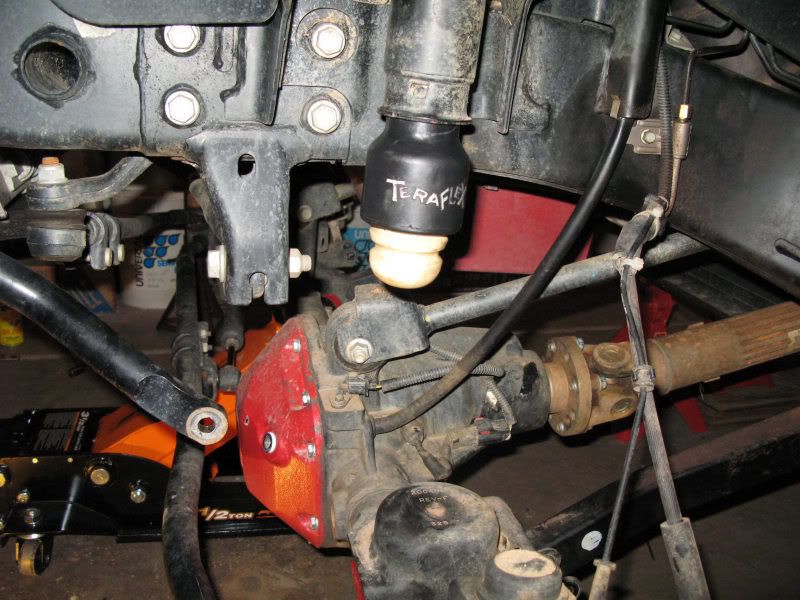
OK, it is a PITA to get the front spring in or to get the front bumps stops in (pick one). The problem is the hole in the top of the spring is just big enough to fit the bump stop - which is OK - but you have a bad angle to push the springs into place with the bump stop installed. If you choose to install the bump stops after setting the spring in place then you have to muscle the bump stops into the hole. The TeraFlex instructions indicate to put the bump stops on first, and I’ve see others install the spring first. I decided to try the bump stops first (again I’ve heard that doing the springs first may be an easier way to go). The TeraFlex bumps stops are hard to seat, so I set them in place and then jacked up the axle with a piece of wood under the bump stop to easily push them in place:
Then easily push the stock bump stop into the TeraFlex bump stop:
Next, get that spring in! Don’t worry that it doesn’t look aligned, it will straighten up when you reconnect the axle:
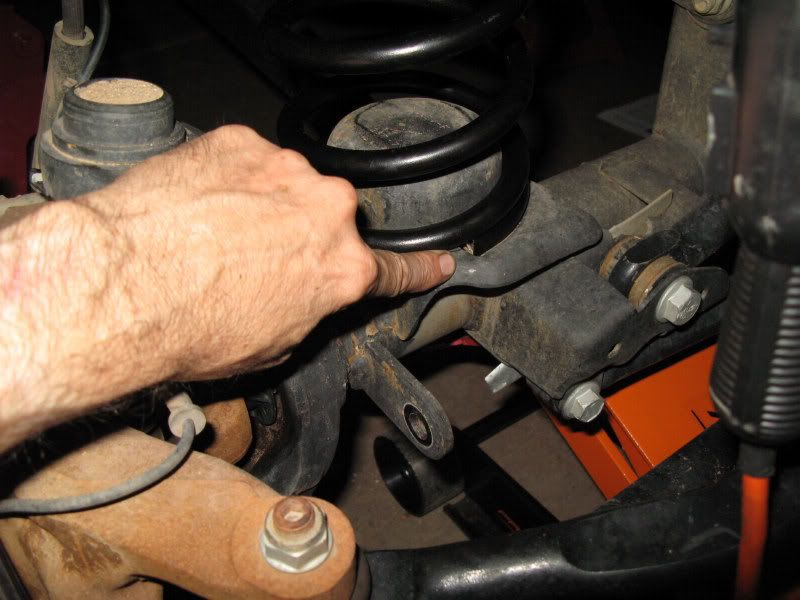
Note, there is a detent in the bottom spring support and the end of the spring should just sit in it:
Next, the shock with its adapter. Here’s the order for the components. The mounting point will be between the two rubber bushings. Note that the bushings are reversed from the stock setup:
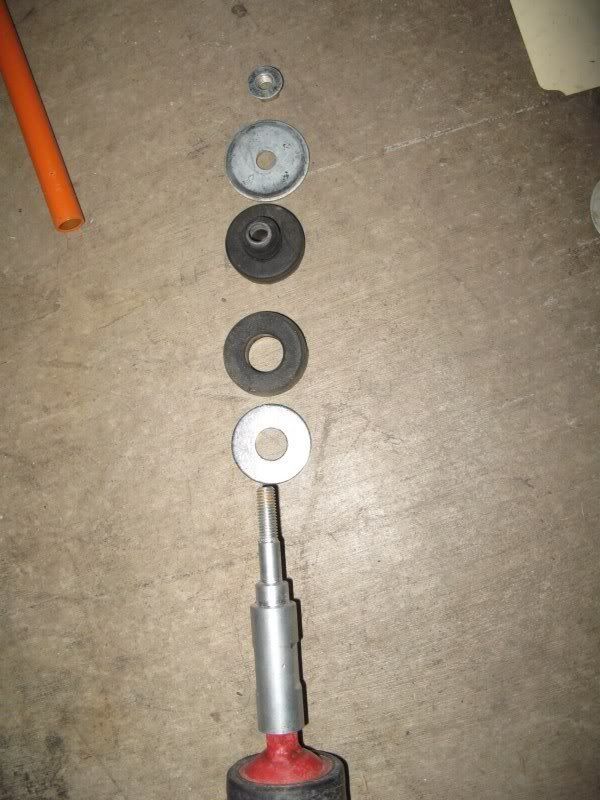
Installed properly:
Here the stock rear sway bar link (bottom - about 4” longer), and the stock front sway bar link. The stock rear sway bar link will now be used in the front:
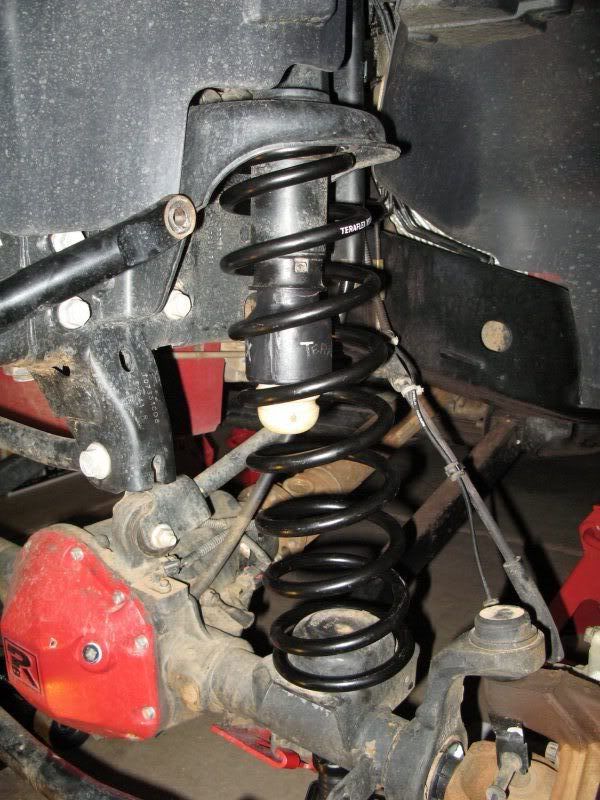
Front finished with the sway bar locked. Note the springs look straight now that the installation is complete:
Even though I lost about 3/4" in the front after installing the front bumper and winch, the lift kit gave me a 3” lift in the front over stock (3 3/4" over the sagging front end), and 2 1/4" in the rear.
Stock:
Lifted with metal bumper/winch:

Lifted with metal bumpers/winch on 35s:

Note: after driving around a few hundred miles re-check the torque of your bolts - especially the trac bar bolts. I also re-check them every 4,000 miles. It's good insurance against Death Wobble.
There’s actually a lot of information available that is helpful for this install - TeraFlex 2.5” BB, 2.5” Spring and 3” Spring instructions, WOL TeraFlex 2.5” BB installation, and numerous threads regarding TeraFlex 2.5” kits. Here's a link to the current instructions from TeraFlex: http://www.teraflex.biz/downloads/dl...structions.pdf.
In this thread I thought I would just point out some additional information and issues I found when installing mine. I do have a lot more pictures than I posted here, so if you would like to see more let me know.
Here’s what comes with the kit:
Here’s a picture of a new TeraFlex rear spring (on the left - about 1.5” higher) and the stock spring:
Both new springs set in place. It’s a lot easier to do if you have two jacks:
Here’s a new rear TeraFlex sway bar link (on top - about 3.75” longer), and the stock sway bar link:
OK, a problem. I tried to install the TeraFlex sway bar link on the inside of the bracket on the axle (per TeraFlex instructions), but the hole in the bracket for the link is drilled too close to the front part of the bracket and so the bottom link would not fit squarely in the hole. Instead of drilling a new hole, or purchasing a new link, or grinding down the TeraFlex link, I decided to install the rear links in the stock position (on the outside of the bracket and the sway bar). This (stock) position gives you plenty of clearance on the inside (frame) side, but as you’ll see later it makes for a tight clearance on the wheel side:
You can see a small part of the top of the shock adapter in this pic - the adapters have 3 mounting points and appear to be very strong:
Here’s a shot where I “simulated” fill flex:
And almost full compression:
Here’s where you can see the clearance problem that occurs when mounting the sway bar links on the outside. The distance from the head of the nut on the top of the link to the wheel is about 3/8”. I felt that wasn’t good enough so I opted for spacers (as a side note TeraFlex recommends spacers or wheels with the correct spacing too):
I purchased Currie front and rear adjustable trac bars (I’ll probably do a quick write-up on them) instead of using the supplied TeraFlex relocation bracket. I found it a lot easier to jack up the axle to slide the bolt in, and then lower the axle to wheel level and torque with the wheel off:
On to the front (Note: On my Rubicon I disconnected the front sway bar with the e-disconnect switch before doing the install). Here’s a TeraFlex spring (on top - about 3” longer) and the stock drivers side spring (my stock passenger side and drivers side springs have different part numbers):
OK, it is a PITA to get the front spring in or to get the front bumps stops in (pick one). The problem is the hole in the top of the spring is just big enough to fit the bump stop - which is OK - but you have a bad angle to push the springs into place with the bump stop installed. If you choose to install the bump stops after setting the spring in place then you have to muscle the bump stops into the hole. The TeraFlex instructions indicate to put the bump stops on first, and I’ve see others install the spring first. I decided to try the bump stops first (again I’ve heard that doing the springs first may be an easier way to go). The TeraFlex bumps stops are hard to seat, so I set them in place and then jacked up the axle with a piece of wood under the bump stop to easily push them in place:
Then easily push the stock bump stop into the TeraFlex bump stop:
Next, get that spring in! Don’t worry that it doesn’t look aligned, it will straighten up when you reconnect the axle:
Note, there is a detent in the bottom spring support and the end of the spring should just sit in it:
Next, the shock with its adapter. Here’s the order for the components. The mounting point will be between the two rubber bushings. Note that the bushings are reversed from the stock setup:
Installed properly:
Here the stock rear sway bar link (bottom - about 4” longer), and the stock front sway bar link. The stock rear sway bar link will now be used in the front:
Front finished with the sway bar locked. Note the springs look straight now that the installation is complete:
Even though I lost about 3/4" in the front after installing the front bumper and winch, the lift kit gave me a 3” lift in the front over stock (3 3/4" over the sagging front end), and 2 1/4" in the rear.
Stock:
Lifted with metal bumper/winch:
Lifted with metal bumpers/winch on 35s:
Note: after driving around a few hundred miles re-check the torque of your bolts - especially the trac bar bolts. I also re-check them every 4,000 miles. It's good insurance against Death Wobble.
Last edited by joe002; 02-12-2011 at 01:36 PM. Reason: Add note on re-checking torque.
 08-15-2008, 10:01 PM
#2
JK Freak
Great post Joe this is what i will be doing in 4 weeks or sooner with the adapters, just need to host an install party in SOcal
i may add a 1inch body lift aswell
i may add a 1inch body lift aswell
08-15-2008, 11:07 PM
#3
JK Freak
Join Date: Nov 2007
Location: Enid, OK
Posts: 627
Likes: 0
Received 0 Likes
on
0 Posts
Installed mine the other day aswell. Keep in mind i did this with the factory car jack, 4 cement blocks, and two pieces of plywood to jack it up. Here are my few bits:
Problem #1: I put my rear swaybars on the same way as joe took them off. I had a buddy doing this and you put the top bolt in reverse so the nut was on the tire side. After placing the wheels back on i was very disapointed when i only get a few feet before hearing a really bad grinding noise. PUT THE NUT ON THE INSIDE OF THE FRAME!!!! saves you trouble later. im still very very very close with it the other way around.
Problem #2: Those front Springs are a 3itch. The instructions i had didn't have me disconnect my front brake lines. This scared me a few times as i was pushing the axle down trying to force the spring in and watched the cables get close to stretching badly. After disconnecting those, I had a buddy push down on the side i was putting the spring in while i had another lift (could use a jack for both). With that i had plenty of room and the coils went right in no problem at all.
Problem #3: Those fawking bump stops. I used a little WD40 to get the actual yellow bumpstop into the extension. I had heard it was easier to put the bumpstops in the coil, place the spring, and then use a breaker bar to put the bumpstops into place. This turned out to be a PITA. After smashing my head into the wheel wells, hitting my hands on the calipers, and various other painfull moments i got out a Hair dryer and just pointed it at the end of the extension that goes into the frame. making sure it was completely heated all around i then sprayed it with a quick shot of WD40 to lub it up and wow with a bar to push, it went right into place. I checked these later to make sure they were completely tight and so far... i can't pull them back out.
Now these are all my personal problems. They had nothing to do with the Lift what so ever really. These came from a guy who has never done something this major to his jeep before and had to learn as he went.
The lift works amazing. I love it! It rides very similar to my factory ride, maybe a little harder. I haven't had any problems with my steering, but i still plan to get an alignment when i get my new tires.
Overall very very good lift. I would recomend it to anyone.
didn't get pictures of teh install put here it is finished
Before lift:

After Lift:
Edit: My pics are failing for some reason... Click HERE for more. Its a later post in this thread.
I have 32" BFG A/T in those pictures if they give refernce to height.
Problem #1: I put my rear swaybars on the same way as joe took them off. I had a buddy doing this and you put the top bolt in reverse so the nut was on the tire side. After placing the wheels back on i was very disapointed when i only get a few feet before hearing a really bad grinding noise. PUT THE NUT ON THE INSIDE OF THE FRAME!!!! saves you trouble later. im still very very very close with it the other way around.
Problem #2: Those front Springs are a 3itch. The instructions i had didn't have me disconnect my front brake lines. This scared me a few times as i was pushing the axle down trying to force the spring in and watched the cables get close to stretching badly. After disconnecting those, I had a buddy push down on the side i was putting the spring in while i had another lift (could use a jack for both). With that i had plenty of room and the coils went right in no problem at all.
Problem #3: Those fawking bump stops. I used a little WD40 to get the actual yellow bumpstop into the extension. I had heard it was easier to put the bumpstops in the coil, place the spring, and then use a breaker bar to put the bumpstops into place. This turned out to be a PITA. After smashing my head into the wheel wells, hitting my hands on the calipers, and various other painfull moments i got out a Hair dryer and just pointed it at the end of the extension that goes into the frame. making sure it was completely heated all around i then sprayed it with a quick shot of WD40 to lub it up and wow with a bar to push, it went right into place. I checked these later to make sure they were completely tight and so far... i can't pull them back out.
Now these are all my personal problems. They had nothing to do with the Lift what so ever really. These came from a guy who has never done something this major to his jeep before and had to learn as he went.
The lift works amazing. I love it! It rides very similar to my factory ride, maybe a little harder. I haven't had any problems with my steering, but i still plan to get an alignment when i get my new tires.
Overall very very good lift. I would recomend it to anyone.
didn't get pictures of teh install put here it is finished
Before lift:
After Lift:
Edit: My pics are failing for some reason... Click HERE for more. Its a later post in this thread.
I have 32" BFG A/T in those pictures if they give refernce to height.
Last edited by eraujk; 01-07-2010 at 09:19 AM.
08-16-2008, 07:50 AM
#4
JK Junkie
Join Date: May 2008
Location: North Alabama
Posts: 3,386
Likes: 0
Received 0 Likes
on
0 Posts
Here’s where you can see the clearance problem that occurs when mounting the sway bar links on the outside. The distance from the head of the nut on the top of the link to the wheel is about 3/8”. I felt that wasn’t good enough so I opted for spacers (as a side note TeraFlex recommends spacers or wheels with the correct spacing too)
Noticed the nut position was different between top and bottom of the rear sway bar link. Was that intentional/beneficial?
Again, thanks for the write-up, and for answering a Newbie's questions.
 08-16-2008, 07:55 AM
#5
JK Super Freak
Thread Starter
Join Date: Oct 2007
Location: Phoenix, AZ
Posts: 1,572
Likes: 0
Received 0 Likes
on
0 Posts
artpics - thanks, have fun with that install!
shadowpro-jk - yeah, you have watch the direction those sway bar link bolts go in. It makes a big difference.
In the front it looks like you did the springs first then the bump stops. I didn’t remove my brake lines doing it the other way around, but I really had “fun” getting the springs to go through the bump stop extensions.
I still have to take mine out on the trail, but on the road it does seem to be close to factory. I’m hoping to hit a trail this weekend.
08-16-2008, 08:03 AM
#6
JK Junkie
Join Date: May 2008
Location: North Alabama
Posts: 3,386
Likes: 0
Received 0 Likes
on
0 Posts
Those front Springs are a 3itch. The instructions i had didn't have me disconnect my front brake lines. This scared me a few times as i was pushing the axle down trying to force the spring in and watched the cables get close to stretching badly. After disconnecting those, I had a buddy push down on the side i was putting the spring in while i had another lift (could use a jack for both). With that i had plenty of room and the coils went right in no problem at all.
Thanks for the pics and heads-up on the potential installation issues!!
 08-16-2008, 08:08 AM
#7
JK Junkie
Join Date: May 2008
Location: North Alabama
Posts: 3,386
Likes: 0
Received 0 Likes
on
0 Posts
By the way, thanks for all the pics. I really, really like the amount of lift it gives our two doors.

Last edited by JK-Rubi; 08-16-2008 at 08:15 AM.
Trending Topics
08-16-2008, 08:16 AM
#8
JK Super Freak
Thread Starter
Join Date: Oct 2007
Location: Phoenix, AZ
Posts: 1,572
Likes: 0
Received 0 Likes
on
0 Posts
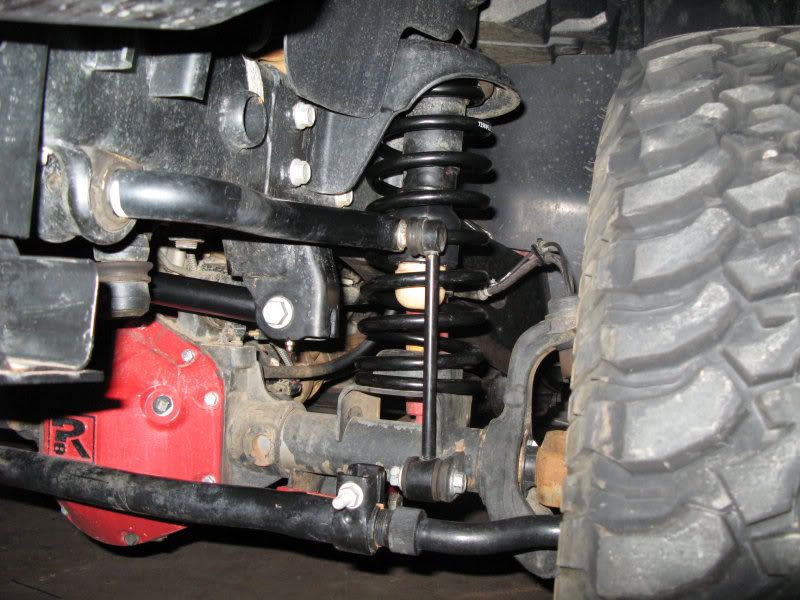
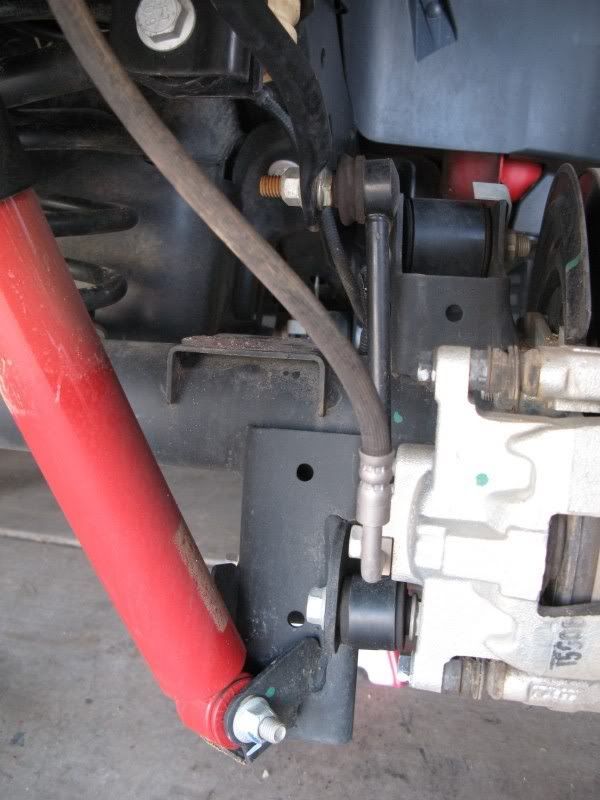
JK-Rubi - it's the Red arrow bolt that you have to worry about. The stock links are shorter so they fall lower (inside of the wheel) so there’s no chance of rubbing. With the longer links they fall higher and can rub. I didn’t take a stock picture with the wheels still on, but if you go out and look at your links I’m sure you’ll see what I mean.
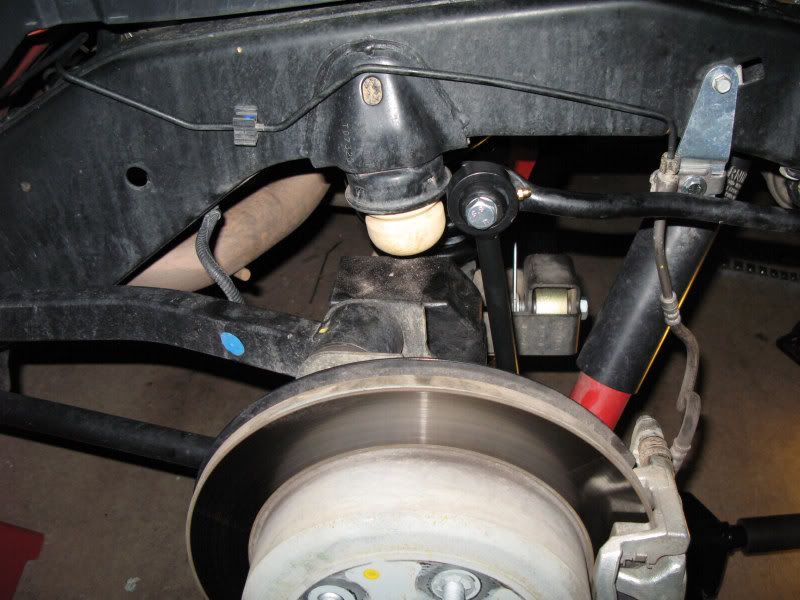
Yeah, the nuts are supposed to be reversed (they are in the stock position). The picture makes it look like the bottom one could hit something, but there’ no way it will. Here’s a before (stock) picture I took before I did any work:
On the spring you have the choice of making the bump stops easy and making the springs hard (my write up), or the springs easy and work on the bump stops (shadowpro-jk’s experience). Since I only did it one way I can’t compare.
I think most of us here are newbie’s installing a TeraFlex 2.5” kit on a JK, but I think the pictures and questions asked/answered really help the next person.
08-16-2008, 08:21 AM
#9
JK Super Freak
Thread Starter
Join Date: Oct 2007
Location: Phoenix, AZ
Posts: 1,572
Likes: 0
Received 0 Likes
on
0 Posts
I was thinking of doing a small writeup on their trac bars too.Yeah, it is a nice lift for a 2 door! The last thing to "worry" about is the rear driveshaft. I'll be watching to see if the increased angle will tear it up and force another "upgrade".
08-16-2008, 08:41 AM
#10
JK Freak
Join Date: Nov 2007
Location: Enid, OK
Posts: 627
Likes: 0
Received 0 Likes
on
0 Posts
I didn't have the money for trac bars at the moment so i have the bracket in the back. Worked nicely, the axle is centered as far as i can tell. The bracket didn't quite line up with the holes in the frame so i had to do some extra drilling but it turned out nicely. The front is off to the drivers side mabye 1/4 -1/2 inch? not to noticable at all. I do plan on getting adj bars in the future but im good for now.
Yeah red arrow. Do it the exact way that Joe has it in his picture or your gunna get rubbing or atleast i did with my stock x wheels.
I kinda tired putting the front coils on over the bumpstops and couldn't get it to go around. actually got the spring stock between the bumpstop and the caliper....
If your willing to take a bit of time to put those bumpstops in i would either put the extension in boiling water for a second and then put it into place (if you go coil over bumpstop). But for my experience once i heated the black TF extension and sprayed it with WD40 i used a little pressure from a pry bar and it slid into place. I put support under that end of the axle and pushed down on the coil with the bar to force the bumpstop up. Worked nicely.