Power Stop Front Brake Kit Write-Up & Install Guide
 10-07-2015, 09:45 PM
#1
JK Junkie
Thread Starter
Power Stop Jeep JK Front Brake Kit Write-Up & Install Guide
Power Stop Z36 Truck & Tow Front Brake Kit

2014 Part Numbers & Pricing
Front: K3097-36 ($179.00)
Rear: K3090-36 ($176.00)
Front & Rear: K2798-36 ($356.00)
REAR WRITE-UP & INSTALL GUIDE LINK
https://www.jk-forum.com/forums/jk-w...3/#post4149906 (CLICK ON LINK)
October 2015 10 Year Anniversary $30 Rebate Offer
• Celebrate Power Stop?s 10-Yr Anniversary with a huge Sale! | Power Stop (CLICK ON LINK)
Company Information
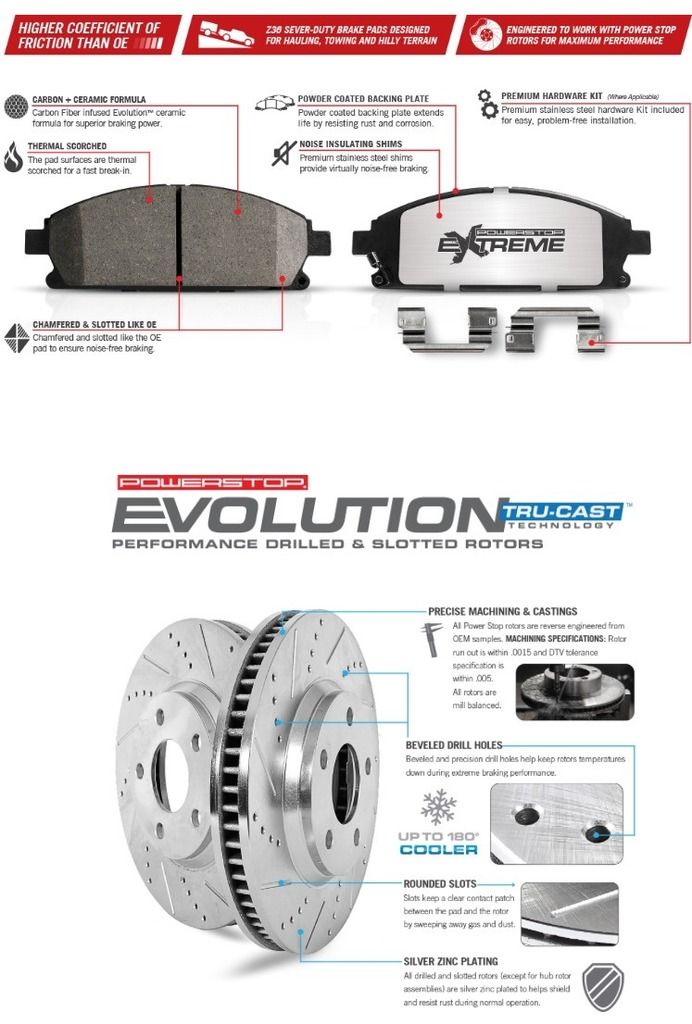
Power Stop Extreme Performance brake rotors and pads were first introduced in California in 1995 as a problem solver for the toughest brake challenges. Power Stop is committed to providing the safest and most effective braking solutions for its customer’s at an affordable price.
Power Stop set the standard when it introduced its first performance brake kit, the 1-Click Brake kit in 2011. Power Stop offers a complete line of application specific brake kits that includes as applicable: performance brake rotors, disc brake pads, brake hardware, brake sensors and calipers.
The “1-Click Brake Kit,” has revolutionized the way consumers purchase their brake parts and take the stress and guesswork out of selecting the right pad and rotor combination while delivering maximum performance and reliability. Don’t just Stop – Power Stop!
Brake Kit Information & Specs
Power Stop 1-Click Extreme Truck & Tow Brake Kits offer superior stopping power that is demanded by those that Tow/Haul, as well as the off-road enthusiast. Any time you add weight to a vehicle by hauling a load, towing a trailer, or simply adding a larger wheel/tire combination, you change the operating conditions of your stock brake package. Those operating conditions may exceed the ability of the stock braking components. The Power Stop 1-Click Extreme Truck & Tow Brake Kits are specifically matched components designed to produce the brake torque that is needed due to the increase in wheel diameter or load. The Drilled & Slotted rotors will reduce the heat and the Z36 Extreme Truck & Tow brake pads will provide the extra stopping power to bring your hauler to a halt quickly.
Warranty Information
60 Day Hassle-Free Warranty on top of a 3 year/36k mile warranty on all Power Stop 1- Click Brake Kits.
IMPORTANT BREAK IN PRODECURE
• 5 moderate to aggressive stops from 40 mph down to 10 mph in rapid succession without letting the brakes cool and do not come to a complete stop. If you're forced to stop, either shift into neutral or give room in front so you can allow the vehicle to roll slightly while waiting for the light. The rotors will be very hot and holding down the brake pedal will allow the pad to create an imprint on the rotor. This is where the judder can originate from.
• Then do 5 mod�erate stops from 35 mph to 5 mph in rapid succession without letting the brakes cool. You should expect to smell some resin as the brakes get hot.
• After this is complete, drive around for as long as possible without excessively heating the brakes and without coming to a complete stop (Try for about 5 minutes at moderate speed). This is the cooling stage. It allows the heated resin in the brake pads to cool and cure.
• After the brakes have cooled to standard operating temperature, you may use the brakes normally.
• For first 100 miles, avoid towing or hauling loads while the pad completes resin cure.
What comes in Power Stop kit
Rotors
Pads
Premium Hardware
Pin Bushing Kit
High Temperature Lubricant
Front Brake Install Guide
Install Time
1-2 Hours
Tools Needed
Refreshment of your choice
Flat Head Screwdriver
C-Clamp
Jack
Jack Stands (2)
� or 3/8 Ratchet
Ratchet Extension
19 or � Socket
13mm Wrench or Socket
15mm Wrench
21mm Wrench or Socket
Plyers
Brake Clean
Rags
Locktite (Blue)
Blocks or Wheel Chalk
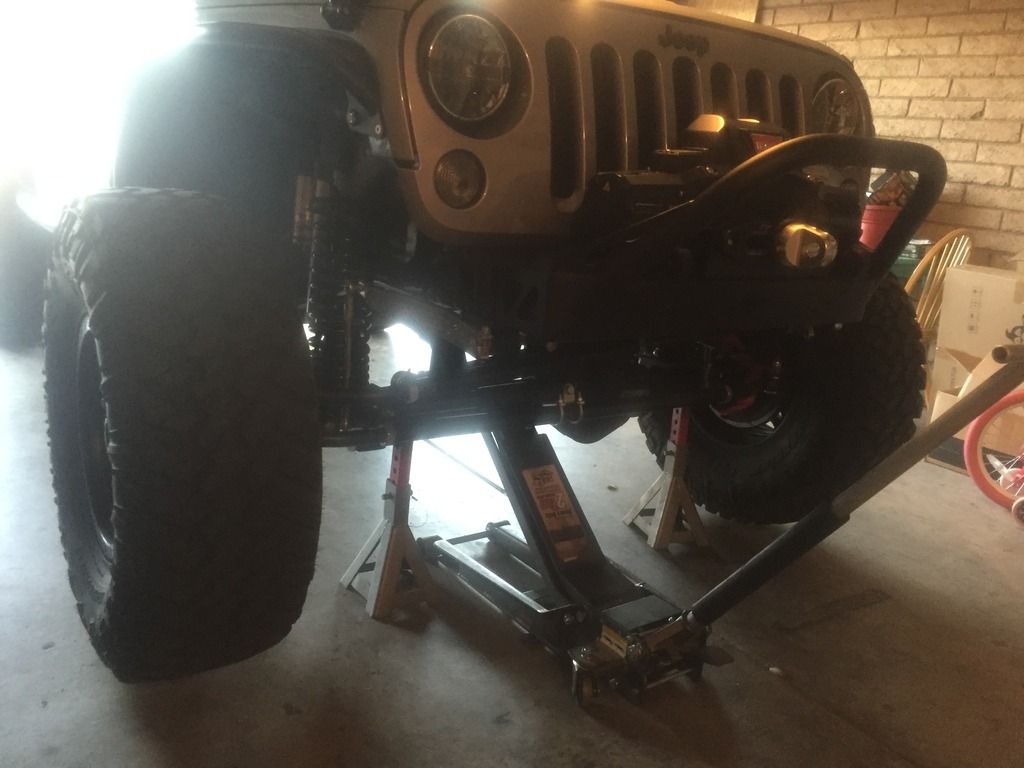
Step 1
Lift Front Of Jeep Off Ground
• Make sure you are parked on somewhat level ground. Pull emergency brake, and place one block in front of rear tire, and other in back of opposite rear tire.
• Take 19mm/ � Socket and loosen all 10 front lug nuts. (Don’t remove.)
• Take jack and place under pumpkin of housing. Jack to proper height and place one jack stand on each side of housing end under axle tubes.
Step 2
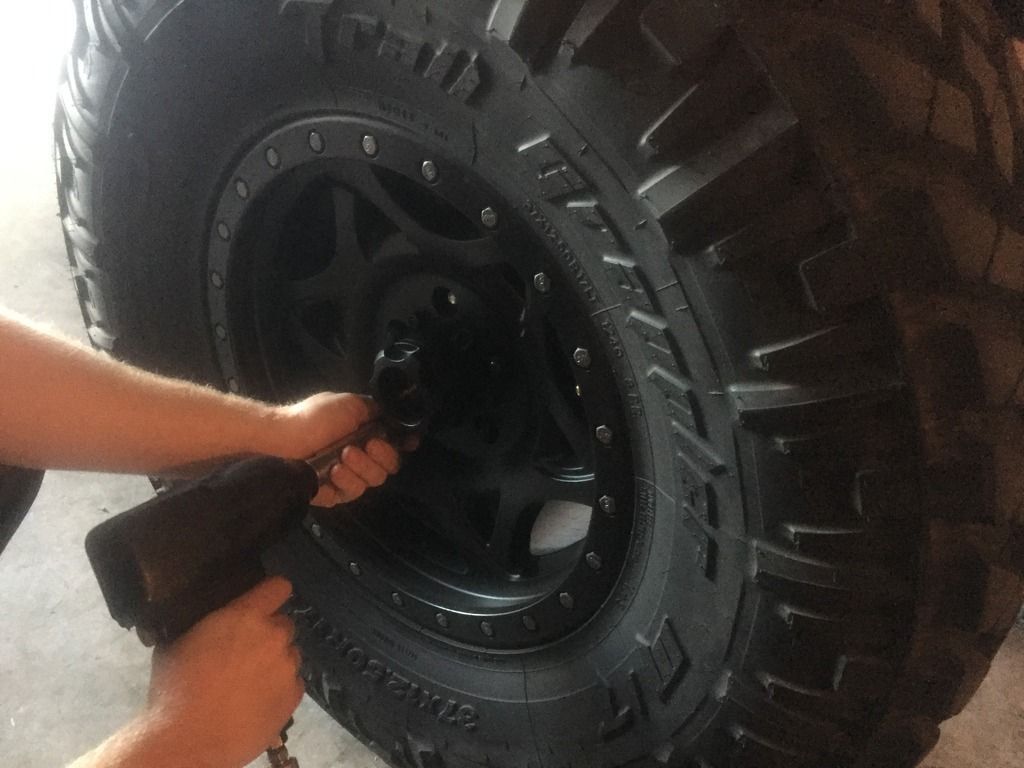
Remove One Wheel
• Leave other wheel on while during installation.
• Remove the 5 loosened lug nuts, and slide wheel off studs.
• Place wheel that was removed under frame of front door area.
Step 3
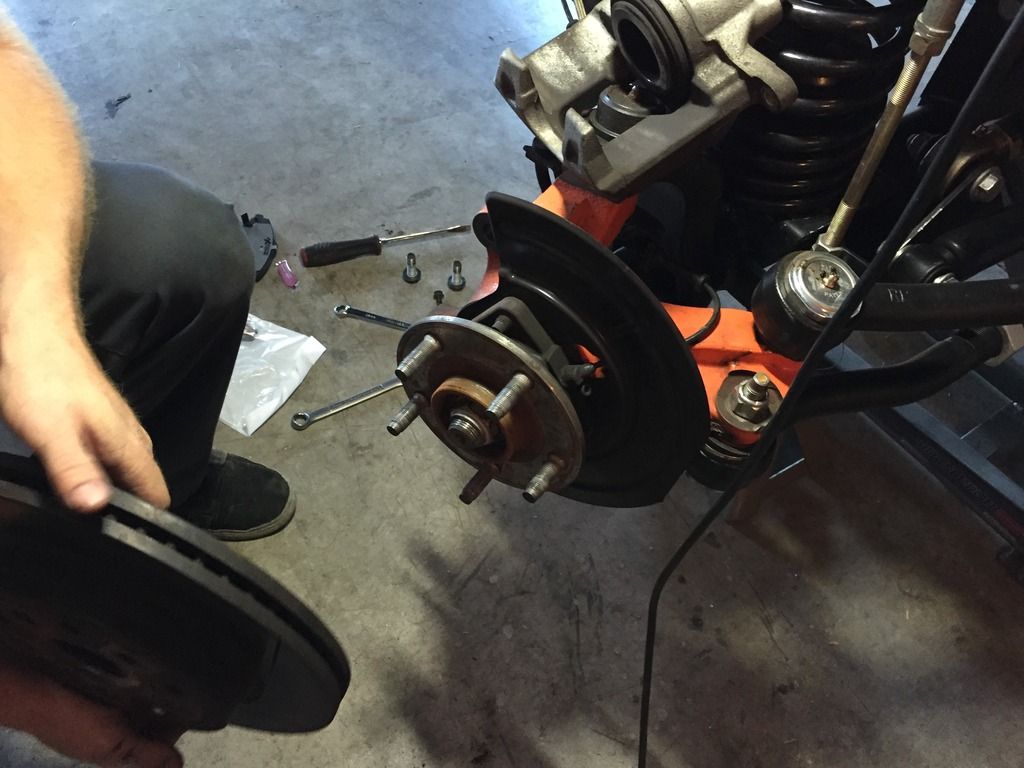
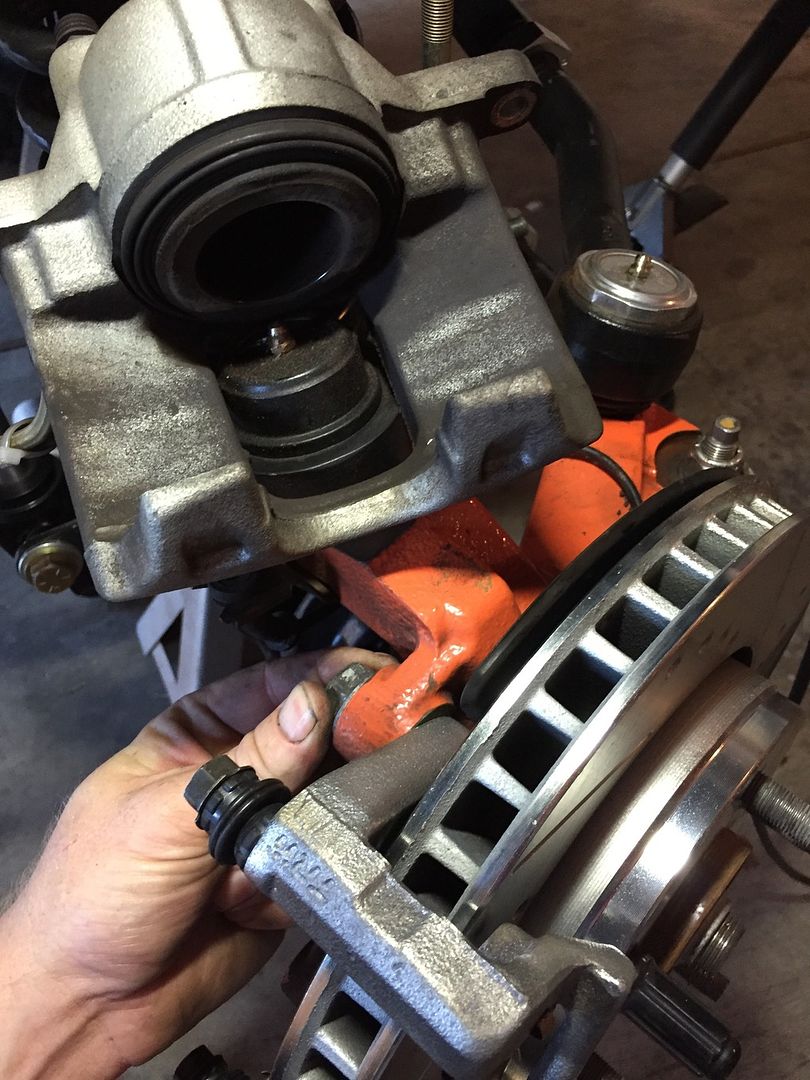
Remove Brake Caliper & Caliper Bracket
• Remove Rotor Retainers on studs if they are present. Use flat head or plyers to remove.
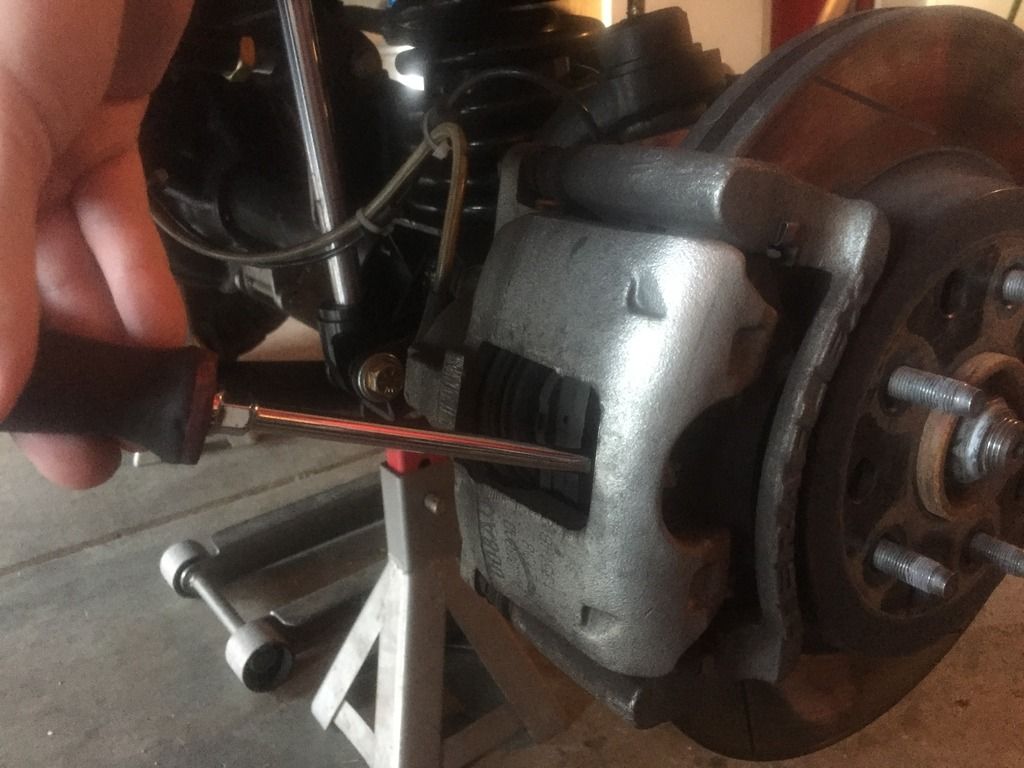
• Compress piston back with flat head screw driver with gentle force. By doing this, you will not have to bleed your brakes when finished.
• Loosen caliper slide bolts with 13mm & 15mm wrenches. Hold 15mm in place while loosening with 13mm.
• Move caliper up out of way and place bracket to the side. Make sure caliper it is sitting in safe spot or hanging with bungee and there is no stress on caliper brake lines.
• Remove caliper mount bolts with 21mm wrench/socket.
Step 4
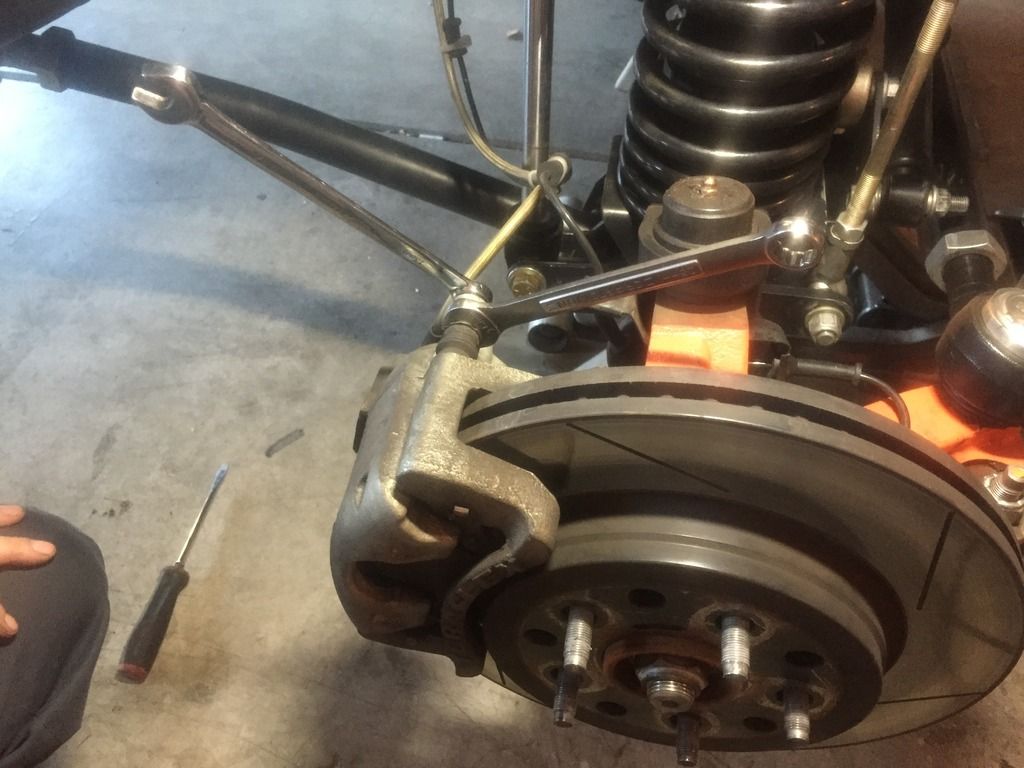
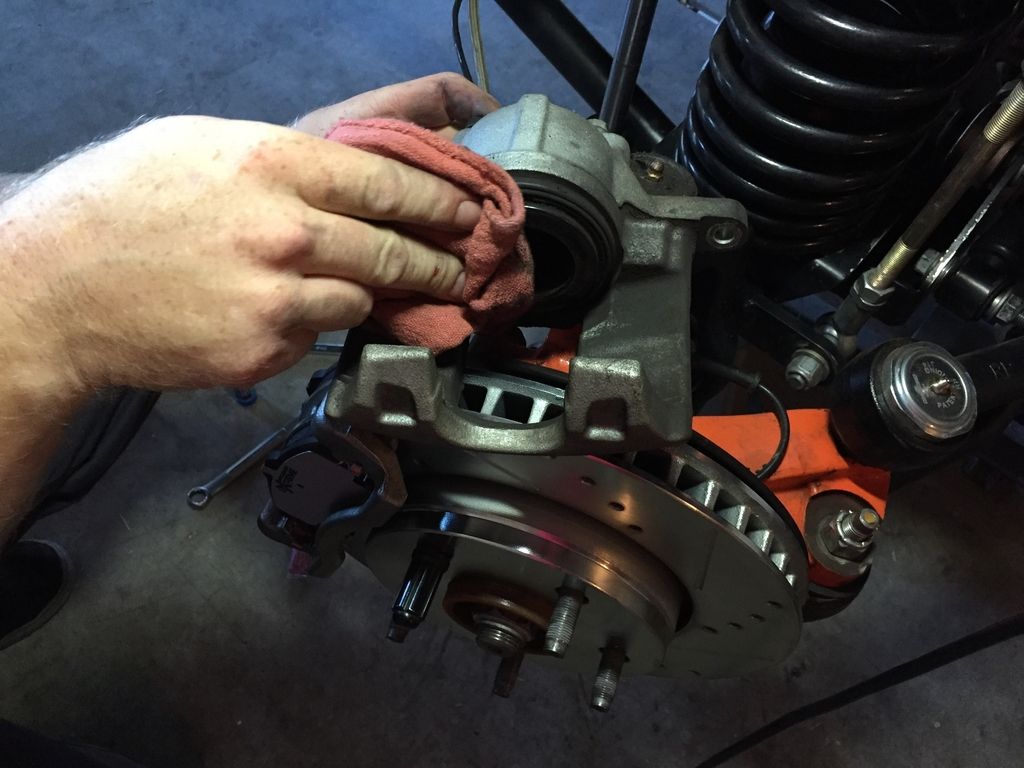
Remove Rotor & Install New
• Slide rotor off now that caliper has been removed and out of way.
• Slide proper marked Power Brake rotor on, and screw on lug nut on to hold in place.
• Spray new rotor down with brake clean and wipe down.
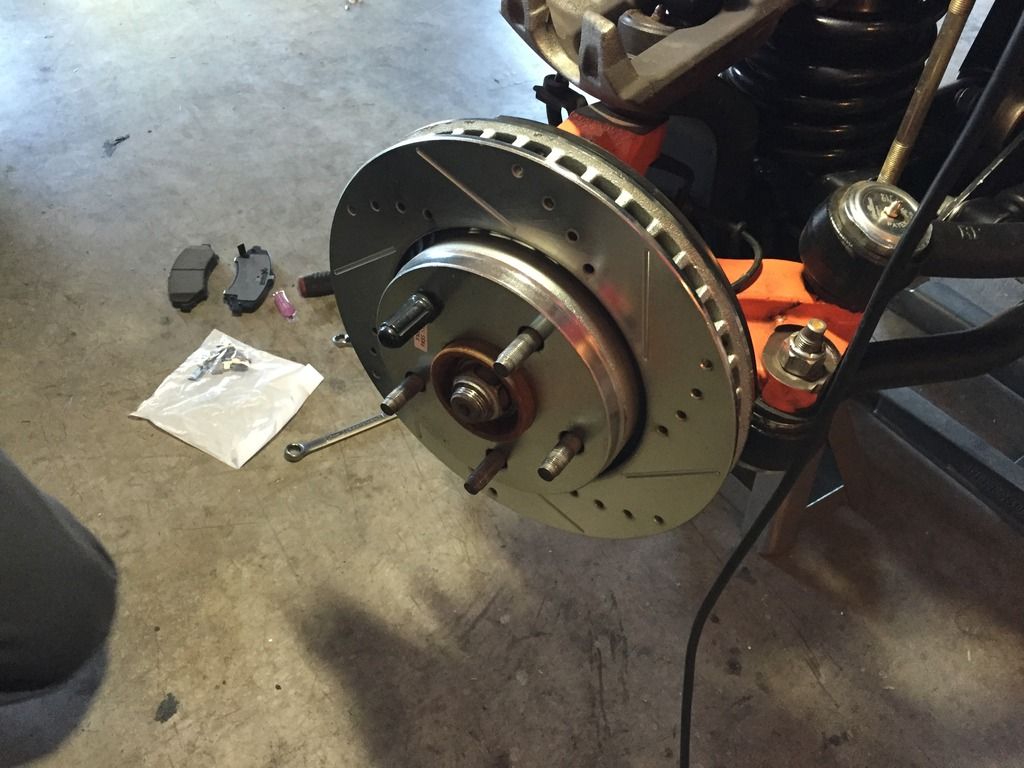
Step 5
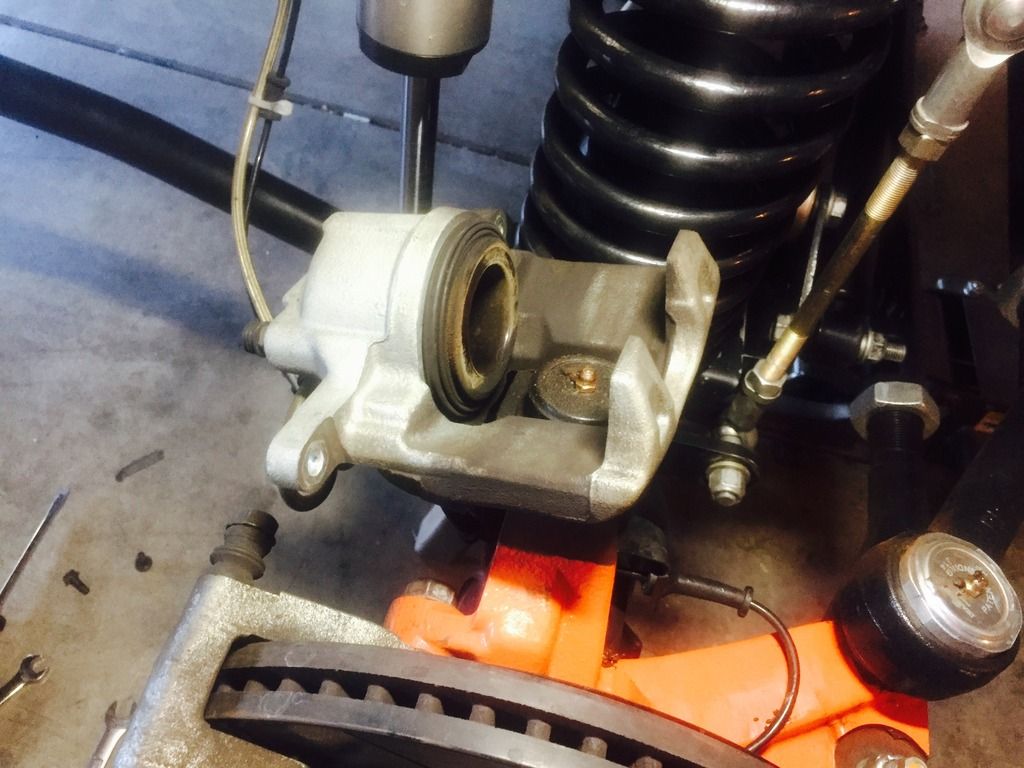
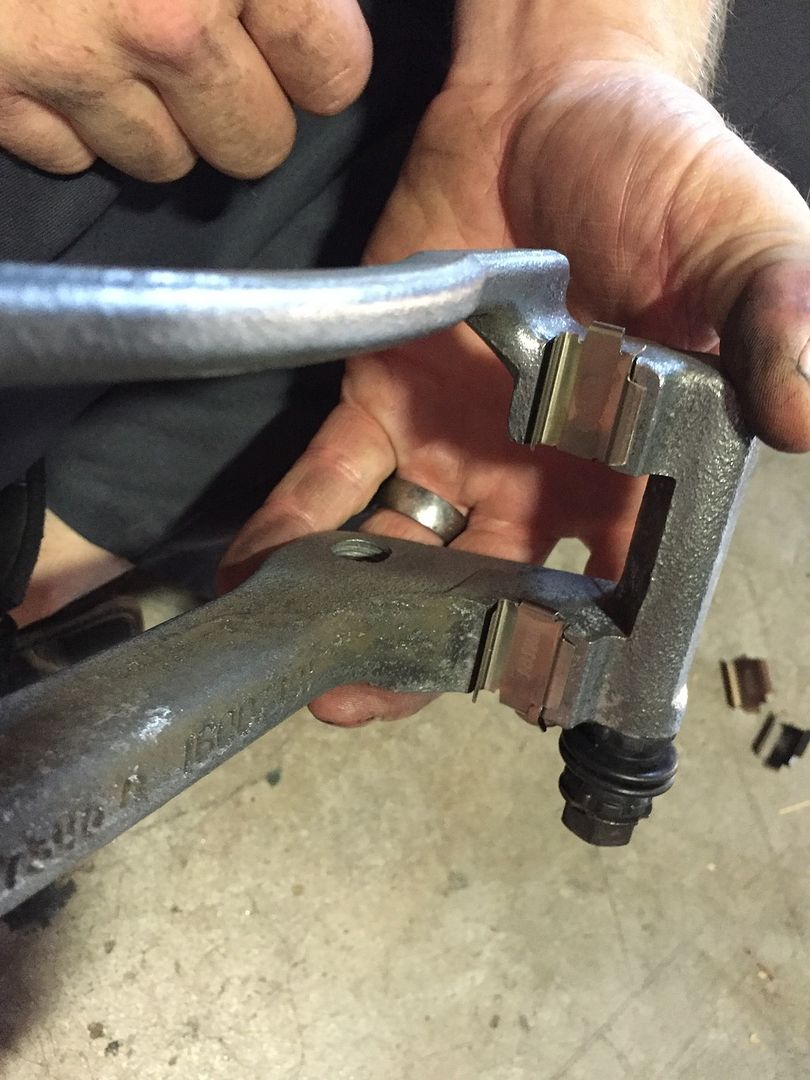
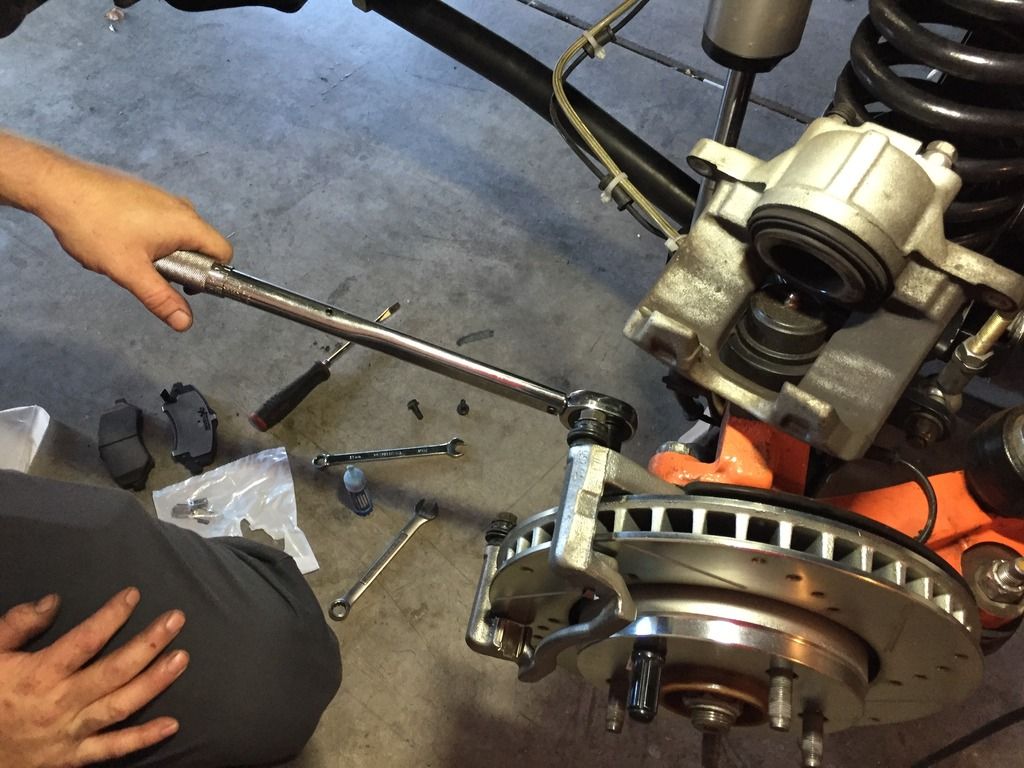
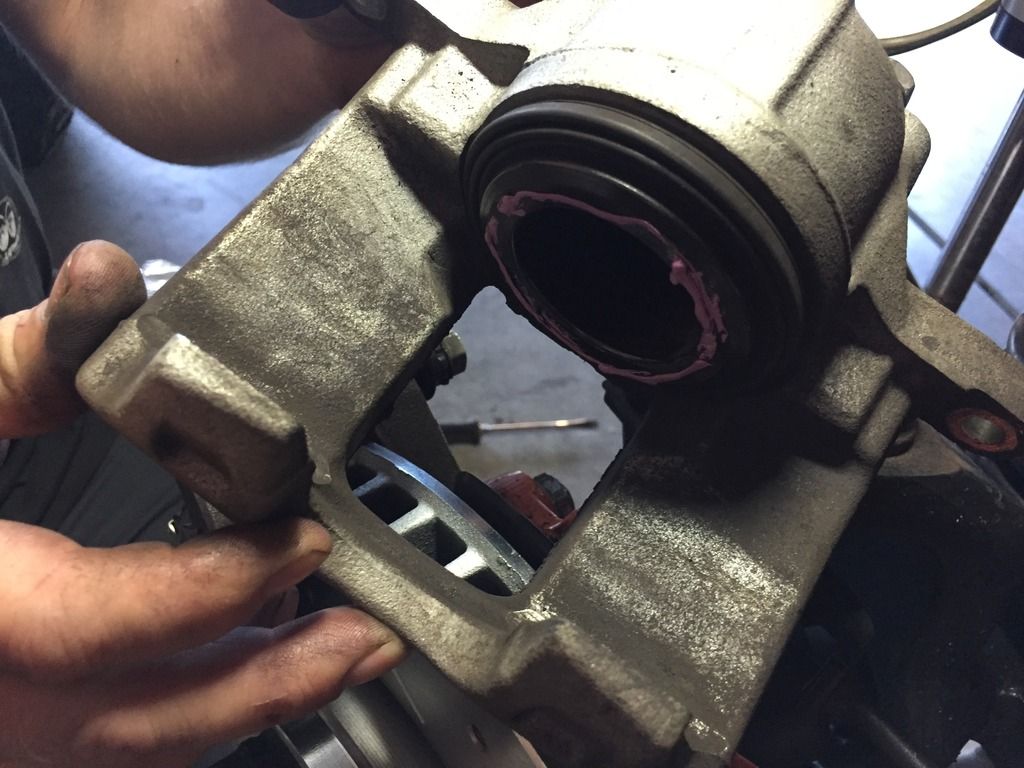
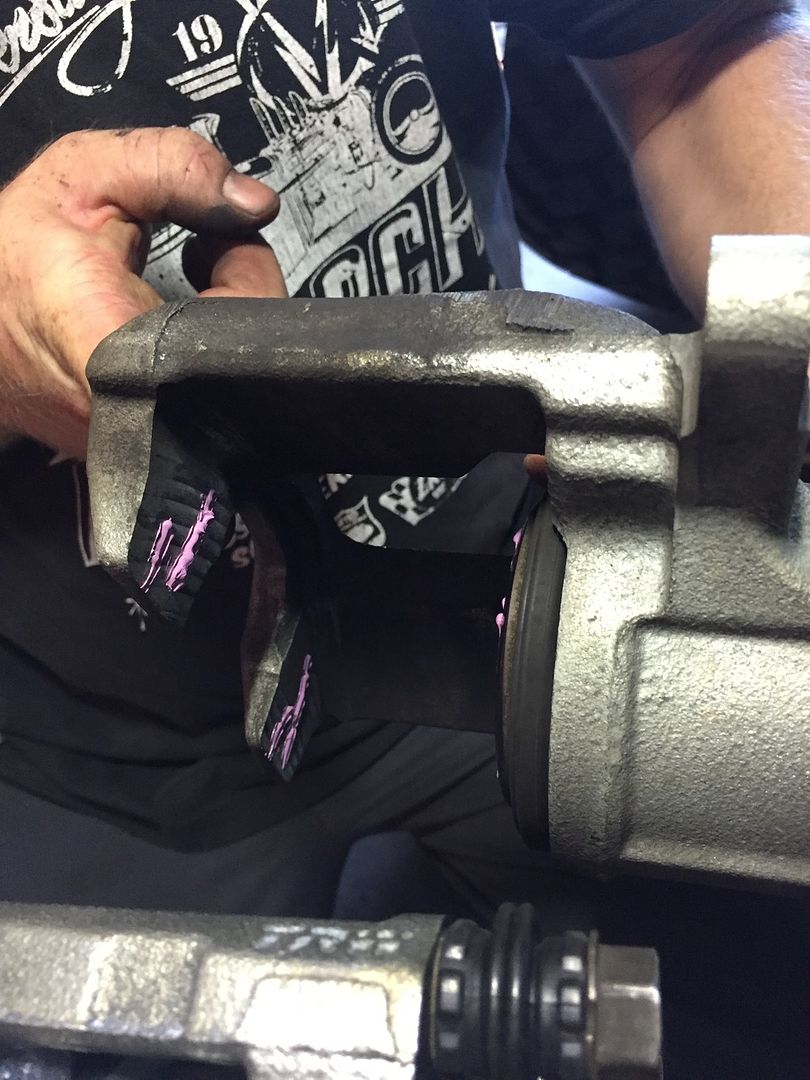
Prep Caliper Bracket
• Remove slide bolts, clean, install new boots clean regrease bolts with provided grease.
• Remove old brake hardware and install the new provided hardware as well. Flat lip of shims go up, and tongue clip goes towards outside.


Step 6
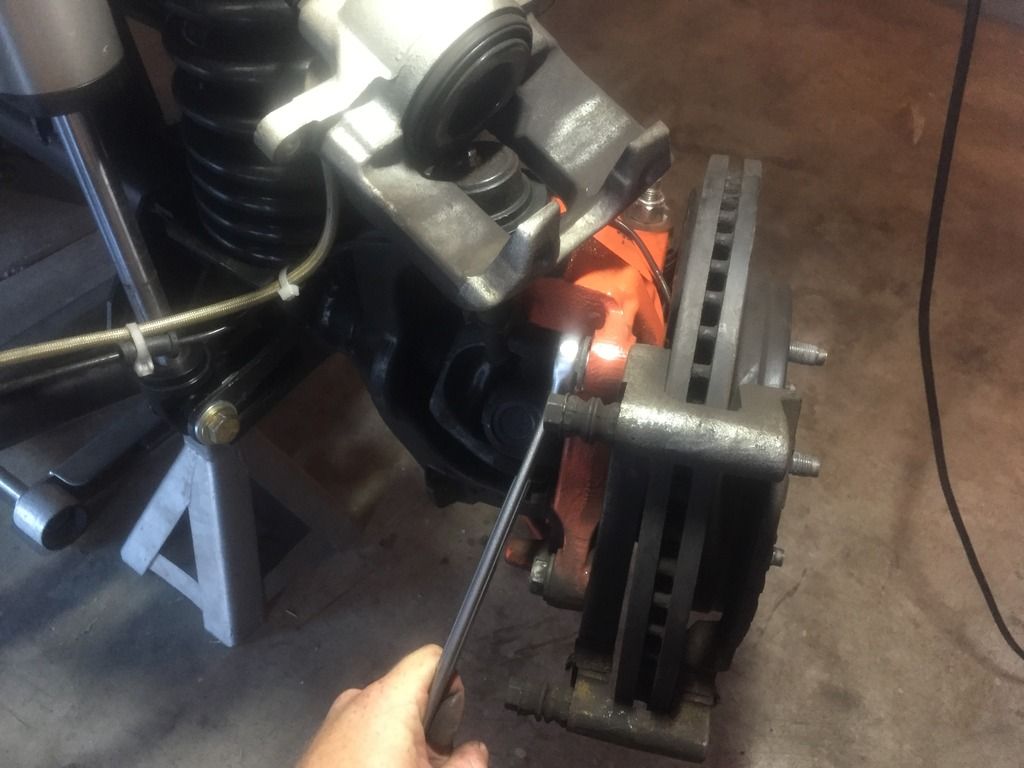
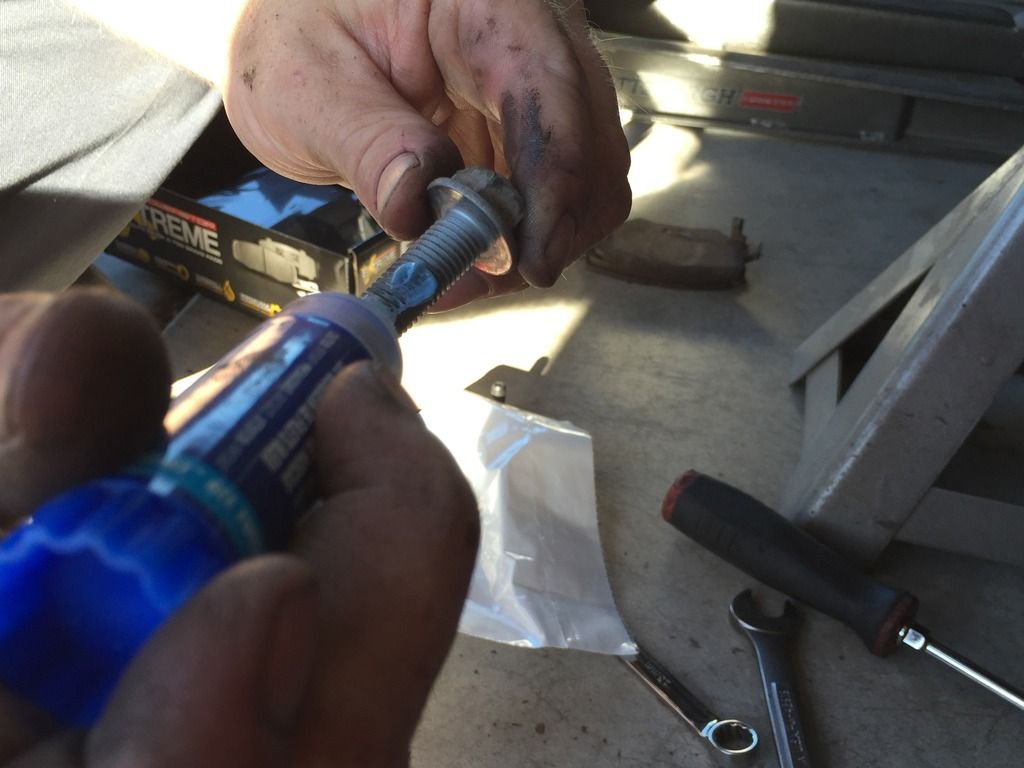
Install Caliper Bracket On To Rotor
• Put blue locktite on bolts.
• use 18 to tighten back down and torque to 120 ft.lb.
Step 7
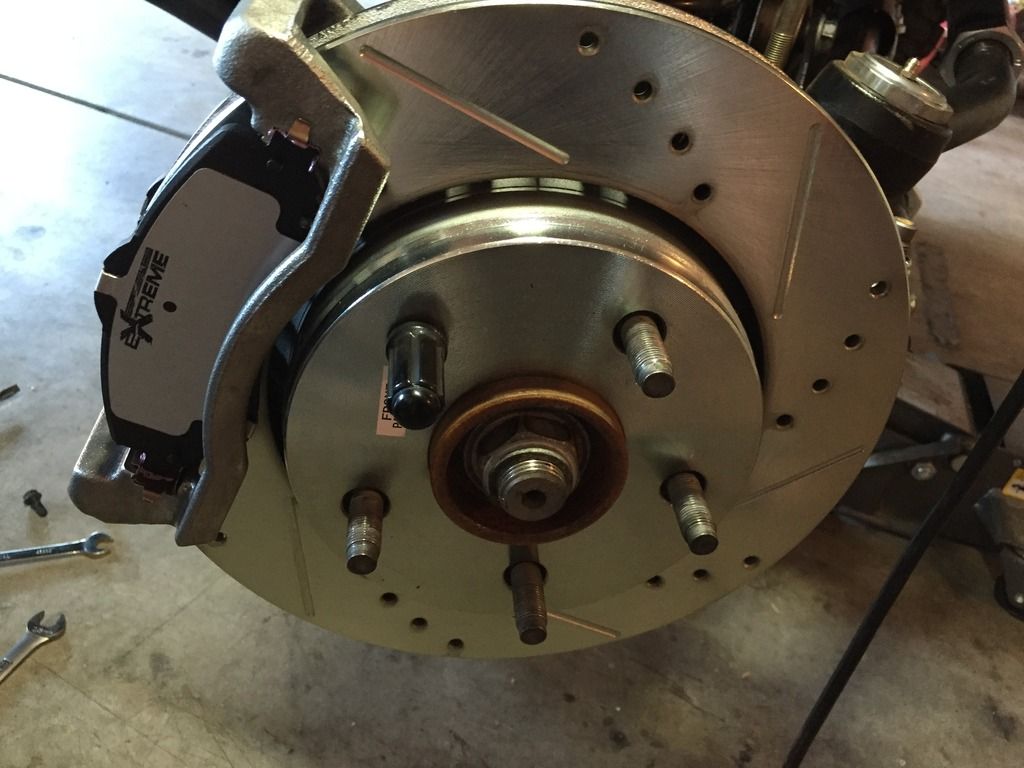
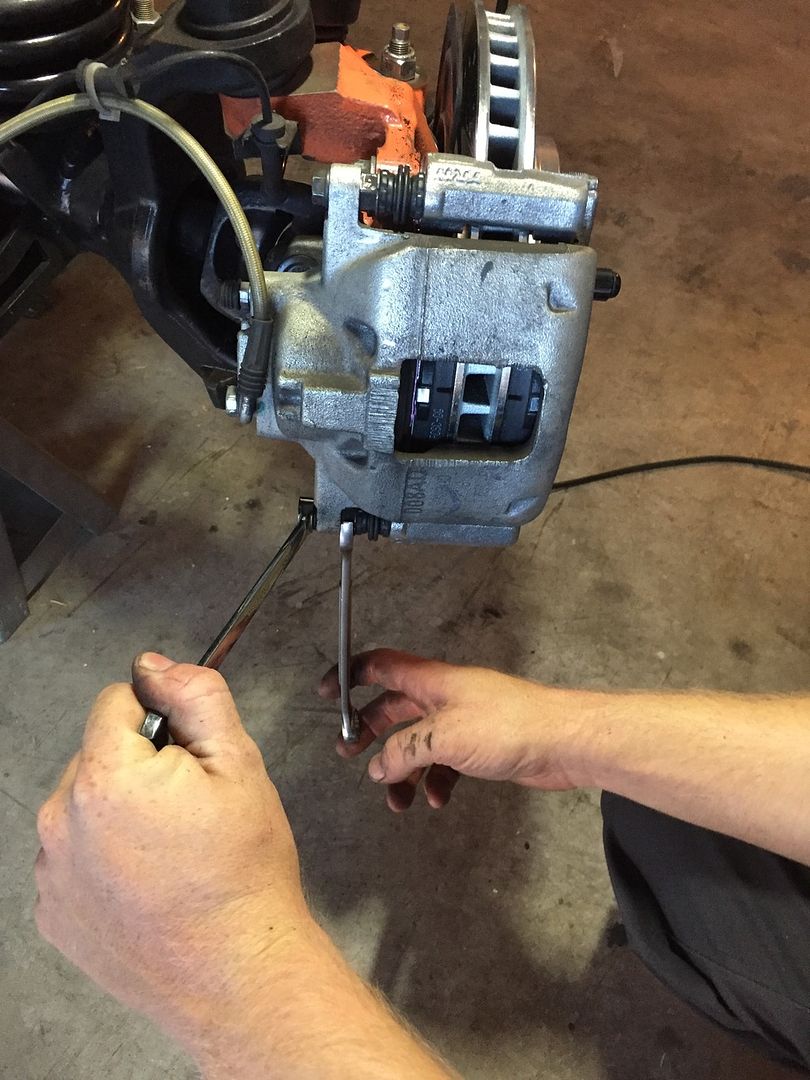
Install Power Stop Pads & Piston Caliper
• Use provided grease, and lubricate the 3 edges of pads on each side that will slide into shims.
• Install pads on each side of rotor.
• Wipe down piston caliper, and use provided grease to grease piston and inner caliper where it touches pad. (This will promote brake from having any noise issues.)
• Slide caliper over bracket and tighten slide bolts with 13mm and 15mm. Once tight, torque bolts to 26 ft.lb.
• Remove lug nut that was holding rotor in place, spray brake clean on rotor and wipe clean one last time.
Step 8
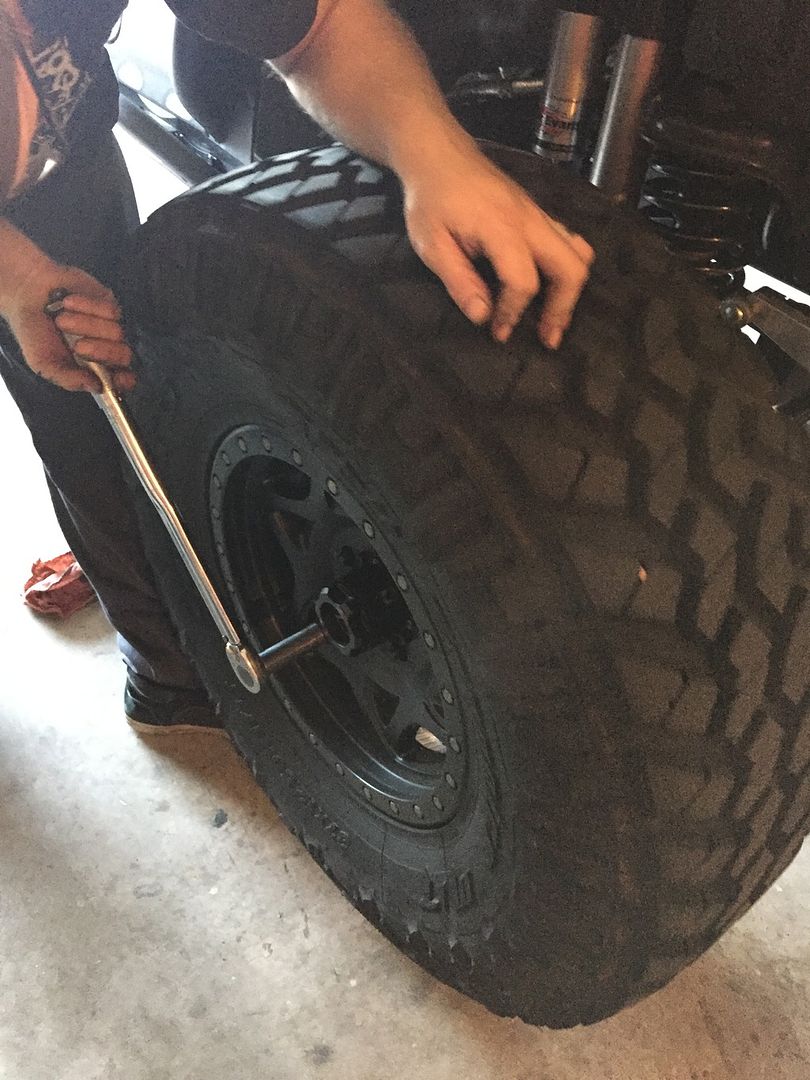
Install Front Wheel & Pump Brake
• Slide back on wheel and tighten down all lugs. (Don’t torque at this time.)
• Once wheel is reinstalled, open Jeep door and pump brake with hand or foot. That will reseed brake to caliper and reset pads.

Step 9-16
**REPEAT STEPS FOR OPPOSITE SIDE**
Step 17
Final Installation
• Remove jack stands and jack.
• Remove wheel blocks.
• Disengage emergency brake.
• Torque all 10 lugs in a cross pattern with 19/ � socket to 95-120 ft.lb. (personal preference)
CONGRATULATIONS!! Your new Power Stop Front Brake Kit is installed!
IMPORTANT BREAK IN PRODECURE
• 5 moderate to aggressive stops from 40 mph down to 10 mph in rapid succession without letting the brakes cool and do not come to a complete stop. If you're forced to stop, either shift into neutral or give room in front so you can allow the vehicle to roll slightly while waiting for the light. The rotors will be very hot and holding down the brake pedal will allow the pad to create an imprint on the rotor. This is where the judder can originate from.
• Then do 5 moderate stops from 35 mph to 5 mph in rapid succession without letting the brakes cool. You should expect to smell some resin as the brakes get hot.
• After this is complete, drive around for as long as possible without excessively heating the brakes and without coming to a complete stop (Try for about 5 minutes at moderate speed). This is the cooling stage. It allows the heated resin in the brake pads to cool and cure.
• After the brakes have cooled to standard operating temperature, you may use the brakes normally.
• For first 100 miles, avoid towing or hauling loads while the pad completes resin cure.
Thank you for taking the time to read over my write-up and install guide!
If you have any further questions for Power Stop, their Facebook page and website link are below.
https://www.facebook.com/powerstop
Power Stop | Extreme Performance Brake Systems
(Click hi-lited links)
If you have any questions for me, please PM me on forum, Facebook, or by email.
www.facebook.com/husker4x4
hskr4x4@gmail.com
Power Stop Z36 Truck & Tow Front Brake Kit
2014 Part Numbers & Pricing
Front: K3097-36 ($179.00)
Rear: K3090-36 ($176.00)
Front & Rear: K2798-36 ($356.00)
REAR WRITE-UP & INSTALL GUIDE LINK
https://www.jk-forum.com/forums/jk-w...3/#post4149906 (CLICK ON LINK)
October 2015 10 Year Anniversary $30 Rebate Offer
• Celebrate Power Stop?s 10-Yr Anniversary with a huge Sale! | Power Stop (CLICK ON LINK)
Company Information
Power Stop Extreme Performance brake rotors and pads were first introduced in California in 1995 as a problem solver for the toughest brake challenges. Power Stop is committed to providing the safest and most effective braking solutions for its customer’s at an affordable price.
Power Stop set the standard when it introduced its first performance brake kit, the 1-Click Brake kit in 2011. Power Stop offers a complete line of application specific brake kits that includes as applicable: performance brake rotors, disc brake pads, brake hardware, brake sensors and calipers.
The “1-Click Brake Kit,” has revolutionized the way consumers purchase their brake parts and take the stress and guesswork out of selecting the right pad and rotor combination while delivering maximum performance and reliability. Don’t just Stop – Power Stop!
Brake Kit Information & Specs
Power Stop 1-Click Extreme Truck & Tow Brake Kits offer superior stopping power that is demanded by those that Tow/Haul, as well as the off-road enthusiast. Any time you add weight to a vehicle by hauling a load, towing a trailer, or simply adding a larger wheel/tire combination, you change the operating conditions of your stock brake package. Those operating conditions may exceed the ability of the stock braking components. The Power Stop 1-Click Extreme Truck & Tow Brake Kits are specifically matched components designed to produce the brake torque that is needed due to the increase in wheel diameter or load. The Drilled & Slotted rotors will reduce the heat and the Z36 Extreme Truck & Tow brake pads will provide the extra stopping power to bring your hauler to a halt quickly.
Warranty Information
60 Day Hassle-Free Warranty on top of a 3 year/36k mile warranty on all Power Stop 1- Click Brake Kits.
IMPORTANT BREAK IN PRODECURE
• 5 moderate to aggressive stops from 40 mph down to 10 mph in rapid succession without letting the brakes cool and do not come to a complete stop. If you're forced to stop, either shift into neutral or give room in front so you can allow the vehicle to roll slightly while waiting for the light. The rotors will be very hot and holding down the brake pedal will allow the pad to create an imprint on the rotor. This is where the judder can originate from.
• Then do 5 mod�erate stops from 35 mph to 5 mph in rapid succession without letting the brakes cool. You should expect to smell some resin as the brakes get hot.
• After this is complete, drive around for as long as possible without excessively heating the brakes and without coming to a complete stop (Try for about 5 minutes at moderate speed). This is the cooling stage. It allows the heated resin in the brake pads to cool and cure.
• After the brakes have cooled to standard operating temperature, you may use the brakes normally.
• For first 100 miles, avoid towing or hauling loads while the pad completes resin cure.
What comes in Power Stop kit
Rotors
Pads
Premium Hardware
Pin Bushing Kit
High Temperature Lubricant
Front Brake Install Guide
Install Time
1-2 Hours
Tools Needed
Refreshment of your choice
Flat Head Screwdriver
C-Clamp
Jack
Jack Stands (2)
� or 3/8 Ratchet
Ratchet Extension
19 or � Socket
13mm Wrench or Socket
15mm Wrench
21mm Wrench or Socket
Plyers
Brake Clean
Rags
Locktite (Blue)
Blocks or Wheel Chalk
Step 1
Lift Front Of Jeep Off Ground
• Make sure you are parked on somewhat level ground. Pull emergency brake, and place one block in front of rear tire, and other in back of opposite rear tire.
• Take 19mm/ � Socket and loosen all 10 front lug nuts. (Don’t remove.)
• Take jack and place under pumpkin of housing. Jack to proper height and place one jack stand on each side of housing end under axle tubes.
Step 2
Remove One Wheel
• Leave other wheel on while during installation.
• Remove the 5 loosened lug nuts, and slide wheel off studs.
• Place wheel that was removed under frame of front door area.
Step 3
Remove Brake Caliper & Caliper Bracket
• Remove Rotor Retainers on studs if they are present. Use flat head or plyers to remove.
• Compress piston back with flat head screw driver with gentle force. By doing this, you will not have to bleed your brakes when finished.
• Loosen caliper slide bolts with 13mm & 15mm wrenches. Hold 15mm in place while loosening with 13mm.
• Move caliper up out of way and place bracket to the side. Make sure caliper it is sitting in safe spot or hanging with bungee and there is no stress on caliper brake lines.
• Remove caliper mount bolts with 21mm wrench/socket.
Step 4
Remove Rotor & Install New
• Slide rotor off now that caliper has been removed and out of way.
• Slide proper marked Power Brake rotor on, and screw on lug nut on to hold in place.
• Spray new rotor down with brake clean and wipe down.
Step 5
Prep Caliper Bracket
• Remove slide bolts, clean, install new boots clean regrease bolts with provided grease.
• Remove old brake hardware and install the new provided hardware as well. Flat lip of shims go up, and tongue clip goes towards outside.
Step 6
Install Caliper Bracket On To Rotor
• Put blue locktite on bolts.
• use 18 to tighten back down and torque to 120 ft.lb.
Step 7
Install Power Stop Pads & Piston Caliper
• Use provided grease, and lubricate the 3 edges of pads on each side that will slide into shims.
• Install pads on each side of rotor.
• Wipe down piston caliper, and use provided grease to grease piston and inner caliper where it touches pad. (This will promote brake from having any noise issues.)
• Slide caliper over bracket and tighten slide bolts with 13mm and 15mm. Once tight, torque bolts to 26 ft.lb.
• Remove lug nut that was holding rotor in place, spray brake clean on rotor and wipe clean one last time.
Step 8
Install Front Wheel & Pump Brake
• Slide back on wheel and tighten down all lugs. (Don’t torque at this time.)
• Once wheel is reinstalled, open Jeep door and pump brake with hand or foot. That will reseed brake to caliper and reset pads.
Step 9-16
**REPEAT STEPS FOR OPPOSITE SIDE**
Step 17
Final Installation
• Remove jack stands and jack.
• Remove wheel blocks.
• Disengage emergency brake.
• Torque all 10 lugs in a cross pattern with 19/ � socket to 95-120 ft.lb. (personal preference)
CONGRATULATIONS!! Your new Power Stop Front Brake Kit is installed!
IMPORTANT BREAK IN PRODECURE
• 5 moderate to aggressive stops from 40 mph down to 10 mph in rapid succession without letting the brakes cool and do not come to a complete stop. If you're forced to stop, either shift into neutral or give room in front so you can allow the vehicle to roll slightly while waiting for the light. The rotors will be very hot and holding down the brake pedal will allow the pad to create an imprint on the rotor. This is where the judder can originate from.
• Then do 5 moderate stops from 35 mph to 5 mph in rapid succession without letting the brakes cool. You should expect to smell some resin as the brakes get hot.
• After this is complete, drive around for as long as possible without excessively heating the brakes and without coming to a complete stop (Try for about 5 minutes at moderate speed). This is the cooling stage. It allows the heated resin in the brake pads to cool and cure.
• After the brakes have cooled to standard operating temperature, you may use the brakes normally.
• For first 100 miles, avoid towing or hauling loads while the pad completes resin cure.
Thank you for taking the time to read over my write-up and install guide!
If you have any further questions for Power Stop, their Facebook page and website link are below.
https://www.facebook.com/powerstop
Power Stop | Extreme Performance Brake Systems
(Click hi-lited links)
If you have any questions for me, please PM me on forum, Facebook, or by email.
www.facebook.com/husker4x4
hskr4x4@gmail.com
Last edited by Hskr4x4; 10-07-2015 at 11:30 PM.
 10-08-2015, 12:11 PM
#3
Super Moderator

It looks like your new rotors have significantly less material- are they simply designed to wear better? What rotors did you pull off??
Thank you for the pictures!
Thank you for the pictures!
10-08-2015, 12:30 PM
#4
JK Junkie
Thread Starter
01-05-2016, 04:14 AM
#7
JK Junkie
I sent a note to Teraflex via their web site. We need measured testing results on the various brake upgrades! I want to upgrade for safety but need proof of results and ROI. These ain't cheap upgrades.
EDIT: found a bunch of stuff with a few clicks, including this: https://www.youtube.com/watch?v=EkXMsHpUQ-Y 172' vs 132' is HUGE
I guess I have to plan my upgrades now, including new 17" trail wheels as my 15's won't do it!
EDIT: found a bunch of stuff with a few clicks, including this: https://www.youtube.com/watch?v=EkXMsHpUQ-Y 172' vs 132' is HUGE
I guess I have to plan my upgrades now, including new 17" trail wheels as my 15's won't do it!
Last edited by adamisadam; 01-05-2016 at 04:45 AM.
Trending Topics
05-29-2016, 04:07 PM
#8
JK Newbie

Join Date: Oct 2012
Location: Yuma AZ
Posts: 18
Likes: 0
Received 0 Likes
on
0 Posts
I just installed Powerstop front brake kit following the above instructions. Now my brake pedal goes to the floor when I stop. I tried bleeding them but this didn't help. I'm wondering if pushing the piston back without opening the bleed screw may have damaged something.
any ideas?
any ideas?

