Rear Pinch Seam / Rubicon Rail End Cap Trim
 11-20-2010, 09:42 PM
#1
JK Enthusiast
Thread Starter
Join Date: Nov 2006
Location: San Antonio TX
Posts: 232
Likes: 0
Received 0 Likes
on
0 Posts
Colleagues,
Here's a quick overview for trimming your rear pinch seams and OEM rubi rails to get a better fit for 35+ tires. The problem with the stock pinch seams are the straight 90 degree angles that interfere with 35+ tires (when air downed) during upward articulation travel.
Everyone knows what the stock pinch seam looks like so I'll spare you that photo.

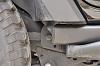
Above is shown the trimmed pinch seam. You could have it done professionally or do it yourself. There are two schools of thought--trim with snips, cutting wheel, etc. or use the big f%cking hammer technique and beat the corner over. I choose the former and specifically used a die grinder with a cutting wheel. I had great success as the cutting wheel makes a clean cut and is easy to follow with painter's tape as your guide.

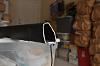
Above shows how I filled the gap w/ aerosol insulation foam (comes in a red can from any home improvement store) and then sprayed a touch of line x (you could use any coating).
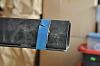
Above shows a good example of using painter's tape as your cutting guide--set 2" all around from the edge. Its easy to do if you use a small grinder with a steady hand. Start a groove all around the tape line and then finish the job as the cutting disc will naturally stay in the channel.
Above shows the finished cut. Grind off the sharp edges, drill the hole for the body panel tab insert, and its ready for paint.
Re-install the rubi rails and you're ready for bigger meats...
Here's a quick overview for trimming your rear pinch seams and OEM rubi rails to get a better fit for 35+ tires. The problem with the stock pinch seams are the straight 90 degree angles that interfere with 35+ tires (when air downed) during upward articulation travel.
Everyone knows what the stock pinch seam looks like so I'll spare you that photo.
Above is shown the trimmed pinch seam. You could have it done professionally or do it yourself. There are two schools of thought--trim with snips, cutting wheel, etc. or use the big f%cking hammer technique and beat the corner over. I choose the former and specifically used a die grinder with a cutting wheel. I had great success as the cutting wheel makes a clean cut and is easy to follow with painter's tape as your guide.
Above shows how I filled the gap w/ aerosol insulation foam (comes in a red can from any home improvement store) and then sprayed a touch of line x (you could use any coating).
Above shows a good example of using painter's tape as your cutting guide--set 2" all around from the edge. Its easy to do if you use a small grinder with a steady hand. Start a groove all around the tape line and then finish the job as the cutting disc will naturally stay in the channel.
Above shows the finished cut. Grind off the sharp edges, drill the hole for the body panel tab insert, and its ready for paint.
Re-install the rubi rails and you're ready for bigger meats...
Last edited by jeeperaf; 11-24-2010 at 05:18 PM.


 12-02-2010, 12:34 PM
#7
JK Enthusiast
Trending Topics
12-03-2010, 10:10 AM
#9
JK Enthusiast
I just used a Hack saw blade..It worked great..Then I filed the edges smooth and then sprayed the job up with some clear Krylon paint..I did this last year..Its still looks like the day I did it...