Reds fender trim with detailed pics and video!!!!!!!!!!!!!!!!!!!!!!!!!!!!!!!
 09-30-2014, 08:50 PM
#731
JK Enthusiast
Join Date: Sep 2013
Location: Roseburg, Oregon
Posts: 138
Likes: 0
Received 0 Likes
on
0 Posts
I read them ALL. Yeah it took me a few days but I did it. I read every post in this thread.
What I was looking for I never did find.
Has anyone left the side marker light in its original location on the fender and cut around it?
I have looked at literally hundreds of FLEX shots, it does not look like a 35" tire will hit the area around the marker light.
So here is my dilemma,
2013 JKUR with a AEV 2" BB, Just put on BFG KM2 35- 12.50-17s Disconnected the sway bar and tried to take it up a rock just to see if it would rub. Oh Yeah! It rubbed hard on full stuff.
This is what I am thinking of doing.
I have several reasons to cut these fenders rather that go with a bigger lift;
1. Wife just had major back surgery and has a very hard time getting up into it now.
2. The cost of going over 3 inches with the driveshaft swap and all just kinda takes a chunk out of the ole butt.
3. The increase of center of gravity is something I really wish to avoid after having a CJ5 on 35s I learned my lesson.
4. Looked at both Bushwacker and Xenon flat fenders but are you freaking kidding me 600 + for a dang chunk of plastic and you have to cut and fit your inner liners as well.
No Red has us on the right direction in my book.
So what about it guys, can the side marker light be left on without contacting the tire, during disconnected stuffing. (I know sounds kind of funny huh? )
)
Thanks for any replies.
What I was looking for I never did find.
Has anyone left the side marker light in its original location on the fender and cut around it?
I have looked at literally hundreds of FLEX shots, it does not look like a 35" tire will hit the area around the marker light.
So here is my dilemma,
2013 JKUR with a AEV 2" BB, Just put on BFG KM2 35- 12.50-17s Disconnected the sway bar and tried to take it up a rock just to see if it would rub. Oh Yeah! It rubbed hard on full stuff.
This is what I am thinking of doing.
I have several reasons to cut these fenders rather that go with a bigger lift;
1. Wife just had major back surgery and has a very hard time getting up into it now.
2. The cost of going over 3 inches with the driveshaft swap and all just kinda takes a chunk out of the ole butt.
3. The increase of center of gravity is something I really wish to avoid after having a CJ5 on 35s I learned my lesson.
4. Looked at both Bushwacker and Xenon flat fenders but are you freaking kidding me 600 + for a dang chunk of plastic and you have to cut and fit your inner liners as well.
No Red has us on the right direction in my book.
So what about it guys, can the side marker light be left on without contacting the tire, during disconnected stuffing. (I know sounds kind of funny huh?
)Thanks for any replies.
 10-05-2014, 05:41 AM
#732
JK Newbie

Join Date: Mar 2014
Location: LDF, Wisconsin
Posts: 87
Likes: 0
Received 0 Likes
on
0 Posts
I read them ALL. Yeah it took me a few days but I did it. I read every post in this thread.
What I was looking for I never did find.
Has anyone left the side marker light in its original location on the fender and cut around it?
I have looked at literally hundreds of FLEX shots, it does not look like a 35" tire will hit the area around the marker light.
So here is my dilemma,
2013 JKUR with a AEV 2" BB, Just put on BFG KM2 35- 12.50-17s Disconnected the sway bar and tried to take it up a rock just to see if it would rub. Oh Yeah! It rubbed hard on full stuff.
<img src="https://www.jk-forum.com/forums/attachment.php?attachmentid=577947"/> <img src="https://www.jk-forum.com/forums/attachment.php?attachmentid=577948"/>
This is what I am thinking of doing.<img src="https://www.jk-forum.com/forums/attachment.php?attachmentid=577949"/>
I have several reasons to cut these fenders rather that go with a bigger lift;
1. Wife just had major back surgery and has a very hard time getting up into it now.
2. The cost of going over 3 inches with the driveshaft swap and all just kinda takes a chunk out of the ole butt.
3. The increase of center of gravity is something I really wish to avoid after having a CJ5 on 35s I learned my lesson.
4. Looked at both Bushwacker and Xenon flat fenders but are you freaking kidding me 600 + for a dang chunk of plastic and you have to cut and fit your inner liners as well.
No Red has us on the right direction in my book.
So what about it guys, can the side marker light be left on without contacting the tire, during disconnected stuffing. (I know sounds kind of funny huh?)
Thanks for any replies.
What I was looking for I never did find.
Has anyone left the side marker light in its original location on the fender and cut around it?
I have looked at literally hundreds of FLEX shots, it does not look like a 35" tire will hit the area around the marker light.
So here is my dilemma,
2013 JKUR with a AEV 2" BB, Just put on BFG KM2 35- 12.50-17s Disconnected the sway bar and tried to take it up a rock just to see if it would rub. Oh Yeah! It rubbed hard on full stuff.
<img src="https://www.jk-forum.com/forums/attachment.php?attachmentid=577947"/> <img src="https://www.jk-forum.com/forums/attachment.php?attachmentid=577948"/>
This is what I am thinking of doing.<img src="https://www.jk-forum.com/forums/attachment.php?attachmentid=577949"/>
I have several reasons to cut these fenders rather that go with a bigger lift;
1. Wife just had major back surgery and has a very hard time getting up into it now.
2. The cost of going over 3 inches with the driveshaft swap and all just kinda takes a chunk out of the ole butt.
3. The increase of center of gravity is something I really wish to avoid after having a CJ5 on 35s I learned my lesson.
4. Looked at both Bushwacker and Xenon flat fenders but are you freaking kidding me 600 + for a dang chunk of plastic and you have to cut and fit your inner liners as well.
No Red has us on the right direction in my book.
So what about it guys, can the side marker light be left on without contacting the tire, during disconnected stuffing. (I know sounds kind of funny huh?
)Thanks for any replies.
10-05-2014, 07:17 PM
#733
JK Enthusiast
Join Date: Sep 2013
Location: Roseburg, Oregon
Posts: 138
Likes: 0
Received 0 Likes
on
0 Posts
okay I did it.
Fenders were left on the vehicle. Outlined with a dry erase marker then back taped for a good line.
I used a Dremel with the wood cutting blade.
If you wound it up, it worked real good. Dremel did get a bit hot and I had to blow compressed air through it once in a while to cool it down.
I left a lot of the radius on as I wanted strength.
The fender edge was then sanded down with a sanding block covered with 60 grit. I doubled up and free formed the radius where the strait lines transitioned.
Used .90 2 inch wide AL. to make a little bracket on the trailing edge of the fronts and both end of the rear fenders to kind of stop the wiggle they had. Bracket was screwed to the body tub and an adhesive was used onto the fender.
Really took my time sanding and for the most part it came out pretty nice. (I am VERY picky) I will not be using the door edge stuff as I am worried about it not sticking and I really don't need to right now.
I trimmed the liner a bit and then reused a lot of it. It can be cut very easily with a sharp utility blade then formed if you warm it a bit with a propane torch turned down very low. Just keep your distance and keep it moving. All I did was warm the spot I wanted to bend, bent it and held it with a wet rag. A spray bottle with water also worked in a few tight places. This allowed me to bend it and form it to fit tight behind the wheel.
Cleaned everything real good, Primed and then used Rustoleum bedliner under the rears and the back of the fronts to kind of clean it up a bit.
Note to those with painted fenders; I had absolutely NO paint chipping using this method. Just take your time and let the Dremel eat the material slowly. It will make little blobs of melted plastic and they can be cut with a razor knife easily or most I just pulled off or kind of broke off.
First time out of the garage, I drove to the bank and was waiting for it to open when a dumb ass woman pulled in real fast next to me, did not leave herself enough room to get out and then proceeded to smack her door into one of the rear fenders. After I told her what I thought of her and her mother, I checked and it did not do any damage.
I am happy with the results and until I can justify going all out for extended width flat steel fenders painted body color, these with work fine.
More photos coming later. Thanks everybody.
Fenders were left on the vehicle. Outlined with a dry erase marker then back taped for a good line.
I used a Dremel with the wood cutting blade.
If you wound it up, it worked real good. Dremel did get a bit hot and I had to blow compressed air through it once in a while to cool it down.
I left a lot of the radius on as I wanted strength.
The fender edge was then sanded down with a sanding block covered with 60 grit. I doubled up and free formed the radius where the strait lines transitioned.
Used .90 2 inch wide AL. to make a little bracket on the trailing edge of the fronts and both end of the rear fenders to kind of stop the wiggle they had. Bracket was screwed to the body tub and an adhesive was used onto the fender.
Really took my time sanding and for the most part it came out pretty nice. (I am VERY picky) I will not be using the door edge stuff as I am worried about it not sticking and I really don't need to right now.
I trimmed the liner a bit and then reused a lot of it. It can be cut very easily with a sharp utility blade then formed if you warm it a bit with a propane torch turned down very low. Just keep your distance and keep it moving. All I did was warm the spot I wanted to bend, bent it and held it with a wet rag. A spray bottle with water also worked in a few tight places. This allowed me to bend it and form it to fit tight behind the wheel.
Cleaned everything real good, Primed and then used Rustoleum bedliner under the rears and the back of the fronts to kind of clean it up a bit.
Note to those with painted fenders; I had absolutely NO paint chipping using this method. Just take your time and let the Dremel eat the material slowly. It will make little blobs of melted plastic and they can be cut with a razor knife easily or most I just pulled off or kind of broke off.
First time out of the garage, I drove to the bank and was waiting for it to open when a dumb ass woman pulled in real fast next to me, did not leave herself enough room to get out and then proceeded to smack her door into one of the rear fenders. After I told her what I thought of her and her mother,
I checked and it did not do any damage.I am happy with the results and until I can justify going all out for extended width flat steel fenders painted body color, these with work fine.
More photos coming later. Thanks everybody.
01-04-2015, 01:46 PM
#734
JK Newbie

Join Date: Jan 2012
Location: Columbia, SC
Posts: 20
Likes: 0
Received 0 Likes
on
0 Posts
I'm thinking about cutting mine...but damn you guys...some of your fenders look like dog sh*t lol What's with the pointy looking ones...round them out a bit more so they flow with the jeep. 
01-05-2015, 08:01 AM
#735
JK Newbie

Join Date: Feb 2014
Location: Miami, FL
Posts: 25
Likes: 0
Received 0 Likes
on
0 Posts
okay I did it. Fenders were left on the vehicle. Outlined with a dry erase marker then back taped for a good line. I used a Dremel with the wood cutting blade. <img src="https://www.jk-forum.com/forums/attachment.php?attachmentid=578698"/> If you wound it up, it worked real good. Dremel did get a bit hot and I had to blow compressed air through it once in a while to cool it down. I left a lot of the radius on as I wanted strength. The fender edge was then sanded down with a sanding block covered with 60 grit. I doubled up and free formed the radius where the strait lines transitioned. Used .90 2 inch wide AL. to make a little bracket on the trailing edge of the fronts and both end of the rear fenders to kind of stop the wiggle they had. Bracket was screwed to the body tub and an adhesive was used onto the fender. Really took my time sanding and for the most part it came out pretty nice. (I am VERY picky) I will not be using the door edge stuff as I am worried about it not sticking and I really don't need to right now. I trimmed the liner a bit and then reused a lot of it. It can be cut very easily with a sharp utility blade then formed if you warm it a bit with a propane torch turned down very low. Just keep your distance and keep it moving. All I did was warm the spot I wanted to bend, bent it and held it with a wet rag. A spray bottle with water also worked in a few tight places. This allowed me to bend it and form it to fit tight behind the wheel. Cleaned everything real good, Primed and then used Rustoleum bedliner under the rears and the back of the fronts to kind of clean it up a bit. Note to those with painted fenders; I had absolutely NO paint chipping using this method. Just take your time and let the Dremel eat the material slowly. It will make little blobs of melted plastic and they can be cut with a razor knife easily or most I just pulled off or kind of broke off. First time out of the garage, I drove to the bank and was waiting for it to open when a dumb ass woman pulled in real fast next to me, did not leave herself enough room to get out and then proceeded to smack her door into one of the rear fenders. After I told her what I thought of her and her mother, I checked and it did not do any damage. I am happy with the results and until I can justify going all out for extended width flat steel fenders painted body color, these with work fine. More photos coming later. Thanks everybody. <img src="https://www.jk-forum.com/forums/attachment.php?attachmentid=578695"/>
I checked and it did not do any damage. I am happy with the results and until I can justify going all out for extended width flat steel fenders painted body color, these with work fine. More photos coming later. Thanks everybody. <img src="https://www.jk-forum.com/forums/attachment.php?attachmentid=578695"/>Very clean.
01-19-2015, 11:53 PM
#736
JK Newbie

Join Date: Jan 2014
Location: Marysville WA
Posts: 89
Likes: 0
Received 0 Likes
on
0 Posts
okay I did it.
Fenders were left on the vehicle. Outlined with a dry erase marker then back taped for a good line.
I used a Dremel with the wood cutting blade. Attachment 578698
If you wound it up, it worked real good. Dremel did get a bit hot and I had to blow compressed air through it once in a while to cool it down.
I left a lot of the radius on as I wanted strength.
The fender edge was then sanded down with a sanding block covered with 60 grit. I doubled up and free formed the radius where the strait lines transitioned.
Used .90 2 inch wide AL. to make a little bracket on the trailing edge of the fronts and both end of the rear fenders to kind of stop the wiggle they had. Bracket was screwed to the body tub and an adhesive was used onto the fender.
Really took my time sanding and for the most part it came out pretty nice. (I am VERY picky) I will not be using the door edge stuff as I am worried about it not sticking and I really don't need to right now.
I trimmed the liner a bit and then reused a lot of it. It can be cut very easily with a sharp utility blade then formed if you warm it a bit with a propane torch turned down very low. Just keep your distance and keep it moving. All I did was warm the spot I wanted to bend, bent it and held it with a wet rag. A spray bottle with water also worked in a few tight places. This allowed me to bend it and form it to fit tight behind the wheel.
Cleaned everything real good, Primed and then used Rustoleum bedliner under the rears and the back of the fronts to kind of clean it up a bit.
Note to those with painted fenders; I had absolutely NO paint chipping using this method. Just take your time and let the Dremel eat the material slowly. It will make little blobs of melted plastic and they can be cut with a razor knife easily or most I just pulled off or kind of broke off.
First time out of the garage, I drove to the bank and was waiting for it to open when a dumb ass woman pulled in real fast next to me, did not leave herself enough room to get out and then proceeded to smack her door into one of the rear fenders. After I told her what I thought of her and her mother, I checked and it did not do any damage.
I am happy with the results and until I can justify going all out for extended width flat steel fenders painted body color, these with work fine.
More photos coming later. Thanks everybody.
Attachment 578695
Fenders were left on the vehicle. Outlined with a dry erase marker then back taped for a good line.
I used a Dremel with the wood cutting blade. Attachment 578698
If you wound it up, it worked real good. Dremel did get a bit hot and I had to blow compressed air through it once in a while to cool it down.
I left a lot of the radius on as I wanted strength.
The fender edge was then sanded down with a sanding block covered with 60 grit. I doubled up and free formed the radius where the strait lines transitioned.
Used .90 2 inch wide AL. to make a little bracket on the trailing edge of the fronts and both end of the rear fenders to kind of stop the wiggle they had. Bracket was screwed to the body tub and an adhesive was used onto the fender.
Really took my time sanding and for the most part it came out pretty nice. (I am VERY picky) I will not be using the door edge stuff as I am worried about it not sticking and I really don't need to right now.
I trimmed the liner a bit and then reused a lot of it. It can be cut very easily with a sharp utility blade then formed if you warm it a bit with a propane torch turned down very low. Just keep your distance and keep it moving. All I did was warm the spot I wanted to bend, bent it and held it with a wet rag. A spray bottle with water also worked in a few tight places. This allowed me to bend it and form it to fit tight behind the wheel.
Cleaned everything real good, Primed and then used Rustoleum bedliner under the rears and the back of the fronts to kind of clean it up a bit.
Note to those with painted fenders; I had absolutely NO paint chipping using this method. Just take your time and let the Dremel eat the material slowly. It will make little blobs of melted plastic and they can be cut with a razor knife easily or most I just pulled off or kind of broke off.
First time out of the garage, I drove to the bank and was waiting for it to open when a dumb ass woman pulled in real fast next to me, did not leave herself enough room to get out and then proceeded to smack her door into one of the rear fenders. After I told her what I thought of her and her mother,
I checked and it did not do any damage.I am happy with the results and until I can justify going all out for extended width flat steel fenders painted body color, these with work fine.
More photos coming later. Thanks everybody.
Attachment 578695
I would like to see more pics of the trim job you did. Looks real nice from the one pic you posted.
01-20-2015, 05:48 PM
#737
JK Enthusiast
Join Date: Sep 2013
Location: Roseburg, Oregon
Posts: 138
Likes: 0
Received 0 Likes
on
0 Posts
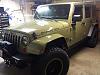
Thanks!
Here is about the best one I have got right now. Most others are variations of this.
I really need to quit working so much and get out more.
So whatever happened to Red? I must have missed something.