Replace starter 2007 3.8 liter
 07-07-2014, 09:54 AM
#1
JK Newbie
Thread Starter
Join Date: Feb 2012
Location: Roanoke, VA
Posts: 42
Likes: 0
Received 0 Likes
on
0 Posts
So, after searching through the forum, I wasn't able to find any detailed information to help me replace my starter. I am not a mechanic, but I am a DIY'er when I can, so for others like me, here goes my attempt to help you when you want to replace your own starter. This is specifically for a 2007 with the 3.8 liter.
Time: +/- 1 hour
Cost: about $100 with core return from local auto parts store
Tools: ratchet with 5/8, 1/2, and 15mm sockets, and a few different length extensions.
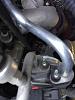
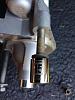
Step 1: Locate the starter! It is not in the most recognizable location and is hidden by a heat shield/sleeve, which makes it difficult to assess how difficult the job will be. I did all of the work from below...too far down to reach from the top of engine.
View from top driver side of engine
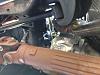
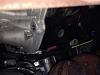
View from bottom driver side directly above front driveshaft.
Step 2: Disconnect the battery to avoid accidental shorting/arcing/grounding while removing the starter.
Step 3: Remove the plastic retainer pin for the heat shield from the center mounting point on starter. The starter has 3 mounting points, but only the top and bottom points are used to mount the starter. The middle simply has the plastic pin to help hold the heat shield in place. It will most likely break from age, so be ready to buy a new one!
Step 4: Using the 5/8 socket, remove the bottom bolt (it is a super tight fit with the ratchet and a super long bolt, so be prepared to spend some time here, which is where I used a longer socket extension more distance on each rotation). The heat shield also attaches here with a clip washer and is easier to remove once this bolt is out.
Step 5: Using a 15mm socket, remover the top bolt (harder to see, but much shorter, so it comes out much quicker than the bottom).
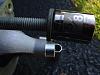
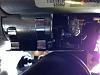
Step 6: Now that the starter is loose, you can more easily see/get to the two wires to disconnect. In my case the small yellow wire simply pulled off. The larger red power wire needed a 1/2 socket to remove the retaining nut.

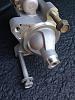
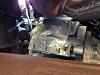
Step 7: Maneuver starter out of place and insert new starter. My new starter came with an additional metal heat shield, which made the original heat shield/sleeve tighter when putting back on.
Step 8: Thread and begin the top and bottom bolts back on. I left these loose to more easily, reattach the electrical wires.
Step 9: Reattach the two wires. The smaller one simply slide/clips back on and the larger power wire will need to be tightened back down with the 1/2 nut and socket.
Step 10: Continue tightening the top (15mm) and bottom (5/8) nuts (again, this will take some time due to limited space and as mentioned earlier, the socket extensions seemed to help out).
Step 11: Maneuver and slide the heat shield back into place, inserting the metal lock washer/ring onto the bottom bolt and the plastic pin into the middle bolt hole. Because of the additional small heat shield on my new starter, I couldn't get the original heat shield back quite as far to use the plastic pin, but felt the new heat shield was more protection.
Hopefully my experience will help any of you first timers!
Time: +/- 1 hour
Cost: about $100 with core return from local auto parts store
Tools: ratchet with 5/8, 1/2, and 15mm sockets, and a few different length extensions.
Step 1: Locate the starter! It is not in the most recognizable location and is hidden by a heat shield/sleeve, which makes it difficult to assess how difficult the job will be. I did all of the work from below...too far down to reach from the top of engine.
View from top driver side of engine
View from bottom driver side directly above front driveshaft.
Step 2: Disconnect the battery to avoid accidental shorting/arcing/grounding while removing the starter.
Step 3: Remove the plastic retainer pin for the heat shield from the center mounting point on starter. The starter has 3 mounting points, but only the top and bottom points are used to mount the starter. The middle simply has the plastic pin to help hold the heat shield in place. It will most likely break from age, so be ready to buy a new one!
Step 4: Using the 5/8 socket, remove the bottom bolt (it is a super tight fit with the ratchet and a super long bolt, so be prepared to spend some time here, which is where I used a longer socket extension more distance on each rotation). The heat shield also attaches here with a clip washer and is easier to remove once this bolt is out.
Step 5: Using a 15mm socket, remover the top bolt (harder to see, but much shorter, so it comes out much quicker than the bottom).
Step 6: Now that the starter is loose, you can more easily see/get to the two wires to disconnect. In my case the small yellow wire simply pulled off. The larger red power wire needed a 1/2 socket to remove the retaining nut.
Step 7: Maneuver starter out of place and insert new starter. My new starter came with an additional metal heat shield, which made the original heat shield/sleeve tighter when putting back on.
Step 8: Thread and begin the top and bottom bolts back on. I left these loose to more easily, reattach the electrical wires.
Step 9: Reattach the two wires. The smaller one simply slide/clips back on and the larger power wire will need to be tightened back down with the 1/2 nut and socket.
Step 10: Continue tightening the top (15mm) and bottom (5/8) nuts (again, this will take some time due to limited space and as mentioned earlier, the socket extensions seemed to help out).
Step 11: Maneuver and slide the heat shield back into place, inserting the metal lock washer/ring onto the bottom bolt and the plastic pin into the middle bolt hole. Because of the additional small heat shield on my new starter, I couldn't get the original heat shield back quite as far to use the plastic pin, but felt the new heat shield was more protection.
Hopefully my experience will help any of you first timers!
Last edited by jaybjeepn; 07-07-2014 at 10:14 AM.
 07-13-2014, 08:44 PM
#4
JK Freak

Join Date: Jul 2014
Location: Lake Metigoshe, North Dakota
Posts: 863
Likes: 0
Received 0 Likes
on
0 Posts

but ya anything below zero without a block heater is asking alot of a starter!
08-14-2014, 10:33 AM
#5
JK Enthusiast
Join Date: Jun 2011
Location: Springfield, Ohio
Posts: 136
Likes: 0
Received 0 Likes
on
0 Posts
My problem is more of a cold engine issue, not an ambient temperature issue. It has happened almost every morning for over a year. From below 0 to above 90.
08-27-2014, 05:38 PM
#7
JK Freak
Join Date: May 2011
Location: Pittsburgh, PA
Posts: 665
Likes: 0
Received 0 Likes
on
0 Posts