Rubicon rail / pinch seam chop/cut/trim
 08-29-2012, 03:07 PM
#1
JK Enthusiast
Thread Starter
Join Date: May 2011
Location: CALIFORNIA
Posts: 240
Likes: 0
Received 0 Likes
on
0 Posts
Well this week I painted the rings on my rims(sunday)...Then enjoyed it for a day until I got a flat(Monday) and was pissed. Then I said screw it and bought 37s same day.. Then yesterday I went offloading and the back tire rubs on the pinch seam/rubi rails.I knew I was going to need to cut/chop them but wanted to test it. I havent been able to find any write ups on the Internet about this process so I decided I would give it a go. Hope this helps somebody who is thinking of doing this or just curious how much work is involved. If nothing else I hope this thread is atleast entertaining lol Welp here we go!
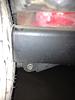
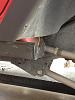
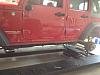
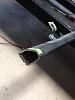
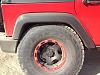
Went offroading last night and this is my back tire rubbing on the rubi rails/ pinch seam. Unfortunately this is the only "before" pic with the tire on that I have lol
So first I put my jeep on the lift in my dads shop (lucky enough to use because it makes any project easier)
Took the wheels off
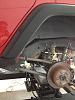
Before
What I'll be chopping
Tools needed to take the rails off.. 10mm ratchet wrench( a lot faster then normal wrench).. And 1/2 socket with extension ( didn't actually really need the extension). Also an air ratchet makes things way faster
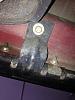
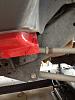
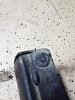
To take the rails off you will need to remove the main bolt and two nuts next to it. There are 3 of these total on each side
The other 2 you need to take off
Then remove the rail

These are the bolts that should be off when you remove the rail
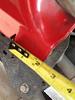
Measured 2in and made my line on a 45 (not exact) angle
My line
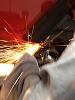
Then cut

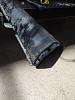
Now on to the rails. Put some masking tape on them and made a guideline to follow that is 2in from the end.
After the cut.
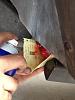
Now to take off the end cap you need to pop this little bolt/screw or whatever you want to call it. I used a flathead screwdriver to pry it up and then used needle nose pliers to get it out
Cap fit in perfectly
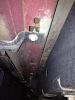
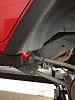
I then used some plasti dip (left over from painting my rings on my pro comp rims) from my other write up lol I used it to touch the pinch seam up.
Finished left side
Same side just showing the length taken off
Forgot to add this in earlier but these were the tools I used to cut / clean up the cut
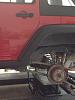
Left side done with tire on and tons of clearance. Imagine 2more of the rail lol it was almost touching just siting there

Right side done with tire on

Jeep all done
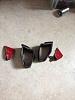
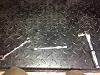
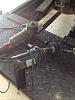
And this is all the material that was removed. Took about an hour and a half to 2 hours and now 37s clear just fine hope this helps someone!
Went offroading last night and this is my back tire rubbing on the rubi rails/ pinch seam. Unfortunately this is the only "before" pic with the tire on that I have lol
So first I put my jeep on the lift in my dads shop (lucky enough to use because it makes any project easier)
Took the wheels off
Before
What I'll be chopping
Tools needed to take the rails off.. 10mm ratchet wrench( a lot faster then normal wrench).. And 1/2 socket with extension ( didn't actually really need the extension). Also an air ratchet makes things way faster
To take the rails off you will need to remove the main bolt and two nuts next to it. There are 3 of these total on each side
The other 2 you need to take off
Then remove the rail
These are the bolts that should be off when you remove the rail
Measured 2in and made my line on a 45 (not exact) angle
My line
Then cut
Now on to the rails. Put some masking tape on them and made a guideline to follow that is 2in from the end.
After the cut.
Now to take off the end cap you need to pop this little bolt/screw or whatever you want to call it. I used a flathead screwdriver to pry it up and then used needle nose pliers to get it out
Cap fit in perfectly
I then used some plasti dip (left over from painting my rings on my pro comp rims) from my other write up lol I used it to touch the pinch seam up.
Finished left side
Same side just showing the length taken off
Forgot to add this in earlier but these were the tools I used to cut / clean up the cut
Left side done with tire on and tons of clearance. Imagine 2more of the rail lol it was almost touching just siting there
Right side done with tire on
Jeep all done
And this is all the material that was removed. Took about an hour and a half to 2 hours and now 37s clear just fine
hope this helps someone!
 08-29-2012, 04:50 PM
#3
JK Enthusiast
Thread Starter
Join Date: May 2011
Location: CALIFORNIA
Posts: 240
Likes: 0
Received 0 Likes
on
0 Posts
Originally Posted by abearsfan
Great write up, I may be doing it soon as it helps to see the removed material...
Thanks
Thanks
08-29-2012, 04:54 PM
#4
JK Enthusiast
Thread Starter
Join Date: May 2011
Location: CALIFORNIA
Posts: 240
Likes: 0
Received 0 Likes
on
0 Posts
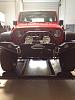
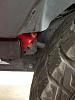
By the way this Pic is today with me fully flexed (tire rubbing fender!) and still not even close to the rail or pinch seam
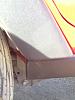
Just further away.. Tire tucked and rubbing a little on the fender lol. Time for some bushwhacker flats? Lol
Just further away.. Tire tucked and rubbing a little on the fender lol. Time for some bushwhacker flats? Lol
08-29-2012, 05:53 PM
#6
JK Enthusiast
Thread Starter
Join Date: May 2011
Location: CALIFORNIA
Posts: 240
Likes: 0
Received 0 Likes
on
0 Posts
Originally Posted by Gman*2007
Thanks for the great write up. That was very helpful information for me since I'll be doing the same thing.
08-30-2012, 06:26 AM
#7
JK Enthusiast
Join Date: Nov 2010
Location: Springfield, VA
Posts: 102
Likes: 0
Received 0 Likes
on
0 Posts
Thanks for the write up, I'm planning on doing this project this weekend. Is it necessary to remove the wheels? I feel like there is plenty of room to do some hacking without taking them off. And how do you think a reciprocating saw will do? Don't have a grinder...looks great though!
Trending Topics
08-30-2012, 08:41 AM
#8
JK Enthusiast
Thread Starter
Join Date: May 2011
Location: CALIFORNIA
Posts: 240
Likes: 0
Received 0 Likes
on
0 Posts
Originally Posted by JKduke86
Thanks for the write up, I'm planning on doing this project this weekend. Is it necessary to remove the wheels? I feel like there is plenty of room to do some hacking without taking them off. And how do you think a reciprocating saw will do? Don't have a grinder...looks great though!
09-11-2012, 08:52 AM
#10
JK Enthusiast
Thread Starter
Join Date: May 2011
Location: CALIFORNIA
Posts: 240
Likes: 0
Received 0 Likes
on
0 Posts
Originally Posted by Power Hungry
Heck, you already cut some sheet metal and sliders, cutting a little plastic off your flares should be nothing. Problem solved :-)