Rugged Ridge Hardtop Insulation Kit Write-Up & Install Guide
 08-31-2015, 11:41 PM
#1
JK Junkie
Thread Starter
Rugged Ridge Two Door & Four Door Hardtop Insulation Kit Write-Up
2011-2015 Jeep Wranglers
12109.03 Two Door Insulation Kit
12109.04 Four Door Insulation kit
Kits run $200-$260 depending on site and if you’re buying for 2dr or 4dr
Product Description
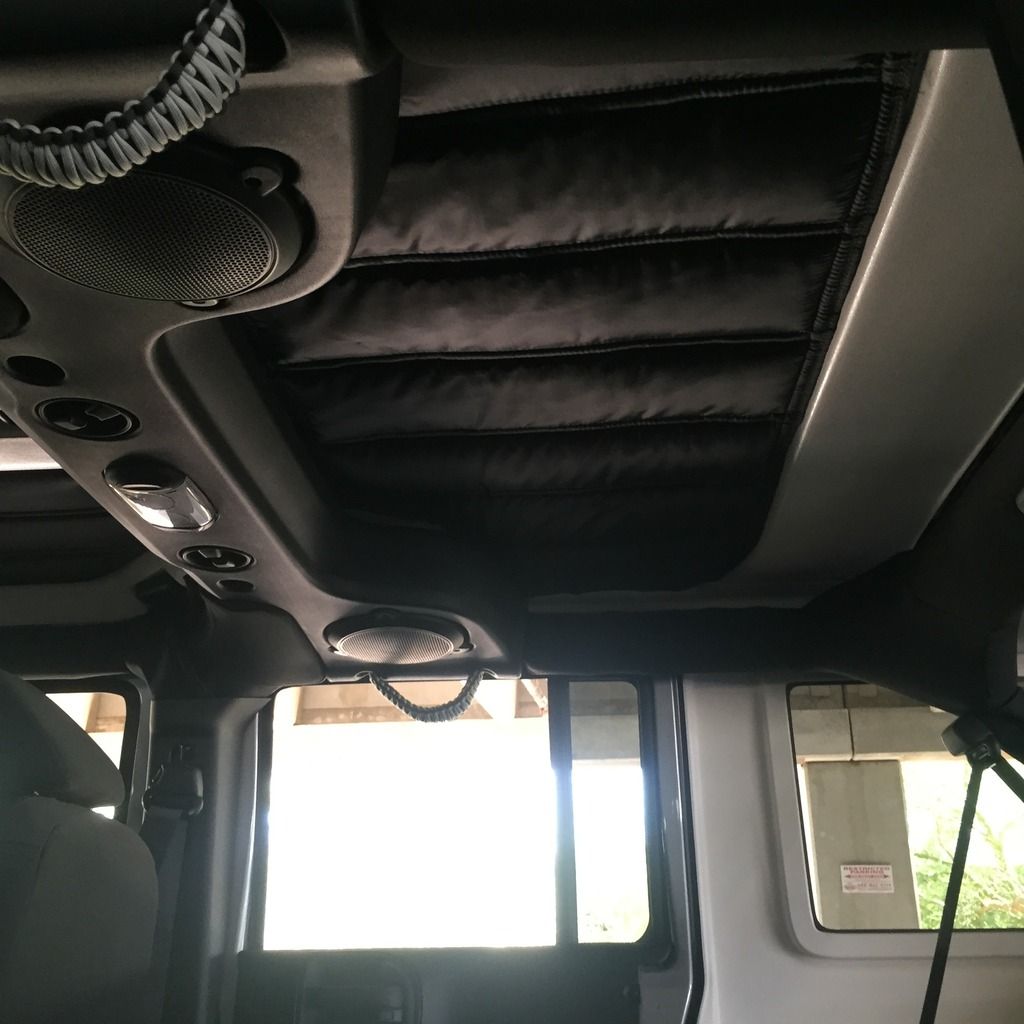
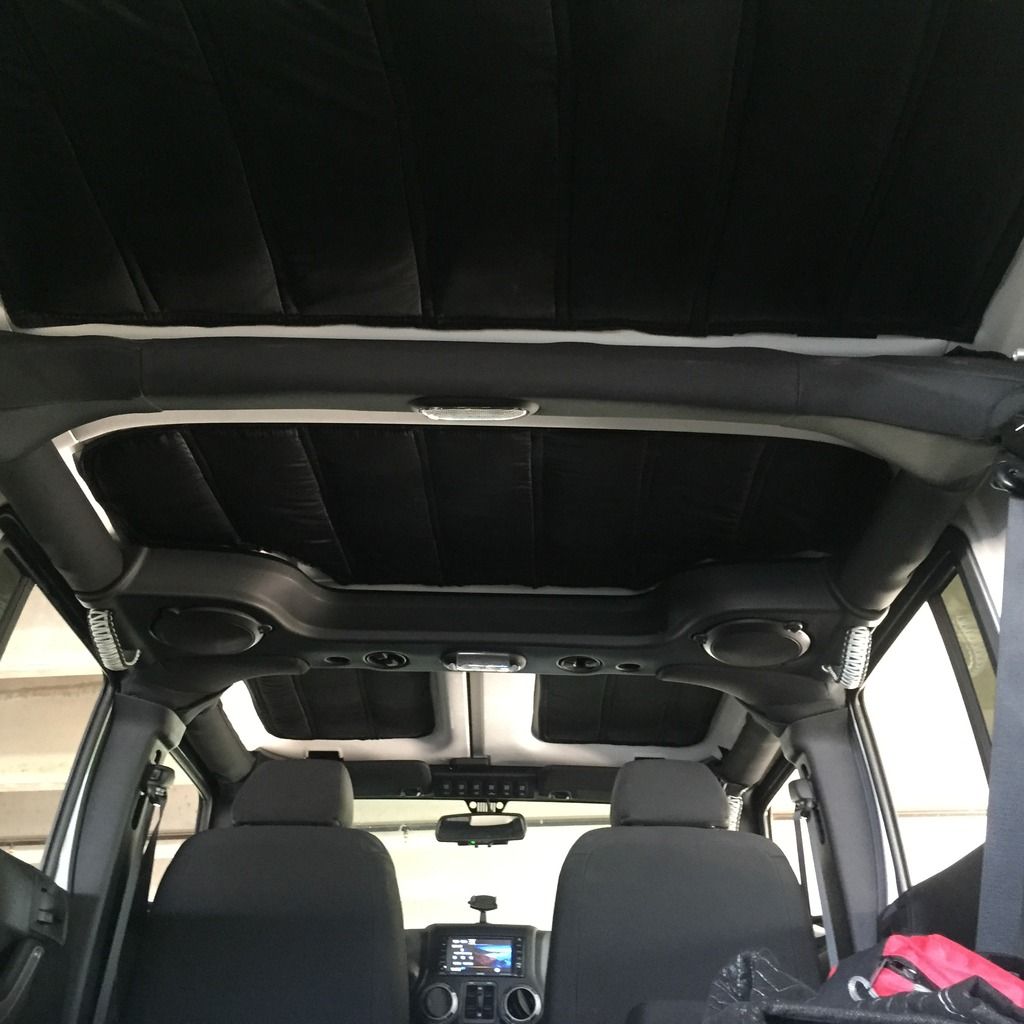
If you chose the hard top option for your Wrangler then you need Rugged Ridge's insulation kit. This insulation is custom fit for the factory multi-piece hard top and greatly reduces noise inside your vehicle. The special insulation material is surrounded by heavy duty pleated nylon providing added interior comfort by insulating the cab from heat and cold. Durable velcro allows for an easy installation without removing your hard top.
About Rugged Ridge
Rugged Ridge develops and sells Jeep parts accessories for the growing Jeep and off road enthusiast market. Rugged Ridge is a division of Omix-ADA, the market-leader for replacement and restoration Jeep parts. With this know-how and experience the Rugged Ridge pedigree is well established in the Jeep market and with the Jeep enthusiast. Realizing that there was a need for new Jeep accessories, the Rugged Ridge brand was established in 2005 to fill that need. Rugged Ridge has designed and manufactured over 3,000 products for the Jeep market and continues to develop hundreds of additional Jeep accessories each year. Many of the recent developed Jeep accessories are patented, like the Jeep floor liners, Jeep snorkel and Jeep XHD modular bumpers. Count on Rugged Ridge to provide you with true and proven Jeep parts and accessories.
Rugged Ridge Warranty Information
Limited 5-Year Warranty
Subject to the terms, exclusions and limitations herein and with respect only to products first sold in the United States, Omix-ADA warrants to the initial retail purchaser (“purchaser”) only that when installed and used on purchaser’s vehicle according to supplied product installation instructions and/or warnings, purchaser’s Omix-ADA product shall be free of defects in material and workmanship for five (5) years.
Detailed warranty information can be found at
Rugged Ridge 12109.04 Hardtop Insulation Kit, 4-Door, 11-15 Jeep Wrangler (JK)
My Thoughts
The Rugged Ridge Hardtop Insulation Kit came packaged very well with detailed instructions, and warranty information. Once I removed the insulation kit from box I was surprised that the material wasn’t as thick as expected. That aside, the kit actually works very well and there is no need for it to be thicker than it is. I would also imagine that if thicker, the material would have a better chance of coming off hardtop due to weight. The kit fit great on hardtop, but I do wish it came with more Velcro to add in little areas around edging. That’s just a personal preference (pickiness). With all that being said, Id still highly recommend this kit for anyone no matter if in cold or ridiculously hot climates like here. The kit will help keep the inside of your Jeep at a better temperature, and will make the inside even quitter than it already is. I am extremely happy with this kit, and I would definitely install in any future Jeep build.
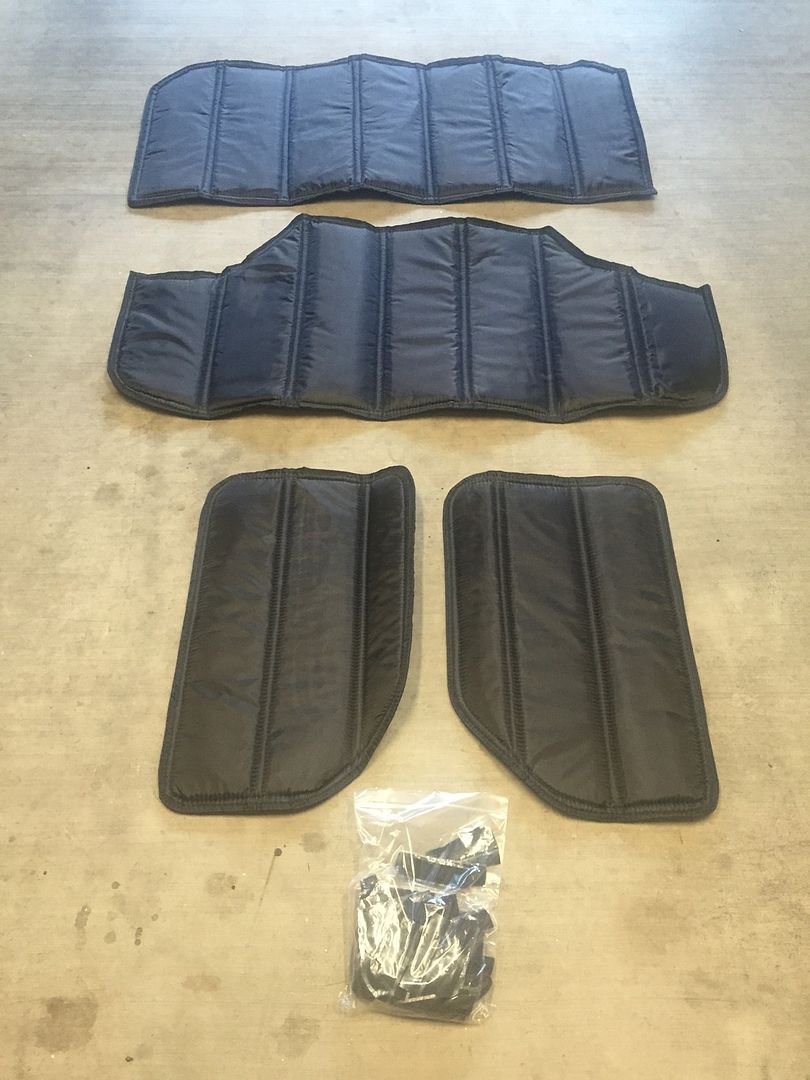
What comes in the kit
• Insulation Panels to fit Two Door or Four Door Hardtops
• Bag of 4” Velcro strips
• Instruction Guide
Things needed for install
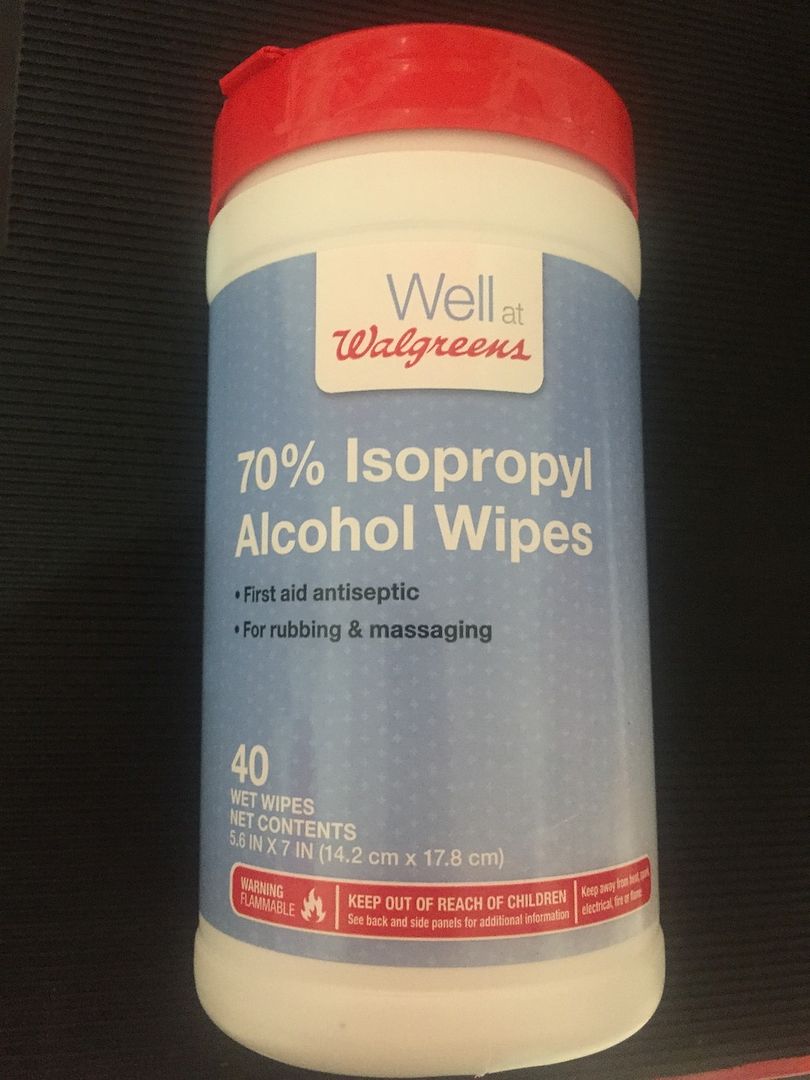
• Towel
• Isopropyl (rubbing) alcohol
• I used alcohol wipes that I got at Walgreens. Wipes make wiping down top a lot easier.
• Cold beverages
• Second set of hands wouldn’t hurt
Install Time & Difficulty
30 minutes & Easy
Rugged Ridge Hardtop Insulation Kit Install Guide
Step 1
Clean hardtop surface with rubbing alcohol
• Alcohol wipes will make cleaning these large areas a breeze.
• Clean all hardtop surfaces where insulation kit will come in contact with top.
• Make sure ALL hardtop surfaces are dry before moving to step two.
Step 2
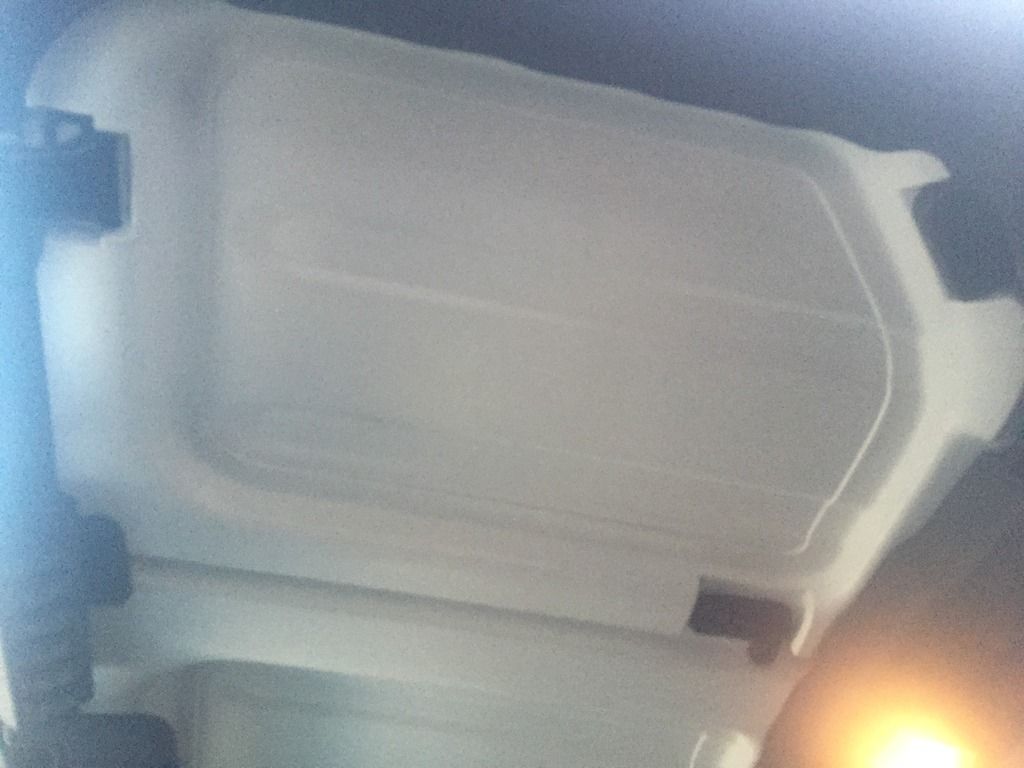
Check fitment of each insulation panel before installing
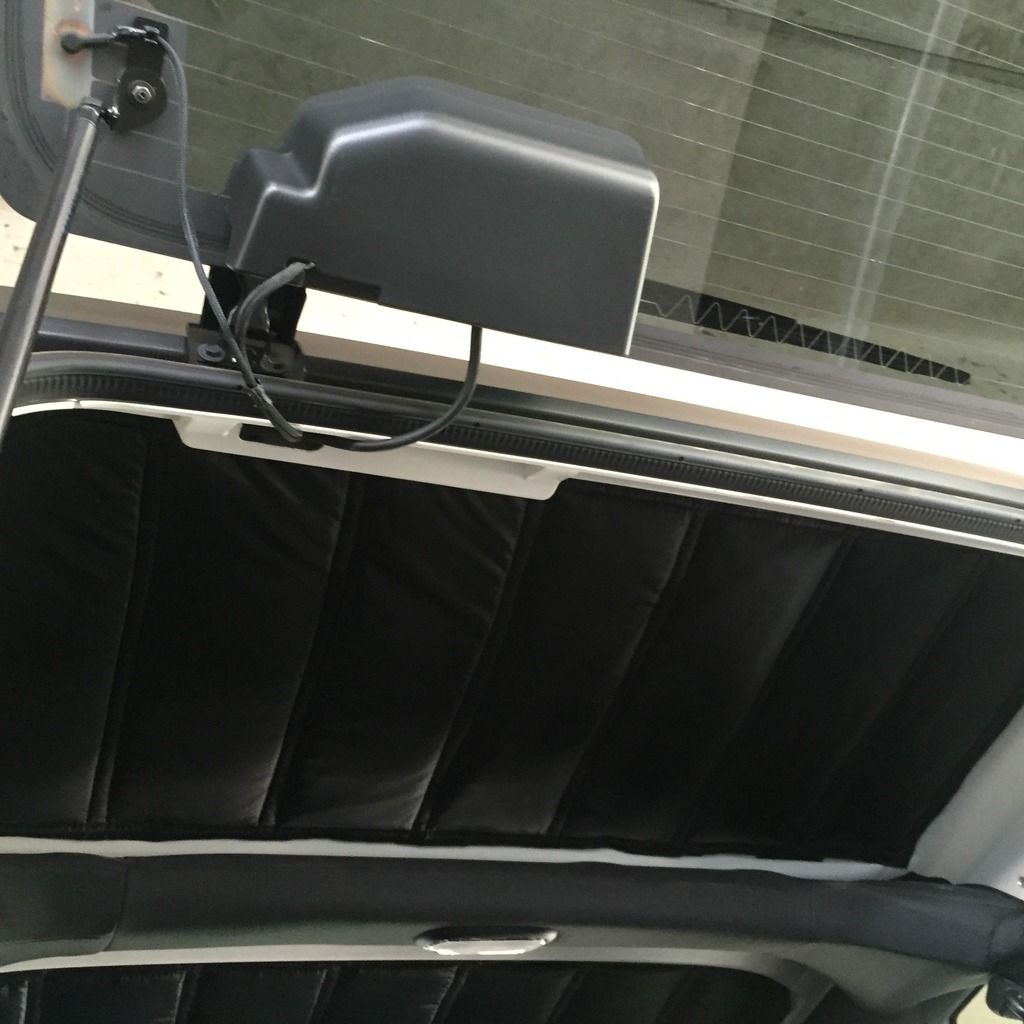
• The liners have been designed to fit the hardtop recesses.
• Hold liner up into each section of hardtop before installing the Velcro to insure that the correct liner is being installed into the correct panel location.
• The liners have been designed to fit shape of all panels and sound bar with removal of hardtop.
Step 3
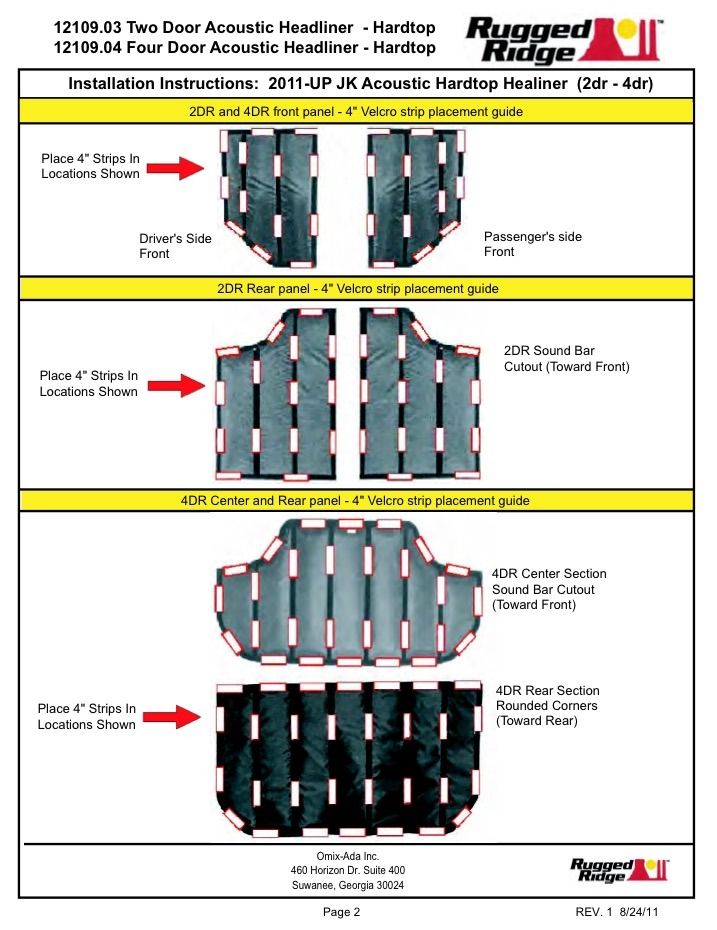
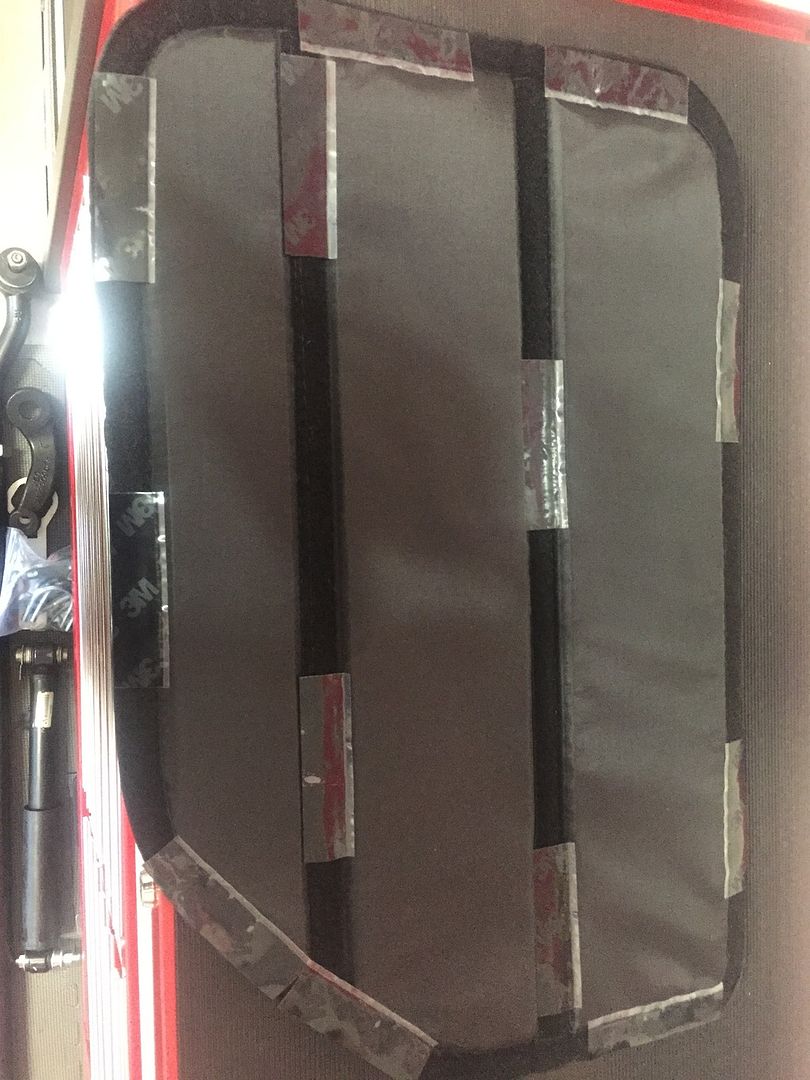
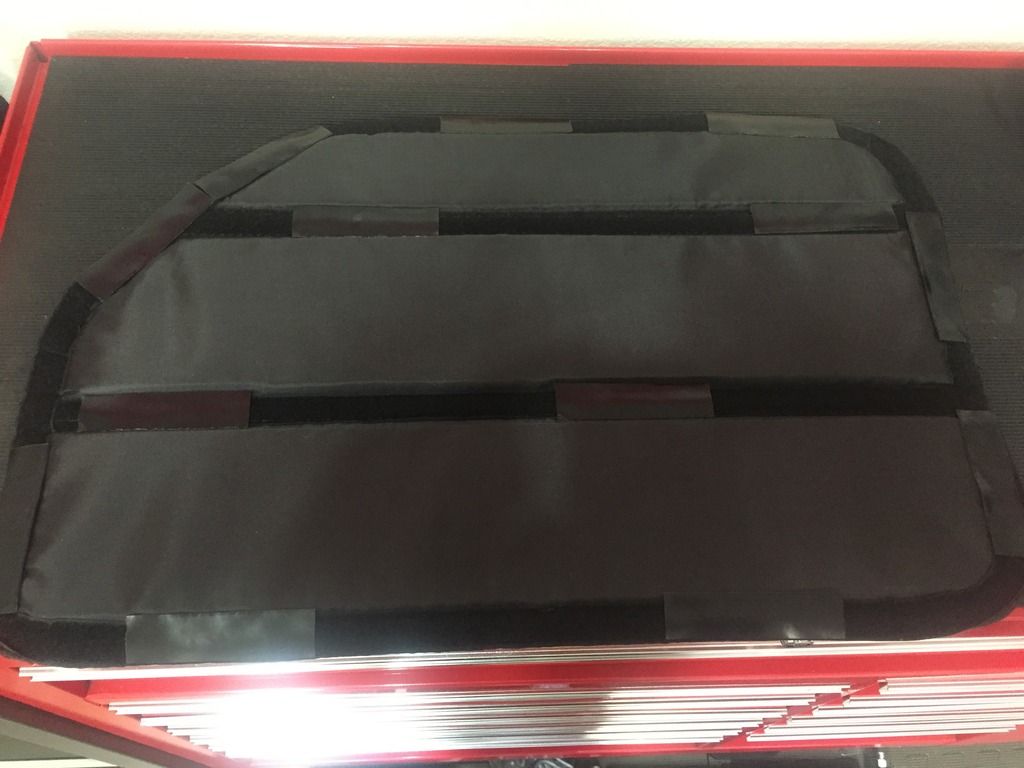
Install the Velcro to each panel
• Place the 4” Velcro strips in the locations shown on image below.
• Proper placement of the Velcro strips is needed for secure fit.
• There is a little clear edge on Velcro strips. I faced all clear edges towards middle of paneling.
Step 4
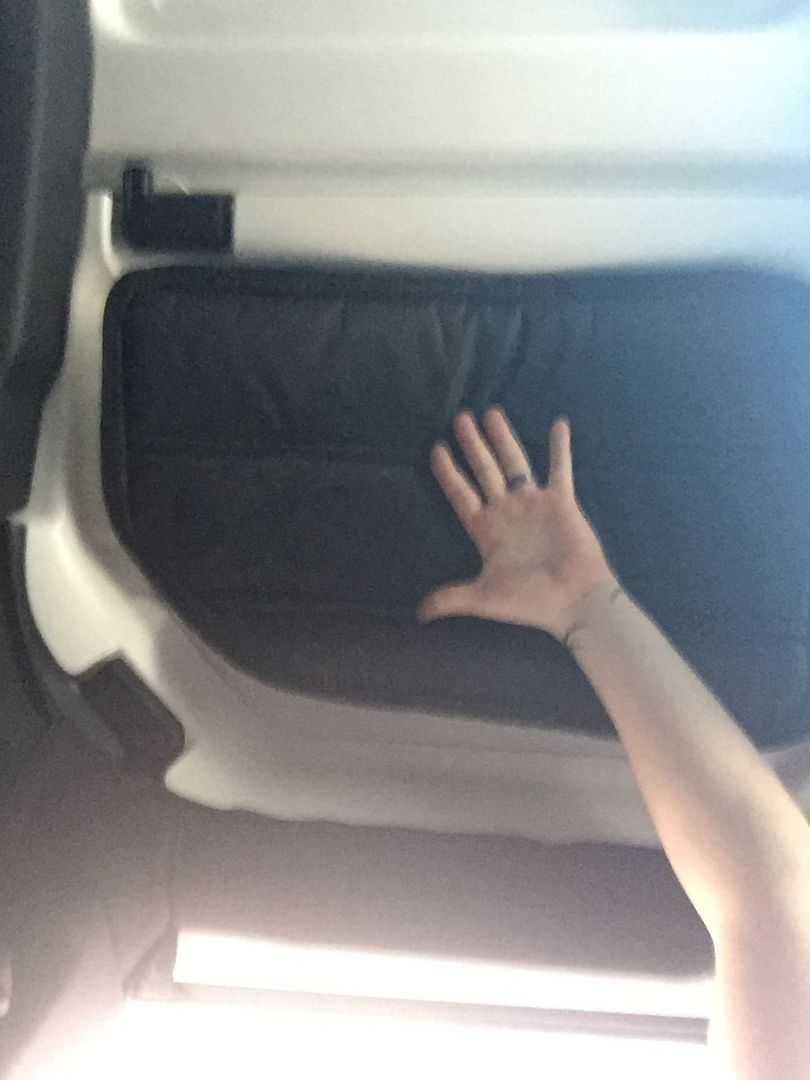
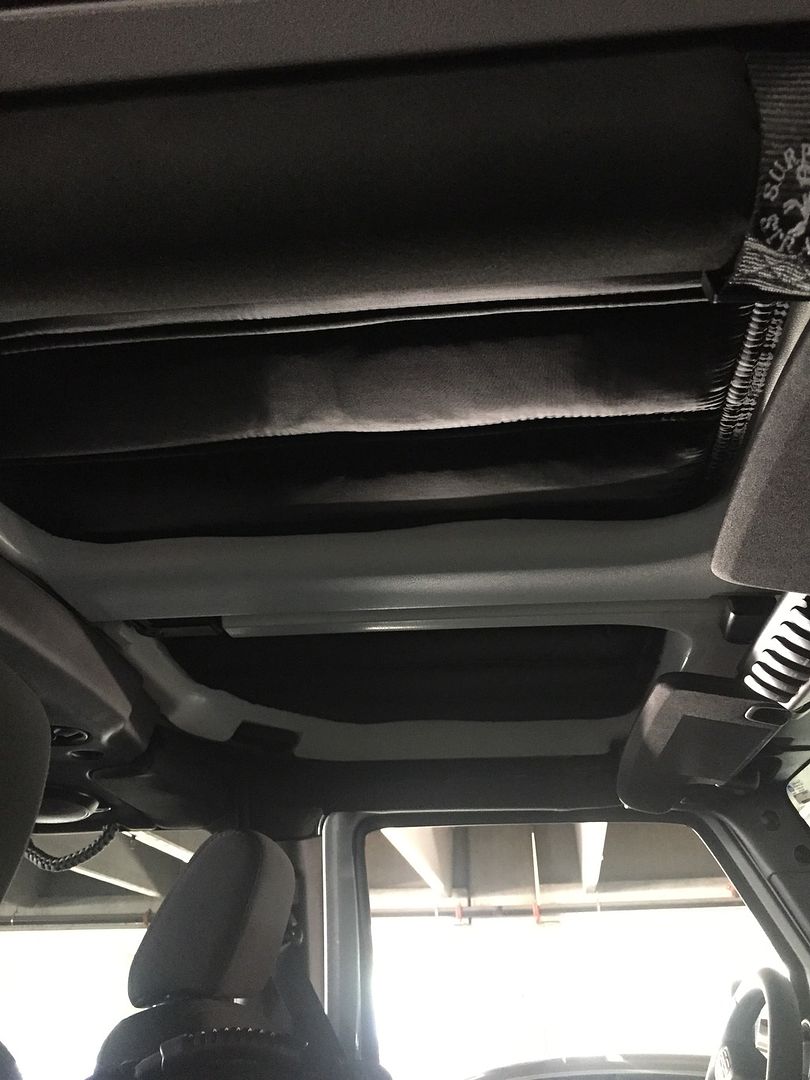
Install driver and passenger panels
• Remove the clear protector of all of the Velcro pieces one panel at a time.
• Once removed be careful not to touch strips or get dirt/grease on adhesive.
• Carefully place insulation panel in correct part of hardtop recess starting from one side work to other.
• Press firmly on liner and hardtop working around the liner making sure all the strips are pressed into top.
• DO NOT REMOVE HEADLINER ONCE INSTALLED. Allow Velcro adhesive to cure for 72 hours before removing or adjusting.

Step 5
Install center panel or rear two door
• Remove the clear protector of all of the Velcro pieces.
• Once removed be careful not to touch strips or get dirt/grease on adhesive.
• Slide liners up and between hardtop and sound bar. Note: The correct orientation of liners have been shaped to match the sound bar profile.
• With the help of a second person, carefully place liner into recess of hardtop starting at the speaker bar.
• Starting at outer corners, press firmly on liner and hardtop working around the liner making sure all the strips are pressed into top.
• DO NOT REMOVE HEADLINER ONCE INSTALLED. Allow Velcro adhesive to cure for 72 hours before removing or adjusting.
Step 6
Install four door rear panel
• Remove the clear protector of all of the Velcro pieces.
• Once removed be careful not to touch strips or get dirt/grease on adhesive.
• With the help of a second person, carefully place liner into recess of hardtop panel.
• Starting at outer corners, press firmly on liner and hardtop working around the liner making sure all the strips are pressed into top.
• DO NOT REMOVE HEADLINER ONCE INSTALLED. Allow Velcro adhesive to cure for 72 hours before removing or adjusting.
Congratulations!!! Your new Rugged Ridge Hardtop Insulation kit is now installed!
If you have any further questions for Rugged Ridge their Facebook page and website link is below.
www.facebook.com/ruggedridge
Jeep Accessories, Bumpers, Lift Kits, Seat Covers, Soft Tops, Wheels, Winches by Rugged Ridge
(Click hi-lited links)
If you have any questions for me, please PM me on forum or by email.
hskr4x4@gmail.com
Thanks for taking the time to read over my write-up!
2011-2015 Jeep Wranglers
12109.03 Two Door Insulation Kit
12109.04 Four Door Insulation kit
Kits run $200-$260 depending on site and if you’re buying for 2dr or 4dr
Product Description
If you chose the hard top option for your Wrangler then you need Rugged Ridge's insulation kit. This insulation is custom fit for the factory multi-piece hard top and greatly reduces noise inside your vehicle. The special insulation material is surrounded by heavy duty pleated nylon providing added interior comfort by insulating the cab from heat and cold. Durable velcro allows for an easy installation without removing your hard top.
About Rugged Ridge
Rugged Ridge develops and sells Jeep parts accessories for the growing Jeep and off road enthusiast market. Rugged Ridge is a division of Omix-ADA, the market-leader for replacement and restoration Jeep parts. With this know-how and experience the Rugged Ridge pedigree is well established in the Jeep market and with the Jeep enthusiast. Realizing that there was a need for new Jeep accessories, the Rugged Ridge brand was established in 2005 to fill that need. Rugged Ridge has designed and manufactured over 3,000 products for the Jeep market and continues to develop hundreds of additional Jeep accessories each year. Many of the recent developed Jeep accessories are patented, like the Jeep floor liners, Jeep snorkel and Jeep XHD modular bumpers. Count on Rugged Ridge to provide you with true and proven Jeep parts and accessories.
Rugged Ridge Warranty Information
Limited 5-Year Warranty
Subject to the terms, exclusions and limitations herein and with respect only to products first sold in the United States, Omix-ADA warrants to the initial retail purchaser (“purchaser”) only that when installed and used on purchaser’s vehicle according to supplied product installation instructions and/or warnings, purchaser’s Omix-ADA product shall be free of defects in material and workmanship for five (5) years.
Detailed warranty information can be found at
Rugged Ridge 12109.04 Hardtop Insulation Kit, 4-Door, 11-15 Jeep Wrangler (JK)
My Thoughts
The Rugged Ridge Hardtop Insulation Kit came packaged very well with detailed instructions, and warranty information. Once I removed the insulation kit from box I was surprised that the material wasn’t as thick as expected. That aside, the kit actually works very well and there is no need for it to be thicker than it is. I would also imagine that if thicker, the material would have a better chance of coming off hardtop due to weight. The kit fit great on hardtop, but I do wish it came with more Velcro to add in little areas around edging. That’s just a personal preference (pickiness). With all that being said, Id still highly recommend this kit for anyone no matter if in cold or ridiculously hot climates like here. The kit will help keep the inside of your Jeep at a better temperature, and will make the inside even quitter than it already is. I am extremely happy with this kit, and I would definitely install in any future Jeep build.
What comes in the kit
• Insulation Panels to fit Two Door or Four Door Hardtops
• Bag of 4” Velcro strips
• Instruction Guide
Things needed for install
• Towel
• Isopropyl (rubbing) alcohol
• I used alcohol wipes that I got at Walgreens. Wipes make wiping down top a lot easier.
• Cold beverages
• Second set of hands wouldn’t hurt
Install Time & Difficulty
30 minutes & Easy
Rugged Ridge Hardtop Insulation Kit Install Guide
Step 1
Clean hardtop surface with rubbing alcohol
• Alcohol wipes will make cleaning these large areas a breeze.
• Clean all hardtop surfaces where insulation kit will come in contact with top.
• Make sure ALL hardtop surfaces are dry before moving to step two.
Step 2
Check fitment of each insulation panel before installing
• The liners have been designed to fit the hardtop recesses.
• Hold liner up into each section of hardtop before installing the Velcro to insure that the correct liner is being installed into the correct panel location.
• The liners have been designed to fit shape of all panels and sound bar with removal of hardtop.
Step 3
Install the Velcro to each panel
• Place the 4” Velcro strips in the locations shown on image below.
• Proper placement of the Velcro strips is needed for secure fit.
• There is a little clear edge on Velcro strips. I faced all clear edges towards middle of paneling.
Step 4
Install driver and passenger panels
• Remove the clear protector of all of the Velcro pieces one panel at a time.
• Once removed be careful not to touch strips or get dirt/grease on adhesive.
• Carefully place insulation panel in correct part of hardtop recess starting from one side work to other.
• Press firmly on liner and hardtop working around the liner making sure all the strips are pressed into top.
• DO NOT REMOVE HEADLINER ONCE INSTALLED. Allow Velcro adhesive to cure for 72 hours before removing or adjusting.
Step 5
Install center panel or rear two door
• Remove the clear protector of all of the Velcro pieces.
• Once removed be careful not to touch strips or get dirt/grease on adhesive.
• Slide liners up and between hardtop and sound bar. Note: The correct orientation of liners have been shaped to match the sound bar profile.
• With the help of a second person, carefully place liner into recess of hardtop starting at the speaker bar.
• Starting at outer corners, press firmly on liner and hardtop working around the liner making sure all the strips are pressed into top.
• DO NOT REMOVE HEADLINER ONCE INSTALLED. Allow Velcro adhesive to cure for 72 hours before removing or adjusting.
Step 6
Install four door rear panel
• Remove the clear protector of all of the Velcro pieces.
• Once removed be careful not to touch strips or get dirt/grease on adhesive.
• With the help of a second person, carefully place liner into recess of hardtop panel.
• Starting at outer corners, press firmly on liner and hardtop working around the liner making sure all the strips are pressed into top.
• DO NOT REMOVE HEADLINER ONCE INSTALLED. Allow Velcro adhesive to cure for 72 hours before removing or adjusting.
Congratulations!!! Your new Rugged Ridge Hardtop Insulation kit is now installed!
If you have any further questions for Rugged Ridge their Facebook page and website link is below.
www.facebook.com/ruggedridge
Jeep Accessories, Bumpers, Lift Kits, Seat Covers, Soft Tops, Wheels, Winches by Rugged Ridge
(Click hi-lited links)
If you have any questions for me, please PM me on forum or by email.
hskr4x4@gmail.com
Thanks for taking the time to read over my write-up!
Last edited by Hskr4x4; 09-01-2015 at 11:15 PM.
