Smart Door Check Strap/Arm Installation
 05-07-2011, 09:11 PM
#1
JK Freak
Thread Starter
Join Date: May 2009
Location: Burbank, CA
Posts: 829
Likes: 0
Received 0 Likes
on
0 Posts
Quoted from JeepSWAG's site:
The installation instructions that come with the kit are actually very good and alone will suffice to guide you through a successful installation. This write-up however will provide additional information, a few of my own tips and additional photographs.
Parts and Supplies Needed:
Smart Door Kit
masking tape
silicone sealant
Tools Needed:
drill
5/16" drill bit
1-3/4" bi-metal hole saw
socket wrench
3" or 6" socket extension
10mm socket
13mm socket
5/32" allen wrench
hammer
center punch
Optional Tools:
1/8"-1/2" step drill bit
chisel
long-nose plyers
telescoping magnetic screw retriever
speedy stitcher
1. This is what comes in the 2-door package:
- left check strap/arm connected to left hinge plate
- right check strap/arm connected to right hinge plate
- bag with 2 washer hinge plate plugs
- bag with 2 limiting strap extenders and 2 binder posts
- bag with 4 13mm replacement hinge bolts
- installation instruction
- sheet with left and right door cutting templates

The installation instructions in this write-up refer to the driver-side front door. Repeat for the passenger-side front door. Installation on the rear doors of a JKU are slightly different. Refer to the provided installation instructions for installation on rear doors.
2. Disconnect the check strap/arm from the hinge plate. Use a 10mm socket and wrench to remove the two nuts.

3. Remove the screws, washers and clip-on nuts from the check strap/arm. Use a 5/32" allen wrench to remove the two screws.

4. To avoid denting the cowl when opening the door all the way, remove the side-view mirror. Use a T-40 torx driver to remove the two screws holding the side-view mirror to the door.

Here's the door with the side-view mirror removed.

On newer JK's with electric side-view mirrors, the mirrors cannot be removed from the door. Instead, place a pillow or other soft cushion between the side-view mirror and the cowl when opening the door all the way to prevent denting the cowl. Use a bungie cord or some other method to keep the door open and the cushion in place.
5. Disconnect the door wiring harness.

6. Remove the limiting strap from the limiting strap post and open the door all the way. If it's windy or if you're on unlevel ground, you may need to bungie the door or prop something up against it to keep it from closing.

7. Use a 13mm socket and wrench to remove the top bolt that secures the factory door hinge to the body inside the door.

8. Put the hinge plate in place, and replace the top bolt with one of the 13mm replacement hinge bolts. Tighten the replacement top bolt, making sure to leave room to put a socket on the lower bolt. Remove the lower bolt.

9. Put one of the washer hinge plate plugs in the lower hole of the hinge plate and secure with a 13mm replacement hinge bolt.

10. Cut out the cutting template and place on the door, carefully following the instructions on the template for proper placement. This is a crucial step, so take your time, check it a hundred times and make sure it's just right.

11. Center punch the three drill points.

12. Remove the cutting template, and drill the center hole. To prevent your drill from wandering off the punch point, use a step drill bit or multiple gradually larger drill bits to drill out the center hole to the size of the drill bit on your hole saw. Use a 1-3/4" bi-metal hole saw to drill out the center hole. File as necessary to remove any burrs.

Here's the center hole drilled out.

13. Put the check strap/arm in place and verify that the top and bottom punches still line up, then remove the check strap/arm again.

14. Use a 5/16" drill bit to drill out the top and bottom holes. As in Step 12, use a step drill bit or multiple gradually larger drill bits to prevent the drill from wandering off the punch point.

15. Apply touch-up paint to the drilled holes to prevent rust.

16. Place the clip-on nuts over the top and bottom holes. I found that these clip-on nuts were a bit tight and difficult to slide in place as is, so I used a chisel and long-nose plyers to pry them open a bit.

When sliding these clip-on nuts in place, be very careful not to drop them inside the door or you may have a hard time fishing them out. Just in case, I suggest having one of these telescoping magnetic screw retrievers on hand.

Here are the clip-on nuts in place.

17. Apply silicone sealant on the check strap/arm for weather protection. There's about a 1/32" to 1/16" gap between the check strap/arm and the door when the check strap/arm is fully fastened in place, so apply enough silicone sealant to fill this gap.

18. Use a 5/32" allen wrench to fasten the check strap/arm to the door.

19. Use a 10mm socket and wrench to connect the check strap/arm to the hinge plate.

20. Since the check strap/arm allows the door to open further than it did before, the limiting strap must be extended using the provided limiting strap extenders. The kit included plastic binder posts to fasten the limiting strap extenders to the limiting strap. I didn't feel that this would hold up over time, so I decided instead to stitch it in place using my handy $12 Speedy Stitcher, a tool used by backpackers around the world for many years to repair broken backpack straps in the field.

Here's the limiting strap extender stitched onto the limiting strap. I'll likely take a Sharpie to it so the stitching doesn't stand out.

21. Put the extended limiting strap on the limiting strap post and reconnect the door wiring harness.

22. Use a T-40 torx wrench to put the side-view mirror back on the door.
And you're done. Repeat for the other side.
Now to remove your doors, you'll need to remove the two nuts and washers connecting the check strap/arm to the hinge plate.

Tired of your JK doors:
- Slamming Shut?
- Not staying open?
The Smart Door system will give your Jeep JK the same feel and movement as regular car doors. These parts install in the same position as a factory check strap inside the door, like a regular car door. This part will give your doors the right amount of resistance with 2 stopping positions allowing them to remain open while keeping you and your family safe. Don't worry, the Smart Door System can easily be removed, allowing you to still take off your doors for all around fun.
Parts and Supplies Needed:
Smart Door Kit
masking tape
silicone sealant
Tools Needed:
drill
5/16" drill bit
1-3/4" bi-metal hole saw
socket wrench
3" or 6" socket extension
10mm socket
13mm socket
5/32" allen wrench
hammer
center punch
Optional Tools:
1/8"-1/2" step drill bit
chisel
long-nose plyers
telescoping magnetic screw retriever
speedy stitcher
1. This is what comes in the 2-door package:
- left check strap/arm connected to left hinge plate
- right check strap/arm connected to right hinge plate
- bag with 2 washer hinge plate plugs
- bag with 2 limiting strap extenders and 2 binder posts
- bag with 4 13mm replacement hinge bolts
- installation instruction
- sheet with left and right door cutting templates
The installation instructions in this write-up refer to the driver-side front door. Repeat for the passenger-side front door. Installation on the rear doors of a JKU are slightly different. Refer to the provided installation instructions for installation on rear doors.
2. Disconnect the check strap/arm from the hinge plate. Use a 10mm socket and wrench to remove the two nuts.
3. Remove the screws, washers and clip-on nuts from the check strap/arm. Use a 5/32" allen wrench to remove the two screws.
4. To avoid denting the cowl when opening the door all the way, remove the side-view mirror. Use a T-40 torx driver to remove the two screws holding the side-view mirror to the door.
Here's the door with the side-view mirror removed.
On newer JK's with electric side-view mirrors, the mirrors cannot be removed from the door. Instead, place a pillow or other soft cushion between the side-view mirror and the cowl when opening the door all the way to prevent denting the cowl. Use a bungie cord or some other method to keep the door open and the cushion in place.
5. Disconnect the door wiring harness.
6. Remove the limiting strap from the limiting strap post and open the door all the way. If it's windy or if you're on unlevel ground, you may need to bungie the door or prop something up against it to keep it from closing.
7. Use a 13mm socket and wrench to remove the top bolt that secures the factory door hinge to the body inside the door.
8. Put the hinge plate in place, and replace the top bolt with one of the 13mm replacement hinge bolts. Tighten the replacement top bolt, making sure to leave room to put a socket on the lower bolt. Remove the lower bolt.
9. Put one of the washer hinge plate plugs in the lower hole of the hinge plate and secure with a 13mm replacement hinge bolt.
10. Cut out the cutting template and place on the door, carefully following the instructions on the template for proper placement. This is a crucial step, so take your time, check it a hundred times and make sure it's just right.
11. Center punch the three drill points.
12. Remove the cutting template, and drill the center hole. To prevent your drill from wandering off the punch point, use a step drill bit or multiple gradually larger drill bits to drill out the center hole to the size of the drill bit on your hole saw. Use a 1-3/4" bi-metal hole saw to drill out the center hole. File as necessary to remove any burrs.
Here's the center hole drilled out.
13. Put the check strap/arm in place and verify that the top and bottom punches still line up, then remove the check strap/arm again.
14. Use a 5/16" drill bit to drill out the top and bottom holes. As in Step 12, use a step drill bit or multiple gradually larger drill bits to prevent the drill from wandering off the punch point.
15. Apply touch-up paint to the drilled holes to prevent rust.
16. Place the clip-on nuts over the top and bottom holes. I found that these clip-on nuts were a bit tight and difficult to slide in place as is, so I used a chisel and long-nose plyers to pry them open a bit.
When sliding these clip-on nuts in place, be very careful not to drop them inside the door or you may have a hard time fishing them out. Just in case, I suggest having one of these telescoping magnetic screw retrievers on hand.
Here are the clip-on nuts in place.
17. Apply silicone sealant on the check strap/arm for weather protection. There's about a 1/32" to 1/16" gap between the check strap/arm and the door when the check strap/arm is fully fastened in place, so apply enough silicone sealant to fill this gap.
18. Use a 5/32" allen wrench to fasten the check strap/arm to the door.
19. Use a 10mm socket and wrench to connect the check strap/arm to the hinge plate.
20. Since the check strap/arm allows the door to open further than it did before, the limiting strap must be extended using the provided limiting strap extenders. The kit included plastic binder posts to fasten the limiting strap extenders to the limiting strap. I didn't feel that this would hold up over time, so I decided instead to stitch it in place using my handy $12 Speedy Stitcher, a tool used by backpackers around the world for many years to repair broken backpack straps in the field.
Here's the limiting strap extender stitched onto the limiting strap. I'll likely take a Sharpie to it so the stitching doesn't stand out.
21. Put the extended limiting strap on the limiting strap post and reconnect the door wiring harness.
22. Use a T-40 torx wrench to put the side-view mirror back on the door.
And you're done. Repeat for the other side.
Now to remove your doors, you'll need to remove the two nuts and washers connecting the check strap/arm to the hinge plate.
 05-08-2011, 08:30 PM
#3
JK Freak
Thread Starter
Join Date: May 2009
Location: Burbank, CA
Posts: 829
Likes: 0
Received 0 Likes
on
0 Posts
 05-10-2011, 11:43 AM
#6
JK Freak
Thread Starter
Join Date: May 2009
Location: Burbank, CA
Posts: 829
Likes: 0
Received 0 Likes
on
0 Posts
Trending Topics
06-22-2011, 05:22 PM
#9
JK Freak
Thread Starter
Join Date: May 2009
Location: Burbank, CA
Posts: 829
Likes: 0
Received 0 Likes
on
0 Posts
04-14-2014, 02:57 PM
#10
JK Freak
Thread Starter
Join Date: May 2009
Location: Burbank, CA
Posts: 829
Likes: 0
Received 0 Likes
on
0 Posts
Sorry for reviving an old thread, but I thought I'd give an update. Nearly three years after installing these Smart Door Check Strap/Arms, the one on the driver side broke at the attachment to the frame. The passenger side one is still holding up fine, but it gets used way less often.
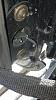
I contacted Star Fabricating directly, sent them the picture and explained what happened. After nearly three years, I really wasn't expecting anything more than maybe some suggestions from them, but to my surprise they sent me out a replacement part free of charge. Props to Star Fabricating for outstanding customer service and for backing their product. I'll also note that the Smart Door product I purchased was their original design, which has since been updated, so if you're considering purchasing one and are concerned that it will break on you after a few years, hopefully their new design will last longer, but it's still too early to tell.
I contacted Star Fabricating directly, sent them the picture and explained what happened. After nearly three years, I really wasn't expecting anything more than maybe some suggestions from them, but to my surprise they sent me out a replacement part free of charge. Props to Star Fabricating for outstanding customer service and for backing their product. I'll also note that the Smart Door product I purchased was their original design, which has since been updated, so if you're considering purchasing one and are concerned that it will break on you after a few years, hopefully their new design will last longer, but it's still too early to tell.