TeraFlex 1.5" Performance Leveling Kit 1351502 install notes
 03-22-2013, 05:12 PM
#1
JK Enthusiast
Thread Starter
Join Date: Mar 2010
Location: Maine
Posts: 364
Likes: 0
Received 0 Likes
on
0 Posts
Got the front half of the TF performance (coil) leveling kit installed today, TF part no. 1351500. Rears will wait until tomorrow.
I'd done the TF regular (spacer) leveling kit before, but on the new Jeep I went for the coil kit. A few notes from the install in case it helps someone doing this in the future:
- I started on the front passenger corner, but read ahead on the instructions and realized they tell you to start on the driver's side. Not sure why. But I switched to the driver's side and proceeded.
- After removing the shock's lower bolt and the swaybar link, I couldn't get the axle to droop far enough to remove the spring; the spring was just much too stiff to compress, and I didn't have a spring compressor. At this point the only support on this corner was the Jeep's factory jack under the axle. As I lowered it, the entire vehicle (frame and all) lowered, so I realize that by raising it up again and then putting a jackstand at the forward part of the frame on the driver's side, nice and high, this would let the control arm and axle drop more. I also made a DIY spring compresser with a set of large slip-joint adjustable pliers and a C-clamp. I grabbed two adjacent coil turns and compressed, then used the C clamp to hold the pliers closed at the tip of the handles, so I could take my hands off it and use them on a pry bar to lever out the spring. There's a LOT of spring energy contained here so I wouldn't really recommend the pliers/clamp method. Popped apart once but I was finally able to lever the spring out. Another tip: the jack will be able to lower completely and free from the axle, so remove it and then push down gently on the axle as you lever out the spring. Just because it droops to a stop doesn't mean there isn't more to go. It may be enough to help get the spring out. Can't do that with the jack in place. Remember at all times the Jeep can slip off the stands, especially if you're pushing and pulling real hard!! Have a "jump out of the way" escape route planned. And you're pry-barring the spring into compression, a heavy mallet helps whack it out. I really can't believe how hard it was to remove the spring this time around. I must be getting old.
- On the Rubi, you need to drill out the (almost 1/2 inch dia.) hole in the swaybar in order to accept the stud on the new swaybar link. I quickly ruined my neighbor's 1/2 inch bit trying to do this (heated up REAL fast, even after applying lube), then went out and bought a new high strength metal bit, did the same to it, but it made it through (barely). That swaybar is tough metal.
- Installing new coil: Same trick as above: jackstand at forward end of the frame, axle dropped in that corner with no support, push down on the axle a bit. as you persuade the spring into place. I found that I could "screw" the spring clockwise to get it to creep upward (the swaybar was up against the coils so I couldn't simply push the spring up). When it was up as far as it would go, now the hard part. Tip: if you don't have a spring compressor, a bottle jack is really useful here! Position bottle jack under an appropriate part of the spring. First rotate the spring so it's in the appropriate rotated position, i.e. the "cut off" end of the spring is likely to rest in the divet on that piece of metal it sits into. Start jacking up the spring, and when the bottom of the spring is level with the bottom ledge around the bump that the spring sits around, gently tap the spring with a heavy mallet to slide part of it onto that ledge so you can relax the jack without the spring popping out. Note: at this point the spring hasn't risen over the "bump" that the spring sits around - that's next. Right now just a portion of the spring is sitting on the ledge. Note: Lots of spring energy contained now, be careful! Remove the bottle jack and reposition it under another part of coil, start jacking up to compress it. When it clears the top of the "bump", take a hard whack of the hammer to quickly get it across the bump where it will then uncompress, hopefully in its final position.
- Rotate the spring to seat the cut-off end in the little divet / channel.
- Reinstall shock bolt/nut, install new sway bar link.
- Even though I drilled the swaybar out to 1/2 inch, the new swaybar stud was too tight a fit and ended up squishing the threads - took a lot of rotating and tapping to get it through the hole, but it made it. I think this might be due to the fact that I was doing more destroying the drill bit than I was enlarging the hole. Installed the swaybar link with the stud at the top end, and zerk fitting (yet to be installed) at the bottom. Also note that the new link goes on the outside of the swaybar at the top (i.e. towards the side of the vehicle), and on the inside at the lower point (i.e. on the motor side).
- Where to put the washer that comes with the kit? Call to TF customer service... says don't need it (was from older kit?) but if you want to use it, they say put it on the nut side. I used it. Only trouble I ran into was that since I mashed some threads, the nut tightened quickly and then started rotating the bolt. Unlike on the factory joint, there is nowhere to put a wrench to stop that from turning, since the new piece has a rounded shoulder instead of being "hex" to accept a wrench. But wait! A closer look revealed a slot for a hex wrench in the end of the bolt. So stick a hex wrench in there to keep it from turning, while you tighten the nut.
Now for the passenger side.
Same trick as before: Jack stand at forward part of passenger-side frame, nice and high. Let axle droop until jack comes out, and give axle a gently push downward (I just put my foot on the brake rotor). WOAH! This time the spring just fell out. Even better: when I installed the new spring, no need for compression - all done EASILY by hand! I couldn't believe it, especially after all the trouble with the driver's side.
Install shock bolt and new swaybar link.
Double check everything. I started to put the wheel back on when for some (forgotten) reason I took it off again, fortunately, because that's when I realized I never put the nut on the swaybar link!
Last step, I installed the zerk fittings. They were getting pretty tight before going all the way in; I didn't force them, left them at an angle that I could easily get to, while being very snug but not overtightening. There are still a couple millimeters of thread showing. Still need to grease them (according to instructions) before using.
Now the boring part but perhaps the most important: I can't stress the safety part enough. The more I work on this stuff, the less I want to. Some thoughts:
- Start by blocking the wheels on the opposite end of the vehicle (working on front, block a wheel on the back). Both the front and the back of the wheel.
- I lay a wheel under the frame just as a backup in case something slips - at least the Jeep won't squish you as much.
- What they say about "make sure vehicle is on FIRM and LEVEL ground" is absolutely true. A 1-inch thick plywood board on top of grass or dirt may seem firm to you but is not enough support for a jack, and a 4,000+ lbs. Jeep will overcome it and slip off. Don't ask me how I know.
- Even when the jackstands are under the frame, I have a second jack positioned adjacent to it, just barely making contact with the support point, as a backup. When one fails, the other can catch it.
- Avoid crawling under the vehicle. Only way I'd ever do this is with all four wheels firmly on the ground, and blocked (and even then, won't lay in path of wheels). Not worth it. Most of the stuff above can be done from the "outside."
- Even when working beside the vehicle, or crouching under the wheel well, do so in a way that you can jump out of the way if something goes wrong (and have somewhere to jump).
- I always have an unused jack within reach, preferably "easy operation" bottle or hydraulic, with valve set to go in "jack it up" position. If I get stuck or squished, it's a good last resort, if you're lucky.
Above doom and gloom aside, this was a fun and satisfying project, though I feel completely beaten up and it's only half done. I came very close to bailing, reinstalling factory parts and paying a garage to do it (and I've done plenty tinkering on cars). Curious to see how the stock 32" BFG KM will look with the coil leveling kit. So far, no plans to go bigger than 32 for various reasons, but wanted the leveling, and wanted to be prepared for future added weight.
Pics will follow when the job is done.
Last edited by mostlystock; 03-22-2013 at 05:18 PM.
 03-23-2013, 03:57 PM
#2
JK Enthusiast
Thread Starter
Join Date: Mar 2010
Location: Maine
Posts: 364
Likes: 0
Received 0 Likes
on
0 Posts
Followup... got the second half of the project (rears) done, a few more notes:
- I found the rears go much easier if you take the time to do the following:
a) Before doing anything, put a jackstand on the frame of each side, reward just forward of the control arm, and remove both wheels. If you do only one side at a time (with the opposite wheel still attached and on the ground), the axle won't droop far enough because the swaybar is fighting the droop.
b) take the extra steps to remove the parking brake bracket (two 10 mm nuts), to disconnect the rear axle breather tube at the axle end, and to remove two plastic sensor-wire clips on each wheel area. These things are relatively easy to do, and make the job easier. The sensor clips are a bit of a pain but I found the best way to do this was to crush the clips with pliers and to push them (with small pointy pliers) through the hole while wiggling/pulling the plastic clip on the other side of the hole. Note: I did not have to loosen the control arm or swaybar bolts.
I then removed the axle jack completely and let the vehicle rest on only the passenger and driver side jackstands toward the rear. In this configuration, I could remove the springs easily by hand with only minimal compression, without the aid of prybar or spring compressors. Don't forget that you can ease things up a bit by pushing the axle down a bit (apply foot pressure to the brake rotor on the side you're working on). Easy!
NOTE!! In a moment of stupidity I realized I was jacking up the rock rail instead of the frame. Don't jack the rock rail. Make sure you're further in, on the frame! As soon as I realized this, I put the wheel back on, lowered the jack and repositioned under the frame.
On the front end, you can use a bottle jack to compress the spring while inserting it. On the rears, there really isn't any room for this, so the bottle jack "spring compressor" trick won't work. But as long as you disconnect the axle breather tube, emergency brake bracket, brake line bracket and sensor clips, you'll have enough axle droop to do the coil swap without using a bottle jack or much compression.
Note: Checklists will really help. Every time you undo something, make a note of it, so you can check it off when you do the reverse. Had I done this, I would have realized 1) I had stowed the jack and lug nut wrench in the Jeep before I had actually tightened down the lug nuts and more important 2) I still needed to reinstall the parking brake bracket and the axle breather tube hose! While I didn't make a checklist, fortunately something told me to double check and I caught my mistakes.
Really happy with this kit, looks fine with stock 32's (I'm sticking with them for the foreseeable future) and I like knowing that if/when I get heavier bumpers - or load down the rear with cargo or a trailer - I'll not need to redo. So far, ride is very comfortable, no complaints, and love the "level" look.
Last edited by mostlystock; 04-19-2014 at 04:50 AM.
01-29-2014, 03:52 PM
#3

Mostly stock: I just wanted to give you a shout out and thanks for your post. I know you posted a while ago and had no responses, but I too am considering the Teraflex performance leveling kit. I have no prior experience working on vehicles and this is my first Jeep... I appreciate your safety tips, thanks
01-29-2014, 04:23 PM
#4
JK Enthusiast
Thread Starter
Join Date: Mar 2010
Location: Maine
Posts: 364
Likes: 0
Received 0 Likes
on
0 Posts
Mostly stock: I just wanted to give you a shout out and thanks for your post. I know you posted a while ago and had no responses, but I too am considering the Teraflex performance leveling kit. I have no prior experience working on vehicles and this is my first Jeep... I appreciate your safety tips, thanks
It's probably time to grease those front end stay bar links. As soon as the temp gets above 10 degrees F
01-29-2014, 04:57 PM
#5
Glad you enjoyed it. If you end up getting this kit and have questions, send me a note or post here. 10 months later, still enjoying this kit a lot. Ever since the install I've heard a slight rattle from the back end and think I narrowed it down to the rear shocks where the bolt going through the lower bushing on each shock - just a little bit of play inside the bushing - not sure if it was related to my install or if it's normal wear. No ill effects so far and I don't notice the rattle much anymore.
It's probably time to grease those front end stay bar links. As soon as the temp gets above 10 degrees F
It's probably time to grease those front end stay bar links. As soon as the temp gets above 10 degrees F
glad to hear you still like it! I hear you on the temp.... I bought my 2014 JKU 12/31/2013 and that was the only day I saw it clean! ...damn road salt in ohio has turned it white!
a few more questions:
- the rattle: did you keep your factory shocks? i'm considering replacing mine with OME.
- did you replace any other suspension parts since the leveling kit install?
Thanks, this is my first jeep and I'm devouring the forum knowledge

Mike
01-29-2014, 06:03 PM
#6
JK Enthusiast
Thread Starter
Join Date: Mar 2010
Location: Maine
Posts: 364
Likes: 0
Received 0 Likes
on
0 Posts
No other suspension mods at all. In fact, no other mods other than the items in my sig.
With my stock '13 Rubi wheels (with factory 32" BFG), I've had absolutely no issues with rubbing, balance, wear, shimmy, etc.
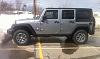
I've done a couple day-long wheeling outings which involved some good rock climbs, and everything performed flawlessly. Here's a photo of the kit in action from one of the trips.
(thanks IroryRing on exploringnh.com forum for the pic)
Missing fender was from a previous outing. Again, when temp warms up, I'll put it back on...!
Last edited by mostlystock; 04-19-2014 at 04:53 AM.
11-18-2014, 12:47 PM
#7
JK Enthusiast
Thanks for the install tips. Great idea about the checklist. This will be my 7th coil spring install but the first on a Jeep. So hopefully I know all the tricks at this point. your bottle jack spring compressor seems kind of dangerous. Any chance you just forgot to loosen something on the tough corner?
The way you describe doing the rear is the way to go. When installing Land Cruiser coil springs, I'd always jack the entire end up from the frame. Remove both wheels. Then place a third jack under the opposite side of the axle I was working on. Jacking up the opposite end forces the end you're working on to droop farther.
The way you describe doing the rear is the way to go. When installing Land Cruiser coil springs, I'd always jack the entire end up from the frame. Remove both wheels. Then place a third jack under the opposite side of the axle I was working on. Jacking up the opposite end forces the end you're working on to droop farther.
Trending Topics
12-03-2014, 10:10 AM
#8
JK Enthusiast
Glad you enjoyed it. If you end up getting this kit and have questions, send me a note or post here. 10 months later, still enjoying this kit a lot. Ever since the install I've heard a slight rattle from the back end and think I narrowed it down to the rear shocks where the bolt going through the lower bushing on each shock - just a little bit of play inside the bushing - not sure if it was related to my install or if it's normal wear. No ill effects so far and I don't notice the rattle much anymore.
It's probably time to grease those front end stay bar links. As soon as the temp gets above 10 degrees F
It's probably time to grease those front end stay bar links. As soon as the temp gets above 10 degrees F