Vacuum Pump Relocation DIY
 06-24-2013, 04:27 AM
#1
JK Newbie
Thread Starter
Join Date: Mar 2013
Location: Long Island, NY
Posts: 36
Likes: 0
Received 0 Likes
on
0 Posts
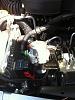
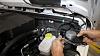
I found a thread some where that showed how to relocate the JK's vacuum pump to the engine bay by re-using the OEM bracket. It worked ok, but I felt like the pump bracket had too much play in it for being that close to the brake system. Plus is was making contact with the wiring harness to the left of it (see picture). So I looked around the garage and put something together that I think worked out great.
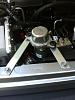
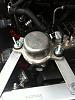
The new bracket itself doesn't move, the pump is still on its original bushings and it has plenty of clearance on all sides. Best of all it got the job done and didn't require a trip to the store or waiting for a package, not to mention $30 more in my pocket.
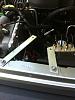
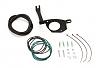
Parts included some flat bar stock and a couple of bolts. Used only a hacksaw, drill and dremel. I used some rustoleum hammered silver to "color match" it.
First try using the original bracket.
DIY bracket.

The new bracket itself doesn't move, the pump is still on its original bushings and it has plenty of clearance on all sides. Best of all it got the job done and didn't require a trip to the store or waiting for a package, not to mention $30 more in my pocket.
Parts included some flat bar stock and a couple of bolts. Used only a hacksaw, drill and dremel. I used some rustoleum hammered silver to "color match" it.
First try using the original bracket.
DIY bracket.
 12-25-2013, 02:48 PM
#2
JK Enthusiast
Join Date: Oct 2007
Location: Bellevue, WA
Posts: 181
Likes: 0
Received 0 Likes
on
0 Posts
Very nice DIY, saved my $$ for kits
Thanks
Thanks
I found a thread some where that showed how to relocate the JK's vacuum pump to the engine bay by re-using the OEM bracket. It worked ok, but I felt like the pump bracket had too much play in it for being that close to the brake system. Plus is was making contact with the wiring harness to the left of it (see picture). So I looked around the garage and put something together that I think worked out great.
The new bracket itself doesn't move, the pump is still on its original bushings and it has plenty of clearance on all sides. Best of all it got the job done and didn't require a trip to the store or waiting for a package, not to mention $30 more in my pocket.
Parts included some flat bar stock and a couple of bolts. Used only a hacksaw, drill and dremel. I used some rustoleum hammered silver to "color match" it.
First try using the original bracket.
Attachment 471205
DIY bracket.
Attachment 471206 Attachment 471207 Attachment 471208 Attachment 471209
12-26-2013, 05:17 AM
#3
JK Freak
Join Date: Jul 2012
Location: United States
Posts: 548
Likes: 0
Received 0 Likes
on
0 Posts
I put mine where my horn used to be. I installed dual horns behind the grill. Mounted to the trans cooler brackets if I had an auto. I made the bracket for the vacuum pump from 1"x3" aluminum plate.
 12-26-2013, 06:57 AM
#6
JK Junkie
Join Date: Feb 2013
Location: West Richland Washington
Posts: 2,013
Likes: 0
Received 0 Likes
on
0 Posts

Trending Topics
12-28-2013, 04:53 PM
#8
JK Jedi
The first location won't work for those who have an sPod. The second won't either because of the stock horn. Anyone else have another placement option for relocating the vacuum pump?
12-28-2013, 05:39 PM
#9


Sent from my ADR6425LVW using Tapatalk
Last edited by espi; 12-28-2013 at 05:49 PM.
12-28-2013, 05:48 PM
#10
JK Enthusiast
Join Date: Oct 2012
Location: kentucky
Posts: 162
Likes: 0
Received 0 Likes
on
0 Posts
[QUOTE="JK-FREAK;3795328"]The first location won't work for those who have an sPod. The second won't either because of the stock horn. Anyone else have another placement option for relocating the vacuum pump?[/QUOT
Teraflex puts it up towards the fire wall more.
Teraflex puts it up towards the fire wall more.