Winch mount W/factory bumper
 01-12-2007, 10:21 PM
#1
JK Newbie
Thread Starter

Join Date: Oct 2006
Location: Phoenix, AZ
Posts: 63
Likes: 0
Received 0 Likes
on
0 Posts
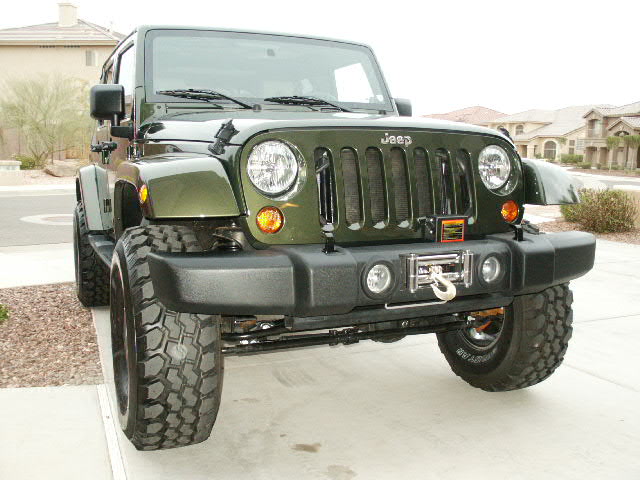
This thread will not be as detailed as I would like it to be, and I hope I haven't forgotten any major steps. It should give a good idea of what you need to do to install a winch in your factory bumper. It is not an easy undertaking, and I think I got lucky on how mine turned out. I used a 4" hand grinder and hack saw for most of the cuts. Here it goes....
Step 1 - Unscrew plastic retainers (about 6) and remove air dam.
Step 2 - Remove 2 bolts from left and right side of bumper to remove plastic bumper (if you have tow hooks you have to procede to step 3 to remove hooks along with plastic bumper)
Step 3 - Remove 8 nuts that secure metal bumper to framerrails (backside of bumper). Push out the 3 fasteners holding wire harness to metal bumper,
and remove metal bumper.
Step 4 - Unscrew plastic retainers (2) and remove plastic filler located on top of frame rails between bumper and grill.
Step 5 - Lay winch mounting plate upside down on top of frame rails and cut notches for frame rails into plate. Lay mounting plate into place on top of frame rails.

Step 6 - Using winch mounting plate as a template, mark metal bumper for fairlead cutouts, and cut metal bumper. Mount winch onto winch mounting plate.

Step 7 - Attach metal bumper to plastic bumper and drill thru fairlead mounting bolt holes to get location of fairlead on plastic bumper. Place fairlead over holes and template fairlead location onto plastic bumper. Double check your fairlead location and measurements and carefully cut plastic bumper. (I used a hack saw blade)

Step 6 - Trim winch mount as required to fit. Weld mount to frame rails or drill 2 holes into each frame rail and bolt mount to frame using 1/2" hardened bolts/nuts.
(At first I was going to mount the winch flush with the front of the frame so the bumper would bolt directly to the frame, mount and fairlead. I ran into issues w/ drum clearance, and trying to access the clutch in/out lever. I also wouldn't have been able to retain my stock fog lights. I would have had to cut the bumper extensively to clear the cable drum and clutch lever and I like the lights, so I decided to place the winch mount as far back as I could, I placed mine flush to the rear. I was going to weld the mount in place but got lucky and had a wrench that would fit into the front frame holes to hold the nuts)

Step 7 - Put metal bumper into place to make sure you have cut for access to clutch lever and drum clearance.

Step 8 - Re-Install metal and plastic bumpers. Measure distance between winch mount and metal bumper and cut spacers to ensure a strong mount for your fairlead.

Step 9 - Attach fairlead to winchmount with hardened bolts and nuts.

Step 10 - Reel in cable and breath a sigh of relief, (if you haven't made any mistakes). Finished product.
Step 1 - Unscrew plastic retainers (about 6) and remove air dam.
Step 2 - Remove 2 bolts from left and right side of bumper to remove plastic bumper (if you have tow hooks you have to procede to step 3 to remove hooks along with plastic bumper)
Step 3 - Remove 8 nuts that secure metal bumper to framerrails (backside of bumper). Push out the 3 fasteners holding wire harness to metal bumper,
and remove metal bumper.
Step 4 - Unscrew plastic retainers (2) and remove plastic filler located on top of frame rails between bumper and grill.
Step 5 - Lay winch mounting plate upside down on top of frame rails and cut notches for frame rails into plate. Lay mounting plate into place on top of frame rails.
Step 6 - Using winch mounting plate as a template, mark metal bumper for fairlead cutouts, and cut metal bumper. Mount winch onto winch mounting plate.
Step 7 - Attach metal bumper to plastic bumper and drill thru fairlead mounting bolt holes to get location of fairlead on plastic bumper. Place fairlead over holes and template fairlead location onto plastic bumper. Double check your fairlead location and measurements and carefully cut plastic bumper. (I used a hack saw blade)
Step 6 - Trim winch mount as required to fit. Weld mount to frame rails or drill 2 holes into each frame rail and bolt mount to frame using 1/2" hardened bolts/nuts.
(At first I was going to mount the winch flush with the front of the frame so the bumper would bolt directly to the frame, mount and fairlead. I ran into issues w/ drum clearance, and trying to access the clutch in/out lever. I also wouldn't have been able to retain my stock fog lights. I would have had to cut the bumper extensively to clear the cable drum and clutch lever and I like the lights, so I decided to place the winch mount as far back as I could, I placed mine flush to the rear. I was going to weld the mount in place but got lucky and had a wrench that would fit into the front frame holes to hold the nuts)
Step 7 - Put metal bumper into place to make sure you have cut for access to clutch lever and drum clearance.
Step 8 - Re-Install metal and plastic bumpers. Measure distance between winch mount and metal bumper and cut spacers to ensure a strong mount for your fairlead.
Step 9 - Attach fairlead to winchmount with hardened bolts and nuts.
Step 10 - Reel in cable and breath a sigh of relief, (if you haven't made any mistakes). Finished product.
Last edited by inlo; 01-12-2007 at 10:34 PM.
 01-13-2007, 04:17 AM
#2
JK Enthusiast
Join Date: Dec 2006
Location: Edmond, OK
Posts: 464
Likes: 0
Received 0 Likes
on
0 Posts
Thank you for taking the time to write this up...I was following your mod on the the threads...great idea...I just wish I had the skills to take this on...
Excellent alternative to having to purchase a new bumper...
Excellent alternative to having to purchase a new bumper...
 01-13-2007, 09:15 AM
#4
Nice job! I asked in your other thread, but you might not have seen my question. Did you try to mount the winch right side up first? I assume the u-shaped crossmember got in the way.
I'm gonna see if I can mount mine like this, but right side up. I plan on cutting the crossmember off, since I've already removed the airdam. Can you forsee any problems with this plan?
Are there any cons to running it upside down like you have? I assume not, since you left it that way.
I'm gonna see if I can mount mine like this, but right side up. I plan on cutting the crossmember off, since I've already removed the airdam. Can you forsee any problems with this plan?
Are there any cons to running it upside down like you have? I assume not, since you left it that way.
 01-13-2007, 05:52 PM
#6
JK Newbie
Thread Starter
Join Date: Oct 2006
Location: Phoenix, AZ
Posts: 63
Likes: 0
Received 0 Likes
on
0 Posts
Nice job! I asked in your other thread, but you might not have seen my question. Did you try to mount the winch right side up first? I assume the u-shaped crossmember got in the way.
I'm gonna see if I can mount mine like this, but right side up. I plan on cutting the crossmember off, since I've already removed the airdam. Can you forsee any problems with this plan?
Are there any cons to running it upside down like you have? I assume not, since you left it that way.
I'm gonna see if I can mount mine like this, but right side up. I plan on cutting the crossmember off, since I've already removed the airdam. Can you forsee any problems with this plan?
Are there any cons to running it upside down like you have? I assume not, since you left it that way.
Last edited by inlo; 01-13-2007 at 05:55 PM.
01-14-2007, 03:53 AM
#7
You are right! The lower crossmember would have to be removed (or cut around) in order to mount winch right side up. When I was measuring out for the install I determined that I didn't want to cut the lower crossmember and liked the placement where the fairlead is on the plastic bumper with the upside down mount. The other drawback to mounting right side up is cutting for access to your clutch lever, my access is on the bottom leaving the top of the bumper cut free. I also believe that most any winch will be taller than the frame rails. My winch hangs down below the frame rails, but the crossmember still gives it good protection.
Thanks. I'll probably run mine upside down too, unless I end up getting an aftermarket bumper first.
