
Crawler Conceptz Body Mounted Tire Carrier (Pic heavy post)
 05-26-2015, 08:08 PM
#1
JK Newbie
Thread Starter

Join Date: Feb 2013
Location: Wylie, Tx
Posts: 42
Likes: 0
Received 0 Likes
on
0 Posts
So I just installed the Crawler Conceptz body mounted spare tire carrier on our 2013 JKUR. CC does not include a set of install directions yet, and I couldn’t find much in the way of install or review help looking online. I guess this is sort of a combo of install help and critique/review of the carrier based on what I have experienced so far. I didn’t keep track of what size wrenches, bits, or sockets I used unfortunately, but I am sure that is something everyone can figure out.
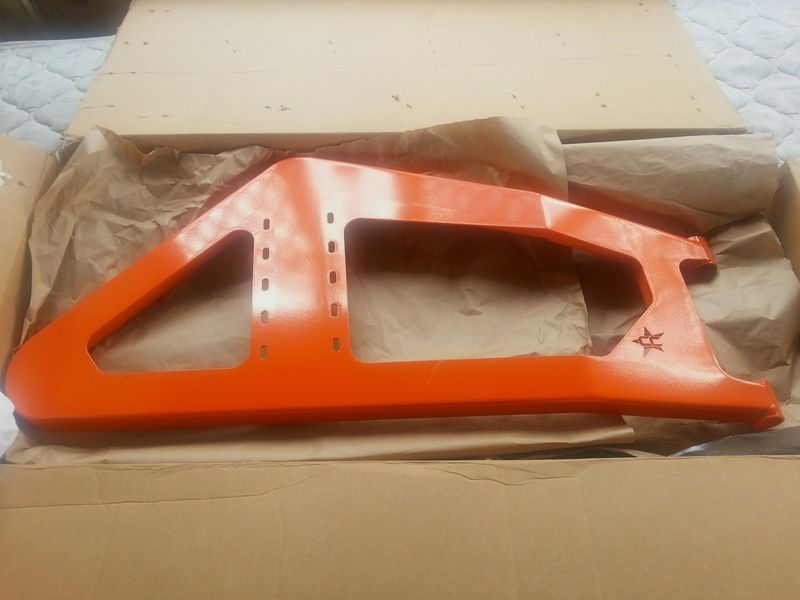
The carrier comes bare metal, disassembled, with hardware in plastic pack or loosely attached in the place it goes on the carrier. You can have it painted or powder coated, I guess you could even use bedliner. Whatever you use there will be some items you need to address to make things fit right as the fit tolerances on ours were crazy tight or not right requiring some finish and metal removal.

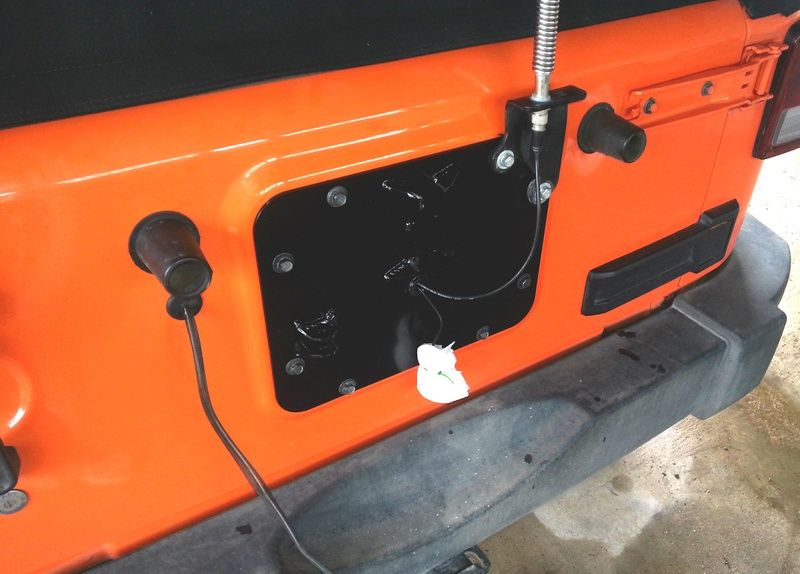
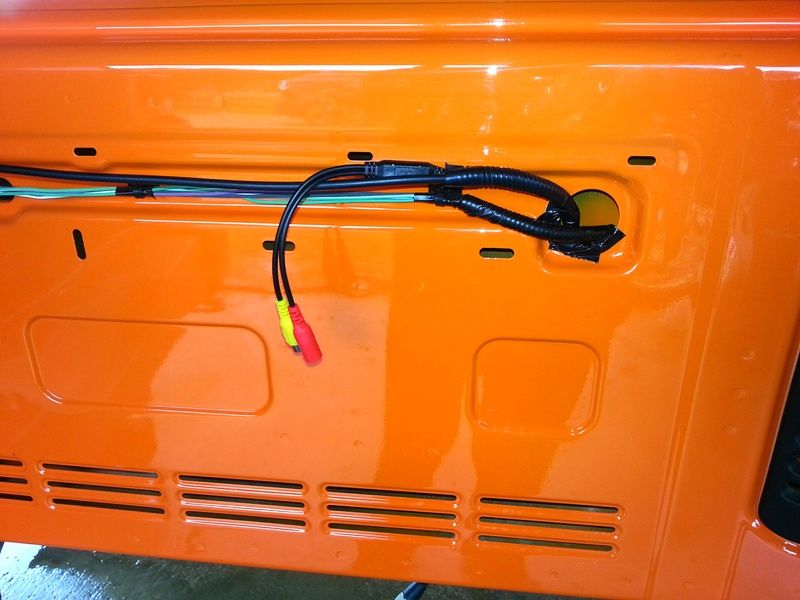
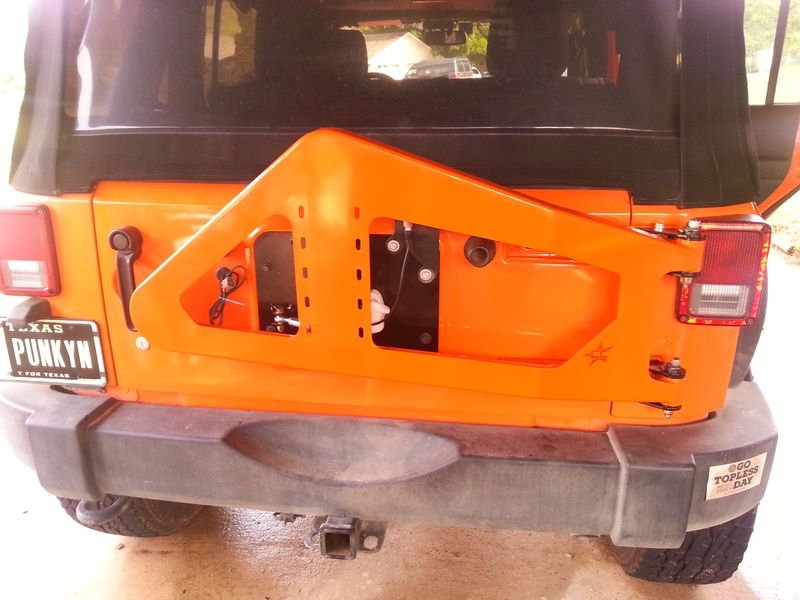
Start off by basically stripping the back of your jeep. I didn’t remove the tire bump stops since I didn’t have anything available to plug them with. But they don’t get in the way at all. I left my 3rd brake light wire in place since I plan to figure out a way to reuse it. I have a CB antenna cable that runs through the tailgate vent, and I plan to run a rearview camera in the next week or so. So I had to take the CC tailgate plate and drill a ľ” hole in the middle of it and run my wires through it and a rubber grommet. The opening in the grommet didn’t allow my CB coax to pass through it, so I did have to cut it. It was all sealed up using clear silicone caulking when I attached it to the tailgate. I ran my wires for my camera through the tailgate while I had it all opened up.
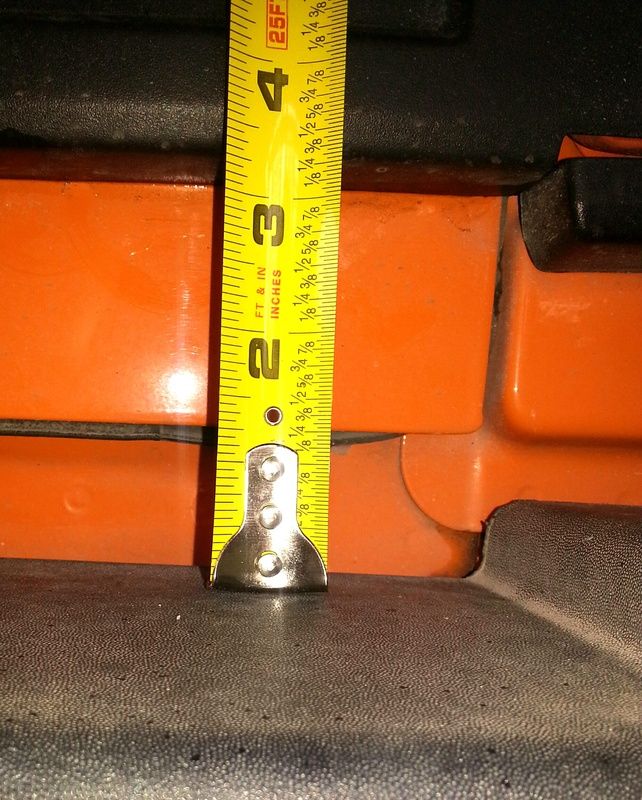
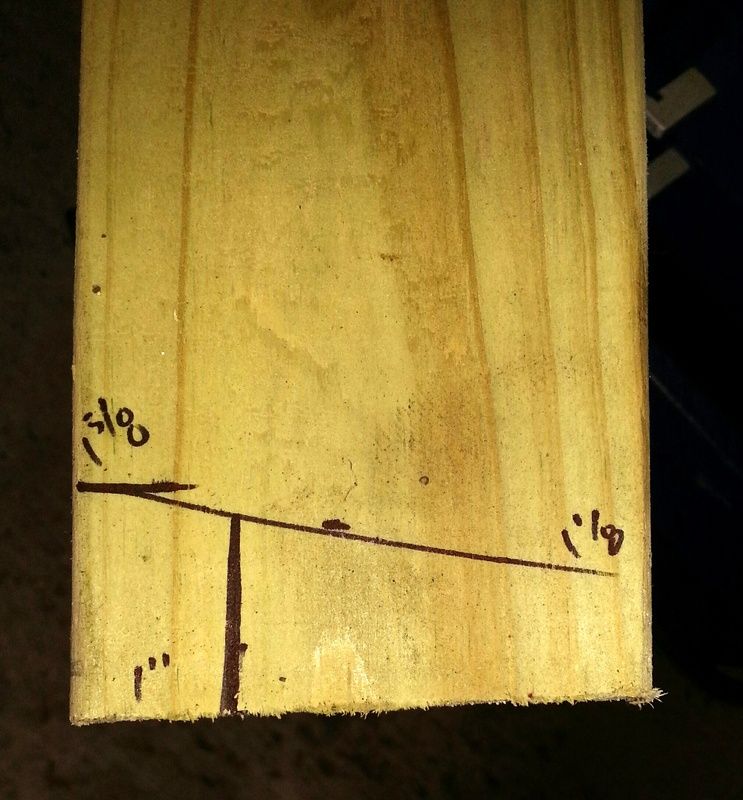
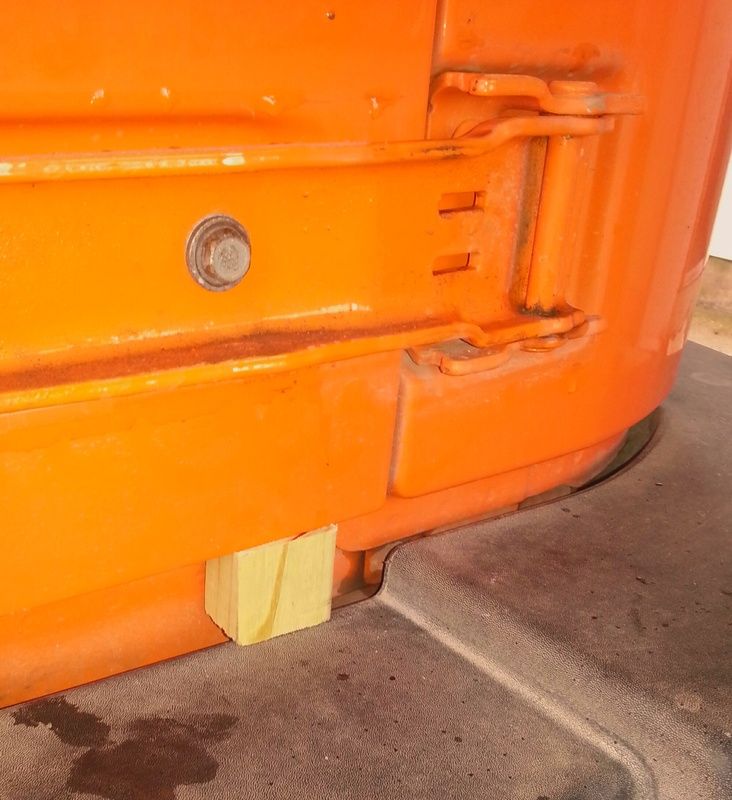
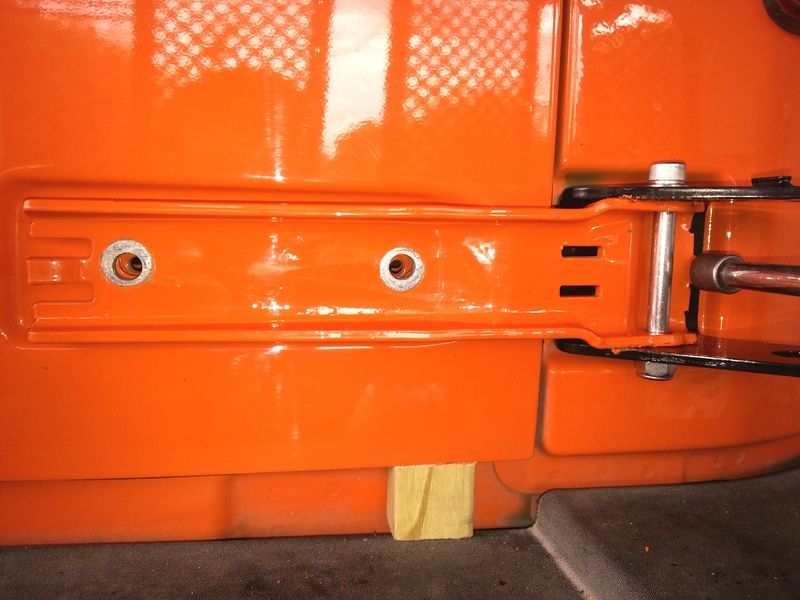
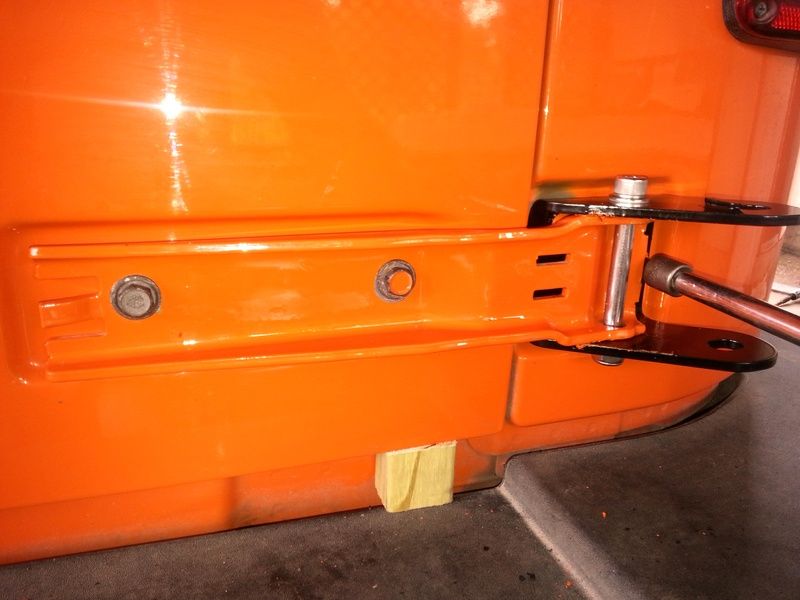
After this the tailgate gets closed and doesn’t get opened again till full installation of the hinges is done. I used a piece of scrap wood to create a small wedge to place between the bumper and the tailgate bottom on the hinge side. I marked the wood at a slope and cut it so that fully inserted it wouldn’t bump against the jeep body. Remove the plastic hinge caps from both the arms and the body. The arm caps can actually be reused after install if the clips don’t get messed up removing them. The hinge plate covers are trash.
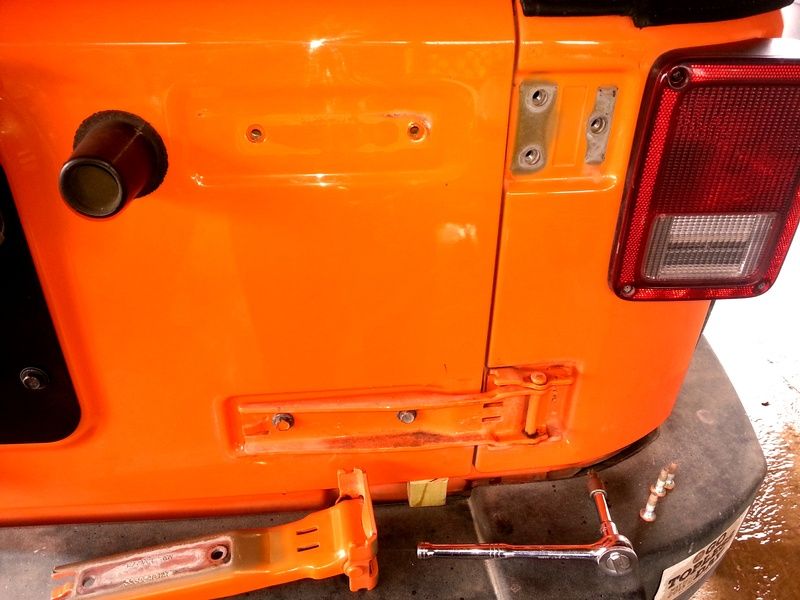
Next is hinge removal. I recommend doing one complete hinge (both removal and new hinge install) at a time. I did my top hinge first. There are three torx bolts that hold the hinge to the body, and 2 bolts that hold the hinge arm to the tailgate. Two of the hinge bolts cant be accessed while the tailgate is closed. So since you cant open the tailgate during this install, you have to remove the two bolts holding the arm to the tailgate so you can swing open the arm and access the two bolts underneath. Take the whole hinge assembly off.

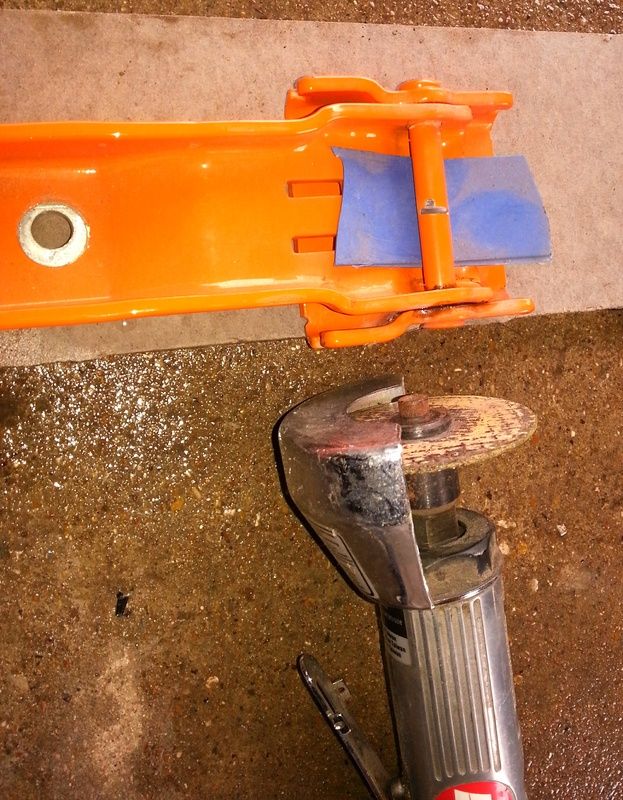
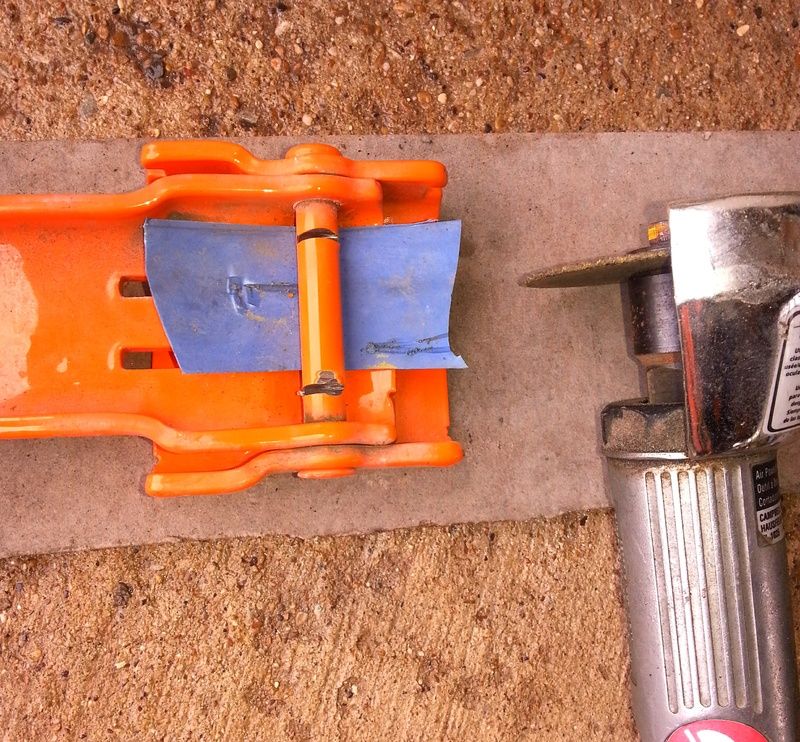
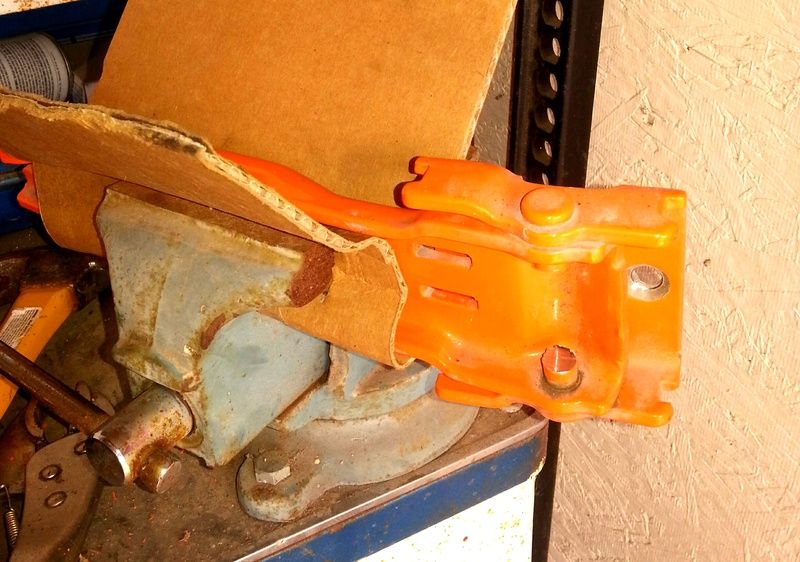
Now that you have your hinge assembly removed you need to free the hinge arm from the hinge plate. This can be accomplished by either grinding off one of the heads of the hinge pin and tapping out the pin, Or cutting it in the middle and tapping out the two pieces. I chose to cut the middle. On my first hinge I made a single cut, on my second I made two cuts toward the ends of the pin so that only small pieces needed to be tapped out while the arm was held in a vise. This was much easier. I also placed a piece of flexible, but thick plastic under my cut to protect the arm finish.
So now the new CC hinge plates needed to be installed. This was one of the first concerns I have with this carrier. The footprint of the new plate is slightly different than the footprint of the stock hinge plate. So unless your vehicle is brand new and hasn’t been dirty, suffered oxidation, or had the finish roughed up a little under the stock hinge plate, you will find that the finish around the new hinge plate edges shows that it isn’t perfect anymore. Don’t fully tighten down your hinge plate bolts just yet.
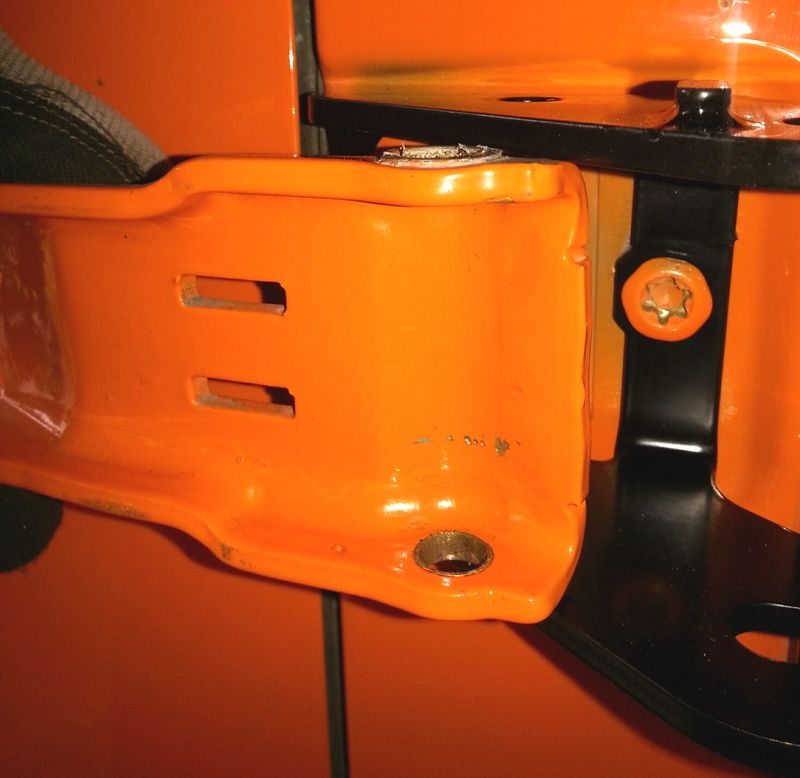
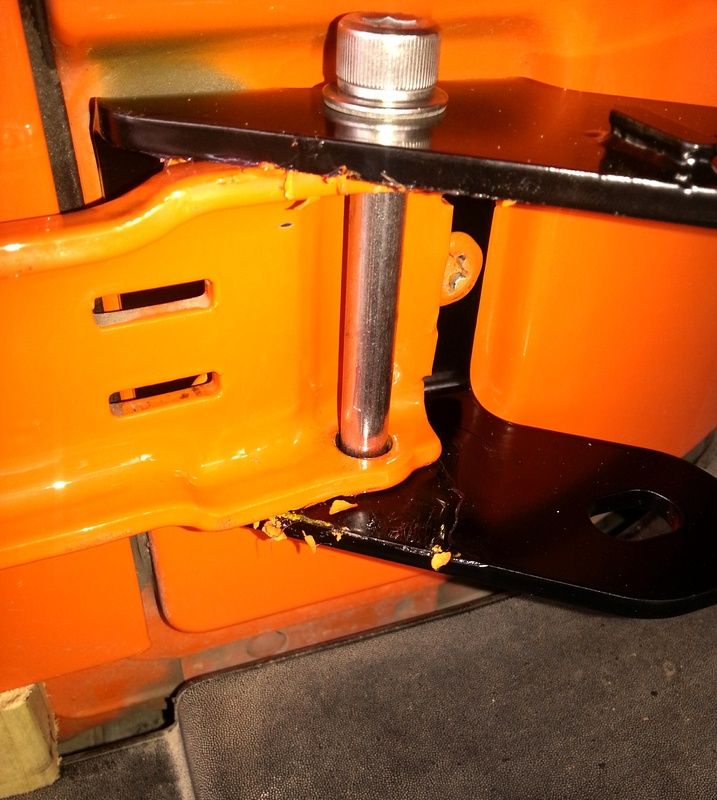
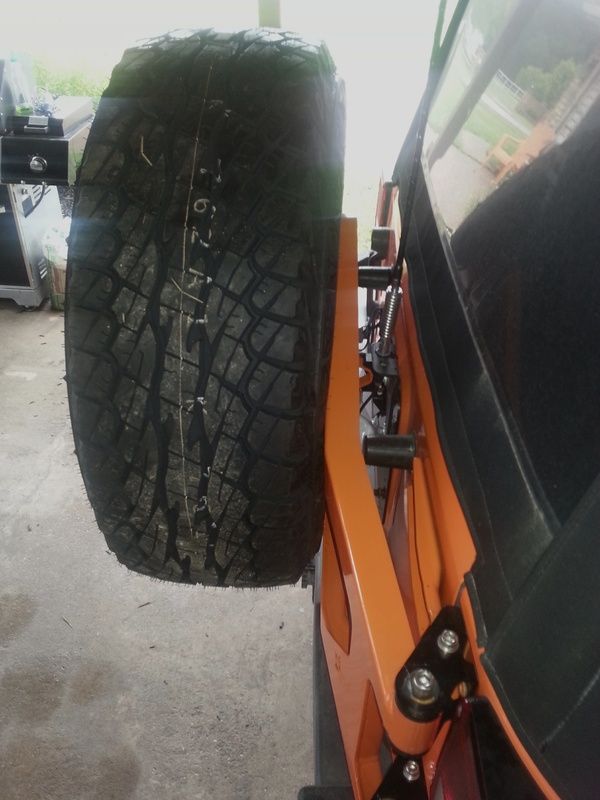
Once your hinge plate is installed reusing the factory hardware, its time to install your hinge arms. Another thing I encountered that I didn’t like…. The torx bolt is made to be set into a recess in the factory hinge plate hole. The CC plate holes are flat, so the torx bolts don’t recess into the plate to be flush mounted. I know they can be replaced at some point, but it would have been nice if CC had made the plate accommodate the factory bolt better. Anyway, now is when you place your hinge arm into the CC hinge plate. This is also where I found one of my biggest issues with this carrier. The hinge arms have small thin inserts in each hole that have a lip that goes over the outside of the hinge arm hole. Hard to explain, but I have included a pic below. There is one on each hole of the arm (4 total), which makes the arm a little wider right at the hole. This added width makes it impossible to insert the arms into position in the CC hinge plate. I had to remove at least one insert on each arm to get the arms to go into the hinge plate location. The problem with this is that removing them increases the inner diameter of the opening in the arm. So you get a loose fit. At some point im going to have to get new inserts, disassemble this carrier, and replace the inserts with the lip to the inside of the hinge arm to regain factory type fit. Right now without them I can open my tailgate and rock it very slightly at the hinges where the bolt doesn’t quite meet the walls of the hole. It still opens and closes without issue, But this shouldn’t be necessary on this carrier in my opinion. You can see how tight the fit is below even with the inserts removed. It actually scrapes finish from the hinge arms the first couple times you open and close the tailgate. And I didn’t tighten down the bolts super tight either. That is just how tight the fit is with almost no pressure from a tightened bolt. I also heavily greased both contact surfaces on the arms and hinge plates.
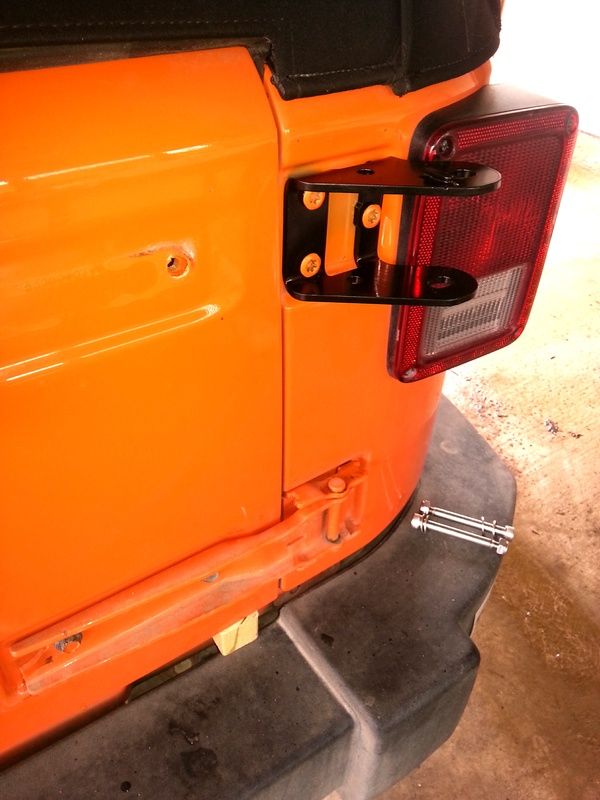
So now that you have your hinge arm in place and bolted down, you can attach your hinge arm back onto your tailgate. You will most likely find that the holes for your arm and tailgate don’t line up perfectly. This is why I mentioned above to not fully tighten your hinge plate bolts. What I did was line up my hinge arm and tailgate holes. Then I inserted the bolts and tighten them down just to hand tight, but a snug fit. There is only one hinge plate bolt that is accessible with the tailgate arm in the closed position, so I tightened this bolt down to hold my hinge plates position. Once it was tightly locked down I removed the hand tight hinge arm bolts from the tailgate and opened the hinge arm to access and tighten the two torx bolts that were covered in the closed position. Once the hinge plate is locked down tight you can reinstall your hinge arm to the tailgate and tighten both bolts all the way.
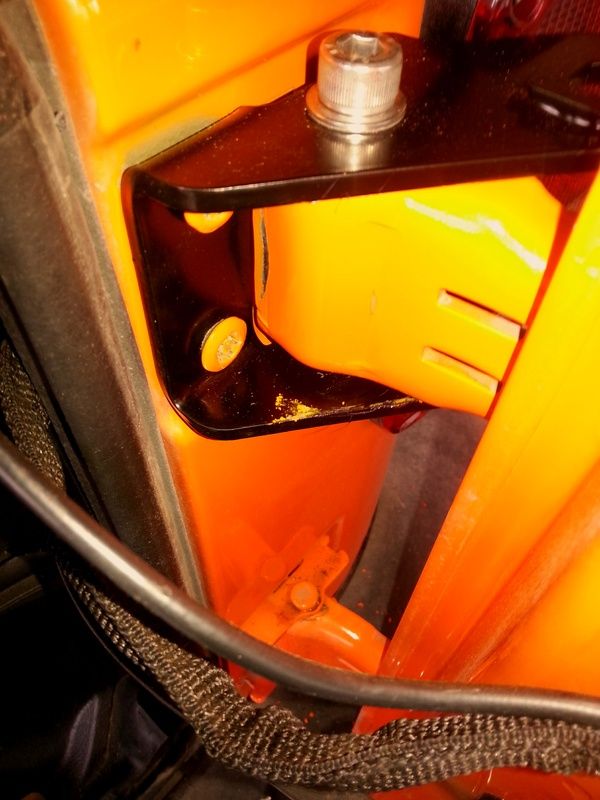
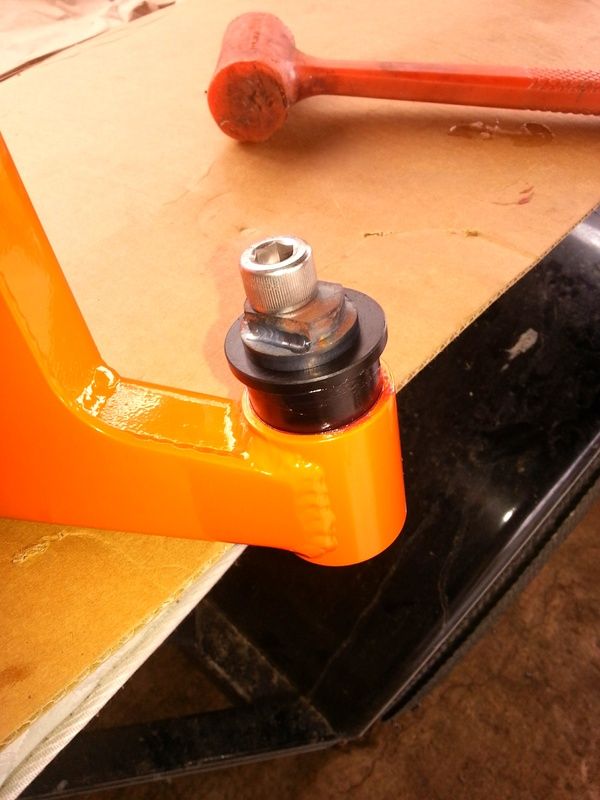
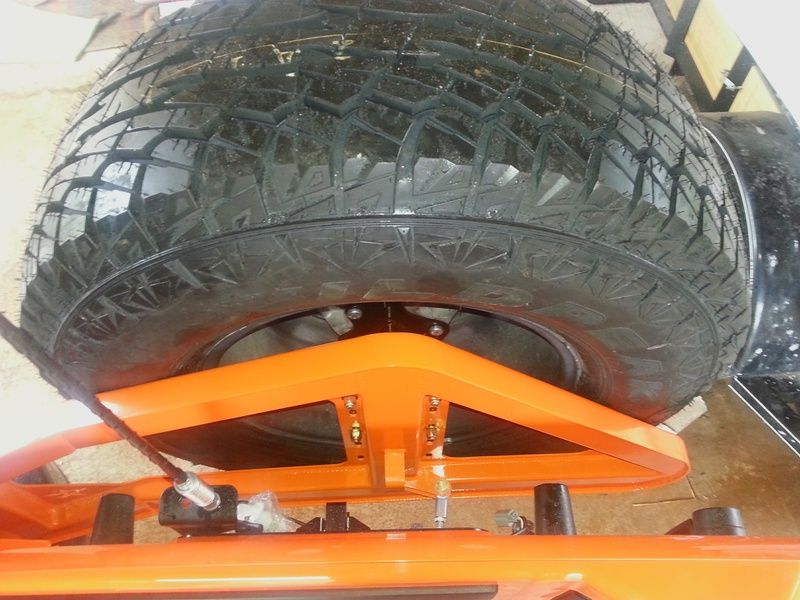
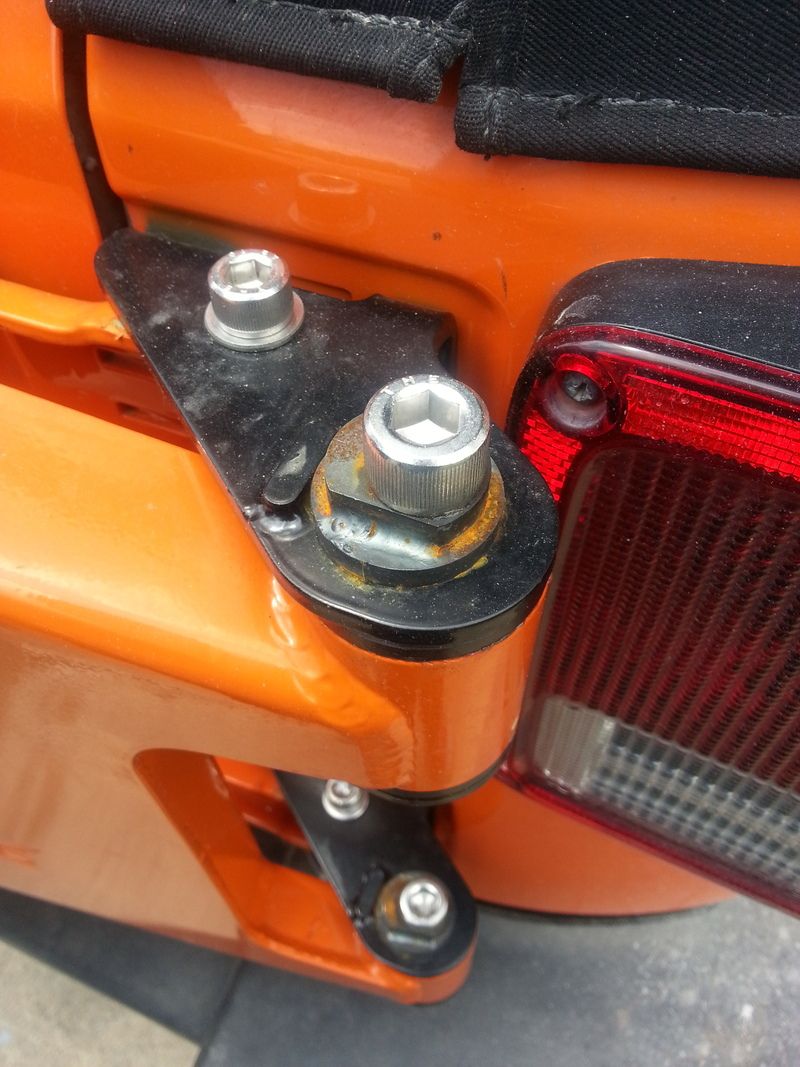
This pic is a repeat from the beginning. But it shows what I mean by opening the hinge arm up to access the two torx bolts it covers when closed.
So the process above gets repeated on both hinges. I don’t really think it would make any difference which hinge you did first. I just don’t recommend removing both hinges at the same time, even if you have the tailgate supported. Once both new hinge plates are installed, and the hinge arms are securely reattached to both the hinge plate and tailgate, you can open the tailgate again. You will most likely find that it is much stiffer to open due to the tight fit of the arms mentioned above. I would almost say that if you tightened everything at the hinge plate down very tight you could make your tailgate near impossible to open. This may actually be of some benefit on a trail since there isn’t a “lock open” device on the tailgate or carrier. So having a tight fit that keeps the tailgate from slamming shut on you if your jeep is off camber might give you a little safety. So I cant complain too much about that tight fit since I can see it saving me from potential injury at some point on a future trail.
So next comes the actual tire carrier arm install. The attachment and adjustment between the carrier arm and the tailgate plate is identical to what is done on the tire carrier/bumper combo that CC sells. So you can look on their site or have them email you this information. It gives you info on how to set/adjust the turnbuckle for preload, how to set the V bushing to meet the carrier arm interface, and how to measure to set up your carrier for your particular tire and wheel combo.
The carrier arm itself comes with 2 sets of 2 piece polymer bushings, 2 steel inserts that go into the polymer bushings once they are inserted into the carrier arm openings, and hardware including cam washers to adjust carrier arm angle for preload on your carrier arm. I used a rubber mallet to tap in the 2 piece polymer bushings. Then with help I held the arm in place at the hinge plate while my wife dropped in the insert and bolt/cam washer.
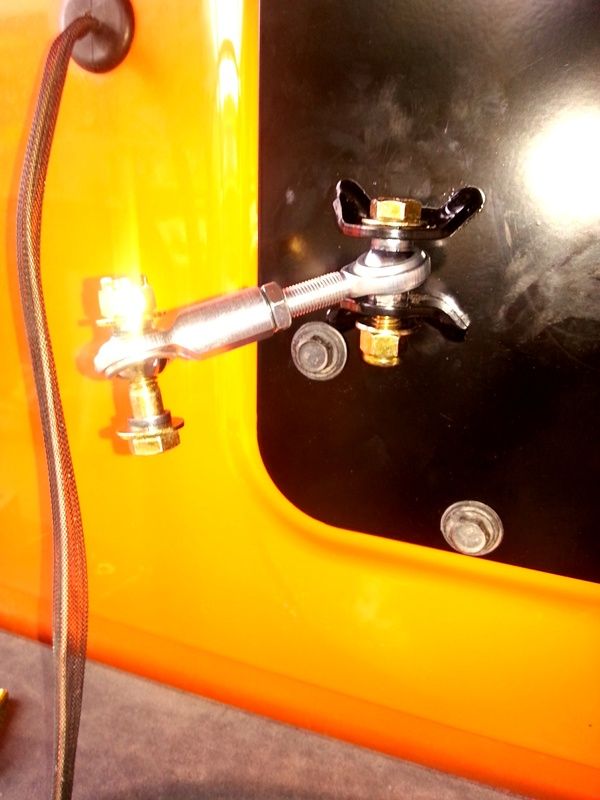
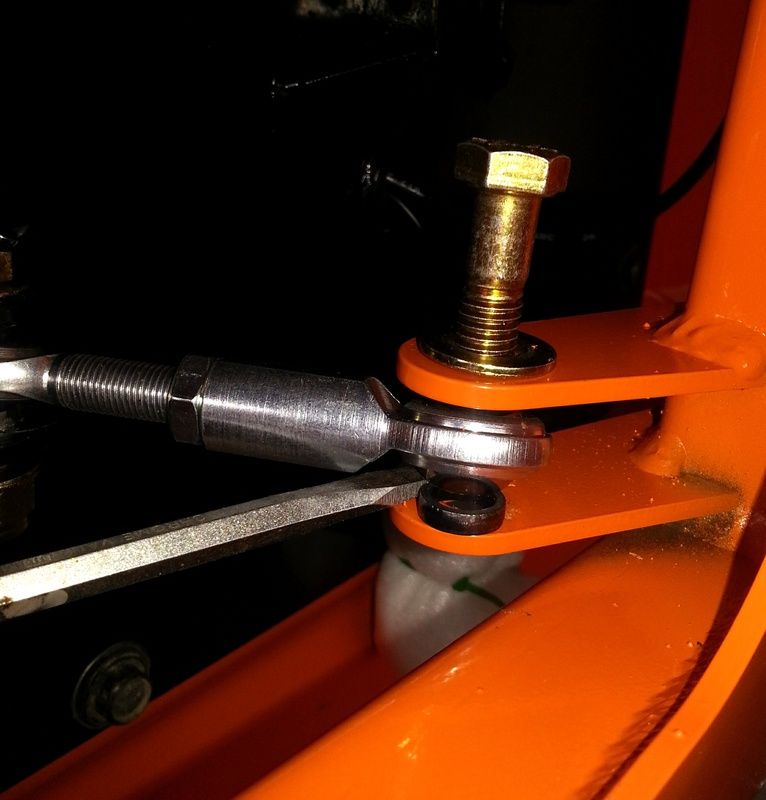
So now the arm is in place, but not connected to the tailgate plate. Install the adjustable turnbuckle to the appropriate position on the tailgate plate, also the V block. The fit tolerance for the turnbuckle ends and spacers is as tight as the fit on the hinges, so it will take a flat screwdriver and some patience to get the ends in place on both the plate and carrier arm. Once you have this done refer to the instructions for adjustment that come from CC to get your carrier adjusted, as I mentioned above.
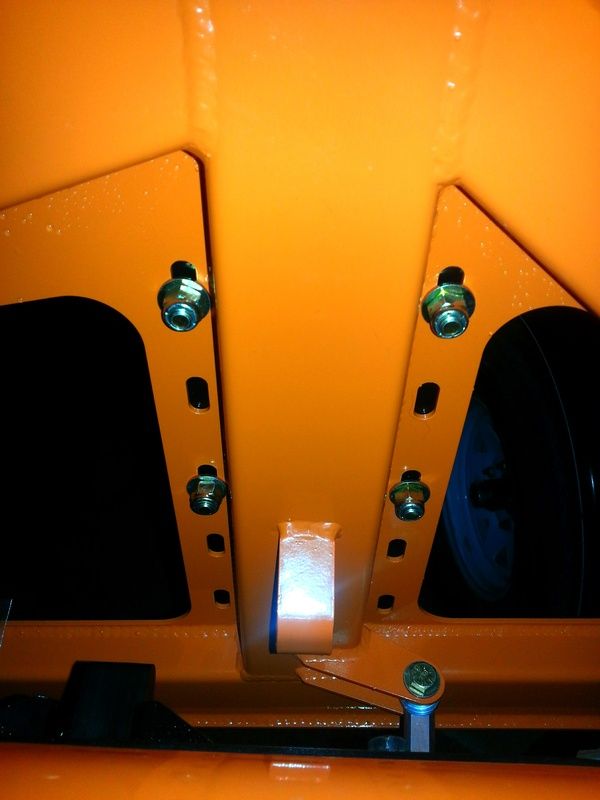
I am mounted at the top of this carrier according the the way CC says to measure. Maybe its because we still have a factory rear bumper. But with only a 35” tire on a 17” wheel it seems that I shouldn’t be maxing out my highest position. It does leave the bottom holes free for me to fab up and mount a bracket for my rearview camera I guess.
I ran into another problem at this point. I got my lugs pressed into the tire mounting plate by a local shop for free, which was awesome of them! But when I went to install the piece on the carrier I found that the mounting holes in this plate did not line up with the long linear hole cut into the piece that mounts to the actual carrier arm. I ended up having to take a small file and oval the holes just a little to get the bolts through. Not a huge deal I guess, but powder coating gone and a little touch up paint to the bare metal that is left shouldn’t have to happen. I made sure to take off as little as possible to get the bolts to pass.

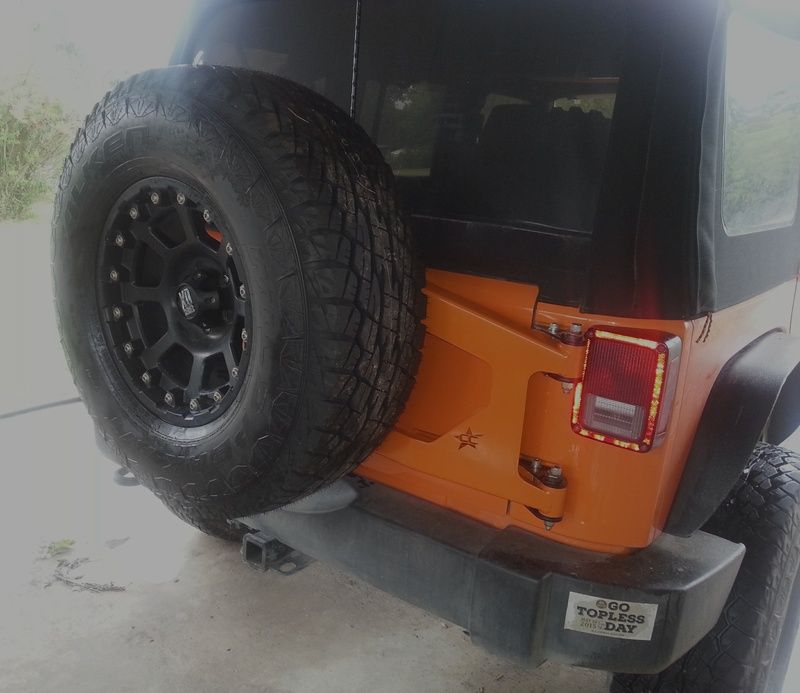
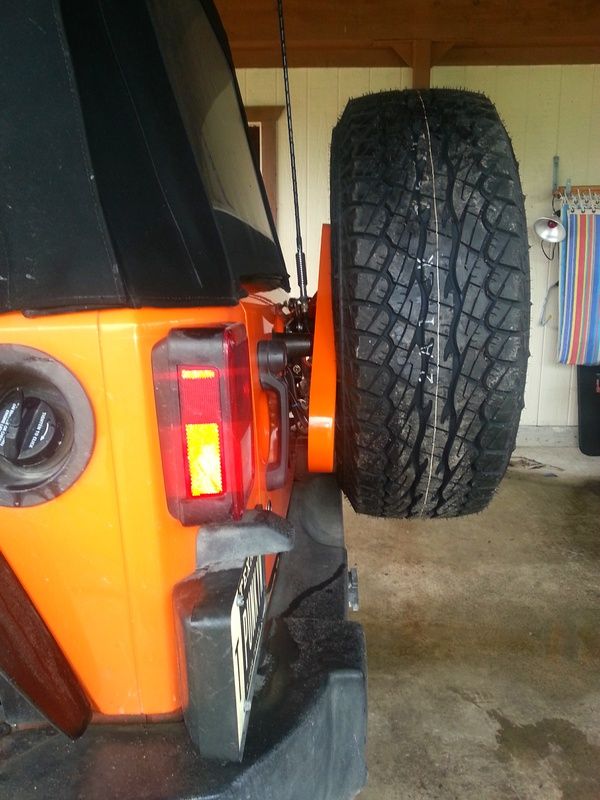
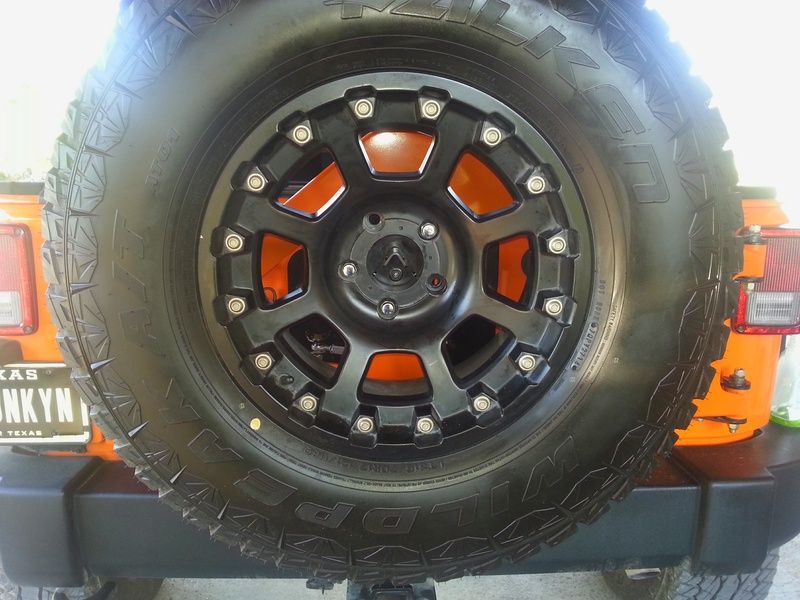
So at this point it is just mounting the tire. The lugs that CC sent don’t work for my wheel. Fortunately the ones I had on my original spare do. Fit seems good. It isn’t too close or too far from anything, clears the tailgate handle and tail lights, does block more rearview from the center mirror (but that is expected). There isn’t a squeak or rattle at all so far going down some rough Texas roads. The tire seems very secure and stable on its mount, and has 3 solid points of contact on the carrier arm along with the bolt plate.
Pros:
Overall install wasn’t difficult, product materials seem to be good quality, once installed it feels very solid and stable, and price was great since I bought it during the sale CC had along with free shipping. I like that it came bare metal since it let us customize it to our jeeps color.
Cons:
Fit of some pieces and some hardware seems a bit off requiring some modifications that I would have preferred to not have had to make and that will require me to have to go back later and address again. Every product should come with install directions or at least have them available. I did call CC last week to ask about install instruction availability, they said they didn’t have a set ready yet. But the guys there are very friendly and helpful. Unfortunately phone support can’t replace written and illustrated instructions. This was a holiday weekend and I’m sure they wouldn’t have been in while I was doing my install had I run into significant issues.
Overall:
Satisfied with the purchase and would recommend it to others as long as they are aware of some of the issues above and can take some steps to remedy them before powder coating and install. I probably could have saved those hinge arm inserts and reused them on the inside of the arm if I had removed them more carefully, but I didn’t think about that at the time. That might have been something mentioned in a set of written instructions. But like I said overall I consider this a good addition to our JKUR.
The carrier comes bare metal, disassembled, with hardware in plastic pack or loosely attached in the place it goes on the carrier. You can have it painted or powder coated, I guess you could even use bedliner. Whatever you use there will be some items you need to address to make things fit right as the fit tolerances on ours were crazy tight or not right requiring some finish and metal removal.


Start off by basically stripping the back of your jeep. I didn’t remove the tire bump stops since I didn’t have anything available to plug them with. But they don’t get in the way at all. I left my 3rd brake light wire in place since I plan to figure out a way to reuse it. I have a CB antenna cable that runs through the tailgate vent, and I plan to run a rearview camera in the next week or so. So I had to take the CC tailgate plate and drill a ľ” hole in the middle of it and run my wires through it and a rubber grommet. The opening in the grommet didn’t allow my CB coax to pass through it, so I did have to cut it. It was all sealed up using clear silicone caulking when I attached it to the tailgate. I ran my wires for my camera through the tailgate while I had it all opened up.


After this the tailgate gets closed and doesn’t get opened again till full installation of the hinges is done. I used a piece of scrap wood to create a small wedge to place between the bumper and the tailgate bottom on the hinge side. I marked the wood at a slope and cut it so that fully inserted it wouldn’t bump against the jeep body. Remove the plastic hinge caps from both the arms and the body. The arm caps can actually be reused after install if the clips don’t get messed up removing them. The hinge plate covers are trash.


Next is hinge removal. I recommend doing one complete hinge (both removal and new hinge install) at a time. I did my top hinge first. There are three torx bolts that hold the hinge to the body, and 2 bolts that hold the hinge arm to the tailgate. Two of the hinge bolts cant be accessed while the tailgate is closed. So since you cant open the tailgate during this install, you have to remove the two bolts holding the arm to the tailgate so you can swing open the arm and access the two bolts underneath. Take the whole hinge assembly off.


Now that you have your hinge assembly removed you need to free the hinge arm from the hinge plate. This can be accomplished by either grinding off one of the heads of the hinge pin and tapping out the pin, Or cutting it in the middle and tapping out the two pieces. I chose to cut the middle. On my first hinge I made a single cut, on my second I made two cuts toward the ends of the pin so that only small pieces needed to be tapped out while the arm was held in a vise. This was much easier. I also placed a piece of flexible, but thick plastic under my cut to protect the arm finish.


So now the new CC hinge plates needed to be installed. This was one of the first concerns I have with this carrier. The footprint of the new plate is slightly different than the footprint of the stock hinge plate. So unless your vehicle is brand new and hasn’t been dirty, suffered oxidation, or had the finish roughed up a little under the stock hinge plate, you will find that the finish around the new hinge plate edges shows that it isn’t perfect anymore. Don’t fully tighten down your hinge plate bolts just yet.

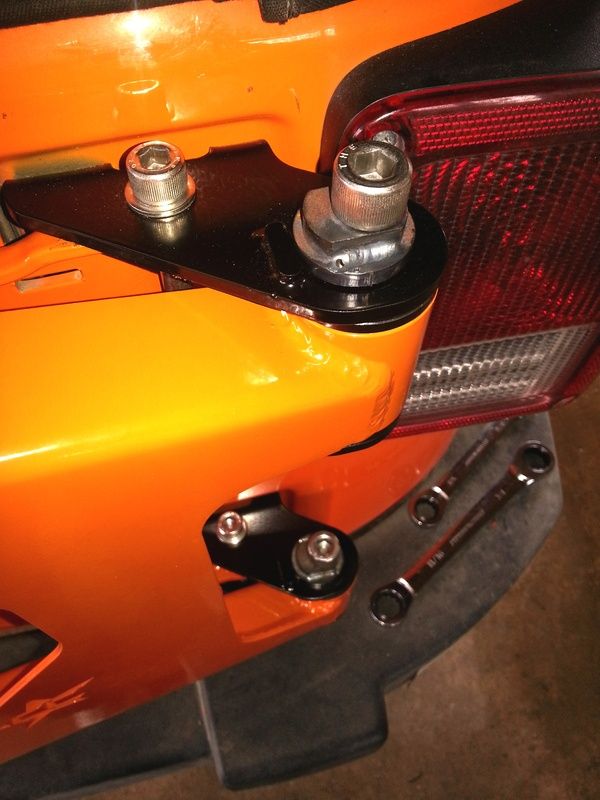
Once your hinge plate is installed reusing the factory hardware, its time to install your hinge arms. Another thing I encountered that I didn’t like…. The torx bolt is made to be set into a recess in the factory hinge plate hole. The CC plate holes are flat, so the torx bolts don’t recess into the plate to be flush mounted. I know they can be replaced at some point, but it would have been nice if CC had made the plate accommodate the factory bolt better. Anyway, now is when you place your hinge arm into the CC hinge plate. This is also where I found one of my biggest issues with this carrier. The hinge arms have small thin inserts in each hole that have a lip that goes over the outside of the hinge arm hole. Hard to explain, but I have included a pic below. There is one on each hole of the arm (4 total), which makes the arm a little wider right at the hole. This added width makes it impossible to insert the arms into position in the CC hinge plate. I had to remove at least one insert on each arm to get the arms to go into the hinge plate location. The problem with this is that removing them increases the inner diameter of the opening in the arm. So you get a loose fit. At some point im going to have to get new inserts, disassemble this carrier, and replace the inserts with the lip to the inside of the hinge arm to regain factory type fit. Right now without them I can open my tailgate and rock it very slightly at the hinges where the bolt doesn’t quite meet the walls of the hole. It still opens and closes without issue, But this shouldn’t be necessary on this carrier in my opinion. You can see how tight the fit is below even with the inserts removed. It actually scrapes finish from the hinge arms the first couple times you open and close the tailgate. And I didn’t tighten down the bolts super tight either. That is just how tight the fit is with almost no pressure from a tightened bolt. I also heavily greased both contact surfaces on the arms and hinge plates.


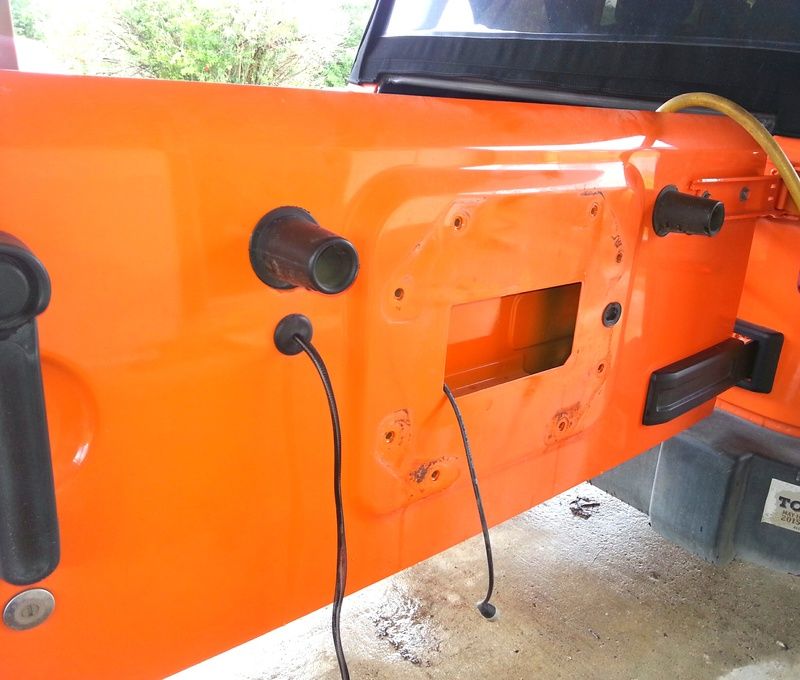
So now that you have your hinge arm in place and bolted down, you can attach your hinge arm back onto your tailgate. You will most likely find that the holes for your arm and tailgate don’t line up perfectly. This is why I mentioned above to not fully tighten your hinge plate bolts. What I did was line up my hinge arm and tailgate holes. Then I inserted the bolts and tighten them down just to hand tight, but a snug fit. There is only one hinge plate bolt that is accessible with the tailgate arm in the closed position, so I tightened this bolt down to hold my hinge plates position. Once it was tightly locked down I removed the hand tight hinge arm bolts from the tailgate and opened the hinge arm to access and tighten the two torx bolts that were covered in the closed position. Once the hinge plate is locked down tight you can reinstall your hinge arm to the tailgate and tighten both bolts all the way.


This pic is a repeat from the beginning. But it shows what I mean by opening the hinge arm up to access the two torx bolts it covers when closed.
So the process above gets repeated on both hinges. I don’t really think it would make any difference which hinge you did first. I just don’t recommend removing both hinges at the same time, even if you have the tailgate supported. Once both new hinge plates are installed, and the hinge arms are securely reattached to both the hinge plate and tailgate, you can open the tailgate again. You will most likely find that it is much stiffer to open due to the tight fit of the arms mentioned above. I would almost say that if you tightened everything at the hinge plate down very tight you could make your tailgate near impossible to open. This may actually be of some benefit on a trail since there isn’t a “lock open” device on the tailgate or carrier. So having a tight fit that keeps the tailgate from slamming shut on you if your jeep is off camber might give you a little safety. So I cant complain too much about that tight fit since I can see it saving me from potential injury at some point on a future trail.
So next comes the actual tire carrier arm install. The attachment and adjustment between the carrier arm and the tailgate plate is identical to what is done on the tire carrier/bumper combo that CC sells. So you can look on their site or have them email you this information. It gives you info on how to set/adjust the turnbuckle for preload, how to set the V bushing to meet the carrier arm interface, and how to measure to set up your carrier for your particular tire and wheel combo.
The carrier arm itself comes with 2 sets of 2 piece polymer bushings, 2 steel inserts that go into the polymer bushings once they are inserted into the carrier arm openings, and hardware including cam washers to adjust carrier arm angle for preload on your carrier arm. I used a rubber mallet to tap in the 2 piece polymer bushings. Then with help I held the arm in place at the hinge plate while my wife dropped in the insert and bolt/cam washer.


So now the arm is in place, but not connected to the tailgate plate. Install the adjustable turnbuckle to the appropriate position on the tailgate plate, also the V block. The fit tolerance for the turnbuckle ends and spacers is as tight as the fit on the hinges, so it will take a flat screwdriver and some patience to get the ends in place on both the plate and carrier arm. Once you have this done refer to the instructions for adjustment that come from CC to get your carrier adjusted, as I mentioned above.


I am mounted at the top of this carrier according the the way CC says to measure. Maybe its because we still have a factory rear bumper. But with only a 35” tire on a 17” wheel it seems that I shouldn’t be maxing out my highest position. It does leave the bottom holes free for me to fab up and mount a bracket for my rearview camera I guess.

I ran into another problem at this point. I got my lugs pressed into the tire mounting plate by a local shop for free, which was awesome of them! But when I went to install the piece on the carrier I found that the mounting holes in this plate did not line up with the long linear hole cut into the piece that mounts to the actual carrier arm. I ended up having to take a small file and oval the holes just a little to get the bolts through. Not a huge deal I guess, but powder coating gone and a little touch up paint to the bare metal that is left shouldn’t have to happen. I made sure to take off as little as possible to get the bolts to pass.

So at this point it is just mounting the tire. The lugs that CC sent don’t work for my wheel. Fortunately the ones I had on my original spare do. Fit seems good. It isn’t too close or too far from anything, clears the tailgate handle and tail lights, does block more rearview from the center mirror (but that is expected). There isn’t a squeak or rattle at all so far going down some rough Texas roads. The tire seems very secure and stable on its mount, and has 3 solid points of contact on the carrier arm along with the bolt plate.


Pros:
Overall install wasn’t difficult, product materials seem to be good quality, once installed it feels very solid and stable, and price was great since I bought it during the sale CC had along with free shipping. I like that it came bare metal since it let us customize it to our jeeps color.
Cons:
Fit of some pieces and some hardware seems a bit off requiring some modifications that I would have preferred to not have had to make and that will require me to have to go back later and address again. Every product should come with install directions or at least have them available. I did call CC last week to ask about install instruction availability, they said they didn’t have a set ready yet. But the guys there are very friendly and helpful. Unfortunately phone support can’t replace written and illustrated instructions. This was a holiday weekend and I’m sure they wouldn’t have been in while I was doing my install had I run into significant issues.
Overall:
Satisfied with the purchase and would recommend it to others as long as they are aware of some of the issues above and can take some steps to remedy them before powder coating and install. I probably could have saved those hinge arm inserts and reused them on the inside of the arm if I had removed them more carefully, but I didn’t think about that at the time. That might have been something mentioned in a set of written instructions. But like I said overall I consider this a good addition to our JKUR.

 05-27-2015, 01:08 PM
#6
JK Newbie
Thread Starter
Join Date: Feb 2013
Location: Wylie, Tx
Posts: 42
Likes: 0
Received 0 Likes
on
0 Posts
Not sure what lug patterns this will accomodate, but the tire mounting plate has multiple lug bolt holes for multiple patterns. Im sure CC would be able to let you know which patterns the plate will accomodate.
The antenna mount is a Terflex spare tire mount bracket. It is a very solid piece and works well in its position. The antenna does need to be removed inside most structures to keep it from dragging on the ceiling. And I did add a spring to handle low branches on trails. But that is the same with most mounts.
I dont know of any accessory mount options for this carrier. I didnt see any available on the CC website. Im trying to manage weight right now since we are still running 4.10 gearing with bigger shoes and a belly covered in plate steel, so I didnt plan to add anything on ours. I went with this carrier so I can look into an aluminum rear bumper at some point.
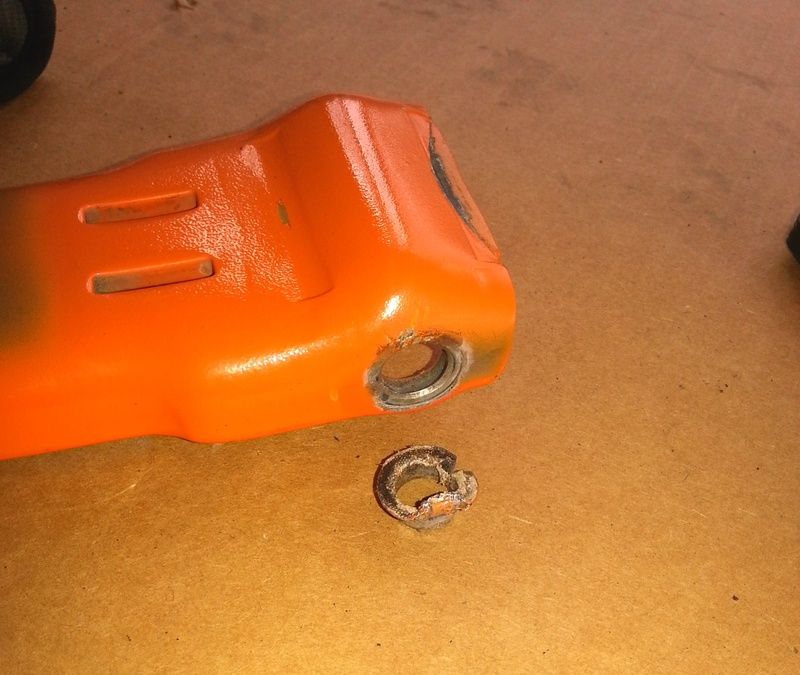
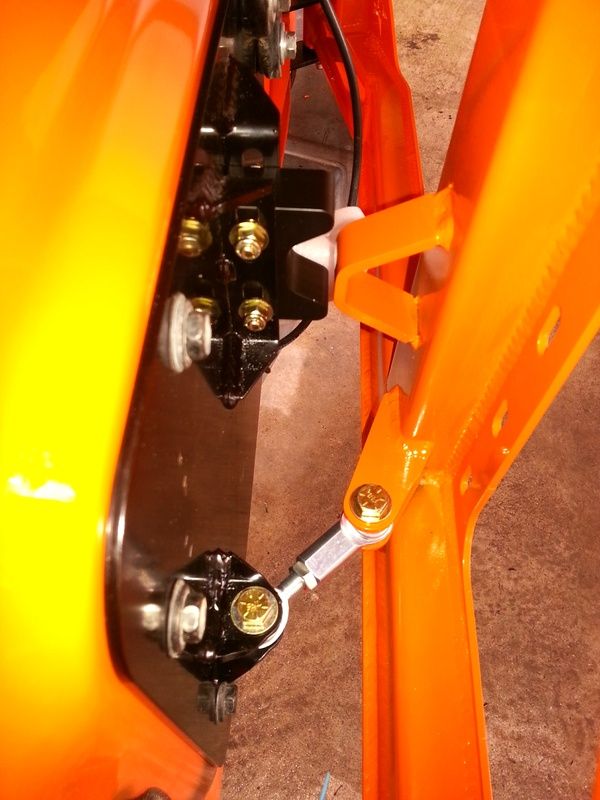
I found one other issue that bothers me. The cam washer that allows for adjustment in the carrier arm is bare metal. I didnt think about that when I was installing. As alot of you probably already know we are getting some rain in Texas. So just a couple days after install the washer looks like this. I guess when I go back to add the inserts into the hinge arms Ill have to do something with these washers to make sure they dont fully rust away. It would have been nice if they used stainless or once again if there had been written instructions to let you know to paint or powder coat them. But then again with the nature of what they do any finish will prob get stripped from the edge that meets up with the adjustment tab on the hinge plate.
The antenna mount is a Terflex spare tire mount bracket. It is a very solid piece and works well in its position. The antenna does need to be removed inside most structures to keep it from dragging on the ceiling. And I did add a spring to handle low branches on trails. But that is the same with most mounts.
I dont know of any accessory mount options for this carrier. I didnt see any available on the CC website. Im trying to manage weight right now since we are still running 4.10 gearing with bigger shoes and a belly covered in plate steel, so I didnt plan to add anything on ours. I went with this carrier so I can look into an aluminum rear bumper at some point.
I found one other issue that bothers me. The cam washer that allows for adjustment in the carrier arm is bare metal. I didnt think about that when I was installing. As alot of you probably already know we are getting some rain in Texas. So just a couple days after install the washer looks like this. I guess when I go back to add the inserts into the hinge arms Ill have to do something with these washers to make sure they dont fully rust away. It would have been nice if they used stainless or once again if there had been written instructions to let you know to paint or powder coat them. But then again with the nature of what they do any finish will prob get stripped from the edge that meets up with the adjustment tab on the hinge plate.
 05-31-2015, 07:36 AM
#7
JK Newbie

Join Date: Apr 2011
Location: Las Vegas, NV
Posts: 1
Likes: 0
Received 0 Likes
on
0 Posts
I like the look and the fact that it swings with the tailgate. My kids throw their soccer gear in the back after practice, and I knew they'd whine and complain if they had to go through two steps (swing open the carrier, then open the tailgate). This carrier seems like the best option if you're staying with stock bumpers. I went with the HyLine Offroad bumper with its tire carrier. It is great, very solid, easy to install, and the carrier swings smoothly along with the tailgate. No whining from the kids.
Last edited by Ryan0260; 05-31-2015 at 08:09 PM.
Trending Topics
05-31-2015, 08:01 AM
#8
JK Junkie
that comes through with quality and dosent have rust issues ? 
other than that , It looks good . Same issue i have with my or fab tire carrier hinge parts w/surface rusting
other than that , It looks good . Same issue i have with my or fab tire carrier hinge parts w/surface rusting
Last edited by jeepmojo; 05-31-2015 at 08:19 AM.
06-03-2015, 07:24 PM
#9
JK Newbie
Thread Starter
Join Date: Feb 2013
Location: Wylie, Tx
Posts: 42
Likes: 0
Received 0 Likes
on
0 Posts
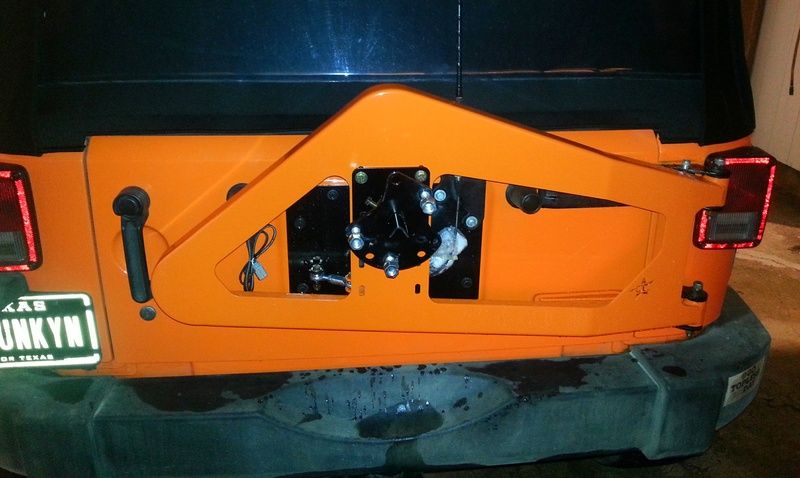
Got the camera mounted and wired up. Still need to get it into the dealership to get the rearview camera feature activated on the headunit. It sucks that Jeep doesnt just turn those features on automatically knowing that owners might add them later. I guess its a money thing. Hopefully it all works once they do, cuz my electronics installs are thorough. Lots wire looming, hiding wires, taping, and sealing. Id hate to have to take it apart again to trouble shoot.
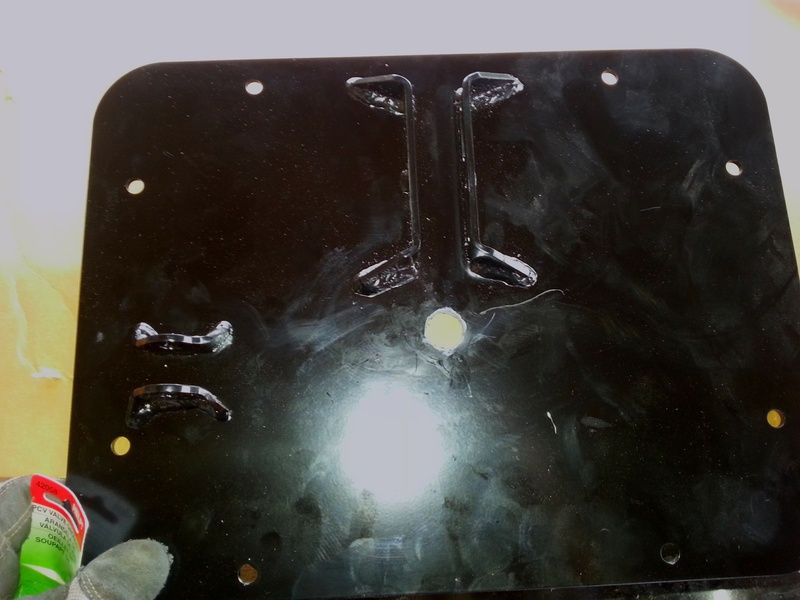
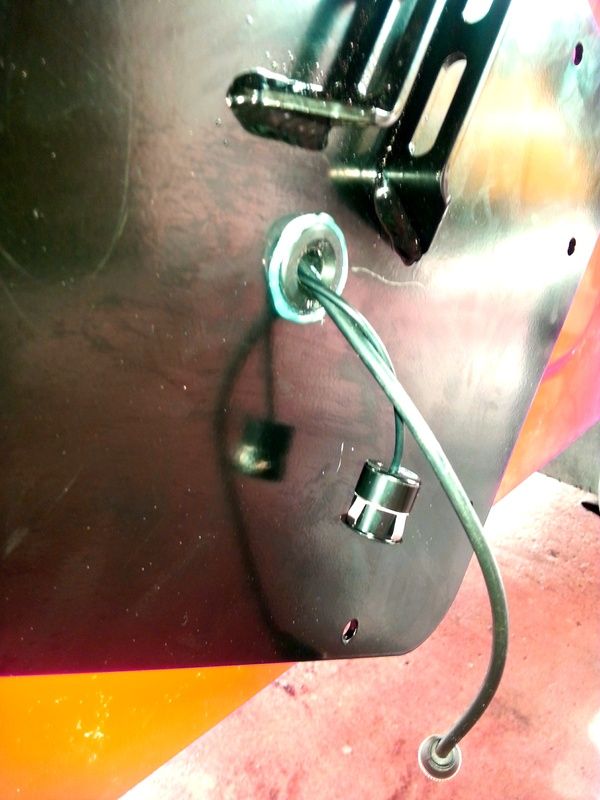
I drilled through the plate that holds the tire to make my camera mounting location. The camera came with a worthless 18.5mm hole saw. I just used a 3/4" step bit, then primed the bare metal in the hole. I sealed the cam in place with clear silicone, protected the wiring with loom and electrical tape along the entire length since its such small gauge wiring. The tire mount plate has a protrusion that is meant for the included licesnse plate mount. Since the camera is right under it I figure it gives it a little protection. Ill see how the image looks once its up and running, that mount may show up. But the main purpose of the rearview cam is to be able to see whats directly behind that huge blindspot created by the tire. So this location seemed pretty good even though it was a little higher than I would have prefered.
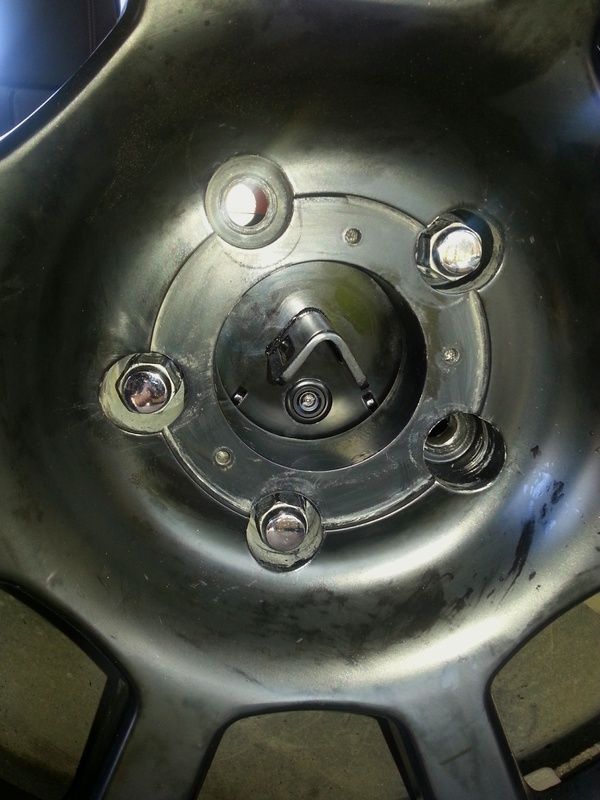
I drilled through the plate that holds the tire to make my camera mounting location. The camera came with a worthless 18.5mm hole saw. I just used a 3/4" step bit, then primed the bare metal in the hole. I sealed the cam in place with clear silicone, protected the wiring with loom and electrical tape along the entire length since its such small gauge wiring. The tire mount plate has a protrusion that is meant for the included licesnse plate mount. Since the camera is right under it I figure it gives it a little protection. Ill see how the image looks once its up and running, that mount may show up. But the main purpose of the rearview cam is to be able to see whats directly behind that huge blindspot created by the tire. So this location seemed pretty good even though it was a little higher than I would have prefered.

 06-03-2015, 07:33 PM
#10

I found one other issue that bothers me. The cam washer that allows for adjustment in the carrier arm is bare metal. I didnt think about that when I was installing. As alot of you probably already know we are getting some rain in Texas. So just a couple days after install the washer looks like this. I guess when I go back to add the inserts into the hinge arms Ill have to do something with these washers to make sure they dont fully rust away. It would have been nice if they used stainless or once again if there had been written instructions to let you know to paint or powder coat them. But then again with the nature of what they do any finish will prob get stripped from the edge that meets up with the adjustment tab on the hinge plate.
Genright had this issue originally with the bare steel hinge brackets for their Aluminum carriers. They shipped me a new set for free that were entirely zinc-plated. Have held up well since. Now I think all of their AL carriers come shipped with them zinc-plated.