
LOD slider install write up - with pics
 05-26-2014, 01:21 PM
#1
JK Newbie
Thread Starter
Join Date: Apr 2014
Location: Portland, ME
Posts: 67
Likes: 0
Received 0 Likes
on
0 Posts
Just got my 2014 jku in Anvil last week and already put the drill to her.. Decided I would take a few pics and do a quick write up on the installation process of LOD's frame mounted rock sliders. First off a few things before we start as to the order process. I ordered my sliders along with the armor lite mid width front bumper with bull bar and the 4th generation armor lite rear bumper with door linked tire carrier. The sliders and front bumper were ready and delivered to me within 2.5 weeks, I am still waiting for rear bumper witch was ordered around 4 weeks ago (they told me it would take about 5-6 weeks). So far Chris at LOD has been awesome in every way with customer service and quality. I also opted for the zinc coating and the textured black powder coat which look flawless. Time will tell though. I also was able to get a pretty good discount on product and shipping because I ordered all three items at once...
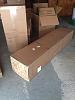
So how did the sliders arrive at my house: In a 2x3 stud built crate and screwed in place then bolted together. Pretty awesome
Upon opening the powder coating is flawless throughout and these things are built to take a serious beating! reinforced every 6-8 inches or so from end to end.
Sorry I didnt take pictures of the sliders in the box as I was way too excited once I opened them. Also the 6 finishing plates for the sliders came in a separate box that I didn't notice initially as someone had put it in the garage while I was work - this almost led to a heated phone call to LOD and would have ended in an I'm a jackass moment
Now to the install process:
First of all, don't let the fact that you have to drill and tap the frame of your new jeep keep you from buying these sliders. I was scared initially and just decided to pull the trigger and deal with it. It really isn't that hard. I have no extensive mechanical experience just a fair amount of basic repair work on my 1990 yj (you guys know what I'm talking about).
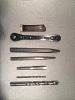
Here's what you need to buy or have in order to install these sliders:
Some sort of paint marker - that isn't black
A center punch: I used two - a 7/32 punch and then stepped up to a 1/4 punch (you could get away with just the 1/4 punch
A serious drill
A pilot drill bit, final drill bit, and hand tap set: pilot bit I used was a 9/64 cobalt steel bit (this is bigger than recommended but it gives the big bit a lot less work to do), final bit sized 25/64, and the hand tap is a 7/16 - 20 - there are posts that a milwaukee set was mismatched so I bought these two separate at grainger and made sure they were correct sized by the stamp on the bit itself.
A 1/4 inch square ratchet wrench is a huge help: This wrench is known as a 1/4 inch refrigerator service wrench
Cutting oil: I used 3 in 1 oil
If I could give you 1 piece of advice its is to not cheap out on these items - buy high quality high speed bits - it will save you a serious amount of time and serious amout of frustration.
total cost of these items together was around $50 (sliders are around $650)
Pic of the items you need:
Now the install part: I will post instructions for one side - both are exactly the same
First u need to undo two bolts one that holds the transmission skid and the other holding a portion of the transfer case skid - i believe these are 18 mm bolts
I had a friend help with this next part and I highly recommend this being a two person job
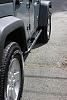
Place the slider on the side of your jk where you took the bolts out THE SLIDER GOES UNDER EVERYTHING - see pics
Replace the two bolts to hold the sliders in place making sure they are fairly snug
Attachment 555677
Next: you need to mark all the holes to drill with your paint pen. 7 holes need to be marker per side. 1 in the front bracket, 2 in the middle bracket, and 4 in the rear bracket (I had a very small gap between the frame and bottom area of the mount - be sure to have a friend push up on the bottom before marking the top holes so they are perfectly aligned after you snug down the screws)
Next: Center punch all of these holes with the 7/32 followed by the 1/4 inch punch (or just the 1/4 punch) (make sure you get a good deep punch so the tip of the pilot bit will fit in the hole and keep from walking out, I had to punch each hole about 4 - 6 times with each punch
Next: Drill all your pilot holes with the 9/64th bit making sure that the bit is dead center
Next: Using the 25/64th bit drill final holes
Next: Using the hand tap, the refrigerator wrench, and some cutting oil hand tap all the holes. Go slowly and don't rush - this is the most important part and fairly easy - keep the tap straight and keep going until you feel a loss of resistance with the tap then slowly back the tap out..
IMPORTANT NOTE: I highly recommend doing one hole first then testing to make sure your hardware will fit the hole, just to make sure, then go to town...
After you have tapped all the holes put the slider back on, replace the two bolts you initially held the slider on with and then screw in the 7 bolts that come with the sliders keeping in mind to insert the 2 bolts in the bottom of the rear mount before inserting the top one's to help line up the holes. NOTE: there are two long carriage bolts and some beast washers that come in the kit. These are meant for the front bracket and supposed to go through the existing hole in the frame (no offense to LOD but I think these are a waste, there is no way these bolts will ever load onto the frame and would only pitch the frame if you ever took a SERIOUS hit on the slider in just the right spot, the directions do not mention the use of these bolts and they seem worthless to me so I opted out of using them figuring the other 7 were hardcore enough, I also thought it would be a better idea to leave the hole and use it as a drain hole so I can power wash out the great New England salt, but I could be wrong, so have at them if you want..... here is a pic of the hole where they should go
Attachment 555684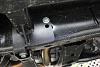
IMPORTANT NOTE #2: Do not crank down on these bolts with a torque wrench or something crazy like that, just wrench tighten them by hand, they can be stripped and then you are serious F'd.
Next: Crack a cold one, rest your arm and, cool down your drill
Next: Do the other side and you are D U N
FINAL PICS!!!
Attachment 555697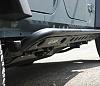
So how did the sliders arrive at my house: In a 2x3 stud built crate and screwed in place then bolted together. Pretty awesome
Upon opening the powder coating is flawless throughout and these things are built to take a serious beating! reinforced every 6-8 inches or so from end to end.
Sorry I didnt take pictures of the sliders in the box as I was way too excited once I opened them. Also the 6 finishing plates for the sliders came in a separate box that I didn't notice initially as someone had put it in the garage while I was work - this almost led to a heated phone call to LOD and would have ended in an I'm a jackass moment
Now to the install process:
First of all, don't let the fact that you have to drill and tap the frame of your new jeep keep you from buying these sliders. I was scared initially and just decided to pull the trigger and deal with it. It really isn't that hard. I have no extensive mechanical experience just a fair amount of basic repair work on my 1990 yj (you guys know what I'm talking about).
Here's what you need to buy or have in order to install these sliders:
Some sort of paint marker - that isn't black
A center punch: I used two - a 7/32 punch and then stepped up to a 1/4 punch (you could get away with just the 1/4 punch
A serious drill
A pilot drill bit, final drill bit, and hand tap set: pilot bit I used was a 9/64 cobalt steel bit (this is bigger than recommended but it gives the big bit a lot less work to do), final bit sized 25/64, and the hand tap is a 7/16 - 20 - there are posts that a milwaukee set was mismatched so I bought these two separate at grainger and made sure they were correct sized by the stamp on the bit itself.
A 1/4 inch square ratchet wrench is a huge help: This wrench is known as a 1/4 inch refrigerator service wrench
Cutting oil: I used 3 in 1 oil
If I could give you 1 piece of advice its is to not cheap out on these items - buy high quality high speed bits - it will save you a serious amount of time and serious amout of frustration.
total cost of these items together was around $50 (sliders are around $650)
Pic of the items you need:
Now the install part: I will post instructions for one side - both are exactly the same
First u need to undo two bolts one that holds the transmission skid and the other holding a portion of the transfer case skid - i believe these are 18 mm bolts
I had a friend help with this next part and I highly recommend this being a two person job
Place the slider on the side of your jk where you took the bolts out THE SLIDER GOES UNDER EVERYTHING - see pics
Replace the two bolts to hold the sliders in place making sure they are fairly snug
Attachment 555677
Next: you need to mark all the holes to drill with your paint pen. 7 holes need to be marker per side. 1 in the front bracket, 2 in the middle bracket, and 4 in the rear bracket (I had a very small gap between the frame and bottom area of the mount - be sure to have a friend push up on the bottom before marking the top holes so they are perfectly aligned after you snug down the screws)
Next: Center punch all of these holes with the 7/32 followed by the 1/4 inch punch (or just the 1/4 punch) (make sure you get a good deep punch so the tip of the pilot bit will fit in the hole and keep from walking out, I had to punch each hole about 4 - 6 times with each punch
Next: Drill all your pilot holes with the 9/64th bit making sure that the bit is dead center
Next: Using the 25/64th bit drill final holes
Next: Using the hand tap, the refrigerator wrench, and some cutting oil hand tap all the holes. Go slowly and don't rush - this is the most important part and fairly easy - keep the tap straight and keep going until you feel a loss of resistance with the tap then slowly back the tap out..
IMPORTANT NOTE: I highly recommend doing one hole first then testing to make sure your hardware will fit the hole, just to make sure, then go to town...
After you have tapped all the holes put the slider back on, replace the two bolts you initially held the slider on with and then screw in the 7 bolts that come with the sliders keeping in mind to insert the 2 bolts in the bottom of the rear mount before inserting the top one's to help line up the holes. NOTE: there are two long carriage bolts and some beast washers that come in the kit. These are meant for the front bracket and supposed to go through the existing hole in the frame (no offense to LOD but I think these are a waste, there is no way these bolts will ever load onto the frame and would only pitch the frame if you ever took a SERIOUS hit on the slider in just the right spot, the directions do not mention the use of these bolts and they seem worthless to me so I opted out of using them figuring the other 7 were hardcore enough, I also thought it would be a better idea to leave the hole and use it as a drain hole so I can power wash out the great New England salt, but I could be wrong, so have at them if you want..... here is a pic of the hole where they should go
Attachment 555684
IMPORTANT NOTE #2: Do not crank down on these bolts with a torque wrench or something crazy like that, just wrench tighten them by hand, they can be stripped and then you are serious F'd.
Next: Crack a cold one, rest your arm and, cool down your drill
Next: Do the other side and you are D U N
FINAL PICS!!!
Attachment 555697
Last edited by JustJeepinWithYa; 05-26-2014 at 01:32 PM. Reason: Pictures didnt post
 05-26-2014, 01:52 PM
#3
Great job man. I've installed 4 sets of these and they are great. I tack welded the tap into a 1/4" socket and use an extension and ratchet to get more space. Just a top for others. Enjoy.
sent from my work leash
sent from my work leash
05-26-2014, 03:29 PM
#5
Trending Topics


 06-03-2014, 09:53 AM
#9
JK Enthusiast
Join Date: Jan 2007
Location: Big Spring Texas
Posts: 293
Likes: 0
Received 0 Likes
on
0 Posts
I had issues mounting mine....tapping the holes. I took them to a shop to get them installed. I was getting frustrated with them and figured let someone else do it before I screwed it up
Sent from my iPhone using Tapatalk
Sent from my iPhone using Tapatalk
Last edited by Maxcustody; 06-05-2014 at 12:28 AM.
06-03-2014, 05:02 PM
#10
JK Newbie
Thread Starter
Join Date: Apr 2014
Location: Portland, ME
Posts: 67
Likes: 0
Received 0 Likes
on
0 Posts
That sucks...... What issues were you having with the tap???