NJKURPat's Rubi Build
 11-05-2015, 11:01 AM
#21
JK Enthusiast
Thread Starter
Join Date: Dec 2014
Location: Denver
Posts: 248
Likes: 0
Received 0 Likes
on
0 Posts
So, On 10/15 our club had a trip up to Rausch. Myself, a TJ, 4Runner, and 2Dr JK started the trip from Blacksburg to Rausch just before 6pm. Our navigator in the 4Runner notified everyone of traffic so we got on a back highway before our journey even started (this was going to be one hell of a trip). After about 45 minutes the TJ notified us his engine light had just come on, and before he was even off the CB I let him know white smoke was billowing out of his tailpipe. We pulled over and concluded his transmission was overfilled and the heat was causing it to boil out of the dipstick, causing it to burn on his exhaust. So, back on the road we went for about 30 minutes before we decided to get on the highway (81). Everything was normal until we got over 65 when more smoke starting coming out from under the TJ, but once we slowed to 50 it disappeared. About 20 minutes later the smoke was worse then before so we pulled off to the side of 81. We came to the conclusion that a tranny cooler would help and the nearest advance was a 10 minute limp away. So, at roughly 830pm we installed a tranny cooler in the TJ.

For the rest of the drive we kept it at a safe speed of 55 and had no incidents. After several pit stops for tranny coolers, white smoke, food, gas, construction, traffic, and constant rerouting to avoid more traffic we arrived at Rausch at 4am!!!! Yes, what should have taken 6 hours took a little over 10.
Two of our friends who were trailering a TJ (axle swap and 37s the week prior) and a Bronco (40's and chopped up) left at 10pm because the TJs steering was binding and they had to remount the trackbar and draglink. Two parts was supposed to arrive that day and never showed up, so we called USPS and they let him pick it up after close so he could make the trip.
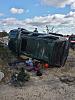
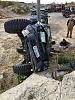
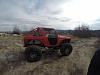
The first day we started off easy running a blue to test everyones rigs and see how we were going to divide up for the rest of the day. First trail went without a hitch so we wanted to play around on the comp course before we started to drive further into the property. After smashing my skids thoroughly into my gas tank I came to the conclusion that I need some HD skids soon haha. Then just as we were about to leave the 4Runner was stuck on his cross-member on a double hump clumb right behind the office. He simply couldn't make it over, so we had to lift him off his cross-member and ease him down. As soon as he started to roll backwards he took a weird bounce and we all knew what was coming. Everyones hands reached out to try and save it, but we just couldn't get there in time. So, before noon on day one after roughly 3 hours of sleep we had the first casualty.
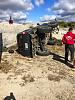
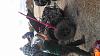
We went to camp for lunch, and took off all the damaged body panels that we could, duct taped the broken rear windows and moon roof, and made some high clearance fenders with his hi-lift. I think a full cage tied to the frame has moved up on my list.
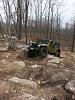
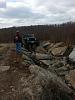
Then the next trail we ran was 5-C (I think), and right after the small hill to climb to enter the trail there is a 2 boulder tight turn obstacle with bypass. I was the 3rd rig to give it a shot and after about 3 or 4 attemps of trying to crawl it fully locked I decided to give it a good bump and gas it right before I was getting hung up. So as soon as I bump it, my jeep bounces to the passenger side and my rubi rails were pretty much ineffective. So now after half a day of wheeling my mod list has changed priority to skids, frame mounted/welded sliders, full cage.
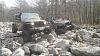
The rest of day 1 was uneventful and everyones rigs performed great.
For the rest of the drive we kept it at a safe speed of 55 and had no incidents. After several pit stops for tranny coolers, white smoke, food, gas, construction, traffic, and constant rerouting to avoid more traffic we arrived at Rausch at 4am!!!! Yes, what should have taken 6 hours took a little over 10.
Two of our friends who were trailering a TJ (axle swap and 37s the week prior) and a Bronco (40's and chopped up) left at 10pm because the TJs steering was binding and they had to remount the trackbar and draglink. Two parts was supposed to arrive that day and never showed up, so we called USPS and they let him pick it up after close so he could make the trip.
The first day we started off easy running a blue to test everyones rigs and see how we were going to divide up for the rest of the day. First trail went without a hitch so we wanted to play around on the comp course before we started to drive further into the property. After smashing my skids thoroughly into my gas tank I came to the conclusion that I need some HD skids soon haha. Then just as we were about to leave the 4Runner was stuck on his cross-member on a double hump clumb right behind the office. He simply couldn't make it over, so we had to lift him off his cross-member and ease him down. As soon as he started to roll backwards he took a weird bounce and we all knew what was coming. Everyones hands reached out to try and save it, but we just couldn't get there in time. So, before noon on day one after roughly 3 hours of sleep we had the first casualty.
We went to camp for lunch, and took off all the damaged body panels that we could, duct taped the broken rear windows and moon roof, and made some high clearance fenders with his hi-lift. I think a full cage tied to the frame has moved up on my list.
Then the next trail we ran was 5-C (I think), and right after the small hill to climb to enter the trail there is a 2 boulder tight turn obstacle with bypass. I was the 3rd rig to give it a shot and after about 3 or 4 attemps of trying to crawl it fully locked I decided to give it a good bump and gas it right before I was getting hung up. So as soon as I bump it, my jeep bounces to the passenger side and my rubi rails were pretty much ineffective. So now after half a day of wheeling my mod list has changed priority to skids, frame mounted/welded sliders, full cage.
The rest of day 1 was uneventful and everyones rigs performed great.
 11-05-2015, 11:35 AM
#22
JK Enthusiast
Thread Starter
Join Date: Dec 2014
Location: Denver
Posts: 248
Likes: 0
Received 0 Likes
on
0 Posts
When Day 2 started, two other alumni members with buggys had joined up with us and the bronco and tj w/ 37s decided to run some harder trails. Before we even got out of the lot, the TJ with transmission problems stopped entering gear. We tried to play around for a bit, but eventually gave up and he rode with the 4Runner in our group. So myself, the 2dr, and 4Runner started together. We drove up to powerline to run 12. Once we got on 12 we got pretty lost (this section of Rausch seems to be poorly mapped and unkempt) and ended up on part of trail 20. This was great for myself and the 4runner, but the 2Dr had to take the bypass.
After that, by chance we met up with the buggy group and headed down to Rock Creek. The buggys entered no problem, so it was the 4Runners turn. As soon as he was turned into the creek, we heard a bang. Wondering what it was, he started to reverse out and another bang. Turns out he blew both CVs at the ujoint before he was even in the trail. I was able to run rock creek without issue thanks to some good spotting and line choice.
So we decided to break off after being told my JK was too wide and unfortunately under built for the next trail without sustaining some damage, and met up with the 2wd 4runner and JK that had to skip rock creek. As we met up it was decided to put in the spare CV so he would at least be in 3wd for the rest of the day.
After arriving at camp we were trying to figure out how to get the TJ with a blown transmission back home. It was decided that a tow bar and my JK would be the solution. I gotta say, that was one interesting drive. I took it slow, and used engine braking on all the hills but still got a bit sketchy in those SWVA mountains.
Just after airing up, I had to play on the RTI ramp. It looks like I was one of many because there is a hole in the ground right where my passenger tire ended up, causing me to max out a little earlier then I wanted.
04-18-2016, 07:48 PM
#23
JK Enthusiast
Thread Starter
Join Date: Dec 2014
Location: Denver
Posts: 248
Likes: 0
Received 0 Likes
on
0 Posts
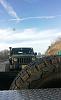
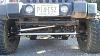
So, drove to Rausch again on 3/4 - 3/7 for some wheeling during spring break. First day we ran pretty hard on trails 20, Rock Creek, TFT, comp course, and some other blues and blacks that met our groups level. Wheeling was great, and had a blast. Knew that when I got home diff covers and steering would need to be replaced, but nothing I wasn't expecting at some point.
Sick bronco on 42s that joined our group the first day
After that I drove to Seven Springs PA for some spring snowboarding with a couple buddies and had a blast for 4 days. I took it easy driving there because of my steering a kept an eye on my diffs. About an hour and a half south of Morgantown, WV I missed the exit and needed to take a u-turn. I slowed down and pulled over into the median (no traffic on either side of the highway), and downshifted into 2nd. I saw that I could continue through the turn and kept speed. As I was entering the highway I hit a bump in the road. All of a sudden, I lost power and my RPMs shot up. I threw on the hazards and used momentum to move off the highway. I waited for traffic to pass, and tried accelerating again but no dice. I knew my DS had gone, just a feeling I had. So I hop out, and here is what I find:
Note: Cant figure out why my photos are rotated here, but not on my computer. Pics taken with my phone and landscape are oriented properly, but vertical photos are rotated.
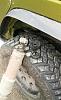
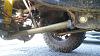
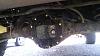
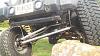
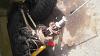
Rear DS broke off at the flange.
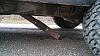
Snapped passenger side rear lower ca
Bent driver side rear lower ca 90*
Caused the axle to shift forward about 3 inches and the pinion to shoot up.
Assuming this is what caused the DS failure.
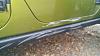
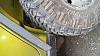
Tires shoved forward into my TRIMMED pinch seam and rubi rails.
I took off 2.5-3" out of the rails and seam when I got 35s, if I hadn't probably would have lost both tires.
Sick bronco on 42s that joined our group the first day
After that I drove to Seven Springs PA for some spring snowboarding with a couple buddies and had a blast for 4 days. I took it easy driving there because of my steering a kept an eye on my diffs. About an hour and a half south of Morgantown, WV I missed the exit and needed to take a u-turn. I slowed down and pulled over into the median (no traffic on either side of the highway), and downshifted into 2nd. I saw that I could continue through the turn and kept speed. As I was entering the highway I hit a bump in the road. All of a sudden, I lost power and my RPMs shot up. I threw on the hazards and used momentum to move off the highway. I waited for traffic to pass, and tried accelerating again but no dice. I knew my DS had gone, just a feeling I had. So I hop out, and here is what I find:
Note: Cant figure out why my photos are rotated here, but not on my computer. Pics taken with my phone and landscape are oriented properly, but vertical photos are rotated.
Rear DS broke off at the flange.
Snapped passenger side rear lower ca
Bent driver side rear lower ca 90*
Caused the axle to shift forward about 3 inches and the pinion to shoot up.
Assuming this is what caused the DS failure.
Tires shoved forward into my TRIMMED pinch seam and rubi rails.
I took off 2.5-3" out of the rails and seam when I got 35s, if I hadn't probably would have lost both tires.
07-24-2016, 02:06 PM
#24
JK Enthusiast
Thread Starter
Join Date: Dec 2014
Location: Denver
Posts: 248
Likes: 0
Received 0 Likes
on
0 Posts
Well, now that I've remember and finally settled after moving...It's time for a much needed update. So where did we leave off?
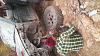
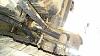
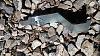
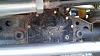
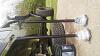
Okay, I'm stuck on the side of the highway and my insurance quoted me at ~$450 for the 160 mile trek back to blacksburg. I reached out to a buddy with a truck and trailer who agreed to come get me. Insurance pulled me off into a gas station so I decided to use that time to start pulling parts and assessing damage.
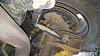
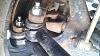
Snapped control arm
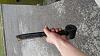
Rear driveshaft
Loading up
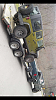
View on the tow home
Once I got home it was time to start reaching out to vendors, friends, etc for parts and maybe some help in labor. Being in school full time, and working part time, the jeep sat for about 3 weeks while I did research and ordered parts.
Okay, I'm stuck on the side of the highway and my insurance quoted me at ~$450 for the 160 mile trek back to blacksburg. I reached out to a buddy with a truck and trailer who agreed to come get me. Insurance pulled me off into a gas station so I decided to use that time to start pulling parts and assessing damage.
Snapped control arm
Rear driveshaft
Loading up
View on the tow home
Once I got home it was time to start reaching out to vendors, friends, etc for parts and maybe some help in labor. Being in school full time, and working part time, the jeep sat for about 3 weeks while I did research and ordered parts.
Last edited by NJKURPat; 07-24-2016 at 02:16 PM.
07-24-2016, 02:15 PM
#25
JK Enthusiast
Thread Starter
Join Date: Dec 2014
Location: Denver
Posts: 248
Likes: 0
Received 0 Likes
on
0 Posts
Being a college student, in apartment style housing, my garage was a gravel lot that my jeep sat on for 3 weeks before repairs started. I had a weekend off of work, parts were being delivered, and I needed to get rolling again.
Being the obvious damage, I opted to start with replacing the control arms. The rear lowers were completely destroyed, the rear uppers were showing signs of stress, and the front lowers had taken a beating. Instead of just getting by, I opted to complete my set and ordered 6 MC control arms. I also opted to fully replace all my hardware with grade 8 as it was almost 8 years old, rusty, and beat up.
I didn't take many pictures of the control arm install. I had two friends helping, and rolling around in a gravel lot for hours isn't fun.
These frame side bolts are the biggest PITA
I'll get some more CA pictures and update soon (i hope)
07-24-2016, 02:29 PM
#26
JK Enthusiast
Thread Starter
Join Date: Dec 2014
Location: Denver
Posts: 248
Likes: 0
Received 0 Likes
on
0 Posts
After replacing the control arms, I just slowly started unbolting broken parts and putting new ones in.
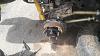
I ended up getting a 2015 drive shaft from a friend of a friend at a dealer who had just pulled it from a customer who bought a package from them. Now on a new jeep, without rust, salt, corrosion you should theoretically be able to pull the shaft out of the flange at either the tcase or pinion. The tcase came off with a lot of persuasion and leverage from pulling on the DS (remember this was taken out in the gas station parking lot). Now I had to remove the flange that was left on the pinion from where the joint disintegrated.
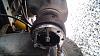
That thing was a b***h. It was so stuck and I had no leverage. I tried soaking in PB, heating the flange, a punch from the back, etc etc etc throwing beer at it. Finally since the jeep was fwd at this point with the CAs set I drove it to a shop and they used a slide hammer to get it out....still took some effort tho.
With that out, the rear drive shaft went in easy. Just 8 bolts on each side haha what a bitch on a CV joint. I inspected the front drive shaft out of curiosity. Then, discovered it had rubbed on a rock a lot and dented/damaged near the u-joint and ripped the slip joint boot. So the slip joint is seized and it is currently in the back of my jeep.
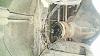
Then after that, it was time to address the damage/leaks in both diff covers. For that I chose the PS diff covers. They went in great and clearance is no problem with the new design.
Rear
Front
I ended up getting a 2015 drive shaft from a friend of a friend at a dealer who had just pulled it from a customer who bought a package from them. Now on a new jeep, without rust, salt, corrosion you should theoretically be able to pull the shaft out of the flange at either the tcase or pinion. The tcase came off with a lot of persuasion and leverage from pulling on the DS (remember this was taken out in the gas station parking lot). Now I had to remove the flange that was left on the pinion from where the joint disintegrated.
That thing was a b***h. It was so stuck and I had no leverage. I tried soaking in PB, heating the flange, a punch from the back, etc etc etc throwing beer at it. Finally since the jeep was fwd at this point with the CAs set I drove it to a shop and they used a slide hammer to get it out....still took some effort tho.
With that out, the rear drive shaft went in easy. Just 8 bolts on each side
haha what a bitch on a CV joint. I inspected the front drive shaft out of curiosity. Then, discovered it had rubbed on a rock a lot and dented/damaged near the u-joint and ripped the slip joint boot. So the slip joint is seized and it is currently in the back of my jeep.Then after that, it was time to address the damage/leaks in both diff covers. For that I chose the PS diff covers. They went in great and clearance is no problem with the new design.
Rear
Front
07-24-2016, 02:42 PM
#27
JK Enthusiast
Thread Starter
Join Date: Dec 2014
Location: Denver
Posts: 248
Likes: 0
Received 0 Likes
on
0 Posts
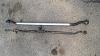
Then, finally came steering. I knew I wanted some beef setup as the stock one had become a noodle of a tube. After reaching out to various companies, I decided on the Fusion 4x4 2.5 ton steering system. It was a bit out of my budget at the time, but with the forum discount and position I was in, I decided to go for it. Couldn't be happier with how it turned out.
Removing the drag link and noodle tie rod
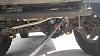
Comparison of TR
Installed
Checking Clearance
Ends rubbed ever so slightly against the dust shield, so I cut that off.
Removing the drag link and noodle tie rod
Comparison of TR
Installed
Checking Clearance
Ends rubbed ever so slightly against the dust shield, so I cut that off.
Last edited by NJKURPat; 07-24-2016 at 03:16 PM.
07-24-2016, 02:56 PM
#28
JK Enthusiast
Thread Starter
Join Date: Dec 2014
Location: Denver
Posts: 248
Likes: 0
Received 0 Likes
on
0 Posts
After all the repairs I took it for a test drive. Everything was fine until about 55mph on. From there the jeep seemed to shake. I couldn't pin it down, but it didn't feel like one specific problem.
Upon inspection I noticed the control arms were to length as what best fit. I found out later from my friends who helped that they were just throwing them in knowing I would align it later. Well, after some adjustment everything was square. Test drive #2 and the jeep is driving better, but still not great.
Well, time to get an alignment print out. After struggling with finding a shop that would do it without worrying about damaging my wheels, I was correctly aligned. Test drive #3 and the wobble is better, but again not fully fixed.
Finally, after a friend pointed out a wobble in my tire I attached a gopro and drove around. Only to discover I had bent something along the passenger side rear drive line. Axle tube, axle shaft, caliper all went under inspection and as it turns out the shaft was bent. Discovering this on a Tuesday while you are supposed to leave on Friday for a weekend trip is not ideal. One quick call to East Coast Gear Supply and I had a new set of shafts with bearings pressed delivered on Thursday.
Getting the bent shaft out was a struggle. I tried flipping the caliper and using it as a redneck slide hammer to no use. Finally ran down to advanced and picked up a slide hammer.
New shafts!

So...after new shafts, diff covers, CAs, steering, a rear drive shaft, and no front drive shaft. I was finally on the road again. Well, after a tire balance.
Upon inspection I noticed the control arms were to length as what best fit. I found out later from my friends who helped that they were just throwing them in knowing I would align it later. Well, after some adjustment everything was square. Test drive #2 and the jeep is driving better, but still not great.
Well, time to get an alignment print out. After struggling with finding a shop that would do it without worrying about damaging my wheels, I was correctly aligned. Test drive #3 and the wobble is better, but again not fully fixed.
Finally, after a friend pointed out a wobble in my tire I attached a gopro and drove around. Only to discover I had bent something along the passenger side rear drive line. Axle tube, axle shaft, caliper all went under inspection and as it turns out the shaft was bent. Discovering this on a Tuesday while you are supposed to leave on Friday for a weekend trip is not ideal. One quick call to East Coast Gear Supply and I had a new set of shafts with bearings pressed delivered on Thursday.
Getting the bent shaft out was a struggle. I tried flipping the caliper and using it as a redneck slide hammer to no use. Finally ran down to advanced and picked up a slide hammer.
New shafts!
So...after new shafts, diff covers, CAs, steering, a rear drive shaft, and no front drive shaft. I was finally on the road again. Well, after a tire balance.

