Power Window Install using Factory Switches and Bezels
 06-23-2015, 06:11 PM
#1
JK Newbie
Thread Starter

Like many others on this forum, I purchased a Jeep JK without power windows and soon regret this decision. I had come across a brand new 2014 JK Unlimited at a deal that was too hard to pass up! This JK had 4 doors, an Auto tranny, 3.73 gears, and a tow package, all that I wanted at a stripped down price of 24,600 out the door! I knew that i was going to lift this Jeep and purchase aftermarket wheels & tires along with many other mods, so paying premium pricing for items that i would soon remove seemed like a foolish matter. Actually it just helped justify the fact that I couldnt get the wife on board with me spending 35k for a new JK, and I wanted a new one with the 3.6l engine and automatic tranny, so the price limit was set, and the rest is history! After spending 8 months manually rolling up and down all FOUR windows EVERY TIME I was in and out of the Jeep, I decided to start researching Power windows and power door locks/keyless entry. I soon found that many people on different forums had started the conversion, but never seemed to finish, or they installed aftermarket switches instead of the factory ones, and I was determined to have a factory look! To many people's dismay, and with the help of one forum member, I was able to piece this system together and I am proud to say that it CAN BE DONE! I wanted to write this to help anyone else that might be interested in doing this swap, or that might need help finding all the part numbers. In this write up, I am only going to discuss power windows and leave the power door locks/keyless entry/remote start to another write up. First off I am going to list Mopar part numbers for the factory switches and door wiring harnesses. I must note that if you are only doing power windows, you wont need the wiring harnesses if you use the aftermarket window motors and regulators, but if you do plan to use mopar motors and mopar factory power door latches, then there really isnt any way around the harnesses. The Window Kit I used was a direct fit version from Electric Life and was for a 4 door JK. This kit is said to be better quality parts than Mopar and is about 300 dollars cheaper than buying mopar motors and regulators. Again this kit is a Direct Fit and looks almost identical to Mopar parts. BTW....the motors are fast and strong! Parts List: power window motors and regulators- Electric Life JE184407 Mopar factory dash switch stack- 68156217AA Mopar factory dash switch bezel- 1RP75DX9AC Mopar factory rear console switch stack- 68057597AB Mopar factory rear console switch bezel- 1UB68DX9AA Mopar factory door wire harness- driver 68066013AD pass 68066012AD rear driver 68014962AA rear pass 68014963AA I bought the: Electric Life window kit from A1 Electric ( great customer service and pricing) Mopar switches and bezels from Quirk Parts (almost any part you need) Mopar door wire harnesses and power door latches from JeepsRUs (he has package deals) So thats all the part numbers you will need to get this project installed. I will add that the Electric life kit comes with aftermarket switches and lots of wiring, I just omitted the switches and used what wiring i needed to go the factory route. Pictures are a must and you guys have stuck with this write up long enough, so here you go! I will try and edit in descriptions to the pictures, but I am a much better installer than a forum writer! 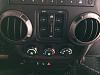
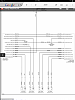
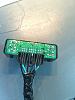
 The only picture that is valuable in this post is the wiring diagram. This is your schematics for the front and rear factory switches. The last picture is the back of the rear switches with wires soldered on to the pins. I could not find factory connectors for the front and rear switches, so i just soldered and shrink wrapped the wires onto the pins. Four of the wires off the rear switches go to the rear doors(pair per door as seen in the schematic) and the other wires go back up to the front switch stack.
Last edited by bcash616; 02-18-2016 at 03:16 AM.
 06-23-2015, 06:22 PM
#2
JK Newbie
Thread Starter
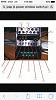
These pictures are of the front switch stack. As with the rear switches, I also soldered the wires on to the pins and incorporated some wire connectors so i could take the switch stack out if i ever want to work in the dash. Not necessary, but I thought it might be convenient down the road.
Last edited by bcash616; 06-23-2015 at 06:40 PM.
The following users liked this post:
Montego (11-10-2022)
06-23-2015, 06:26 PM
#3
JK Newbie
Thread Starter
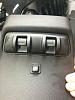
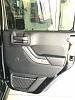
In this series of pictures, you can see the trim pieces that are missing on the door panel. This reveals the "hidden" screws that must be removed before the door panel will pop off. Also you can see the square holes in the plastic inner door that i used a Dremel to cut out. This will give you access to the two tabs that hold the window into the regulator. Inside these square holes, with the window rolled almost all the way down, you will be able to press on the detents and release the window. To get the window out off the way for the rest of the removal/installation, use your hands and pull the window all the way up as if you were closing the window, BE careful not to drop the window, as its not being held up by anything at this point. I used packaging tape to hold the window up. Two pieces for added security! Probably best to have them already cut and ready to stick on! Ask me how I know!
Last edited by bcash616; 06-23-2015 at 06:50 PM.
The following users liked this post:
Montego (11-10-2022)
06-23-2015, 06:29 PM
#4
JK Newbie
Thread Starter
After taping up the window, you can remove all the 10mm bolts, along with the 3 latch bolts and a single hidden 8mm nut behind the rubber gromet(last picture in previous post), holding in the inner door panel and gently remove the whole panel assembly. Once you have the inner panel out of the door, replace the manual window regulator with the motorized version and repeat steps to reinstall. Connect the wires and Voila!
Last edited by bcash616; 06-23-2015 at 06:57 PM.
The following users liked this post:
Montego (11-10-2022)
06-23-2015, 06:30 PM
#5
JK Newbie
Thread Starter
OK OK, I might have skipped a few steps like, running wires from the factory switches to the doors and even the part where you have to decide what quick release connector to use for removing the door wiring if you plan to take the doors off. I used some 8 pin waterproof connectors like the ones on my dash switch, but the internet is the limit in helping you decide which kind/ones to use. If your real savvy, you might be able to find a factory repair kit and just add wires to the exsisting factory connector, but I had No luck tracking them down, so I spent an evening making up new connectors for all four doors. Up to you! I also skipped the step showing you how to run a power wire to the battery(fused of course) to power these windows, and also the relay wire that's connected to the accessory to turn the power off when the key is out of the ignition. Last but not least you will have to find the factory "dimmer" wire to have illumination in the switches when the lights are turned on. All of this is on the wiring schematic and should be easy for anyone that's competent to figure out, BUT if you need help with ANY of the installation, just PM me or even email me and I will be glad to help you out. You can even post on the thread and I will reply for others to see....
Last edited by bcash616; 06-23-2015 at 07:11 PM.
The following users liked this post:
Montego (11-10-2022)

Trending Topics
06-24-2015, 11:23 AM
#8
JK Newbie
Thread Starter
Door Harnesses $160
Electric Life window kit $460
Dash window switch $68
Dash window switch bezel $19
Rear console switch $29
Rear console switch bezel $19
Door & dash waterproof 6&8 pin connectors $9ea
Like I mention in my initial thread, if you are not planning on doing power locks, then you really wouldn't need the door harnesses or the 8 pin connectors. The Electric life kit comes with door quick connectors, but they are only for 2 wires, so if you add power locks, then you will need to also use the 8 pin connectors that I listed above and factory door wire harnesses due to the fact that the factory power latch assemblies have a proprietary plug. Hope this helps!
 06-26-2015, 04:56 AM
#10
JK Newbie
Thread Starter