WxNerd2015's Never Ending Build -
 08-24-2016, 05:25 AM
#161
JK Enthusiast
Thread Starter
Ah! That's where that tree came from! Hahaha! Yeah, though to be honest, kind of looks like a smaller version of how the GM HD diesel trucks have their exhaust pipes! Kinda what it made me think of! And the way it took off was definitely not an existing Jeep engine either I don't believe!
 09-06-2016, 05:01 AM
#162
JK Enthusiast
Thread Starter
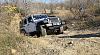
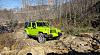
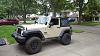
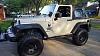
Just a small update, and nothin' too special, as I was havin' too much fun and forgot to take pics, but took the Jeep out to Bundy Hill ORV Park here in Michigan, and got some dirt on the tires and gave it a good running! Lots of fun, but since I don't have too much experience off roading still and I just went on my own, I stuck to more of the "green" and "blue" trails and didn't get into any "red" or "black" trails! And the Jeep had not a single issue or tire slip at all on em! Did exactly what I wanted it to! Still a heck of a lotta fun, and can't wait to get back again!
https://www.bundyhilloffroad.com/
https://www.bundyhilloffroad.com/
09-08-2016, 06:32 PM
#163
JK Enthusiast
Thread Starter
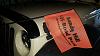
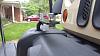
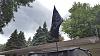
Ok, guess I forgot! I did pick up one new thing! Finally grabbed a trail flag for the rig! $20 from Bundy Hill, but was just the most convenient to get and did the job just fine! For Off Roading at Bundy Hill, I just used the extra hole in the CB Mount Bracket on the Teraflex Tire Carrier, but for the next adventure, I need to pick up a tow hook mount for the front! Besides that, nothing new going on, just enjoying the rig!
09-21-2016, 12:29 PM
#164
JK Enthusiast
Thread Starter
Well, haven't had much time or money lately for much modding, and been traveling too much as well, but just figured I would share a couple new goodies I picked up!
One, when I was out at Bundy Hill ORV Park, the Ranger informed me that they would prefer that I picked up something to mount the trail flag on the front. They were ok at the time with me running it off the back, but said next time try to have something ready, so I went to Appletree Auto's website and picked up a tow hook trail flag mount. Test fit it this afternoon, and it works great! Check it out!
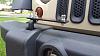
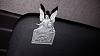
I also recently became a Member of the Wicked Jeeps Southeast Michigan Chapter Club, and picked up a flag from ForeverWave! These flags are pretty neat, and very nice quality with a lifetime warranty, and they have a million flags and will do custom flags! I personally got the CB Antenna Sleeve to mount my Flag to the CB Antenna. They also make roll bar mounts!

One, when I was out at Bundy Hill ORV Park, the Ranger informed me that they would prefer that I picked up something to mount the trail flag on the front. They were ok at the time with me running it off the back, but said next time try to have something ready, so I went to Appletree Auto's website and picked up a tow hook trail flag mount. Test fit it this afternoon, and it works great! Check it out!
I also recently became a Member of the Wicked Jeeps Southeast Michigan Chapter Club, and picked up a flag from ForeverWave! These flags are pretty neat, and very nice quality with a lifetime warranty, and they have a million flags and will do custom flags! I personally got the CB Antenna Sleeve to mount my Flag to the CB Antenna. They also make roll bar mounts!
10-10-2016, 09:29 AM
#165
JK Enthusiast
Thread Starter
Well, haven't been too busy modding lately, but figured I would post an update! Just had the rig in the shop to get the rear brake pads and rotors replaced. Nbd, just had run the pads down to the "squeakers", so that every time the Jeep moved I just hear a metal on metal screech! No a good sound, but that's what it's supposed to do, so no worries, and now i can stop all good again! Always a huge Plus! 
Anyways, so added a couple small things to the Jeep too! First one was my Guardian Angel Prayer Visor Clip! I had one a bit ago and it broke, so I go a new one and it is up on my visor now!
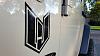
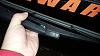
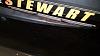
Second...I added on my new Jeep Club Decal! Wicked Jeeps! IMO finishes off that area for Decals pretty nicely!
Besides that, between house hunting and wedding planning and work, I haven't had much time or money to do anything else! That's the update though!
Anyways, so added a couple small things to the Jeep too! First one was my Guardian Angel Prayer Visor Clip! I had one a bit ago and it broke, so I go a new one and it is up on my visor now!
Second...I added on my new Jeep Club Decal! Wicked Jeeps! IMO finishes off that area for Decals pretty nicely!
Besides that, between house hunting and wedding planning and work, I haven't had much time or money to do anything else! That's the update though!
10-20-2016, 08:40 PM
#166
JK Enthusiast
Thread Starter
Guess who stopped by today??? What's in the box???
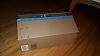
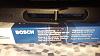
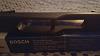
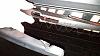
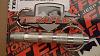
Looks like got some new Jeep parts! Nothing too fancy, but figured I would share real quick! It's getting time to swap back to the hard top, and I am needing to get a new rear wiper, as the blade was pretty shot that was on there, so I snagged an OE Replica replacement from Bosch!

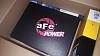
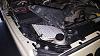
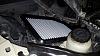
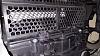
I also had the oil changed recently, and needed a new air filter, however the shop was out of the one I needed, so I decided I would give the AFE Pro-Dry S filter a try! Feels very high quality and the seal around the outside of the filter is really nice! I will update more once I install and get more time to test it!
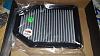
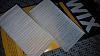
And lastly, needing to use the vent more to heat the Jeep as the temp is dropping, I figured I would finally invest in some Cabin Filters from Wix too!


So that's all the new stuff! Nothing too special, but still needed maintenance stuff for the Jeep! I'll update as I get em in and installed!
Looks like got some new Jeep parts! Nothing too fancy, but figured I would share real quick! It's getting time to swap back to the hard top, and I am needing to get a new rear wiper, as the blade was pretty shot that was on there, so I snagged an OE Replica replacement from Bosch!
I also had the oil changed recently, and needed a new air filter, however the shop was out of the one I needed, so I decided I would give the AFE Pro-Dry S filter a try! Feels very high quality and the seal around the outside of the filter is really nice! I will update more once I install and get more time to test it!
And lastly, needing to use the vent more to heat the Jeep as the temp is dropping, I figured I would finally invest in some Cabin Filters from Wix too!
So that's all the new stuff! Nothing too special, but still needed maintenance stuff for the Jeep! I'll update as I get em in and installed!
10-28-2016, 05:58 AM
#167
JK Enthusiast
Thread Starter
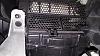
Was able to work from home yesterday and on my lunch break got the Air Filter changed out and the Cabin Filters installed as well! Only took about 15 minutes! And most of that was wrestling with the clip closest to the radiator on the air box, and getting the cabin filters to sit properly in their slots! Both though we very simple processes though, but, I like doing write-ups! So i am going to put a few steps of how to do both here!
First off, the Engine Air Filter!
As you have seen in the previous post, I went with the AFE Pro Dry S replacement filter, as I wanted to test out a new filter for me there, and figured it was a plus to just be able to clean it and not have to keep buying new ones! And the AFE seemed to get pretty good reviews! And from handling it, seems like a pretty well built air filter and the weather seal around the outside fit very snuggly into the airbox, leaving no gap at all! So i feel confident this filter will do good! And on the seal on the outside, I did have to run my fingers all the way around the outside edge pushing down to get the full seal all the way in the box where it should sit, as it basically exact size!
Step 1: Release the 4 Clips holding the lid of the airbox to the base. There are two on the passenger side either side of the intake and two on the drivers side. The further rearward clip on the driver side of the airbox is located on the side in the opening, so fairly easy to find. The other driver side one is located nearly up against the radiator on the side facing the front of the Jeep, basically below the radiator cap, and is extremely hard to get your hand in to that one.
Step 2: With the Clips released, carefully lift the lid of the airbox with the Intake attached up and off the base of the airbox so that you cane see the air filter.
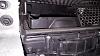
Step 3: Remove the existing Air Filter (and if disposable) discard the air filter.
Step 4: Place the New Air filter into the airbox.
Step 5: Make sure to gently press around the edge of the filter to make sure that it is in the housing fully and sealed off so that nothing can get around the filter.
Step 6: Refit the airbox cover over the top, making sure that it fits and nothing is hung or in the way.
Step 7: Lock the Cover back down by closing all 4 clips. For the Clip next to the radiator, I had to support the box, and carefully fish a Flathead screwdriver in there and use that to push it to lock.
And you are down with that! Easy!
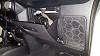
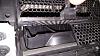
Next, on to the Cabin Air Filter! These are simple filter from Wix, nothing fancy to them. If you got either a Rubicon or Sahara Model, or had ATC (not sure exactly which of those or which combo does provide this, seen a few different things) then you recieved the Cabin Filter stock from the factory, however, if you do not fit any of those options, chances are, you do not have cabin filters at all...and I fall into the latter. So I purchased em from Amazon, nice and cheap!
Step 1: Remove the Glove Box. First pull the handle to open the glove box, and then squeeze the side together to release the side fro the retainers.
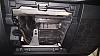
Step 2: With the glove box removed, look through the opening and find the 2 doors with honeycomb screening slightly to the right side in the opening and at the bottom end of the honeycomb screening. When you have located these doors, lift the latch on each up to open them.
Step 3: With these doors open, check to make sure you do not have any filters already in there that need to be removed. I clearly do not, so I was clear to proceed. While this is open, you can feel free to clean in there if you want to, as if may be a little dirty having not had any filters in there. This is also a good chance to look and see where the filters go if you do not have any in there as a guide!
Step 4: Slide the Filters (there will be 2) starting with the furthest to the passenger side first as it is hard to get to, and then the other filter. They set on top of that opening and there is a small protrution above each filter location which you slide the filter under to hold it down and a lip at the back end to hold it too.
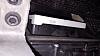
Step 5: Close the Cabin Filters doors and match sure they latch.
Step 6: Make sure all is closed up and out of the area.
Step 7: Reverse Step 1 to reinstall the glove box.
And now you have Fresh cabin Filters Installed too! Very simple and inexpensive! Highly recommend doing these!
First off, the Engine Air Filter!
As you have seen in the previous post, I went with the AFE Pro Dry S replacement filter, as I wanted to test out a new filter for me there, and figured it was a plus to just be able to clean it and not have to keep buying new ones! And the AFE seemed to get pretty good reviews! And from handling it, seems like a pretty well built air filter and the weather seal around the outside fit very snuggly into the airbox, leaving no gap at all! So i feel confident this filter will do good! And on the seal on the outside, I did have to run my fingers all the way around the outside edge pushing down to get the full seal all the way in the box where it should sit, as it basically exact size!
Step 1: Release the 4 Clips holding the lid of the airbox to the base. There are two on the passenger side either side of the intake and two on the drivers side. The further rearward clip on the driver side of the airbox is located on the side in the opening, so fairly easy to find. The other driver side one is located nearly up against the radiator on the side facing the front of the Jeep, basically below the radiator cap, and is extremely hard to get your hand in to that one.
Step 2: With the Clips released, carefully lift the lid of the airbox with the Intake attached up and off the base of the airbox so that you cane see the air filter.
Step 3: Remove the existing Air Filter (and if disposable) discard the air filter.
Step 4: Place the New Air filter into the airbox.
Step 5: Make sure to gently press around the edge of the filter to make sure that it is in the housing fully and sealed off so that nothing can get around the filter.
Step 6: Refit the airbox cover over the top, making sure that it fits and nothing is hung or in the way.
Step 7: Lock the Cover back down by closing all 4 clips. For the Clip next to the radiator, I had to support the box, and carefully fish a Flathead screwdriver in there and use that to push it to lock.
And you are down with that! Easy!
Next, on to the Cabin Air Filter! These are simple filter from Wix, nothing fancy to them. If you got either a Rubicon or Sahara Model, or had ATC (not sure exactly which of those or which combo does provide this, seen a few different things) then you recieved the Cabin Filter stock from the factory, however, if you do not fit any of those options, chances are, you do not have cabin filters at all...and I fall into the latter. So I purchased em from Amazon, nice and cheap!
Step 1: Remove the Glove Box. First pull the handle to open the glove box, and then squeeze the side together to release the side fro the retainers.
Step 2: With the glove box removed, look through the opening and find the 2 doors with honeycomb screening slightly to the right side in the opening and at the bottom end of the honeycomb screening. When you have located these doors, lift the latch on each up to open them.
Step 3: With these doors open, check to make sure you do not have any filters already in there that need to be removed. I clearly do not, so I was clear to proceed. While this is open, you can feel free to clean in there if you want to, as if may be a little dirty having not had any filters in there. This is also a good chance to look and see where the filters go if you do not have any in there as a guide!
Step 4: Slide the Filters (there will be 2) starting with the furthest to the passenger side first as it is hard to get to, and then the other filter. They set on top of that opening and there is a small protrution above each filter location which you slide the filter under to hold it down and a lip at the back end to hold it too.
Step 5: Close the Cabin Filters doors and match sure they latch.
Step 6: Make sure all is closed up and out of the area.
Step 7: Reverse Step 1 to reinstall the glove box.
And now you have Fresh cabin Filters Installed too! Very simple and inexpensive! Highly recommend doing these!
10-28-2016, 06:31 AM
#168
JK Enthusiast
Thread Starter
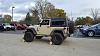
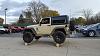
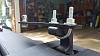
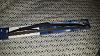
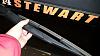
I decided to get ahead on something too. I place on getting my hard top back on this weekend as the temp is getting cooler outside and we had some of our first sightings of snow here in the mitten. And when I took the hard top off in the spring, the rear wiper was pretty shot, but no need to replace it then! So, anyways, fast forward til now, and I have a new rear wiper to install, and waaaaaay cheaper and easier than taking it to the stealership! I grabbed a Bosch OE Replacement rear wiper and swapped out no problem and only $10! Once again, not a hard process, but I will detail it out anyways!
Before:
Step 1: Grab the wiper bar gently and pull it the maximum distance fro the window.
Step 2: Place you hand between the wiper and the wiper arm near the base.
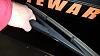
Step 3: Grab at the pivot point of the wiper, where i connects to the arm, and pull towards the window. Not too hard as you do not want to brake the wiper arm, but enough to loosen it.
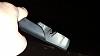
Step 4: With the old wiper removed, the end of the wiper arm will look something like this. Just a pressure clip that the wiper will go into. Go ahead and grab you new wiper and line up the clip with the bar in the middle of the wiper.
Step 5: When the Wiper and clip on the arm are lined up, squeeze at teh pint of connect the two together. You should hear and feel the wiper snap into the clip.
Step 6: Verify that the wiper is snapped all the way in by giving a gentle pull and move the wiper around.
Step 7: Let the wiper Arm go and put the wiper blade onto the glass.
Done! Simple as that and still looks OE! And will now work much better than the old one!
Before:
Step 1: Grab the wiper bar gently and pull it the maximum distance fro the window.
Step 2: Place you hand between the wiper and the wiper arm near the base.
Step 3: Grab at the pivot point of the wiper, where i connects to the arm, and pull towards the window. Not too hard as you do not want to brake the wiper arm, but enough to loosen it.
Step 4: With the old wiper removed, the end of the wiper arm will look something like this. Just a pressure clip that the wiper will go into. Go ahead and grab you new wiper and line up the clip with the bar in the middle of the wiper.
Step 5: When the Wiper and clip on the arm are lined up, squeeze at teh pint of connect the two together. You should hear and feel the wiper snap into the clip.
Step 6: Verify that the wiper is snapped all the way in by giving a gentle pull and move the wiper around.
Step 7: Let the wiper Arm go and put the wiper blade onto the glass.
Done! Simple as that and still looks OE! And will now work much better than the old one!
11-14-2016, 03:59 AM
#169
JK Enthusiast
Thread Starter
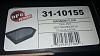
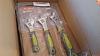
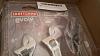
After the last outing to Bundy Hill, I decided I needed to pick up a few more things so I would be prepared and ready for more off roadin'. As well as I wanted to make some things easier on myself too! One, airing down takes a while without some sort of easy deflator, and 2 I need a more flexible, wide range of wrenches for what I could come across! that takes me to the current moment, where I just got my package from Amazon! I picked up a set of Teraflex Tire Deflators for $15, and a set of Craftsman Evolv Adjustable Wrenches for Trail Flag setup, Sway Bar disconnect, and some other stuff that may be unforseen for about $26. Not a bad $40+ spent I believe!
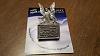
Teraflex Tire Deflator

And another very cheezy Teraflex Video, but shows how the Deflators work! Not as sophisticated as some the deflators you can get, but they would get the job done! And for a good bit cheaper!
https://www.youtube.com/watch?v=h3N5jvVIrxA Craftsman Evolv Adjustable Wrenches
Teraflex Tire Deflator
And another very cheezy Teraflex Video, but shows how the Deflators work! Not as sophisticated as some the deflators you can get, but they would get the job done! And for a good bit cheaper!
https://www.youtube.com/watch?v=h3N5jvVIrxA Craftsman Evolv Adjustable Wrenches
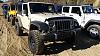
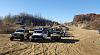
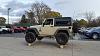
11-28-2016, 07:52 AM
#170
JK Enthusiast
Thread Starter
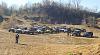
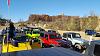
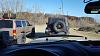
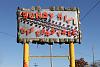
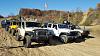
Just figured I would share an update as I have not done much work, but just havin' fun driving the Jeep and Wheelin' and enjoying the holidays. But I did make it out to Bundy Hill ORV park for a bit of wheelin' with Wicked Jeeps, as well as been havin' fun with them as the Jeep Nights and Meet 'n Greets! Even got up on the "Big Things" at the last Meet 'N Greet! But...enjoy the pics!