Install Write-Up: Rigid Industries Tail Light Mount Kit/SR-Q LED for JK Wrangler
 06-10-2016, 08:45 PM
#1
JK Newbie
Thread Starter

Join Date: Jan 2011
Location: FWB, FL
Posts: 8
Likes: 0
Received 0 Likes
on
0 Posts
This write-up covers the installation of the Rigid Industries Driver Tail Light Mount onto a 2007 JK Wrangler, as well as installation of a SR-Q Diffused light onto the mount. This write-up specifically focuses on the driver side mount, but installation procedures are the same for both sides. This write-up covers the wiring of the SR-Q lights.
This installation uses the following products:
Rigid Industries 40311 Drivers Tail Light Mount
Rigid Industries 98002 SR-Q Hybrid LED Back Up Light Kit
The passenger side mount is:
Rigid Industries 40322 Passengers Tail Light Mount
Install Time:
About 1 hour per mount, working at a leisurely/comfortable pace.
The following tools are required:
STEP 1:
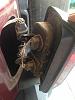
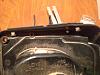
While the tail light is still on the Jeep, position the mounting bracket onto the tail light. The leading edge of the mount should be flush with the edge of the red lens on the tail light
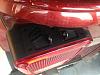
Additionally, you can use a molding/seam line at the back of the light to align the rear of the mount.
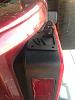
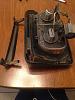
STEP 2:
With the mount in the proper position, use the pencil to color through the holes in the mount, including the notch at the back. Remove the mount, and you should see something like this:
These will be your drill guide marks in the coming steps.
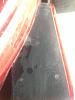
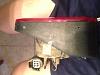
STEP 3:
Using the Phillips Screwdriver, unscrew the tail light. Note that there are two different sizes of screws, so be sure to remember where each one goes.
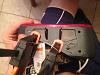
STEP 4:
Once the screws are undone, the light will come away from the Jeep. Separate the wiring harness by squeezing the grey plug. You do NOT need to remove the lights themselves.
STEP 5:
With the light removed, you can take the light and work someplace comfortable. I opted for the kitchen table. There is a small piece of curved plastic that helps contour the light to the back of the Jeep. It may have already detached when you removed the light in Step 4, but if it didn't, go ahead and set it aside now.
STEP 6:
With the prep work done, you're ready to start the install itself. Using your handy cordless drill with a 7/64 bit, and following the pencil hole guides you marked earlier, drill out the two holes on the right side of the mount. The plastic is pretty soft, you don't have to apply a ton of pressure/speed to drill the holes. You will have to enlarge these holes before the screws will fit, but using the 7/64 bit to make pilot holes makes the installation WAY easier. DO NOT DRILL THE LONE HOLE (the one on the left) AT THIS TIME.
STEP 7:
With the two holes drilled, place the mount back on top the light and realign like you did in Step 1. With the mount in the right spot, clamp using 4" bars. I got mine at Harbor Freight.

STEP 8:
Swapping the 7/64 bit for the 5/32, with the mount still clamped to the top of the light, use the 5/32 to drill out the two holes.
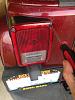
STEP 9:
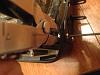
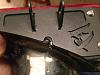
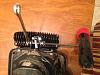
Using the supplied screws and nyloc nuts in the Rigid kit, twist in the button screws until the tip of each screw is just flush with the inside of the tail light housing. You may have to use a 8/32 hex key to twist the screw in since the hole will be very tight. Starting with the screw closest to the rear of the light, using a pair of Needle Nose Pliers, slip a nyloc nut over the screw and hold in place. Use the hex key to turn the screw until the nut tightens all the way down. This step can take awhile and there isn't much space to work with, so be patient and take a break if you need to. Once the back screw/nut is tight, repeat for the screw in the front. Here is a photo of me working on the second nut.
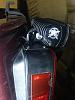
When all is said and done, it should look like this:
STEP 10:
Now you're ready to work on the drilling the last hole. Since the two screws are holding the mount in place, remove the clamps, you won't need them anymore. I opted to just use the 5/32 bit to drill the last hole since the mount was pretty snug, but feel free to drill a pilot hole first if you want to. I found using my thumb to apply gentle pressure to the mount to keep it in the right spot really helped.
STEP 11:
Use the procedure described in Step 9 to secure the last screw/nyloc nut. Once everything is tight, double check to make sure everything is flush. This is important because the light won't sit tight against the Jeep if it isn't. Adjust as needed and proceed once everything is flush/aligned.
STEP 12:
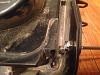
Now you're ready to drill out the last hole; the one for the light cord to run through. Using the 7/32 drill bit, drill out the hole. You could maybe use a 1/4, but I wanted a tight fit so I opted for the 7/32.
STEP 13:
With the hole drilled, all that's left is cleanup. Using a pair of wire clippers and a file, tidy up the hole until it's nice and smooth. You don't want any jagged edges here; the vibrations of the jeep will cause the cord to rub against any sharp edges and potentially damage/cut through the cord.

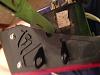
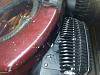
When all is said and done, you should have a hole that looks like this:

STEP 14:
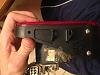
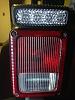
Now you're ready to attach the light to the mount itself. To prevent scratches to the light, put the supplied lens cover on the light before going further. With the light protected, using the supplied hex bolt/washers/nyloc nut in the SR-Q kit, use the hex bolt to secure the light to the mount. MAKE SURE YOU'RE MOUNTING THE LIGHT FACING THE RIGHT WAY. A 3/16 hex key is needed to tighten the bolt. NOTE: you will want to position the washers on each side of the mount before running the bolt through; the baffles/heat sink on the light will prevent you from snugging them tight if you don't. RECOMMENDATION: I opted to have the hex head end of the bolt points towards the outside of the Jeep (when the light is remounted) to aid in aiming the light later.
STEP 15:
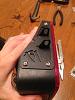
Tighten the hex head bolt all the way into the nyloc nut. It helps to use a 12 mm crescent wrench and a hex key handle to hold the nut in place and get the extra torque to get everything tight.
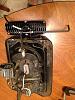
STEP 16:
With everything done, you're ready to start the wiring process. Take the entire tail light back out to the Jeep, and don't forget the curved plastic piece you removed in Step 5. I test fit everything before starting the wiring process just to make sure everything fit. Pretty sharp looking!
Simply repeat the above steps for the passenger side light mount.
This installation uses the following products:
Rigid Industries 40311 Drivers Tail Light Mount
Rigid Industries 98002 SR-Q Hybrid LED Back Up Light Kit
The passenger side mount is:
Rigid Industries 40322 Passengers Tail Light Mount
Install Time:
About 1 hour per mount, working at a leisurely/comfortable pace.
The following tools are required:
- Pencil
- Phillips Screwdriver
- Cordless Drill
- 7/64, 5/32, and 7/32 drill bits
- 8/32 and 3/16 hex keys
- Needle Nose Pliers
- File
- Wire Cutters
- 4" bar clamps
- 12 mm crescent wrench
STEP 1:
While the tail light is still on the Jeep, position the mounting bracket onto the tail light. The leading edge of the mount should be flush with the edge of the red lens on the tail light
Additionally, you can use a molding/seam line at the back of the light to align the rear of the mount.
STEP 2:
With the mount in the proper position, use the pencil to color through the holes in the mount, including the notch at the back. Remove the mount, and you should see something like this:
These will be your drill guide marks in the coming steps.
STEP 3:
Using the Phillips Screwdriver, unscrew the tail light. Note that there are two different sizes of screws, so be sure to remember where each one goes.
STEP 4:
Once the screws are undone, the light will come away from the Jeep. Separate the wiring harness by squeezing the grey plug. You do NOT need to remove the lights themselves.
STEP 5:
With the light removed, you can take the light and work someplace comfortable. I opted for the kitchen table. There is a small piece of curved plastic that helps contour the light to the back of the Jeep. It may have already detached when you removed the light in Step 4, but if it didn't, go ahead and set it aside now.
STEP 6:
With the prep work done, you're ready to start the install itself. Using your handy cordless drill with a 7/64 bit, and following the pencil hole guides you marked earlier, drill out the two holes on the right side of the mount. The plastic is pretty soft, you don't have to apply a ton of pressure/speed to drill the holes. You will have to enlarge these holes before the screws will fit, but using the 7/64 bit to make pilot holes makes the installation WAY easier. DO NOT DRILL THE LONE HOLE (the one on the left) AT THIS TIME.
STEP 7:
With the two holes drilled, place the mount back on top the light and realign like you did in Step 1. With the mount in the right spot, clamp using 4" bars. I got mine at Harbor Freight.
STEP 8:
Swapping the 7/64 bit for the 5/32, with the mount still clamped to the top of the light, use the 5/32 to drill out the two holes.
STEP 9:
Using the supplied screws and nyloc nuts in the Rigid kit, twist in the button screws until the tip of each screw is just flush with the inside of the tail light housing. You may have to use a 8/32 hex key to twist the screw in since the hole will be very tight. Starting with the screw closest to the rear of the light, using a pair of Needle Nose Pliers, slip a nyloc nut over the screw and hold in place. Use the hex key to turn the screw until the nut tightens all the way down. This step can take awhile and there isn't much space to work with, so be patient and take a break if you need to. Once the back screw/nut is tight, repeat for the screw in the front. Here is a photo of me working on the second nut.
When all is said and done, it should look like this:
STEP 10:
Now you're ready to work on the drilling the last hole. Since the two screws are holding the mount in place, remove the clamps, you won't need them anymore. I opted to just use the 5/32 bit to drill the last hole since the mount was pretty snug, but feel free to drill a pilot hole first if you want to. I found using my thumb to apply gentle pressure to the mount to keep it in the right spot really helped.
STEP 11:
Use the procedure described in Step 9 to secure the last screw/nyloc nut. Once everything is tight, double check to make sure everything is flush. This is important because the light won't sit tight against the Jeep if it isn't. Adjust as needed and proceed once everything is flush/aligned.
STEP 12:
Now you're ready to drill out the last hole; the one for the light cord to run through. Using the 7/32 drill bit, drill out the hole. You could maybe use a 1/4, but I wanted a tight fit so I opted for the 7/32.
STEP 13:
With the hole drilled, all that's left is cleanup. Using a pair of wire clippers and a file, tidy up the hole until it's nice and smooth. You don't want any jagged edges here; the vibrations of the jeep will cause the cord to rub against any sharp edges and potentially damage/cut through the cord.
When all is said and done, you should have a hole that looks like this:
STEP 14:
Now you're ready to attach the light to the mount itself. To prevent scratches to the light, put the supplied lens cover on the light before going further. With the light protected, using the supplied hex bolt/washers/nyloc nut in the SR-Q kit, use the hex bolt to secure the light to the mount. MAKE SURE YOU'RE MOUNTING THE LIGHT FACING THE RIGHT WAY. A 3/16 hex key is needed to tighten the bolt. NOTE: you will want to position the washers on each side of the mount before running the bolt through; the baffles/heat sink on the light will prevent you from snugging them tight if you don't. RECOMMENDATION: I opted to have the hex head end of the bolt points towards the outside of the Jeep (when the light is remounted) to aid in aiming the light later.
STEP 15:
Tighten the hex head bolt all the way into the nyloc nut. It helps to use a 12 mm crescent wrench and a hex key handle to hold the nut in place and get the extra torque to get everything tight.
STEP 16:
With everything done, you're ready to start the wiring process. Take the entire tail light back out to the Jeep, and don't forget the curved plastic piece you removed in Step 5. I test fit everything before starting the wiring process just to make sure everything fit. Pretty sharp looking!
Simply repeat the above steps for the passenger side light mount.
Last edited by dadunkindude; 06-12-2016 at 07:57 AM.

