Jeep Wrangler JK: How to Create Rear Cargo Trunk
Want to install rear cargo trunk space in your Jeep Wrangler? Read on to learn how.
This article applies to the Jeep Wrangler JK (2007-present).
Adding additional rear cargo trunk space to your Jeep Wrangler could dramatically improve your next off-road adventure. Not only would you be able to bring all the utensils and gear you'll need for even the most extreme of adventures, but you'll also be able to pack the must-have items for any Jeep (e.g., Hi-lift jack, DOT approved tow strap, winch and CB radio). You could even install a locker or extra drawers for easy organization of your most treasured (and needed) goods. You'll wonder how you ever managed without a rear cargo trunk or why you would ever want to again.

Materials Needed
- 8' sheet of 5/8" plywood
- (4) 24" angle iron w/holes
- 1-quart of flat black exterior paint
- An assortment of nuts, bolts and washers
Step 1 – Prep for construction
- Paint your metal brackets.
- Remove the carpeting in your Jeep, but maneuver one side so it's underneath the side rails.
- Fasten your angle iron to your Jeep via the two holes located along the rear portion of your vehicle. These are the same holes that hold your hard top in place. Use bolts and rubber washers to complete the task.
- Grab another piece of angle iron, face it in the opposite direction of the first piece, and then fasten it down using bolts and rubber washers.
- Cut plywood to fit the top and bottom portions of your project.
- Pinpoint the exact drilling location for the holes you'll be adding to the pieces of plywood. Note: You will be drilling from the bottom side up, so remove the plywood while you complete this task.
- Once you're done, align your materials (e.g., plywood, brackets, bolts), and then slide the bolts into the brackets and fasten.
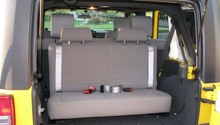
- Cut out a piece that will fit evenly behind the rear seats. You will need to secure the piece with brackets.

Figure 1. Remove your carpeting. 
Figure 2. Fasten down the angle iron. 
Figure 3. Grab your second piece of angle iron and fasten it down.

Figure 4. One piece should fit the top and one piece should fit the bottom. 
Figure 5. Cut that plywood neatly. 
Figure 6. Your plywood needs to fit.

Figure 7. Be mindful of the bar near the rear window. 
Figure 8. Mark holes through the metal brackets you see above. 
Figure 9. Cut out your back piece.
Step 2 – Paint the plywood
- Give your plywood a couple coats of paint.
- Once you're done, go ahead and reassemble your new DIY cargo project.
- Add an (optional) reinforcement bar down the middle, if you feel it's necessary.

Figure 10. Grab your paint. 
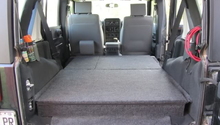
Figure 11. This is what the finished project should look like. 
Figure 12. Add a cargo net, as desired.
Step 3 – Add a layer of carpeting
- Add a layer of carpeting for a more finished look.
- Choose carpeting that matches the color paint that you used in the previous step.

Figure 13. Cut the carpet to size. 
Figure 14. It's a good idea to add carpeting once you're done!
Featured Video: DIY Rear Cargo Cover for Jeep Wrangler
Related Discussions
- DIY Cargo Instructions - Jk-forum.com
- DIY Elevated Platform - Jk-forum.com