Jeep Build Recap
 10-16-2012, 11:48 AM
#1
JK Jedi
Thread Starter
This is my late build thread. i don't have pictures of the work in between i was always way to excited to slow down and take pictures... seen as i can only do 5 pics per post i will put a few on here to cover it all. Let me know what you think! Its my first jeep and has definitely been a learning experience. Ive done it all so far with little guidance.
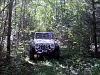
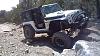
This is what i started at..
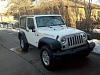
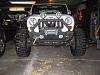
Front Bumper
I decided to go with the Bestop stubby style front bumper love the way it looks. I did bed line the whole thing to make it match as it was gloss black. As you can see in other pictures it does chip off though form rocks.
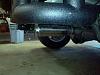
Rear Bumper
Went with a smittybuilt tubular to be cheap at first. Really regret this now....
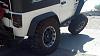
Rock Sliders (Need to Modify)
Also went cheap on these with the rugged ridge tubular style, but in the future i plan on welding the steps to the rubi rock rails.
Lights
This is what i started at..
Front Bumper
I decided to go with the Bestop stubby style front bumper love the way it looks. I did bed line the whole thing to make it match as it was gloss black. As you can see in other pictures it does chip off though form rocks.
Rear Bumper
Went with a smittybuilt tubular to be cheap at first. Really regret this now....
Rock Sliders (Need to Modify)
Also went cheap on these with the rugged ridge tubular style, but in the future i plan on welding the steps to the rubi rock rails.
Lights
Last edited by Maertz; 10-16-2012 at 12:17 PM.
 10-16-2012, 11:50 AM
#2
JK Jedi
Thread Starter
Bed Lined Interior
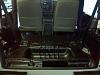
This was a long and boring project but was so glad i did it when i was done. I sued the Rustoleum bed liner and its holding up great. I used a brush for the whole thing and did about 4 coats. Took about 6 hours to complete with the help of my gf.
Exhaust
Went with the magnaflow cat back and this was a lot easier than expected. The removal of the old one was the hardest part.
Cold Air Intake
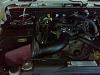
Went airraid for this, but also regret this i wish i would have went snorkel. The install was very simple,but down the road will probably change it. Not a huge deal though.
This was a long and boring project but was so glad i did it when i was done. I sued the Rustoleum bed liner and its holding up great. I used a brush for the whole thing and did about 4 coats. Took about 6 hours to complete with the help of my gf.
Exhaust
Went with the magnaflow cat back and this was a lot easier than expected. The removal of the old one was the hardest part.
Cold Air Intake
Went airraid for this, but also regret this i wish i would have went snorkel. The install was very simple,but down the road will probably change it. Not a huge deal though.
Last edited by Maertz; 10-16-2012 at 12:19 PM.
 10-16-2012, 11:52 AM
#4
JK Jedi
Thread Starter
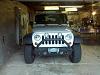
Winch Installed
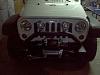
I went smittybuilt XRC8 on this and its worked great so far. Install went great but the control box didn't mount up as id like. i may redrill the hoop mount to get it to work out in the future.
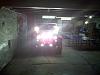
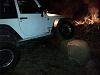
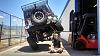
Flex Test On Current Setup
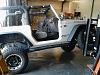
This picture was with the stock 32s and 3 inches of lift. I Installed the Zone Offorad 3 inch lift. I now need to find another place with a forklift....
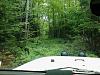
Few Offroad Shots
I went smittybuilt XRC8 on this and its worked great so far. Install went great but the control box didn't mount up as id like. i may redrill the hoop mount to get it to work out in the future.
Flex Test On Current Setup
This picture was with the stock 32s and 3 inches of lift. I Installed the Zone Offorad 3 inch lift. I now need to find another place with a forklift....
Few Offroad Shots
Last edited by Maertz; 10-16-2012 at 12:22 PM.
10-16-2012, 11:55 AM
#5
JK Jedi
Thread Starter
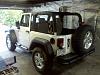
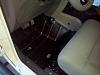
Seats Installed
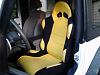
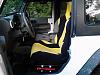
These were sort of a pain to install as they were universal. I also have the airbag light on all the time as there is no plug under these seats.
New Tires

Ended up going with the Nitto Mud Grapplers 35x12.5 I lovem so far. They are very loud but i don't care... You can hardly see the Rugged Ridge Dual Steering Stabalizer on there. Ill try and get a better pic of that. Was a pain to install and get it set so the wheels could turn fully each way. Probably would have been alot easier with someones help.
Read Tire Carrier
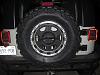
Smittybuilt rear tire carrier. Very simple install and works great so far. Hasn't fallen off yet.
These were sort of a pain to install as they were universal. I also have the airbag light on all the time as there is no plug under these seats.
New Tires
Ended up going with the Nitto Mud Grapplers 35x12.5 I lovem so far. They are very loud but i don't care... You can hardly see the Rugged Ridge Dual Steering Stabalizer on there. Ill try and get a better pic of that. Was a pain to install and get it set so the wheels could turn fully each way. Probably would have been alot easier with someones help.
Read Tire Carrier
Smittybuilt rear tire carrier. Very simple install and works great so far. Hasn't fallen off yet.
Last edited by Maertz; 10-16-2012 at 12:29 PM.
10-16-2012, 11:59 AM
#6
JK Jedi
Thread Starter
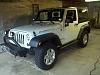
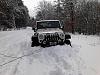
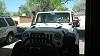
Rock With 35s
This is with a 3" Zone Offroad Lift and 3/4 Wedges in the rear and 1" Spacer up front. I also installed Skyjacker front lower control arms and rear uppers.
Still a work in progress but its crazy to see how much it has changed!
 to here
I will be adding more details about each when i get some more free time.
This is with a 3" Zone Offroad Lift and 3/4 Wedges in the rear and 1" Spacer up front. I also installed Skyjacker front lower control arms and rear uppers.
Still a work in progress but its crazy to see how much it has changed!
I will be adding more details about each when i get some more free time.
Last edited by Maertz; 10-16-2012 at 12:28 PM.
Trending Topics
 06-21-2013, 10:05 AM
#9
JK Jedi
Thread Starter
Well havent updated in awhile and dont take many pictures as im always in a rush to finish it as its my daily driver.
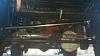
I fabbed up my front drag link from 1.5od x 1/4 wall tubing and mounted it on top of the knuckle for a high steer.
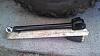
I tried making double adjustable upper control arms but the bushing on the axle were huge so i just re used the one stock end.
All the other arms worked out fine
I also took a rear hitch cargo carrier and welded it on top of my rear tire carrier.
I fabbed up my front drag link from 1.5od x 1/4 wall tubing and mounted it on top of the knuckle for a high steer.
I tried making double adjustable upper control arms but the bushing on the axle were huge so i just re used the one stock end.
All the other arms worked out fine
I also took a rear hitch cargo carrier and welded it on top of my rear tire carrier.
06-21-2013, 10:14 AM
#10
JK Jedi
Thread Starter
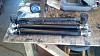
I have installed some new rockkrawler 3.5 coils front and rear as well as some skyjacker m95 monotube shocks with 12.5" of travel.

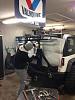
Also put in some hood vents....
Also put in some hood vents....